Wiley 978-1-1180-2731-8 User manual
- Category
- Software manuals
- Type
- User manual
This manual is also suitable for

Administering
Service Delivery
PART I
X
CHAPTER 1 USING POWERSHELL
WITH ACTIVE DIRECTORY 03
X
CHAPTER 2 MANAGING DOMAIN AND FORESTS 55
X
CHAPTER 3 MANAGING SITES AND REPLICATION 91
X
CHAPTER 4 MANAGING DOMAIN CONTROLLERS 157
c01.indd 1c01.indd 1 5/12/2011 1:07:24 PM5/12/2011 1:07:24 PM
COPYRIGHTED MATERIAL

c01.indd 2c01.indd 2 5/12/2011 1:07:37 PM5/12/2011 1:07:37 PM

CHAPTER 1
Using PowerShell with
Active Directory
IN THIS CHAPTER, YOU WILL LEARN TO:
X
UNDERSTAND THE BASICS OF POWERSHELL 4
Use the Shell . . . . . . . . . . . . . . . . . . . . . . . . . . . . . . . . . . . . . . . . . . . . . . . . .6
Use the Scripting Environment . . . . . . . . . . . . . . . . . . . . . . . . . . . . . . . .8
Understand Profi les. . . . . . . . . . . . . . . . . . . . . . . . . . . . . . . . . . . . . . . . . . .9
Work with Cmdlets . . . . . . . . . . . . . . . . . . . . . . . . . . . . . . . . . . . . . . . . . .11
Script Administration Tasks. . . . . . . . . . . . . . . . . . . . . . . . . . . . . . . . . . 19
X
UNDERSTAND HOW POWERSHELL AND
ACTIVE DIRECTORY WORK TOGETHER 39
Interact with Active Directory Using PowerShell . . . . . . . . . . . . . . 39
Prepare Your Environment for the Active Directory Module. . . . 50
c01.indd 3c01.indd 3 5/12/2011 1:07:37 PM5/12/2011 1:07:37 PM

CHAPTER 1
ince the dawn of the information technology age, administrators have been
continually searching for ways to make their jobs easier. Rather than spending time
performing the same or similar tasks repeatedly, many administrators have taken to
adopting some form of automation. roughout the years, you’ve witnessed many
advances in automation, from the early days of DOS batch les to VBScripts and
Windows Management Instrumentation (WMI). ese advances come out of the
desire for things to happen on their own—to use the computing power available at
the ngertips of administrators to make their lives easier.
e next generation of automation technology was o cially released for Windows
environments in 2006. PowerShell (formerly referred to as Monad in the beta release
years) promised to deliver an extremely powerful and exible scripting environ-
ment complete with access to standard object models and programming interfaces.
PowerShell has certainly lived up to the promise over the years, but adoption by
Microso products has been slow. Until Windows Server 2008 R2, there was no
out-of-the-box PowerShell extension for Active Directory. However, the adoption of
PowerShell has now become mainstream, and Active Directory has a built-in
module for PowerShell. In this chapter, you’ll learn the basics of PowerShell and
understand how Active Directory and PowerShell work together.
Understand the Basics of PowerShell
PowerShell version 1 debuted as a web download and as part of Windows 2008,
although you had to install it through the Add Features Wizard in the Server
Manager. PowerShell v2 is installed by default in Windows Server 2008 R2. At its
core, PowerShell is a command interpreter. Much as with the command prompt,
you type in a command and press Enter, and the command executes. But beyond
that, PowerShell has some amazing scripting capabilities that really take it to the
next level in terms of administrative usefulness. Because of this, it’s becoming
increasingly more common to see people replacing the command prompt with
PowerShell. In fact, most of the things that you can do at a command prompt can
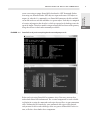
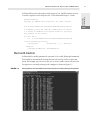
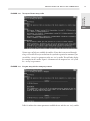
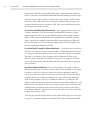
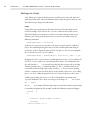
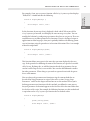
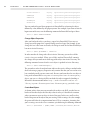
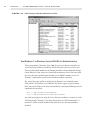
be done by default with PowerShell using the same commands. Figure 1.1 shows a
comparison of the
dir
command run in a traditional command prompt (top) and
PowerShell (bottom).
One of the things you’ll notice in Figure 1.1 is that the information PowerShell
exposes by default looks more structured. e entries in the output have headings
attached to them, similar to how a spreadsheet might look. is is because PowerShell
isn’t a text-based command interpreter like the Windows command prompt and other
command shells. Standard text-based interpreters can take a text string as input and
S
c01.indd 4c01.indd 4 5/12/2011 1:07:37 PM5/12/2011 1:07:37 PM

UNDERSTAND THE BASICS OF POWERSHELL 5
Administering
Service Delivery
PART I
return a text string as output. PowerShell is based on the .NET Framework. Rather
than using text, PowerShell takes .NET objects as input and returns .NET objects as
output. So, when the
dir
command is run, PowerShell enumerates the les and fold-
ers on disk and treats each le and folder as a separate object. Each object is composed
of a variety of properties that describe it, which are exposed as the headings across the
top of the output. is object model is unique to PowerShell and is one of the primary
things that elevates it above other commonly used shells.
FIGURE 1.1 PowerShell can do just about anything that the command prompt can do.
Before you begin using PowerShell to automate Active Directory, you must rst
understand some of the fundamentals. e essential components are used as build-
ing blocks for creating the commands and scripts that you’ll use in your automation
tasks. Without this base knowledge, your commands and scripts will be limited,
and you won’t be able to take advantage of the true power of PowerShell. In this sec-
tion, we’ll take a closer look at these components.
c01.indd 5c01.indd 5 5/12/2011 1:07:38 PM5/12/2011 1:07:38 PM

6 CHAPTER 1
•
USING POWERSHELL WITH ACTIVE DIRECTORY
Use the Shell
e shell is the primary way that you’ll interact with PowerShell. e shell is very
similar to the Windows command prompt. You can type in commands and have
some output returned to you. You can launch the shell by clicking the Start menu
and selecting All Programs
‚
Accessories
‚
Windows PowerShell
‚
Windows
PowerShell. If you’re on a 64-bit operating system, then you may notice that there are
two PowerShell options: Windows PowerShell and Windows PowerShell (x86). e
x86 version is the 32-bit version of PowerShell. Unless you need to run a command
in a 32-bit environment, we recommend using the 64-bit version of the shell. is
will allow you to use additional memory beyond 4 GB if you’re caching lots of data in
the shell. And with Active Directory, this could actually be a possibility if you have
a large forest. In Windows Server 2008 R2, PowerShell is pinned to the taskbar by
default, so you can launch it by clicking the PowerShell icon. You can also choose to
launch it by typing
powershell.exe
in the Run dialog or at the command prompt.
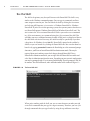
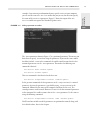
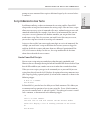
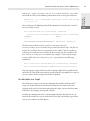
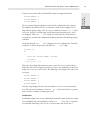
Sometimes, you’ll have to launch PowerShell in administrator mode. is may be
required when you’re making system-level changes through PowerShell. To use
PowerShell in administrator mode, you can right-click the PowerShell executable and
select Run As Administrator from the menu. Depending on your system’s con guration,
you may be prompted with a User Account Control dialog. If you’re prompted, click Yes
to continue. e shell will launch, and it will look similar to the window in Figure 1.2.
FIGURE 1.2 The PowerShell shell
When you’re working with the shell, you can use some shortcuts to make your job
easier. Each command that you type in is kept in memory. erefore, you can cycle
through commands that you typed earlier by using the up and down arrow keys.
c01.indd 6c01.indd 6 5/12/2011 1:07:40 PM5/12/2011 1:07:40 PM

UNDERSTAND THE BASICS OF POWERSHELL 7
Administering
Service Delivery
PART I
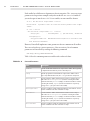
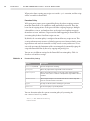
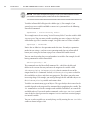
You can use the right arrow key to retype the previous command one character at
a time. You also have the option of accessing a list of the previous 50 commands by
pressing the F7 key, as shown in Figure 1.3. Navigate through this list by using the
arrow keys and pressing Enter on the command you want to execute, or type the
command number that you want to execute and press F9. To close the list without
executing a command, press the Esc key.
FIGURE 1.3 PowerShell command history
One of the lesser-known customizations of PowerShell is the ability to change
the look at and feel of the shell itself. You can do this via the
Get-Host
cmdlet in
PowerShell (more on cmdlets later in this chapter). You modify certain components
of the shell by changing the properties in the console. For example, to change the
text color to green, you can use the following command:
(Get-Host).UI.RawUI.ForegroundColor = “Green”
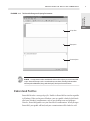
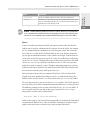
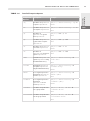
Table 1.1 outlines some properties that you may want to change in the console.
TABLE 1.1 Console Properties
Property Description Example Command
ForegroundColor
The color of the text
(Get-Host).UI.RawUI i
.ForegroundColor = “Green”
BackgroundColor
The color of the background
(Get-Host).UI.RawUI i
.BackgroundColor = “Black”
WindowTitle
The text that is displayed in the
title bar of the PowerShell window
(Get-Host).UI.RawUI.WindowTitle i
= “Ken’s PowerShell Window”
c01.indd 7c01.indd 7 5/12/2011 1:07:41 PM5/12/2011 1:07:41 PM

8 CHAPTER 1
•
USING POWERSHELL WITH ACTIVE DIRECTORY
Use the Scripting Environment
PowerShell 2.0 provides a new Integrated Scripting Environment (ISE) for
writing PowerShell scripts with more ease. e ISE provides some great capa-
bilities that are typically found in expensive development environments. Full
development environments o er additional features that justify the cost if you’ll
be writing a lot of code; but if you’re just looking for basic debugging and script
writing, you need look no further than the ISE.
e PowerShell ISE isn’t installed by default on Windows Server 2008 R2, so you’ll
need to add it if you want to use it. You can install the PowerShell ISE through
Server Manager, using the
Add-WindowsFeature
PowerShell cmdlet. is cmdlet
isn’t registered by default, so you must rst import the Server Manager module in
PowerShell:
Import-Module ServerManager
A er the module is imported, you have access to the
Add-WindowsFeature
cmd-
let. You can run the following command to add the PowerShell ISE:
Add-WindowsFeature PowerShell-ISE
e 3.5.1 version of the .NET Framework is required for the ISE, so you may notice
that installing as well if it’s not already installed on your server. A er you install
the ISE, you can launch it by clicking the Start menu and selecting All Programs
‚
Accessories
‚
Windows PowerShell
‚
Windows PowerShell ISE.
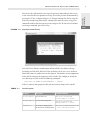
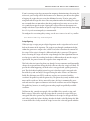
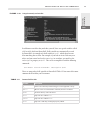
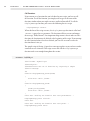
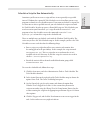
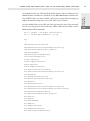
e ISE will be launched as shown in Figure 1.4. It consists of three panels that
assist you in writing scripts:
Script Editor e script editor is the top panel of the ISE. You can have multiple
scripts open at the same time, and each script will have its own tab in the editor.
You can run your script and test it in the editor by clicking the green arrow in the
toolbar.
Command Pane e bottom panel is called the command pane. is pane pro-
vides you with an interactive PowerShell command interface just as if you were
using the shell itself. You can type in commands freehand and see the results. is
is especially useful when determining the syntax of your command before inserting
it into a script.
Output Pane e output pane is the middle pane in the ISE. When you run the
script you’re writing or execute a command in the command pane, the output is
displayed in the output pane.
c01.indd 8c01.indd 8 5/12/2011 1:07:42 PM5/12/2011 1:07:42 PM

UNDERSTAND THE BASICS OF POWERSHELL 9
Administering
Service Delivery
PART I
FIGURE 1.4 The PowerShell Integrated Scripting Environment
Script editor
Command pane
Output pane
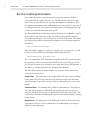
NOTE
It’s important to understand that the ISE isn’t the only way to create PowerShell
scripts. PowerShell scripts can be created with any text editor, including built-in utilities
like Notepad and WordPad, along with third-party development environments.
Understand Profiles
PowerShell also has a concept of pro les. Pro les in PowerShell are similar to pro les
in Windows. When you log on to Windows, your user pro le is loaded, which loads
all of your Windows customizations, such as your desktop items and wallpaper.
Likewise, PowerShell pro les save your PowerShell customizations. When you open
PowerShell, your pro le will load, and your customizations will be loaded as well.
c01.indd 9c01.indd 9 5/12/2011 1:07:43 PM5/12/2011 1:07:43 PM

10 CHAPTER 1
•
USING POWERSHELL WITH ACTIVE DIRECTORY
Profile Scripts
e PowerShell pro le is really a script that runs automatically when you open
PowerShell. PowerShell scripts are covered in more detail later in this chapter, but for
now just know that you can execute various PowerShell commands, save variables, and
de ne functions in your PowerShell pro le. For example, suppose you frequently put
your computer into Hibernate mode. You can create a custom function (functions are
also covered later in this chapter) that puts the computer in Hibernate mode by typing
in a simple command. To do this, add the following line to your PowerShell pro le:
function hib { shutdown -h -t 0 }
is function tells PowerShell to run the
shutdown
command with the
-h
(hiber-
nate) switch whenever you type in
hib
. Because your PowerShell pro le is loaded
every time you open PowerShell, the
hib
command will always be available to you.
Creating a Profile
By default, you have a PowerShell pro le de ned, but the le doesn’t exist and there-
fore isn’t executed. You determine what your current pro le script is by displaying
the contents to the
profile
variable. To see the
profile
variable, type the follow-
ing command:
$profile
You can determine whether the pro le script exists by the running the
Test-Path
cmdlet, which returns true if the le exists and false if it doesn’t:
Test-Path $profile
If the pro le script doesn’t exist, you can create it using any text editor, such as
Notepad
.exe
. You can also run the
New-Item
command to create the pro le script le:
PS C:\Users\Administrator> New-Item -Path $profile -ItemType File -Force
Directory: C:\Users\Administrator\Documents\WindowsPowerShell
Mode LastWriteTime Length Name
---- ------------- ------ ----
-a--- 11/29/2010 3:29 PM 0 Microsoft.PowerShell_profile.ps1
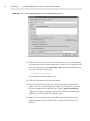
A er the pro le script is created, you can use Notepad to edit it:
PS C:\Users\Administrator> notepad.exe $profile
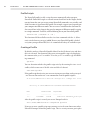
If you try to create a pro le script now, you may receive the error shown next when
PowerShell attempts to load the pro le script. is is a security measure put in place
c01.indd 10c01.indd 10 5/12/2011 1:07:44 PM5/12/2011 1:07:44 PM

UNDERSTAND THE BASICS OF POWERSHELL 11
Administering
Service Delivery
PART I
by PowerShell to ensure that only trusted scripts are run. You’ll learn how to create
a trusted script later in this chapter in the “Create PowerShell Scripts” section:
Windows PowerShell
Copyright (C) 2009 Microsoft Corporation. All rights reserved.
File C:\Users\Administrator\Documents\WindowsPowerShell\Microso
ft.PowerShell_profile.ps1 cannot be loaded because the executio
n of scripts is disabled on this system. Please see “get-help a
bout_signing” for more details.
At line:1 char:2
+ . <<<< ‘C:\Users\Administrator\Documents\WindowsPowerShell\M
icrosoft.PowerShell_profile.ps1’
+ CategoryInfo : NotSpecified: (:) [], PSSecurity
Exception
+ FullyQualifiedErrorId : RuntimeException
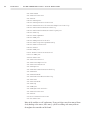
Work with Cmdlets
In PowerShell, a cmdlet (pronounced command-let) is a small, lightweight command.
Each cmdlet is self-contained, meaning that you can run it by itself as its own com-
mand. For example, you can execute the
get-process
cmdlet, and it will return the
list of processes currently running on the computer, as shown in Figure 1.5.
FIGURE 1.5 Running the
Get-Process
cmdlet returns the list of processes currently running on the computer.
c01.indd 11c01.indd 11 5/12/2011 1:07:44 PM5/12/2011 1:07:44 PM

12 CHAPTER 1
•
USING POWERSHELL WITH ACTIVE DIRECTORY
Cmdlets are precompiled and can be run from the PowerShell command interpreter
directly or be used in a script. ey’re surprisingly exible and can be used in a
variety of ways.
PowerShell has several cmdlets built in, and applications can provide their own cmd-
lets as well. For example, Active Directory adds 76 additional cmdlets to PowerShell
when the module is installed. In fact, anyone can write a cmdlet to be used in
PowerShell; the process for writing a cmdlet is well documented by Microso .
Execute Cmdlets
When it comes down to it, executing cmdlets is as easy as opening PowerShell and
typing in the name of the cmdlet, as was demonstrated in Figure 1.5.
Basic Cmdlet Structure
When you work with cmdlets long enough, you’ll start to notice some similarities
between them. Most cmdlets start with a verb, such as
Get
,
Set
,
Add
, or
Remove
.
Usually following the verb is a noun, such as
Process
. is common structure used
in cmdlets is referred to as a verb-noun pair. For example, in the
Get-Process
cmdlet,
the verb (
Get
) tells the cmdlet that it’s retrieving information for the noun (
Process
).
All cmdlets are singular, so you’ll never see a cmdlet called
Get-Processes
.
Executing a cmdlet is as simple as opening up PowerShell and running the cmdlet:
1. Open PowerShell by choosing Start
‚
All Programs
‚
Accessories
‚
Windows PowerShell
‚
Windows PowerShell.
You can also launch PowerShell by clicking the icon in the taskbar, as shown
in Figure 1.6. A er PowerShell loads, you’re presented with the cursor, ready
to accept your command.
FIGURE 1.6 Launching PowerShell via the icon in the taskbar
2. Type in the cmdlet, and press Enter. For example, to get a list of the services
currently installed on the computer, you can run the
Get-Service
cmdlet.
Parameters
You can also feed a cmdlet parameters that in uence the behavior of the cmd-
let when it’s run. To specify a parameter, append it to the end of the cmdlet. For
c01.indd 12c01.indd 12 5/12/2011 1:07:45 PM5/12/2011 1:07:45 PM

UNDERSTAND THE BASICS OF POWERSHELL 13
Administering
Service Delivery
PART I
example, if you want to get information about a speci c service on your computer,
you can run the same
Get-Service
cmdlet that you just ran, but this time specify
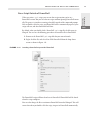
the name of the service as a parameter. Figure 1.7 shows the output of the
Get-
Service
cmdlet run against the Windows Update service.
FIGURE 1.7 Adding a parameter to a cmdlet
e
-Name
parameter shown in Figure 1.7 is a positional parameter. is means you
don’t have to specify
-Name
when using the parameter. If you ran the same cmdlet
but didn’t include
-Name
in the command, the cmdlet would assume that the rst
unnamed parameter was the
-Name
parameter. at makes the following two
commands identical:
Get-Service -Name “Windows Update”
Get-Service “Windows Update”
is next command is also identical to the rst two:
Get-Service -ComputerName localhost “Windows Update”
In the previous command, the rst parameter used (
-ComputerName
) is a named
parameter, because the parameter is speci ed by using
-ComputerName
in the
command, followed by the name of the computer (localhost in this case). e
second parameter wasn’t named. However, because it’s the rst unnamed parameter
in the command, the cmdlet assumes that it’s the
-Name
parameter. It’s the same as
using the following command:
Get-Service -ComputerName localhost -Name “Windows Update”
You’ll learn how to nd out which parameters are positional or named, along with
their default values, later in this chapter.
c01.indd 13c01.indd 13 5/12/2011 1:07:45 PM5/12/2011 1:07:45 PM

14 CHAPTER 1
•
USING POWERSHELL WITH ACTIVE DIRECTORY
Each cmdlet has a di erent set of parameters that it recognizes. e
-ComputerName
parameter in the previous example is only relevant for the
Get-Service
cmdlet. If
you tried to pass it into the
Get-ChildItem
cmdlet, an error would be thrown:
PS C:\> Get-ChildItem -ComputerName localhost
Get-ChildItem : A parameter cannot be found that matches parameter name ‘Comput
erName’.
At line:1 char:28
+ Get-ChildItem -ComputerName <<<< localhost
+ CategoryInfo : InvalidArgument: (:) [Get-ChildItem], ParameterB
indingException
+ FullyQualifiedErrorId : NamedParameterNotFound,Microsoft.PowerShell.Comm
ands.GetChildItemCommand
However, PowerShell implements some parameters that are common to all cmdlets.
ese are referred to as common parameters. You can retrieve a list of common
parameters in PowerShell by running the following command:
Get-Help about_CommonParameters
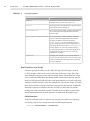
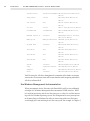
Table 1.2 lists the common parameters and describes what each does.
TABLE 1.2 Command Parameters
Name Description
-Verbose
Includes detailed information in the output of the cmdlet. This is typically
in-depth information that may not be commonly used.
-Debug
Includes programmer-level detail in the output of the cmdlet. In most
day-to-day administration tasks, the
-Debug
parameter is rarely used.
-WarningAction
Specifi es what the cmdlet should do if it encounters a warning. The pos-
sible values are
SilentlyContinue
(continue executing the cmdlet
without notifi cation),
Continue
(display a notifi cation and then continue
executing the cmdlet),
Inquire
(ask the user whether to stop or keep
going), and
Stop
(stop execution of the cmdlet).
-WarningVariable
Specifi es a variable to which warning information can be written. You can
use this variable later in other commands or scripts.
-ErrorAction
Specifi es what the cmdlet should do if it encounters an error. The pos-
sible values are
SilentlyContinue
(continue executing the cmdlet
without notifi cation),
Continue
(display a notifi cation and then continue
executing the cmdlet),
Inquire
(ask the user whether to stop or keep
going), and
Stop
(stop execution of the cmdlet).
-ErrorVariable
Specifi es a variable to which error information can be written. You can
use this variable later in other commands or scripts.
c01.indd 14c01.indd 14 5/12/2011 1:07:46 PM5/12/2011 1:07:46 PM

UNDERSTAND THE BASICS OF POWERSHELL 15
Administering
Service Delivery
PART I
Name Description
-OutVariable
Specifi es a variable to which you want to write the output objects.
-OutBuffer
Determines how many objects are in the output buff er before the objects
are passed through the pipeline. This is an advanced parameter that you
probably won’t use frequently, if at all.
NOTE
Cmdlets and their parameters aren’t case sensitive. However, it’s a good practice
to use capitalization for cmdlets that other people might read, such as when writing scripts.
This increases the readability of the command without aff ecting the syntax of the cmdlet.
Aliases
If you’ve already been using PowerShell, you may have noticed that not all of the
cmdlets you’ve run have conformed to the structure discussed earlier. For example,
the
dir
command doesn’t conform to the verb-noun pair syntax. e reason for
this is that
dir
is really an alias. In PowerShell, an alias is an alternate name that
you can give to command elements, such as cmdlets and scripts, to make them eas-
ier for users to run. When you execute the
dir
alias, the cmdlet that is really being
run is
Get-ChildItem
. You don’t have to use an alias; if you wanted to, you could
run the
Get-ChildItem
cmdlet directly. However, the
dir
alias saves you time;
and if you’re used to typing
dir
into a Windows command prompt to get a listing
of les and directories, then this alias makes PowerShell a little more intuitive and
uses the muscle memory you’ve built up over the years.
You aren’t limited to one alias per command. If you have a Unix or Linux back-
ground, then you’re probably more likely to use the
ls
command for listing les
and directories. For this reason,
ls
is also an alias to the
Get-ChildItem
cmdlet.
To create your own alias, you can run the
New-Alias
cmdlet. You’ll need to pass in
the name for the alias and the command element for which you’re creating the alias.
e following example creates an alias called
d
for the
Get-ChildItem
cmdlet. If
you create this alias, then you only need to type
d
instead of
dir
or
ls
to get a
listing of les and directories in PowerShell:
New-Alias -Name d -Value Get-ChildItem
Earlier in this chapter, you learned about using pro les to customize the PowerShell
environment for di erent users. You can add your commonly used aliases to your
pro le so that your aliases are loaded every time you open PowerShell.
c01.indd 15c01.indd 15 5/12/2011 1:07:46 PM5/12/2011 1:07:46 PM

16 CHAPTER 1
•
USING POWERSHELL WITH ACTIVE DIRECTORY
String Cmdlets Together
When used alone, a cmdlet can be a powerful tool. However, you can use
cmdlets more e ciently by stringing multiple cmdlets together using a process
called pipelining. When you pipeline two cmdlets, the results from the rst
cmdlet are fed into the second cmdlet. In order to perform a pipeline, you use
the pipe character (
|
). For example, if you want to kill every Internet Explorer
process running on your computer, you can use the
Get-Process
cmdlet and
pipe its output into the
Stop-Process
cmdlet. e command to accomplish
this looks like this:
Get-Process iexplore | Stop-Process
A pipelined cmdlet is also sometimes referred to as a one-liner. Some advanced
administrators pride themselves on the length of their one-liners. Some
consider a long one-liner that performs a complex task an administrative badge
of honor. One-liners can get complex, but when you start using PowerShell
regularly, they will become second nature. Some of the complex one-liners can
be good substitutes for administrative tasks that require multiple steps. For
example, the following one-liner will look in the Application Event Log, nd
all the error and warning events, put them in a CSV le, and then open the le
with Microso Excel:
Get-EventLog Application -EntryType Error | Export-Csv errors
.csv -NoTypeInformation | Start-Process excel.exe errors.csv
At rst, it may seem complex, but you could easily create a function for this one-
liner, put it in your pro le, and have an easier and more exible way to view your
critical system events. Or imagine running this command on each of your domain
controllers every day using the Task Scheduler and outputting your errors and
warnings into a shared folder.
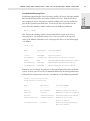
Get Help on a Cmdlet
You can get help executing any cmdlet by using a special PowerShell cmdlet called
Get-Help
. When you execute
Get-Help
, you must specify the name of the cmdlet
that you want help on as the rst parameter. For example, if you’re stuck on how to
use the
Get-Process
cmdlet, you can run the following command to learn how
to use it:
Get-Help Get-Process
Figure 1.8 shows the output of this command.
c01.indd 16c01.indd 16 5/12/2011 1:07:47 PM5/12/2011 1:07:47 PM

UNDERSTAND THE BASICS OF POWERSHELL 17
Administering
Service Delivery
PART I
FIGURE 1.8 The output of the
Get-Help
cmdlet
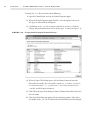
Various types of help are available for cmdlets. If you don’t want to read through
a large screen full of text just to nd out the syntax for a particular command, you
can add the
-Examples
parameter to the
Get-Help
cmdlet. is will only display
the examples for the cmdlet. Figure 1.9 demonstrates the output of
Get-Help
with
the
-Examples
parameter.
FIGURE 1.9 Using
Get-Help
with the
-Examples
parameter
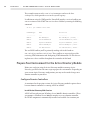
Table 1.3 outlines the various parameters available for use with the
Get-Help
cmdlet.
c01.indd 17c01.indd 17 5/12/2011 1:07:47 PM5/12/2011 1:07:47 PM

18 CHAPTER 1
•
USING POWERSHELL WITH ACTIVE DIRECTORY
TABLE 1.3 Parameters for the
Get-Help
Cmdlet
Parameter Description
-Examples
Displays various examples that demonstrate the use of the cmdlet
-Detailed
Displays detailed information on the cmdlet, including a description of each
parameter that is accepted
-Full
Displays the full output of the technical information for the cmdlet
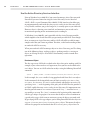
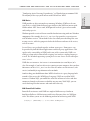
Format the Output of a Command
Sometimes, when you run a command, the output is di cult to read or you don’t get
all the information you wanted. You can change the output of the cmdlets that you
run in various ways. is is accomplished using cmdlets beginning with
Format-
.
ere are multiple
Format-
cmdlets that will format the output into multiple views.
To use them, you simply pipeline the output from one cmdlet into the appropriate
format cmdlet. For example, if you want to view the running processes as a list, you
can pipeline the output to the
Format-List
cmdlet:
Get-Process | Format-List
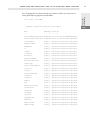
To view the list of available format cmdlets, you can run the
Get-Command
cmdlet:
PS C:\> Get-Command format-*
CommandType Name Definition
----------- ---- ----------
Cmdlet Format-Custom Format-Custom [[-Property] <...
Cmdlet Format-List Format-List [[-Property] <Ob...
Cmdlet Format-Table Format-Table [[-Property] <O...
Cmdlet Format-Wide Format-Wide [[-Property] <Ob...
Test What a Command Will Do
ere may be times when you just want to see the output of a particular command
to make sure you have it right, without making the actual change to the system.
is is especially useful when you’re writing scripts, as covered in the next section,
“Script Administration Tasks.” To nd out what is a ected by a command without
actually running it, you can use the
-WhatIf
parameter.
Perhaps you’re trying to gure out if you have the syntax of a cmdlet right, but
you don’t want to accidently run the cmdlet if you happen to get it right. In
this case, you can use the
-Confirm
parameter. Doing so adds a con rmation
c01.indd 18c01.indd 18 5/12/2011 1:07:47 PM5/12/2011 1:07:47 PM

UNDERSTAND THE BASICS OF POWERSHELL 19
Administering
Service Delivery
PART I
prompt to your command that requires additional input by the executor before
it continues.
Script Administration Tasks
In addition to o ering a robust environment for executing cmdlets, PowerShell
also provides an integrated environment for writing scripts. Like one-liners, scripts
allow you to execute a series of commands all at once, without having to enter each
command individually. For example, if you have a list of commands that you run
every time a server is promoted to a domain controller, you can put those com-
mands into a script. en, the next time you install Active Directory on a server,
you run the script once instead of executing each command.
Scripts are also useful if you want to apply some logic to a series of commands. For
example, you could write a script to determine the last time your users logged in
and then disable the accounts and move them to a di erent Organizational Unit
(OU) if it’s been over 90 days. In this case, the script would make the decisions
about what to do with the user accounts.
Create PowerShell Scripts
You can create a script using any standard text editor that you’re comfortable with.
However, there are advantages to using the built-in PowerShell ISE discussed earlier. If you
have the ISE available to you, it makes sense to use it rather than a standard text editor.
When you create scripts, you type in the commands just as you would if you were
typing them directly into the shell. You have the option of inserting comments into
your scripts by placing a pound symbol (
#
) in front of the comment, as shown in the
following snippet:
# This is a comment.
Get-Process
In PowerShell v2, you also have the ability to use block comments. is allows you
to comment out large portions of text in your script les. To use a block comment,
you start the comment with
<#
and end it with
#>
. Everything in between is consid-
ered a comment, as demonstrated in the following snippet:
<#
This is a block comment.
The next line of code will execute the Get-Process cmdlet
which will display a list of running processes on the screen
#>
Get-Process
c01.indd 19c01.indd 19 5/12/2011 1:07:48 PM5/12/2011 1:07:48 PM

20 CHAPTER 1
•
USING POWERSHELL WITH ACTIVE DIRECTORY
When you’re done creating your script, save it with a
.ps1
extension, and the script
will be executable in PowerShell.
Execution Policy
With great power comes great responsibility. Being the robust scripting environ-
ment that PowerShell is, its capabilities could potentially be misused. ere has
been a lot of scripting misuse in the past with other scripting languages. Multiple
vulnerabilities, viruses, and malware have used script-based exploits to engrain
themselves on users’ machines. To prevent this from happening in PowerShell, an
execution policy de nes if and how scripts can run.
By default, the execution policy is con gured to not allow any scripts to run. is
security enhancement is meant as a failsafe to prevent users from accidently execut-
ing malicious code and isn’t intended as a fully vetted security architecture. Users
can easily overcome the limitations of the execution policy by manually typing the
script into PowerShell line by line or by copying and pasting it in.
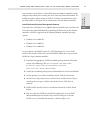
You can use six di erent settings for the PowerShell execution policy. Table 1.4
describes each of these settings.
TABLE 1.4 Execution Policy Settings
Setting Description
Restricted
(Default) Prevents all scripts from executing.
AllSigned
Allows only scripts that are signed with a trusted certifi cate.
RemoteSigned
Allows scripts written locally to execute, but scripts downloaded from a
nonlocal source (such as a website or email) must be signed with a trusted
certifi cate.
Unrestricted
Allows unsigned scripts to execute but warns the user about scripts that
were not created from the local machine.
Bypass
No scripts are blocked, and no warnings are generated.
Undefined
No execution policy is specifi cally defi ned.
You can determine what the current execution policy is by running the
Get-ExecutionPolicy
cmdlet:
PS C:\> Get-ExecutionPolicy
Restricted
c01.indd 20c01.indd 20 5/12/2011 1:07:48 PM5/12/2011 1:07:48 PM
Page is loading ...
Page is loading ...
Page is loading ...
Page is loading ...
Page is loading ...
Page is loading ...
Page is loading ...
Page is loading ...
Page is loading ...
Page is loading ...
Page is loading ...
Page is loading ...
Page is loading ...
Page is loading ...
Page is loading ...
Page is loading ...
Page is loading ...
Page is loading ...
Page is loading ...
Page is loading ...
Page is loading ...
Page is loading ...
Page is loading ...
Page is loading ...
Page is loading ...
Page is loading ...
Page is loading ...
Page is loading ...
Page is loading ...
Page is loading ...
Page is loading ...
Page is loading ...
Page is loading ...
Page is loading ...
-
 1
1
-
 2
2
-
 3
3
-
 4
4
-
 5
5
-
 6
6
-
 7
7
-
 8
8
-
 9
9
-
 10
10
-
 11
11
-
 12
12
-
 13
13
-
 14
14
-
 15
15
-
 16
16
-
 17
17
-
 18
18
-
 19
19
-
 20
20
-
 21
21
-
 22
22
-
 23
23
-
 24
24
-
 25
25
-
 26
26
-
 27
27
-
 28
28
-
 29
29
-
 30
30
-
 31
31
-
 32
32
-
 33
33
-
 34
34
-
 35
35
-
 36
36
-
 37
37
-
 38
38
-
 39
39
-
 40
40
-
 41
41
-
 42
42
-
 43
43
-
 44
44
-
 45
45
-
 46
46
-
 47
47
-
 48
48
-
 49
49
-
 50
50
-
 51
51
-
 52
52
-
 53
53
-
 54
54


Wiley 978-1-1180-2731-8 User manual
- Category
- Software manuals
- Type
- User manual
- This manual is also suitable for
Ask a question and I''ll find the answer in the document
Finding information in a document is now easier with AI
Related papers


Other documents
-
VMware Horizon Horizon View 5.2 Integration Guide
-
-
-
VMware Horizon Horizon View 7.0 Integration Guide
-
 VMware View View 5.1 Integration Guide
-
Microsoft SharePoint Server 2010, SP1, x64, Disk Kit, RUS User manual
-
 VMware View View 5.0 Integration Guide
-
 VMware View View 4.6 Integration Guide
-
VMware View VIEW 4.5 Integration Guide
-
Dell EqualLogic PS4210 Series User guide


