Page is loading ...

TDN 07103-00277
INSTALLATION MANUAL
©2017 Triton Systems of Delaware, LLC. All Rights Reserved. ATMGurus®, the ATMGurus logo and tag-
line, Triton®, and the Triton logo are all registered trademarks of Triton Systems of Delaware, LLC. e third
party trademarks that may be identied herein are the trademark of their respective owners. Triton disclaims any
aliation, connection, or association between its products and services, and those of the respective trademark
owners, or any sponsorship or approval of its products and services by such trademark owners.

Triton Systems ©
2
Contact Information - North America Contact Information - International
Triton© Triton©
21405 B Street 21405 B Street
Long Beach, MS 39560 USA Long Beach, MS 39560 USA
1 (800) 259-6672 1 (228) 575-3175
(228) 868-9445 (fax) (228) 868-0859 (fax)
customer.service@atmgurus.com customer.service@atmgurus.com
www.atmgurus.com www.atmgurus.com
Manufacturer warrants that the products delivered to a distributor will perform in accordance with the Manufac-
turer’s published specications for thirteen months from date of shipment from Long Beach, MS. Manufacturer’s
warranty shall not apply to any damage resulting from abuse, negligence or accident, or to any loss or damage to
the product(s) while in transit. Written notice and explanation of circumstances surrounding any claims that the
goods have proved defective in material or workmanship shall be given promptly from the distributor to the man-
ufacturer. No claim may be made, or action brought, by or through a distributor aer the expiration of 14 months
following any alleged breach of warranty.
Distributor’s sole and exclusive remedy in the event of defect is expressly limited to the replacement or correction
of such defective parts by manufacturer at its election and sole expense, except there shall be no obligation to re-
place or repair items which, by their nature, are expendable.
ese terms and conditions shall be governed by and construed in accordance with the provisions of the Uniform
Commercial Code as adopted by the State of Mississippi.
For detailed warranty information by unit, Soware End-User Agreement, access to ADA compliance statement,
ISO 9001 compliance certicate, PCI v3 EPP certications, card reader TQM certications, EMV certications
and more, please visit www.tritonatm.com.
This guide covers the basic installation information for a Triton ARGO FT.
is manual applies to all service personnel involved in installing, converting, or upgrading hardware on Triton
ATMs nationwide and abroad.
is installation guide provides information, methods, and easy-to-follow instructions for installation of the
Triton ARGO FT ATM. e manual contains information regarding site compliance, environmental precautions,
basic dimensions, installation of the unit, FCC/ADA compliance and emissions statements.

Triton Systems ©
3
..................................................................................................................
..................................................................................................................................
.......................................................................................................................................
...........................................................................................................................
...............................................................................................................
................................................................................................................................
..................................................................................................................
....................................................................................................................
..................................................................................................................
..........................................................................................
.................................................................................................
/ - .......................................................................
/ - ....................................................................
- .........................................................................
- .......................................................................
- ..................................................................................
- ....................................................................................
...................................................................................................
- ........................................................................
- ...........................................................................
- .......................................................................................
- .....................................................................................
- ...................................
- ................................................
...............................................................................................
.......................................................................
............................................................................................
..................................................................................................
/- ..........................................................
/ () ...............................................................................................................
.....................................................................................................................
..............................................................................................
............................................................................................................
........................................................................................
- ..................................................................................................
/ .......................................................................................................

Triton Systems ©
4
Alternating current
Anti-counterfeiting Trade Agreement
Americans with Disabilities Act
American National Standards Institute
Automated teller machine
- Category 5 (ethernet)
Compliance, safety, accountability
Direct current
Disability Discrimination Act
Europay, Mastercard, and Visa
Encrypting pin pad
Federal Communications Commission
Facility interface code
International Organization of Standardization
in. Inches
Isolated terra
mm Millimeters
Notes and Media Dispenser
Printed circuit board
/ Part number
Ringer equivalence number
- Regulated jack 11 (phone/modem)
Secure socket layer
/ Transmission control protocol/internet protocol
Total quality management
Universal service order code

Triton Systems ©
5
Triton recommends that the unit be secured to the facility oor or a plinth structure. If a plinth is used, Triton
recommends securing the terminal to that structure rst as accessibility may be limited once the unit is mount-
ed on plinth. e footprint of the cabinet oor allows for securing to either a concrete pad or plinth structure.
Anchor bolts may be too short to go straight from the cabinet to the oor, depending on how high the unit was
raised to accommodate the wall opening. It is the customer or their agent’s responsibility to determine how the
unit is axed to the facility.
WARNING
Level 1 vaults are considerably heavier than business hours cabinets. Exercise extreme caution when moving Level
1 vaults. At least two people should work together to move the cabinet into position for mounting.
Caution
It is important that the ATM cabinet be located on at, level ooring. If oor is not at, cabinet bottom or walls
may become distorted when mounting bolts are tightened. is could prevent the vault door from operating cor-
rectly.
Listed are some general considerations when securing the unit:
1. What is the oor structure (wood, concrete, etc.)? Do you have anchors, lag bolts, and/or screws to secure
cabinet/plinth?
2. Is the unit a Level 1 vault or a business hours cabinet? Will the oor support the weight of the cabinet? What
is the plinth constructed of (wood, concrete, metal, etc.)?
3. Is inside oor level the same as the outside ground? If oors are not even, will you need the optional 2 ⅜
inches plinth?
4. Is the oor level? Will the unit need to be raised using the plinth/cabinet leveling feet? (Leveling feet are only
for minimal corrections to level cabinet.) Leveling feet are not standard on Level 1 cabinets and must be pur-
chased separately.
5. Are exterior walls solid (brick, concrete) or wood framed? Does wall cavity need insulation?
6. Aer cabinet is anchored, is the control panel trim ush against exterior wall? Is trim suciently sealed to
keep moisture from entering the control panel electronics?
7. Are doorways/hallways leading to point of installation wide enough to allow the shipping package to pass
through? If access is restricted, make arrangements to unpack the unit in an area with sucient space and
move the unit to installation site.
Caution
Observe all safety precautions for operating hand and power tools. Wear appropriate eye and ear protection. Use a
back support belt when liing and moving the ATM.

Triton Systems ©
6
e site must be prepared by the customer or an agent who is fully conversant with the requirements of install-
ing ATM equipment. e responsibility for ensuring that the site is prepared in compliance with this document
remains with the customer.
For information and guidance only, a list is provided to outline the general matters for which the customer is re-
sponsible. is list is not intended to be comprehensive and in no way modies, alters, or limits the responsibility
of the customer for all aspects of site preparation. ese procedures should be carried out prior to the arrival of
the ATM.
1. Location of the ATM and site preparation. Ensure access is not hindered by cabinet placement.
2. Site wiring (power and communications).
3. Location of any other equipment that may cause electrical, electromagnetic, or head induced interference.
4. Installation of all communications cables, wall jacks, and other associated hardware.
5. Installation of any necessary power distribution boxes, conduits, and grounds.
6. Make any required building alterations to meet wiring and site requirements.
7. Ensure all applicable codes, regulations, and laws are adhered to.
8. Ensure environmental requirements of the unit are met.
9. Install ATM terminal in accordance with ADA/DDA/CSA accessibility regulations for the state or country of
installation.
Site Preparation Checklist
Select site and design oor plan.
Plan installation and accessory needs before starting. Ensure instal-
lation accessories are available.
Check oor plan and make necessary alterations.
Ensure all environmental conditions of the unit are met.
Check communication line requirements.
Install and test communications lines.
Install and test all required electrical xtures/power outlets.
Establish contractor and vendor schedules.
Plan operator training exercises (optional).
1. Temperature and humidity must fall within the following ranges for ARGO FT operation:
Temperature (Exterior)
— -30°F to 0°F
— 0°F to 40°F
— 40°F to 122°F
Humidity (Interior, Non-Condensing)
— 10% - 20%
— 10% - 30%
— 20% - 80% (20% - 70% for polymer banknotes)
Temperature (Interior)
— 70°F to 80°F
— 60°F to 80°F
— 50°F to 104°F

Triton Systems ©
7
2. e following AC power requirements must be met:
Current (max)
— 5.05A @ 120V
— 2.01A @ 240V
Voltage
— 90V - 136V @ 50/60 Hz
— 198V - 257V @ 50/60 Hz
WARNING
Do not apply power to unit until installation is complete. Injury to service personnel or damage to equipment is
possible.
Dedicated Source. e ATM AC power feed will be a dedicated line to which no other electrical
devices are connected. e ATM power line will be wired for a single duplex-style outlet and
connected directly to the AC service panel.
Isolated Ground. An equipment grounding conductor that is insulated from the conduit or raceway
and all other grounding points throughout its entire length. e only points of electrical connection
will be at the duplex outlet and service panel ends of the line.
3. e following telephone line requirements must be met:
Dedicated Line. e telephone line servicing the ATM will not be a party line
(fax machine, point of sale devices, etc.).
Proximity to Interference Sources. e telephone line must not be in close proximity to noisy
devices (modem, phone line, etc.) that could induce interference into the ATM communications
channel.
4. When using TCP/IP communication, ensure the following conditions are met:
— A clear path of communication has been set up for interface with host processor.
— No security rewalls are in place that will prevent communication with the host processor.
5. Ensure no devices that can cause RF interference are nearby, such as:
— TVs
— Coolers
— Security devices
— Neon signs
— Devices with compressors
Power Consumption (idle)
— 2.0A @ 115VAC at 60 Hz
— 1.0A @ 230VAC at 50 Hz
Power Consumption (max load)
— 606 Watts @ 120V
— 482 Watts @ 240V

Triton Systems ©
8
Triton Systems oers an optional, metal-constructed plinth with leveling feet. Each plinth is 2 ⅜ inches in
height, allowing you to adjust the ATM height by a xed amount and still be able to adjust up using the leveling
feet. A plinth enables the ATM to be installed through the wall at the required height. To determine if a plinth is
needed with your unit, see / .
1. If plinth will be used, secure cabinet to plinth before installing cabinet into wall opening.
2. If cabinet will be secured to oor, drill anchor holes before installing cabinet into wall opening.
**Note**
e leveling feet on the cabinet itself should not be used to raise the unit signicantly.
Required Tools: No. 2 phillips screwdriver
¾” (19mm) socket
½” carbide-tipped masonry drill bit, 6” long
Adjustable crescent or ratchet wrench
¼” open-ended or ratchet wrench
Rotary hammer
⁄” box or socket wrench
Torque wrench 60 foot-pounds
⁄” allen wrench
Water-resistant sealant (caulk)
Recommended Tools: Bubble level Pencil
Center punch (for marking drill points) Portable vacuum cleaner
Chisel Screwdriver, large athead
Diagonal cutters Tape measure
Framing square Wire brush
Hammer
Due to the size of the ARGO FT, recommended safety tools include: a liing/moving device such as pallet jack,
forkli, trolley, etc., wooden or metal safety blocks to support the ATM during installation, a crowbar and/or a
level, back support belt, ear plugs, and safety goggles.
**Note**
Standard anchor kit (Triton P/N 06200-00066) is required for installation. is does not ship with unit and must
be purchased separately. Contact customer service at 1 (800) 259-6672 option 3 for availability, or click part num-
ber to order online.

Triton Systems ©
9
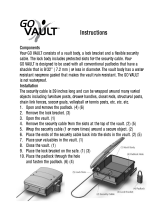
/
**Note**
Dimensions listed comply with US Federal ADA Guidelines. For installations in the US, check state guidelines.
For international installations, please verify regulations relating to the country of install.
A
B
C
48 in. max
per ADA
D
E
Exterior GroundExterior Ground
Caution
Dimension C in the table below is applicable only if interior and exterior oors are the same height, and ATM is
elevated with two, 2.4 in. Triton plinths, totaling a plinth height of 4 3/4 in. (122 mm).
Recommended Wall Opening
Dimensions
Fascia Trim Dimensions **Height from Exterior Ground
*(A) Width *(B) Height (D) Width (E) Height *(C) ADA Compliance
18 ⅛ in.
461 mm
37 ⅞ in.
961 mm
22 ⁄ in.
573 mm
40 ⅞ in.
1038 mm
26 ⅝ in. max
677 mm
* Actual tube dimensions of ARGO FT are (A) 17 ⅛ in. (436 mm) and (B) 36 ⅞ in. (939 mm). Recommend-
ed wall openings listed above include ½ in. of clearance on all sides.
** is dimension is based on the high forward reach item, the top function key, being 48 inches maximum
per ADA Guidelines.

Triton Systems ©
10
/
**Note**
Dimensions listed comply with US Federal ADA Guidelines. For installations in the US, check state guidelines.
For international installations, please verify regulations relating to the country of install.
A
B
C
48 in. max
per ADA
D
E
Exterior GroundExterior Ground
Caution
Dimension C in the table below is applicable only if interior and exterior oors are the same height, and ATM is
elevated with two, 2.4 in. Triton plinths, totaling a plinth height of 4 3/4 in. (122 mm).
Recommended Wall Opening
Dimensions
Fascia Trim Dimensions **Height from Exterior Ground
*(A) Width *(B) Height (D) Width (E) Height *(C) ADA Compliance
18 ⅛ in.
461 mm
37 ⅞ in.
961 mm
22 ⁄ in.
573 mm
40 ⅞ in.
1038 mm
24 ¼ in. max
615 mm
* Actual tube dimensions of ARGO FT are (A) 17 ⅛ in. (436 mm) and (B) 36 ⅞ in. (939 mm). Recommend-
ed wall openings listed above include ½ in. of clearance on all sides.
** is dimension is based on the high forward reach item, the top function key, being 48 inches maximum
per ADA Guidelines.

Triton Systems ©
11
-
34 ⁄ in
875 mm
43 ⁄ in
1097 mm
36 in
914 mm
34 ⅜ in
873 mm
27 ⁄ in
696 mm
32 ⅛ in
816 mm
70°
15°
7 ¼in
185 mm

Triton Systems ©
12
-
27 ⁄ in
696 mm
37 ⁄ in
942 mm
33 ¼ in
844 mm
37 in
939 mm
38 ⅝ in
981 mm
45 ⅝ in
1159 mm
85°
70°
3 ⁄ in
84 mm

Triton Systems ©
13
- -
25 ⁄ in
650 mm
22 ⁄ in
570 mm
1 ¼ in
32 mm
59 ¼ in
1505 mm
2 ⁄ in
52 mm
22 ⅜ in
569 mm
36 ⅞ in
936 mm
2 in
51 mm
11 ¾ in
299 mm
37 ⁄ in
948 mm
38 ⁄in
979 mm
38 ⁄ in
989 mm
Level 1 Only
**Note**
Handle indicated by dashed line is present on Level 1 only.

Triton Systems ©
14
- -
25 ⁄ in
650 mm
22 ⁄ in
570 mm
1 ¼ in
32 mm
59 ¼ in
1505 mm
2 ⁄ in
52 mm
22 ⅜ in
569 mm
36 ⅞ in
936 mm
2 in
51 mm
6 ¼ in
159 mm
31 ⁄ in
808 mm
33 in
839 mm
33 ⁄ in
849 mm
Level 1 Only
**Note**
Handle indicated by dashed line is present on Level 1 only.

Triton Systems ©
15
-
52 ⁄ in
1325 mm
40 ½ in
1029 mm
17 ⁄ in
447 mm
16 ⁄ in
431 mm
17 ⁄ in
440mm
18 ⁄ in
465 mm
22 ⁄ in
573 mm
18 in
457 mm
17 in
432 mm
17 ⅛ in
436 mm
Tube Width
L
Safe Door Swing
BH: 180°
Level 1: 125°
Tube Door
Swing 172°
Conguration(BH and Level 1) L
ick Wall
Walk Up & Drive Up
77 ⁄ in.
1977 mm
in Wall
Drive Up Only
72 ⁄ in.
1837 mm
indicates service area
20 3/16 in
513 mm
Space Required To
Remove Dispenser
10 in
ick Wall

Triton Systems ©
16
- /
10 in
thick wall
40 ½ in
1029 mm
25 ⅛ in
638 mm
22 ⁄ in
573 mm
2 ½ in
63 mm
5 ½ in
139 mm
2 ⁄ in
69 mm
2 ⁄ in
69 mm
2 ⁄ in
52 mm
2 ⁄ in
71 mm
5 ⁄ in
138 mm
5 ⁄ in
147 mm
19 ⁄ in
507 mm
L
Safe Door Swing
BH: 105°
Space Required To
Remove Dispenser
17 ⅛ in
436 mm
Tube Width
Tube Door
Swing 90°
**Note**
10-inch thick wall conguration shown.
Conguration
Business Hours
L
ick Wall
Walk Up & Drive Up
77 ⁄ in.
1977 mm
in Wall
Drive Up Only
72 ⁄ in.
1837 mm
indicates service area

Triton Systems ©
17
- /
10 in
thick wall
40 ½ in
1029 mm
22 ⁄ in
576 mm
22 ⁄ in
573 mm
2 ⁄ in
52 mm
3 in
76 mm
3 ⁄ in
78 mm
2 ½ in
63 mm
2 ⁄ in
69 mm
2 ⁄ in
69 mm
19 ⁄ in
507 mm
L
Space Required To
Remove Dispenser
17 ⅛ in
436 mm
Tube Width
Tube Door
Swing 90°
Safe Door Swing
BH: 98°
**Note**
10-inch thick wall conguration shown.
Conguration
Business Hours
L
ick Wall
Walk Up & Drive Up
77 ⁄ in.
1977 mm
in Wall
Drive Up Only
72 ⁄ in.
1837 mm
indicates service area

Triton Systems ©
18
-
14 ⅛ in
359 mm
11 in
279 mm
15 ⁄ in
386 mm
13 ¾ in
350 mm
4 ½ in
114 mm
Anchor Holes
1 in

Triton Systems ©
19
-
10 in
254 mm
19 ¼ in
490 mm
15 ⁄ in
386 mm
11 in
279 mm
14 ⅛in
359 mm
Anchor Holes
1 in

Triton Systems ©
20
Aer unpacking the unit, carefully inspect the ATM and accessories for shipping damage. Report any damage to
shipping company immediately. Refer to complete retail warranty statement at www.tritonatm.com for policies
and procedures related to shipping damage.
e electronic lock combination consists of six digits. Upon arrival, the combination is set at the factory default
setting of 1-2-3-4-5-6. To open electronic lock, follow the steps below:
**Note**
Aer each key press, the lock will beep. Aer the nal digit is entered, the lock will beep twice and the 4-second
open period will begin.
1. Enter the six-digit combination. If successfully entered, the lock will beep twice.
2. Aer lock is opened, the door may be opened. Open door by liing up on the lever under the tab on the
vault door. e bolt will retract when door is opened on the swing bolt style lock.
Invalid code entry - Lock will beep three times if combination is entered incorrectly. Repeat steps 1 - 2.
e electronic lock combination consists of six digits. Upon arrival, the combination is set at the factory default
setting of 1-2-3-4-5-6. To open electronic lock, follow the steps below:
**Note**
Aer each key press, the lock will beep. Aer the nal digit is entered, the lock will beep twice and the 4-second
open period will begin.
1. Enter the six-digit combination. If successfully entered, the lock will beep twice.
2. Turn the outer dial clockwise to the open position within four seconds.
3. Aer lock is opened, the door may be opened.
Invalid code entry - Lock will beep three times if combination is entered incorrectly. Repeat steps 1 - 3.
/