Page is loading ...

Installation Guide
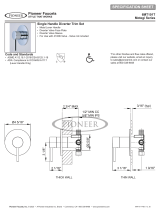
Single Handle Tub And Shower Trim Set:
4MT100T•
4MT110T•
4MT120T•
4MT130T•
4MT200T•
4MT300T•
4MT320T•
4MT330T•
4MT400T•
This product meets the following standards:
ASME A112.18.1 •
ADA COMPLIANT•
REV-12 2, 13
Engineering Excellence
Pioneer Industries, Inc. © 2012
Engineering Excellence
Engineering E xcellence

2
REV-12 2, 13
Thank you for purchasing this Pioneer quality product.
Tools Required
Strap Wrench TeonTape Thermometer Allen Wrench Plumbers Putty
Prior to Installation
Observe all local plumbing and building codes before you begin •
installation.
Thenishedwallandtub/showervalve(4020Bor4020B-D)mustbein-•
stalled prior to installing this trim.
Shut off main water supply.•
Pioneer reserves the right to make changes in the design of faucets without •
noticeasspeciedinthepricebook.
Caution:(1).Theseproductsmaycausepersonalinjuryduetoscaldingif
the temperature is set too high. We recommend that temperature is set below
120°F(49°C).

3
REV-12 2, 13
Trim Installation (For 4MT100T, 4MT200T)
Remove the temporary nipple.•
IPS Installation:-•
The1/2”threadedpipenipplemustbekeptwithalengthof1-3/8”from•
nishedwall.
Fortubspout(A)withtubspoutescutcheon(B)slidethespout•
escutcheon(B)alongthethreadedpipenipple.Applyteontapeat
thethreadedconnection.Screwtubspout(A)ontothepipenippleand
tighten by strap wrench.
CXC Installation• :-
UseCXCto1/2”IPSadapter(X-5400009)andMountingTool•
(X-5400010)toinstallthetubspoutfor1/2”coppertubinginlet.Please
noteX-5400009andX-5400010needtobepurchasedseparately.

4
REV-12 2, 13
Trim Installation(For 4MT110T, 4MT120T)
Remove the temporary nipple.•
IPS Installation:-•
Note:- The 1/2” threaded pipe nipple must be kept with a length of •
7/16”fromnishedwall.
Applyteontapeatthethreadedconnection.Screwdivertertub•
spout(C)ontothepipenippleandtightenbystrapwrench.
CXC Installation• :-
UseCXCto1/2”IPSadapter(X-5400008)andMountingTool•
(X-5400010)toinstallthetubspoutfor1/2”coppertubinginlet.Please
noteX-5400008andX-5400010needtobepurchasedseparately.

5
REV-12 2, 13
Trim Installation (For 4MT100T, 4MT110T, 4MT300T)
Caution:-Toavoidpluggingtheshowerheadsprayoutletuseteontape•
on the shower arm threads.
Remove temporary nipple from the shower elbow.•
Usesilicontocaulkthebackoftheshowerarmange(D).•
Slidetheshowerarmange(D)overtheshowerarm(E).•
Applytheteontapeontheboththreadedendsofshowerarm(E)and•
installtheshowerarm(E)totheshowerelbow.
Carefully tighten with a clean strap wrench.•
Presstheshowerarmange(D)againstthenishedwall.•
Turnonmainwatersupplytoushoutthesystemforoneminute,then•
turn off main water supply.
Threadtheshowerhead(F)totheshowerarm(E).•

6
REV-12 2, 13
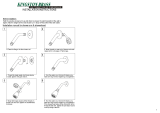
Trim Installation
Turn off the main water supply1.
Removetestcap(G)withthehelpof1-11/32”socket,relivethewater2.
pssureensureallthedebrisareushedoutofthesystem.
Threadsleeve(H)tothevalvebody.Insertthecartridge(I)tothevalve3.
body.EnsuretoinstallCartridgeunitsocoldwaterowsrst.Ensure
the two notches underneath of the cartridge seats properly in the valve
body.Holdthecartridge(I)andthreadthelocknut(J)tosleeve(H).
Threadretainercap(K)toretainernut(J).
For back to back installation:- Rotate the cartridge 180 Degree. Ensure 4.
‘B-BUP’symbolonthecartridgeisonthetop.Followtheinstructionon
3toinstallsleeve(H),locknut(J)andretainercap(K).
Turnonthemainwatersupply.Checkforanyleak.Turnthecartridge(I)5.
counterclockwise to the full open position. Allow water to run for some
time until the hot water comes out. Check the temperature with ther-
mometer for the hot water.
If necessary to reduce the hot water temperature then, turn off main 6.
watersupply.Removethecartridgebyremovingretainercap(K)
andlcoknut(J).Turnredtemperatureadjustingring(L)clockwiseto
decrease the temperature. Follow instruction 3 or 4 to reassemble the
cartridge(I).Ensurethehotwatertemperatureissetbelow120°F.

7
REV-12 2, 13
Trim Installation

8
REV-12 2, 13
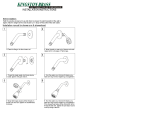
Trim Installation
Placethefaceplate(N)onthevalve.Ensuretherubbergasket(M)is•
placedbehindthefaceplate(N)toformwatertightseal.Slidethees-
cutcheon(O)onthevalve.
Usesilicontocaulkaroundthefaceplate(N).•
Securethehandle(R)bytighteningtheallenscrew(P).Placeholecover•
(Q)onthehandle(R).Ensurethehandlerotatescounterclockwisefrom
coldtohotfrom6o’clockto3o’clock.

9
REV-12 2, 13
Trim Installation (For 4MT100T)
Remove the protective cover if placed on the valve.1.
Threadthevalvesleeve(S)onthevalve.Installthehandleadapter2.
(T)onthedivertervalvestem.securethehandleadapter(T)withthe
screw.
Slidethefaceplate(T)onthevalvesleeve.Ensuretherubbergasket3.
isbehindthefaceplate(T).Ifnecessaryapplysilicontocaulkaround
thefaceplate(T)toformwatertightseal.
Installthehandle(V)onthehandleadapter(T).Tightentheallen4.
screw(W)with3/32”sizeallenwrench.
Check if water diverts to desired outlet.•
For more care information or trouble shooting inquiries about your
Pioneer Product, please see the contact information on the back page.

10
REV-12 2, 13
3325S.GareldAve.|Commerce,CA90040
Telephone:(800)338-9468|(323)888-8873|Fax:(323)888-9515
Hours:M-F,7:30amto5:00pmPST
www.pioneerind.com
Engineering Excellence
Engineering E xcellence
/