Page is loading ...

Model Number: 3MO160, 3MO180, 3MO168,
3MO160-WD, 3MO180-WD
Warnings and Notes:
Check with local plumbing code requirements before installation.
This product should be installed by a local listed plumber.
Do not use plumbers putty on threads.
Installation Steps:
Single Handle Lavatory Faucet
(1) Shut off water supplies. Remove old faucet.
Clean mounting surface in preparation for new
faucet.
(2a) For 1-Hole Installation:- Install mounting
bolt.
For 3MO168 :- Install mounting bolt. Place 8”
extension and align it.
For Both:- Place escutcheon with gasket
under the faucet then place faucet in position
on the sink. Slide mounding washer and
mounting plate through mounting bolt from
underneath of the sink, tighten locknut to
mounting bolt.
(2b) For 3-Hole Installation:- Install mounting
bolt. Place deck plate with gasket under the
faucet then place faucet in position on the
sink. Slide mounding washer and mounting
plate through mounting bolt from underneath
of the sink, tighten locknut to mounting bolt.
(3) Connect hot and cold inlet supply hoses
to supply stops. For 1/2” connection; use 3/8”
male to 1/2” female adapter for installation.
Adapters are optional and not provided with
the faucet.
(4) Important: After installation is complete,
remove aerator. Turn water supplies on and
allow both hot and cold water to run at least
one minute each. While water is running,
check for leaks. Turn off water and replace
aerator.
Pop-up Drain Installation:
PIONEER INDUSTRIES, INC.
3325 S. Gareld Ave.
Commerce, CA 90040
(800) 338-9468
www.pioneerind.com
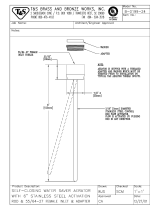
INSTALLATION
Tools:
Adjustable Wrench Plumbers Putty Teon Tape Rags
(1) Remove pop-up ange from body
(2) Place a ring of putty on the bottom of
ange.
(3) Insert pop-up ange through drain hole
and attach fIange to body. Ensure the pop-up
outlet faces towards the back of the slnk
Tíghten the locknut securely with a wrench Do
not overtighten.
(5) Remove pivot rod nut from pop-up body,
ensure the washers is in place, insert pivot
rod, tighten pivot rod nut back to pop-up body.
(4) Remove the excess putty. Connect the
trap (check manufacturer’s instructions for
ínstallation)

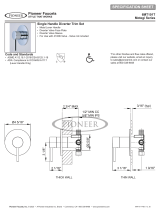
Exploded Drawing (3MO160):
* Note: Please specify nish/color when ordering.
G
A
1
2
B
C
D
E
H
F
I
OR
ITEM # DESCRIPTION
A X-1300019* Metal Lever Handle
B X-4300088* Cap
C X-4300089 Locknut
D X-3300006 Ceramic Disc Cartridge
E X-4300090 1.5 GPM Aerator
F X-4300091* Escutcheon
G X-5300012 Mounting Kit
H X-6300029* Pop-Up Drain Assembly
I X-4300087* Deck Plate (For 3MO160-WD)
1 X-4900044* Hole Cover
2 X-4400099 Allen Screw
(6) Push pivot rod down, insert drain plug
carefully. Test to ensure drain plug works
properly.
(7) Connect lift rod strap to pivot rod by using
clip. Tighten the thumbscrew to connect lift rod
strap to pop-up lift rod.
For more care information or trouble shooting
inquiries about your Pioneer product, please call:
Pioneer Industries, Inc. (800) 338-9468
8AM - 8PM EST (5AM to 5PM PST)
www.pioneerind.com

Exploded Drawing (3MO180):
* Note: Please specify nish/color when ordering.
A
B
C
D
E
F
G
I
1
2
OR
H
ITEM # DESCRIPTION
A X-4300090 1.5 GPM Aerator
B X-3300007 Ceramic Disc Cartridge
C X-4300089 Locknut
D X-4300088* Cap
E X-1300019* Metal Lever Handle
F X-4300091* Escutcheon and Washer
G X-5300012 Mounting Kit
H X-6300029* Pop-Up Drain Assembly
I X-4300087* Deck Plate (For 3MO180-WD)
1 X-4900044* Hole Cover
2 X-4400099 Allen Screw
For more care information or trouble shooting
inquiries about your Pioneer product, please call:
Pioneer Industries, Inc. (800) 338-9468
8AM - 8PM EST (5AM to 5PM PST)
www.pioneerind.com

Exploded Drawing (3MO168):
* Note: Please specify nish/color when ordering.
A
B
C
D
E
G
F
ITEM # DESCRIPTION
A X-1300019* Metal Lever Handle
B X-4300088* Cap
C X-4300089 Locknut
D X-3300006 Ceramic Disc Cartridge
E X-4300090 1.5 GPM Aerator
F X-4300091* Escutcheon and Washer
G X-5300008 Mounting Kit
1 X-4900044* Hole Cover
2 X-4400099 Allen Screw
For more care information or trouble shooting
inquiries about your Pioneer product, please call:
Pioneer Industries, Inc. (800) 338-9468
8AM - 8PM EST (5AM to 5PM PST)
www.pioneerind.com
/