Page is loading ...

Installation Guide
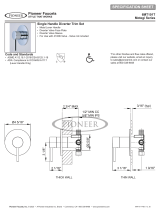
Single Handle Wallmount Roman Tub Set:
4MT840•
This product meets the following standards:
ASME A112.18.1 •
ANSI A117.1•
CUPC / IAPMO LISTED / ADA COMPLIANT•
REV-08 15, 12
Engineering Excellence
Pioneer Industries, Inc. © 2012
Engineering Excellence
Engineering E xcellence

2
REV-08 15, 12
Thank you for purchasing this pioneer quality product.
Tools Required
Adjustable
Wrench
TeonTape Rags 3/32” Allen
Wrench
Prior to Installation
Observe all local plumbing and building codes before you begin •
installation.
Carefully shut off both hot and cold water supplies. •
Plug the tub drain with a soft cloth to prevent intrusion of debris or the •
loss of any parts.
Pioneer reserves the right to make changes in the design of faucets •
without notice.

3
REV-08 15, 12
Valve Installation
Note• :- The wall bracket (A) requires special framing and support consid-
erations. Please pay special attention to minimum and maximum dimen-
sion recommendations noted.
Refertothespecicationforadditionaldimensioninformation.•
A suggested framing example is shown. Each installation may have dif-•
ferent framing requirements than shown.
Construct the framing for your installation. •
Attach the wall bracket (A) to the framing with six panhead mounting •
screws (B) provided with the wall bracket (A).
Verify that the installation is correct and leveled. Also verify the wall •
bracket(A)isrmlysecuredtotheframing.

4
REV-08 15, 12
Valve Installation
Attach the valve body (E) to the wall bracket (A) with the screws (D) and •
washers (C) provided.
Tighten the screws (D) securely•
Before soldering remove all the components (like retainer sleeve (N), •
ceramic cartridge (O), retainer nut (P) and retainer ring (Q)) to prevent
internal damage. Solder the 1/2” hot and cold water supply lines to the
valve. After soldering replace all the components removed.
Position a bucket in front of the spout shank. and turn on the main water •
supplies.
Slowleyopenthevalveandallowhotandcoldwatertoowfromthe•
spout shank for about a minute.
Close the valve, carefully inspect all the connections for leak. repair if •
necessary.
Reattach mud guards( F) to the valve. •

5
REV-08 15, 12
Trim Installation
Note• :-Tomakesurepropertandappereance,donotoversizethe
spout and handle shank holes.
Completethenishedwallwithone1-1/2”holeforspoutandone2”hole•
for valve. Both holes should be 4” center apart.
Removetheguards(J)oncethenishedwalliscomplete.•
Place the spout escutcheon (L) with the rubber washer underneath to •
the spout shank (K). Thread spout (M) on the spout shank (K). till against
thenishedwall.Makesurethespout(M)facesdownword.
Install handle and valve escutcheon (N). Ensure washer is behind the •
valve escutcheon (N) to form watertight seal. Tighten the allen screw (O)
and snap on button (P).

6
REV-08 15, 12
To Set or Adjust Temperature Limit Stop
Caution: Valve is preset at the factory test at maximum. Adjust as neces-
sary. Please see the instructions below:
Turn off water and relieve the pressure.•
Remove handle by removing button and loosening allen screw lift •
off handle.
Counterclockwice unscrew retainer ring (U) and retainer nut (T) •
counterclockwise.
Usetwongerstoraisetheredadjustmentring(V).•
Turn adjustment ring counterclockwise to decrease the temperature •
and clockwise to increase the temperature. Replace the adjustment
ring.
Reassemble and test until desired safe temperature is reached. •
(Note: Ensure proper alignment of cartridge with notch in valve
body.)
For more care information or trouble shooting inquiries about your
Pioneer Product, please see the contact information on the back page.

7
REV-08 15, 12
3325S.GareldAve.|Commerce,CA90040
Telephone:(800)338-9468|(323)888-8873|Fax:(323)888-9515
Hours: M - F, 7:30am to 5:00pm PST
www.pioneerind.com
Engineering Excellence
Engineering E xcellence
/