Page is loading ...

Getting Started with the LilyPad MP3 Player a
learn.sparkfun.com tutorial
Available online at: http://sfe.io/t58
Contents
Introduction
Getting to Know the LilyPad MP3 Player
Getting Started with the Default "Trigger" Sketch
Building the Board into Your Project
Getting Started with the "Player" Sketch
Hardware Details and Hacking Tips
Troubleshooting
Supported Audio Formats
Writing Your Own Code
Resources and Going Further
Introduction
The LilyPad MP3 Player is an amazing little board that contains almost everything you need to play
audio files. You just need to add a Lipo battery, speakers, and a micro-SD card with your audio files
on it.
Page 1 of 28


Before diving in, you should familiarize yourself with any of the following topics that will be covered
in this tutorial, if you are not comfortable with them already.
How to install an Arduino Library
Battery Technologies
Sewing with Conductive Thread
Using GitHub
Getting to Know the LilyPad MP3 Player
Page 3 of 28

The LilyPad MP3 Player comes with preinstalled software called "Trigger" that will play specific
files when the input pins are grounded. You can also add an optional rotary encoder and load the
"Player" software to turn the board into a "real" audio player, or even write your own software using
the free Arduino programming environment.
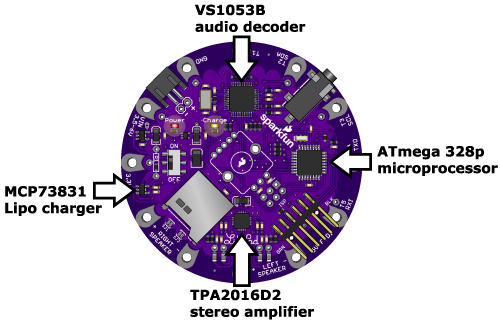
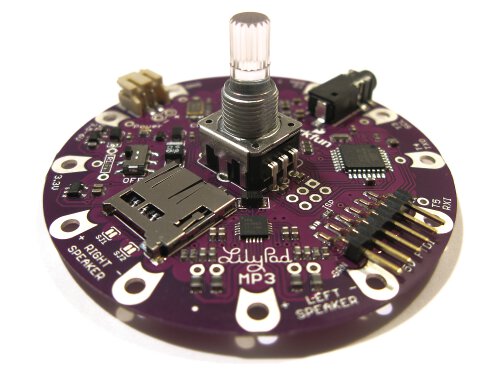
Anatomy of the LilyPad MP3 Player:
Page 4 of 28

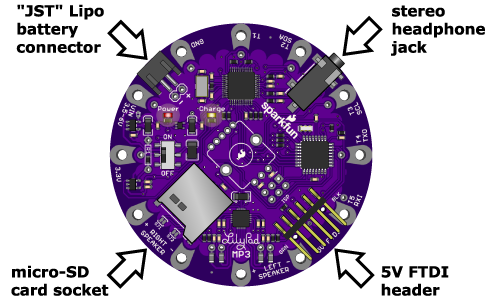
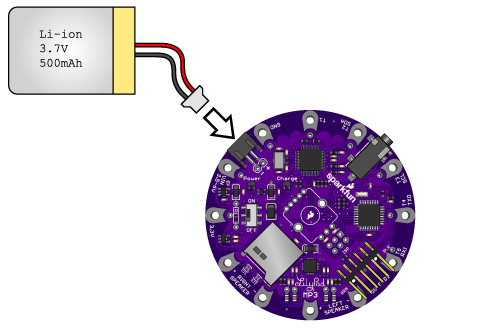
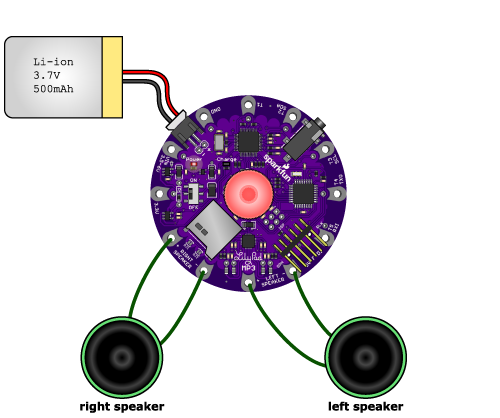
Let's start with the connectors. You will normally power the board with a single-cell (3.7V) Lipo
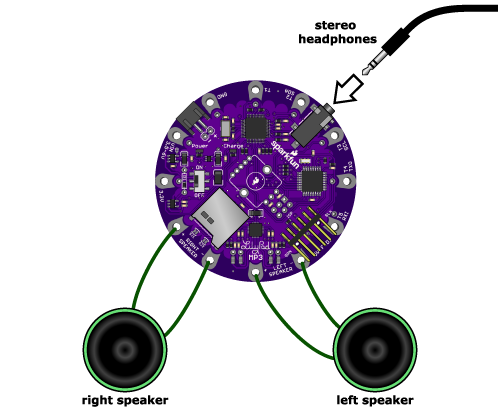
battery, which plugs into the two-pin "JST" battery connector. There is a stereo headphone jack
that you can use to connect the board to a pair of headphones if desired. Connecting headphones
will disable the speakers, but you can change this behavior if you wish. (If you'd like to connect the
board to an external amplifier, see the special note here.) You can plug a 5V FTDI board or cable
into the 6-pin 5V FTDI header, to both recharge an attached Lipo battery and to reprogram the
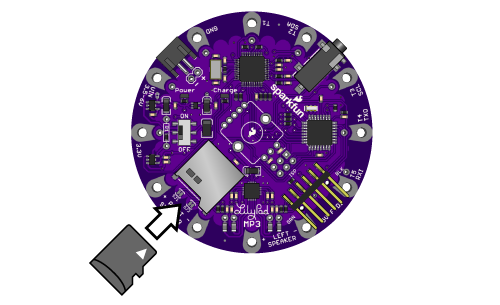
board if desired (see this note about powering the board from USB). And finally, there is a micro-
SD card socket into which you'll insert a micro-SD memory card containing the audio files you want
to play.
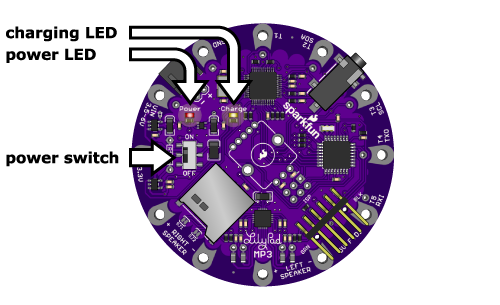
The board contains a power switch that is used to turn the board on and off. There are also two
LEDs; a red power LED that will light up when the board is powered on, and a yellow charge LED.
The charge LED will light up when the battery is being charged, and go out when it is full. (It is also
normal for the charge LED to turn on if no battery is attached.) You can charge the battery while the
Page 5 of 28

board is on or off, but the battery will charge faster if the board is off.
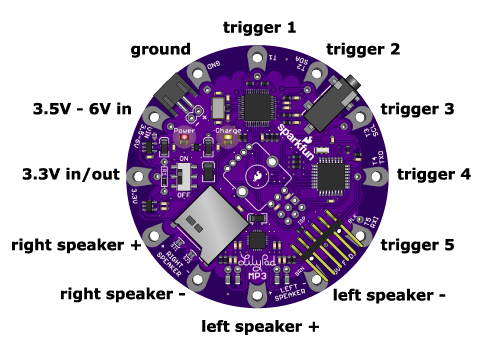
The LilyPad MP3 Player has twelve "pins" (they're really holes, but they connect to pins on the
microcontroller) that you'll use to connect to the outside world. For each pin, we've provided both
"sew taps" (large holes you can loop conductive thread around to use it in fabric projects), and
standard headers (smaller holes that you can solder wires or header pins to if you wish).
Five of the pins are set up to be triggers, which you can use with the default software to trigger
playback of specific audio files. (We'll learn more about this on the next page, "Using the default
trigger sketch".) Typically you'll connect triggers to switches that activate the playback of various
audio files. Many of the triggers also have alternate functions, such as serial ports, that you can use
to communicate with other devices in more complex projects. The alternate functions are listed in
the table below.
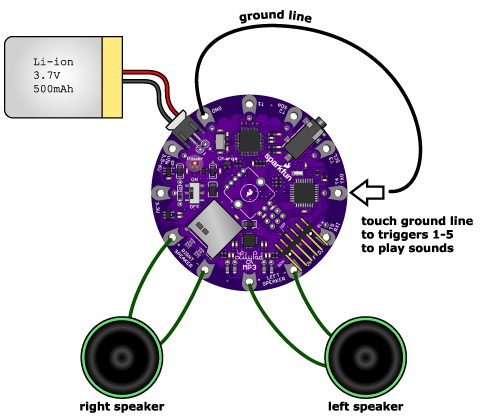
You'll also use the pins to connect to external speakers. The LilyPad MP3 Player includes a stereo
(two channel, left and right) amplifier that supports speakers between 4 and 8 ohms. Each speaker
has two terminals, labeled "+" and "-". Normally you'll connect two speakers to the board, but you
can also use just one speaker if you wish, or connect multiple speakers in series or parallel. Just
don't connect the speaker pins to anything but a speaker or transducer.
Here is a table of the pins and their functions:
pin
name
function notes
VIN
Raw
voltage in
(3.5V to
6V)
If you don't want to connect a Lipo battery, you can use this pin to power the
board from an external supply. If you want to also charge an attached Lipo
battery, this input should be between 4.5V and 6V. You can read more about
your options for powering the board here.
Page 6 of 28

3.3V
Regulated
3.3V in or
out
If you already have a regulated 3.3V supply, you can use this pin to power the
board. (Powering the board through this pin will not charge the battery.) You
can also pull 3.3V power out of this pin if you need it somewhere else.
GND
Ground
(0V)
Use as a power ground, and also for the return side of your trigger switches
(see the diagram here).
T1 Trigger 1
General purpose I/O pin (Arduino pin A0). You'll usually connect this through
a switch to ground. Can also be used as an analog input.
T2
Trigger 2 /
SDA
General purpose I/O pin (Arduino pin A4). You'll usually connect this through
a switch to ground. Can also be used as SDA (serial data) in an I2C ("wire"
library) connection (4.7K pullup included), or an analog input if the pullup is
disabled.
T3
Trigger 3 /
SCL
General purpose I/O pin (Arduino pin A5). You'll usually connect this through
a switch to ground. Can also be used as SCL (serial clock) in an I2C ("wire"
library) connection (4.7K pullup included), or an analog input if the pullup is
disabled.
T4
Trigger 4 /
TX
General purpose I/O pin (Arduino pin D1). You'll usually connect this through
a switch to ground. Can also be used as TX (transmit) in a serial connection.
Do not permanently pull this pin low or reprogramming and serial monitoring
will be disabled.
T5
Trigger 5 /
RX
General purpose I/O pin (Arduino pin D0). You'll usually connect this through
a switch to ground. Can also be used as RX (receive) in a serial connection.
Do not permanently pull this pin low or reprogramming and serial monitoring
will be disabled.
Right
Speaker
+
Right
Speaker
+
Connect to the right speaker + terminal. Only connect to a speaker or other
coil-based transducer. Do not short to power, ground, or any other signal.
Right
Speaker
-
Right
Speaker -
Connect to the right speaker - terminal. Only connect to a speaker or other
coil-based transducer. Do not short to power, ground, or any other signal.
Left
Speaker
+
Left
Speaker
+
Connect to the left speaker + terminal. Only connect to a speaker or other
coil-based transducer. Do not short to power, ground, or any other signal.
Left
Speaker
-
Left
Speaker -
Connect to the left speaker - terminal. Only connect to a speaker or other coil-
based transducer. Do not short to power, ground, or any other signal.
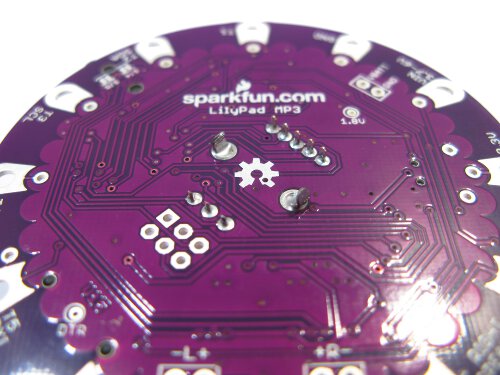
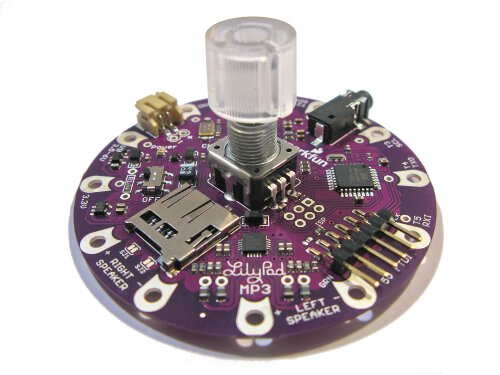
You may have noticed the unused footprint in the middle of the board. That is there to allow you to
add an optional RGB rotary encoder if you wish. You won't need it to run the preinstalled "Trigger"
software, but if you want to turn the LilyPad MP3 Player into a true audio player, the rotary encoder
provides a simple user interface to switch tracks and change the volume. See the "Getting started
with the player sketch" page for more information.
Page 7 of 28

In case you're interested in the hardware on the board, there is an ATmega 328p microprocessor,
running Arduino software that pulls data from audio files on the micro-SD card and feeds that data
to the VS1053B audio-decoding chip. The VS1053B transforms the digital audio data back into
analog audio signals. The audio signals are sent to the headphone jack and a TPA2016D2 stereo
amplifier, which boosts the audio signal for the speakers. We also threw in a MCP73831 Lipo
battery charger to make it easy to recharge the battery from the FTDI port. Neat, huh?
Tips on speaker selection
The TPA2016D2 stereo amplifier on the LilyPad MP3 Player is capable of driving about a watt of
power into each channel. This doesn't sound like much, but it can produce surprising volume from a
large speaker.
In general, larger speakers will sound better than small ones, so use the largest ones that your
project will accommodate. Don't worry that the speaker is marked "20 watts" or higher; that is just
the maximum power that the speaker is designed to handle. We've had great results with recycled
automotive and PC speakers, and even large cabinet speakers.
If your project requires a small speaker, remember that any small speaker will sound much better if
it has an enclosed cavity behind it. You can do this with a project enclosure, recycled food
containers, etc. Use your imagination!
Some important things to know:
Always turn the LilyPad MP3 Player off before inserting or removing the micro-SD card. This
will prevent corruption of the data on the card.
The 5V FTDI port is provided to charge an attached Lipo battery, and provide a way to
reprogram the board. It will power the board if no audio is playing, but will not provide enough
power to drive the speakers (the board will reset while playing). In general, the best way to
Page 8 of 28

power the LilyPad MP3 Player is with a Lipo battery. If you'd like to use an external supply,
see the instructions here, and if you really want to run the board from FTDI power you can
hack it to do so.
To recharge an attached Lipo battery, plug a 5V FTDI Basic or cable into the 6-pin FTDI
connector. Match up the direction of your FTDI board or cable with the "GRN" and "BLK"
markings on either side of the connector. The yellow "Charge" light will turn on while the
battery is charging and turn off when it's fully charged. It's normal for the charge light to turn
on if no battery is attached. The charge rate is set to 500mA, which means that a 1000mAh
battery will charge in about two hours. If you'd like to change the charge rate, see the
instructions here.
The LilyPad MP3 Player's headphone jack is safe for headphones, but don't connect it to an
external amplifier unless you're using a battery to power the LilyPad. (The fine print is that if
the audio ground is shorted to the power ground, the audio decoder chip will be damaged).
The VS1053B chip understands a large variety of audio file formats, but we'll occasionally run
into one it can't play back (it will quietly skip it). See the list of formats and bitrates it
understands here. If you do run into a file it has problems with, you can often fix the problem
by translating the file into a different format using the audio software of your choice.
The LilyPad MP3 Player is washable, but because conductive thread connections can be
fragile, we recommend washing your project as little as possible. Please hand-wash, and be
sure to remove the Lipo battery and micro-SD card before washing. Because water can get
into lots of little crevices, allow everything to air-dry for several days before powering it up
again.
With that out of the way, let's start playing audio!
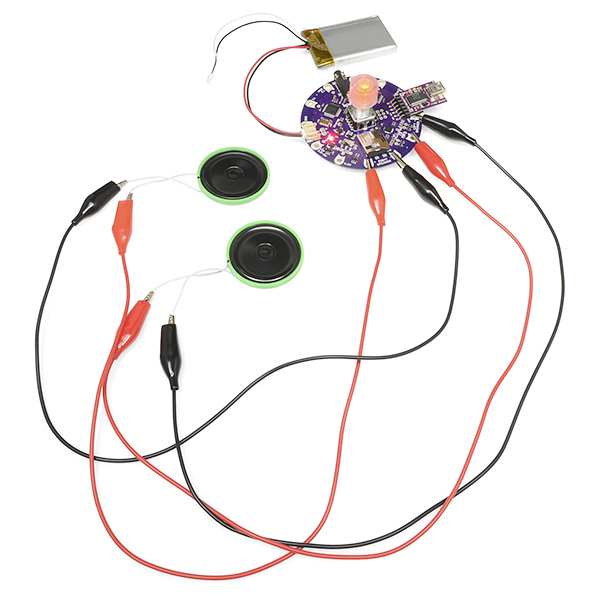
Getting Started with the Default "Trigger" Sketch
The LilyPad MP3 Player comes with a preinstalled sketch (Arduino programs are called sketches)
called "Trigger". This sketch will wait for one of the five trigger inputs to be grounded and will then
play the corresponding audio file from the micro-SD card. You can sew the LilyPad MP3 Player into
your project and use "soft switches" to trigger any sound you want. Best of all, since this sketch
comes preinstalled on every LilyPad MP3 Player, you can use it right out of the box, with no
programming necessary. Let's get started!
Required Materials
A single-cell (3.7V) Lipo battery (500mAh or above recommended. You can use smaller ones
if you reduce the charge rate, see the instructions here).
A 5V FTDI Breakout or cable (to recharge the battery and reprogram the board if desired).
One or two 4 or 8-ohm speakers, surface transducers, or headphones with a 1/8" stereo jack.
If you want to connect the LilyPad MP3 Player to an amplifier, see this note.
Page 9 of 28

Conductive thread and sewing supplies, or hook-up wire and soldering tools. (TIP: alligator
cables are a great way to quickly test out circuits and programming before committing to
needle and thread!)
A micro-SD card.
Some audio files you'd like to play. The LilyPad MP3 Player can play many audio formats, you
can see the whole list here.
Instructions
1. Put up to five audio files onto the micro-SD card. Usually this is done by putting the card into a
reader attached to your computer and copying audio files to it. The LilyPad MP3 Player will
play a number of audio formats including MP3, WAV, WMA, AAC, MID, etc.
2. Rename the audio files on the micro-SD card so that the first character of each filename is the
number "1" to "5", corresponding to the trigger that you want to play that file. You don't need
to change anything else about the filename.
3. Turn off the LilyPad MP3 Player and plug your micro-SD card into the socket. Push it in until it
clicks; if you release it, it will stay seated. To remove it, push again until it clicks, and it will pop
out when you release it.
4. Connect a headphone to the headphone jack, or connect speakers to the left and right
speaker terminals. (Note that when anything is plugged into the headphone jack, the speakers
are disabled. This behavior can be changed if desired).
Page 10 of 28

5. Plug a 3.7V single-cell Lipo battery into the JST connector. Note that a FTDI USB connection
will not provide enough power to run the board, so a battery or other external power source is
required.
6. Move the power switch to ON. The red LED should light up.
7. Wait a few seconds for the software to start up. Now, momentarily, connect the ground sew
tap (marked GND) to one of the trigger terminals (marked T1 through T5). The audio file
Page 11 of 28

associated with that terminal should play through the speakers / headphone. If you don't hear
anything, see the troubleshooting page.
8. To charge the battery or reprogram the board, connect a 5 volt FTDI board to the FTDI
header. The yellow LED will light up while the battery is charging, and go out when it's full. To
reprogram the board, see the instructions here.
9. Have fun!
Now that you know how the trigger sketch works, it's time to think about what you'll do with it.
Tips
The Trigger sketch has several software settings within it that control whether triggers can restart an
already playing clip, send debugging information to the serial monitor window, etc. You can easily
change these settings if desired, or make any other changes you wish to the sketch, by using the
free Arduino programming environment. See the programming page for more information.
Building the Board into Your Project
Now that you know how it works, it's time to think about building the board into your dream project.
The LilyPad MP3 Player is equally at home with conductive thread or soldered wire connections, so
you can use it in "soft" or more traditional projects.
If this is your first time doing a fabric project, take a look at our Beginning LilyPad Arduino tutorial. It
Page 12 of 28

will give you an overview of the techniques you'll use working with LilyPad components and sewing
with conductive thread.
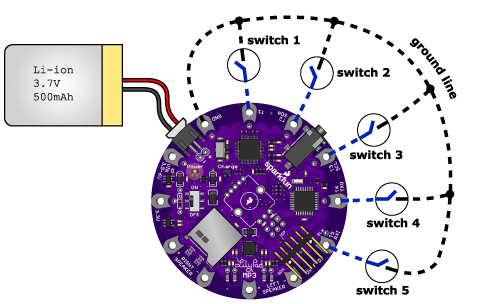
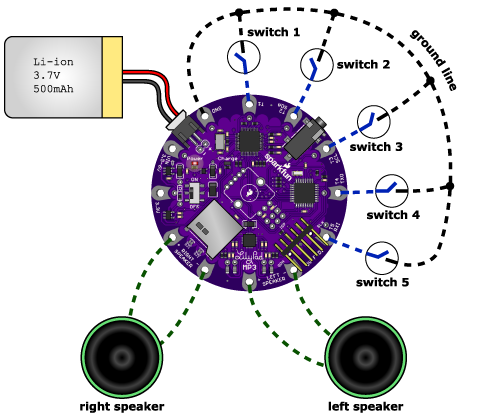
Triggers
Electrically, we'll be connecting each trigger to a momentary switch, with the opposite side of the
switch connected to ground. Because the switch is normally open, the trigger pin will be
disconnected from ground and will "float" to a "high" state (3.3V) because of a pull-up resistor on
the board.
When you activate a switch, the trigger will be connected to ground, which is "low" or 0V. The
software knows that when a trigger is low, it's time to play the proper audio file.
Note that the very low voltages the LilyPad MP3 Player uses are completely safe. You can touch
anything on the board without fear of damaging yourself or the board.
Switches
You can certainly use hardware switches if you wish. If you're doing a fabric project, you may want
to use a soft switch. A soft switch acts just like its hardware cousin, but it is made with conductive
thread or fabric. The conductive areas are normally separated, but when you press / brush against /
twist / fold the switch, the conductive surfaces touch each other and conduct electricity. There are
lots of ways to make soft switches, and because this field is so new there is lots of room for new
ideas. Invent someting amazing! Here's one example where SparkFun engineer Dia made a soft
switch that looks like a flower that you brush against to activate.
Because there are five triggers, you can have up to five soft switches. You'll run each trigger to one
side of a switch. The other side of each soft switch will be connected to ground. You can run one
ground line to all the switches.
Page 13 of 28

Speakers
The only other lines you need to run are to the speakers. Remember that these lines should only be
attached to real speakers or other coil-based transducers; if you need an analog audio output, use
the headphone jack. As the speakers use more current than the switches, you should make the
speaker connections a bit beefier than the others. Be careful not to short the speaker lines together
or to any other connection, and be careful about loose threads at the "Left Speaker -" connection
which is close to the 5V FTDI header.
Battery
To keep the battery from flopping around and possibly breaking its wires, we recommend sewing a
little pocket to hold it snugly. Don't sew it in permanently; you may need to remove it for washing or
replacement. Speaking of which...
Washing
The LilyPad MP3 Player is washable, but because conductive thread connections can be fragile, we
recommend washing your project as little as possible. Please hand-wash, and be sure to remove
the Lipo battery and micro-SD card before washing. Because water can get into lots of little
crevices, allow everything to air-dry for several days before powering it up again.
Getting Started with the "Player" Sketch
Page 14 of 28

The "Player" sketch is not preprogrammed onto the LilyPad MP3 Player, but you can easily install it
using the free Arduino IDE. It is included with the LilyPad MP3 software that you can download from
the GitHub page.
The Player sketch turns the LilyPad MP3 Player into a "real" audio player, allowing you to easily
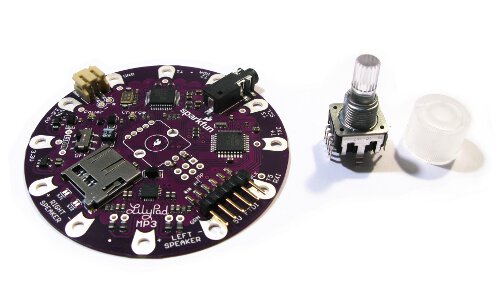
switch between tracks and change the volume. The user interface is a rotary encoder (a knob with a
built-in pushbutton) available separately from SparkFun.com that you can solder onto the LilyPad
MP3 Player board.
If you plan on using the player sketch and rotary encoder, be sure to install the rotary encoder
before sewing the LilyPad MP3 Player into your project. This because you'll need access to the
back of the board to install the encoder.
Required Materials
RGB Rotary Encoder
Clear Plastic Knob (Optional)
Soldering tools (soldering tools (i.e. soldering iron, solder, safety glasses, etc.))
A single-cell (3.7V) Lipo battery (500mAh or above recommended. You can use smaller ones
if you reduce the charge rate, see the instructions here).
A 5V FTDI BOB or cable (to recharge the battery and reprogram the board if desired).
One or two 4 or 8-ohm speakers, surface transducers or headphones with a 1/8" stereo jack. If
you want to connect the LilyPad MP3 Player to an amplifier, see this note.
Conductive thread and sewing supplies, or hook-up wire and soldering tools. (TIP: alligator
cables are a great way to quickly test out circuits and programming before committing to
needle and thread!)
A micro-SD card.
Some audio files you'd like to play. The LilyPad MP3 Player can play many audio formats, you
can see the whole list here.
Page 15 of 28

Instructions
1. Install the rotary encoder.
Insert the Rotary Encoder's pins into the holes in the center of the LilyPad MP3 Player.
Note that it goes into the "top" side of the board (the side with the silkscreen that
indicates where the encoder goes).
Flip the board over, and solder the encoder's pins to the board.
Page 16 of 28

Optional: place the knob onto the rotary encoder shaft. That's it!
2. Install the Arduino software.
If you haven't, download and install the free Arduino IDE (Integrated Deveopment
Environment) available from www.arduino.cc. Follow the instructions there for your type
of computer and operating system.
Page 17 of 28

Plug your FTDI board or cable into your computer. The drivers should install
automatically. If they don't, see the instructions at www.arduino.cc for your computer
and operating system.
3. Install the LilyPad MP3 Player libraries.
Download the latest LilyPad MP3 Player software from the product page at
SparkFun.com.
Open the archive, and drag the contents of the "Arduino" folder into your personal
Arduino sketches directory (this is usually called "Arduino" and will be in your
documents folder). This will install a "libraries" folder with several new libraries, and a
"LilyPad MP3 Player" folder with example code.
If it's running, restart the Arduino IDE.
4. Upload the "Player" sketch.
Connect a Lipo battery (or other power source) to the LilyPad MP3 Player.
Connect your 5V FTDI board or cable to the LilyPad MP3 Player. (The yellow "charge"
LED may light up, that's fine.)
Turn on the LilyPad MP3 Player's power switch. The red LED should light up.
Start the Arduino IDE, and load the "Player" sketch from the "LilyPad MP3 Player"
folder.
From the IDE's "Tools/Board" menu, select "Arduino Pro or Pro Mini (3.3V/8MHz)
w/ATmega 328"
From the IDE's "Tools/Serial Port" menu, select the port that your FTDI board or cable is
using. This is usually the highest number; you can be sure if you unplug the FTDI and
the number disappears.
Upload the "Player" sketch to the LilyPad MP3 Player. If you have compilation problems,
double-check that the required libraries were installed correctly from step 3 above.
Once the code is loaded and running, the RGB LED on the rotary encoder will blink if
there is no micro-SD card installed. This is normal.
5. Place the audio files of your choice on a micro-SD card.
The LilyPad MP3 Player understands a wide variety of audio types. The filenames can
be anything as long as they use one of the standard file extensions (MP3, WAV, AAC,
MID, etc.).
The only limit to the number of audio tracks you can have on your SD card is its storage
capacity.
Page 18 of 28

6. Turn off the LilyPad MP3 Player, and plug your micro-SD card into the socket.
Push it in until it clicks; if you release it, it will stay seated. To remove it, push again until
it clicks, and it will pop out when you release it.
7. Connect a headphone to the headphone jack, or connect speakers to the left and right
speaker terminals. (Note that when anything is plugged into the headphone jack, the speaker
terminals are disabled. This behavior can be changed if desired.
TIP: alligator cables are a great way to quickly test out circuits and programming before
committing to needle and thread!
8. Plug a 3.7V single-cell Lipo battery into the JST connector. Note that a FTDI USB connection
will not provide enough power to run the board, so a battery or other external power source is
required.
9. Turn the power switch ON. The red LED should light up, and after a few seconds, the rotary
encoder will turn red, indicating the player is in "track" mode. (If the rotary encoder blinks,
there was a startup problem, see the troubleshooting page for help.)
10. Play music! Here's how:
At any time, to start and stop playback, briefly press the rotary encoder button. When a
track has finished playing, the next track will automatically start.
Page 19 of 28

To switch between "track" and "volume" modes, hold the rotary encoder button down
for one second until the color changes. Red = track mode, green = volume mode.
In track mode, you can turn the knob forwards or backwards to change tracks (one track
per "click" of the knob). If you're currently playing, turning the knob will stop the current
track, switch to the next / previous one, and start the new track. If you're not playing, the
player will silently keep track of how many clicks you've made. If you click more than the
number of tracks on the card, it will loop around to the beginning.
In volume mode, you can turn the knob forwards or backwards to change the volume.
11. To charge the battery or reprogram the board, connect a 5 volt FTDI board or cable to the
FTDI header. The yellow LED will light up while the battery is charging and go out when it's
full.
12. Have fun!
Hardware Details and Hacking Tips
Power options and hacks
You can power the LilyPad MP3 Player in several ways:
Lipo battery
The easiest option is to use a Lipo (Lithium-Polymer) battery. SparkFun carries these in several
sizes, which translates into different run times.
It is recommended that you use a Lipo battery of at least 500mAh, to match the default 500mA rate
of the built-in Lipo charger (this is also the maximum current available from most USB ports).
SparkFun Lipo batteries have a maximum charge rate of 1C, which means you shouldn't charge
them faster than one hour. 500mA will charge a 500mAh battery in one hour, a 1000mAh battery in
two hours, etc. A battery smaller than 500mAh would charge in less than one hour, which could
cause the battery to overheat and possibly be damaged.
Unregulated 3.7V to 6V source
If you have an external 3.7V to 6V source, you have two options:
If you want to use your power source to recharge an attached Lipo battery, you can attach it to the
"VIN" sew tap. Note that to recharge a battery the voltage must be greater than 4.5V (but still less
than 6V).
If you want to use your power source to run the LilyPad MP3 Player directly (without a battery),
connect it to the JST battery connector or the headers directly behind it. SparkFun carries pigtails (a
connector with bare wires) that match this connector. Note that if you connect a 5V FTDI to the
Page 20 of 28
/


