Page is loading ...

MIR 035 R03
1
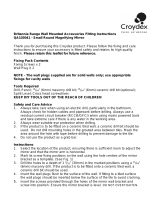
MM7101##E
MM7102##E
MM7103##E
MM7104##E
MM7105##E
MM7106##E
ALL PRODUCT DIMENSIONS DETAILED IN THIS INSTALLATION AND MAINTENANCE
MANUAL ARE APPROXIMATE
ALL ILLUSTRATIONS OF THE PRODUCT ARE FOR REFERENCE ONLY. COMPONENTS
SUPPLIED WITH INDIVIDUAL PRODUCTS MAY DIFFER
CONTACT DETAILS (UK)
Croydex
Central Way
Andover
Hampshire
SP10 5AW
UK
Tel: +44 (0)1264 365881
Email: info@croydex.co.uk
Web: www.croydex.com
CONTACT DETAILS (EU)
MIL
Unit 8 Purcellsinch Ind Est
Dublin Road
Kilkenny
R95 HP71
Ireland
ALWAYS CHECK THE PACKAGING FOR FIXINGS AND PARTS BEFORE RECYCLING OR
DISPOSAL.
PLEASE READ THROUGH AND FULLY UNDERSTAND THE INSTRUCTION LEAFLET BEFORE
STARTING THE INSTALLATION OF THIS MIRROR.
ENSURE YOU HAVE ALL THE FIXINGS AND PARTS BEFORE ATTEMPTING TO ASSEMBLE OR FIT
THIS PRODUCT.
SECTION 1 - INTRODUCTION
Thank you for purchasing this Croydex product. Please follow the fixing and care instructions to
ensure that your product is fitted safely and that it retains its high quality finish. PLEASE RETAIN
THIS MANUAL FOR FUTURE REFERENCE.
IMPORTANT WARRANTY INFORMATION
In some circumstances the Building Regulations 2010 require the installer to give the occupier
of the premises in which this product has been installed a certificate to confirm that the
requirements of regulations 4 and 7 have been satisfied, or the installation of this product must
be inspected and tested by the Local Authority Building Control Department who will issue a
compliance certificate.
A copy of this certificate may be required for certain warranty claims. Failure to provide a copy
of the certificate may invalidate the warranty. This does not aect your statutory rights. We
recommend that you make yourself aware of the Regulations before you undertake any work and
if you require clarification you should contact your Local Authority Building Control Department.
MM7101##E - Input: 220 - 240V ~ AC 17W Rating: IP44
MM7102##E - Input: 220 - 240V ~ AC 26W Rating: IP44
MM7103##E - Input: 220 - 240V ~ AC 26W Rating: IP44
MM7104##E - Input: 220 - 240V ~ AC 17W Rating: IP44
MM7105##E - Input: 220 - 240V ~ AC 42W Rating: IP44
MM7106##E - Input: 220 - 240V ~ AC 27W Rating: IP44

MIR 035 R03
2
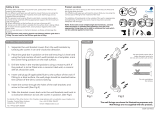
SAFETY & PRODUCT CARE
1. It is recommended that two people fit the
mirror to ensure that it is fitted safely.
2. ALWAYS take care when using power tools,
particularly if there is any water in the working
area.
3. ALWAYS wear eye protection when using
power tools.
4. ALWAYS check for pipes and cables before
drilling into walls.
5. ALWAYS use a Residual Current Circuit
Breaker (RCCB).
6. ALWAYS use a ceramic drill bit when drilling
into tiled surfaces.
7. ALWAYS use a drill bit that is suitable for the
surface that is being drilled.
8. The wall plugs supplied are for use on solid
walls only. For cavity walls or plasterboard
ALWAYS use specialist fixings that are suitable
for the type of wall construction.
9. DO NOT use abrasive or chemical cleaners as
these may damage the product.
10. DO NOT strike the mirror with hard or sharp
objects.
11. DO NOT drill on the grout line of tiles.
12. ALWAYS use masking tape on tiles surfaces.
13. DO NOT position glass components in close
contact with a heat source.
x2
IMPORTANT INSTALLATION
INFORMATION
This is a class 1 appliance and MUST NOT be
connected to earth.
Hazardous voltages inside - DO NOT remove any
covers.
This product MUST ONLY be installed in
accordance with the installation instructions.
Connection of the electrical supply MUST ONLY
be carried out by a competent person.
Keep DIY tools out of the reach of children.
Installation MUST be carried out by a competent
electrician in accordance with the Building
Regulations 2010 and connection to the fixed
wiring of the mains electrical supply must
comply with the current revision of the IET Wiring
Regulations BS 7671.
6
mm
TOOLS REQUIRED
8
mm
WALL FIXING PACK
x2 Countersink
Screw
x4 Hang 'n' Lock
Wall Plug
x1 Hang 'n' Lock
Bracket x2 Cam
x1 L-Shaped
Bracket
x1 L-Shaped
Bracket Screw
x1 L-Bracket
Wall Plug
x2 Roundhead
Screws
x2 Sticky Padsx1 Button Head
Screw

MIR 035 R03
3
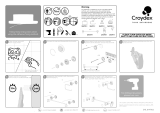
SECTION 2 - MOUNTING USING HANG 'N' LOCK
1. Assemble the Hang ‘n’ Lock bracket sections
making sure all parts are slotted tightly
together.
(See Fig. 2)
Note: The Hang 'n' Lock bracket may vary in
size.
fig. 2
2. Place the assembled Hang ‘n’ Lock bracket
onto the support slot on the back of the mirror
and hold in place. Measure the distance
from the bottom bracket to the top edge of
the mirror glass. Make a note of the ‘Bracket
Distance’ as it will help you when mounting your
mirror.
(See Fig. 3)
fig. 3
3. Carefully hold your mirror in the desired
location on the wall and using a pencil make a
reference line along the top edge of the mirror.
Use the Bracket Distance you measured earlier
to create a reference line where the bottom of
your Hang ‘n’ Lock bracket will be located.
(See Fig. 4)
fig. 4
Top Edge of Mirror
Bracket Distance
Bottom Edge of Hang 'n' Lock Bracket
Bracket
Distance
POSITIONING THE MIRROR
1. The mirror is rated IP44 and must only be installed
with the connection to the domestic mains electrical
supply in the Outside Zones, as shown in Fig. 1.
2. Ensure that the access to the domestic mains
electrical supply is located behind the intended
mounting position for the mirror and unobstructed by
the mounting brackets.
fig. 1

MIR 035 R03
4
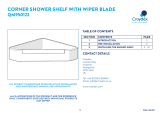
5. Drill holes to a depth of 45mm and insert
the wall plugs level with the surface of the wall.
Insert the countersink screws through the Hang
‘n’ Lock cams and loosely secure the Hang ‘n’
Lock bracket to the wall.
The wall plugs supplied are for use on solid
walls only. For cavity walls or plasterboard use
specialist fixings that are available from all
good DIY stores. (See Fig. 6)
Note: if you are fitting the product to a
tiled surface, insert the wall plugs below the
surface of the tile to avoid cracking the tiles.
fig. 6
6. With the Hang ’n’ Lock bracket loosely
attached to the wall, adjust for height and
level by rotating the cams with a flat head
screwdriver. Use the attached spirit level as
a guide. Once complete, fully tighten the
mounting screws to securely fix the bracket into
position.
(See Fig. 7)
fig. 7
Note: The position of the
mirror can be adjusted by
sliding left or right along
the bracket.
fig.5
4. Place the bottom edge of the Hang ’n’ Lock
bracket onto the lower reference line and mark
a screw hole position in each cam hole recess.
Remove the bracket from the wall.
(See Fig. 5)

MIR 035 R03
5
8. With the mirror connected to the electrical
supply, hang the mirror onto the Hang ‘n’ Lock
bracket. Ensure the mirror has securely located
onto the bracket before letting go.
(See Fig. 9)
fig. 9
* Follow Step 9 if you have one of the following products that allow for landscape orientation *
9. The mirrors that can be mounted in
landscape orientation are:
To do this, measure the distance between the
keyhole slot centres and use a spirit level to
mark two points on the wall. Drill the mounting
holes in the marked positions using a 6mm
drill bit and insert the screws, ensuring that
the screw head extends out of the wall by
approximately 5mm. Adjust screw depth for a
secure fit.
(See Fig. 10)
fig. 10 2mm
Landscape Mounting ONLY
x2
MM710500E - Sherston Illuminated Mirror
MM710600E - Cheaton Illuminated Mirror
7. Peel one side of the buer o the backing
paper and push onto the back of the mirror
frame at the bottom of the mirror. Repeat with
the second sticky pad on the right side.
(See Fig. 8)
fig. 8

MIR 035 R03
6
SECTION 4 - OPERATING INSTRUCTIONS
To turn the LED lights on or o, operate the touch switch on the front of the mirror glass.
SECTION 5 - CONNECTING THE ELECTRICAL SUPPLY
ENSURE THAT THE DOMESTIC ELECTRICAL MAINS SUPPLY TO WHICH THE
CABINET IS TO BE CONNECTED IS TURNED OFF.
Connect the flexible mains supply cable on the mirror to the domestic electrical mains supply
ensuring that:
• The Live (Brown) conductor is connected to the Live on the domestic electrical mains supply.
• The Neutral (Blue) conductor is connected to the Neutral on the domestic electrical mains
supply.
• The Earth (Green/Yellow) conductor is connected to the Earth/Ground on the domestic
electrical mains supply.
Note: Connection of the product to the domestic electrical mains supply must only be
carried out by a Building Regulations Part P certified electrician or must be checked by
your Local Authority Building Control Department.
12. With the mirror in place and connected to the
electrical supply, secure the L bracket to the mirror
using the bolt provided.
(See Fig. 12)
fig. 12
* Refer to SECTION 5 - CONNECTING THE ELECTRICAL SUPPLY before proceeding to
Step 12 and fastening the mirror. *
10. Place the L bracket over the threaded hole
located at the bottom of the mirror. Using a pencil
mark the position of the L bracket onto the wall.
(See Fig. 11)
11. Remove the mirror and place the bracket on the
mark and drill a hole in the centre of the slot on the
wall. Lightly screw the bracket to the wall, allowing
the bracket to be moved up and down the slot.
Remove the mirror to connect the electrical supply.
(See Fig. 11)
fig. 11

MIR 035 R03
7
PRODUCT REPAIR
In the unlikely event that your shaver unit or LED lighting becomes faulty, they can be replaced by a qualified electrician. Detailed
repair instructions (REP00002.pdf) can be downloaded from www.croydex.com or requested from info@croydex.co.uk.
PRODUCT RECYCLING
This product has been designed so that electrical components can be easily removed by the consumer for recycling at end of life. A
detailed Electronic and Electrical Waste Recycling Guide (WEEE00002.pdf) can be downloaded from www.croydex.com or requested
from info@croydex.co.uk.
THIS PRODUCT COMPLIES WITH THE REQUIREMENTS OF:
• The UK Electrical Equipment (Safety) Regulations 2016
• The UK Electromagnetic Compatibility Regulations 2016
• The UK Restriction of the Use of Certain Hazardous Substances in Electrical and Electronic Equipment Regulations 2012
• The EU Low Voltage Directive (LVD) 2014/35/EU
• The EU Electromagnetic Compatibility (EMC) Directive 2014/30/EU
• The EU Restriction of Hazardous Substances (RoHS) Directive 2011/65/EU
The following UKCA and CE Declarations of Conformity can be downloaded from www.croydex.com or
requested from info@croydex.co.uk:
• UKCA electrical safety and EMC (UKCA-DoC-00009-Safety-EMC.pdf)
• UKCA RoHS (UKCA-DoC-00009-RoHS.pdf)
• EU CE LVD and EMC (CE-DoC-00009-LVD-EMC.pdf)
• EU CE RoHS (CE-DoC-00009-RoHS.pdf)
SECTION 8 - DECLARATION OF CONFORMITY
THIS PRODUCT COMPLIES WITH THE REQUIREMENTS OF
The UK Electrical Equipment (Safety) Regulations 2016
The UK Electromagnetic Compatibility Regulations 2016
The UK Restriction of the Use of Certain Hazardous Substances in Electrical and Electronic Equipment
Regulations 2012
The EU Low Voltage Directive (LVD) 2014/35/EU
The EU Electromagnetic Compatibility (EMC) Directive 2014/30/EU
The EU Restriction of Hazardous Substances (RoHS) Directive 2011/65/EU
The following UKCA and CE Declarations of Conformity can be requested from info@croydex.co.uk or
downloaded from www.croydex.com:
UKCA electrical safety and EMC (UKCA-DoC-00001-Safety-EMC.pdf)
UKCA RoHS (UKCA-DoC-00001-RoHS.pdf)
EU CE LVD and EMC (CE-DoC-00001-LVD-EMC.pdf)
EU CE RoHS (CE-DoC-00001-RoHS.pdf)
/