Page is loading ...

WMA 146 R01
1
CORNER SHOWER SHELF WITH WIPER BLADE
QM950122
ALL PRODUCT DIMENSIONS DETAILED IN THIS INSTALLATION
AND MAINTENANCE MANUAL ARE APPROXIMATE
ALL ILLUSTRATIONS OF THE PRODUCT ARE FOR REFERENCE
ONLY. COMPONENTS SUPPLIED WITH INDIVIDUAL PRODUCTS
MAY DIFFER
SECTION CONTENTS PAGE
1 INTRODUCTION 2
2 PRE-INSTALLATION 2
3INSTALLING THE ANGLED SHELF 3 - 4c
CONTACT DETAILS
Croydex
Central Way
Andover
Hampshire
SP10 5AW
UK
Tel: +44 (0)1264 365881
Email: info@croydex.co.uk
www.croydex.com
TABLE OF CONTENTS

WMA 146 R01
2
SECTION 1 - INTRODUCTION
INTRODUCTION
Thank you for purchasing this Croydex product. Please follow
all assembly and product care instructions to ensure that your
product is assembled safely and retains it's high quality finish.
PLEASE RETAIN THIS MANUAL FOR FUTURE REFERENCE
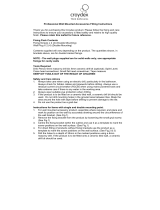
WALL FIXING PACK
SECTION 2 - PRE-INSTALLATION
x2 wall screws x2 wall plugs
SAFETY & PRODUCT CARE
1. ALWAYS take care when using power tools, particularly if
there is any water in the working area.
2. ALWAYS wear eye protection when using power tools.
3. ALWAYS check for pipes and cables before drilling into
walls.
4. ALWAYS use a ceramic drill bit when drilling into tiled
surfaces.
5. ALWAYS use a drill bit that is suitable for the surface that is
being drilled.
6. The wall plugs supplied are for use on solid walls only. For
cavity walls or plasterboard ALWAYS use specialist fixings
that are suitable for the type of wall construction.
7. DO NOT use abrasive or chemical cleaners as these may
damage the product. 6
mm
TOOLS REQUIRED
PRODUCT FITTING
IMPORTANT!
Before attempting to install this product, ensure that it fits
and will function in the desired location.
x1
MAX
5kg

WMA 146 R01
3
SECTION 3 - INSTALLATION
INSTALLING THE ANGLED SHELF
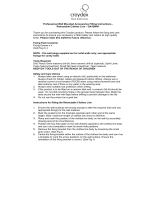
1. BEFORE INSTALLING the wall bracket, ensure that the safety
warnings in section 1 are followed.
2. Place the bracket against the wall in the desired position.
Ensure both faces are flush with the walls and mark the hole
centres for drilling. (See Fig. 1)
fig. 1
3. Drill the holes to a depth of 32mm in the marked positions
using a 6mm masonry drill. If the product is being fitted onto a
ceramic tiled wall - a ceramic drill bit should be used.
(See Fig. 2)
fig. 2
fig. 4
5. Insert the wall screws through the slots in the wall bracket
and tighten until the wall bracket is held in place but can still be
adjusted.
(See Fig. 4)
4. Insert the wall plugs flush to the wall surface. If fitting to a
tiled surface the wall plugs should be inserted below the surface
of the tile to avoid cracking.
(See Fig. 3)
fig. 3

WMA 146 R01
4
SECTION 3 - INSTALLATION
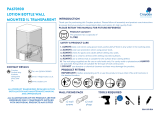
6. Check that the wall bracket is level. Use the slots to adjust the
levelling if necessary. (See Fig. 5)
fig. 5
7. Tighten the screws to lock the bracket in place. Do not
overtighten. (See Fig. 6)
fig. 6
8. Install the inner plastic enclosure.
(See Fig. 7)
fig. 7
9. Install the wiper into the recess located at the front of the
enclosure. (See Fig. 8)
fig. 8
/