Page is loading ...

Date Issued: 07/05/16 IS-5018-US
We’re here to help 866-558-5706
Hrs: M-F 9am to 5pm EST
CAUTION – RISK OF SHOCK –
Disconnect Power at the main circuit breaker panel or main fuse
box before starting and during the installation.
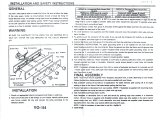
ILLUSTRATION A
1) At the center of the backpan is a hole, insert plastic bushing.
2) At the center of the backpan are knockout slots. Remove the
set that matches your outlet box.
3) Grounding instructions for United States installation only:
(See Illus. A or B).
A) On fixtures where mounting strap is provided with a hole
and two raised dimples. Wrap ground wire from outlet
box around green ground screw, and thread into hole.
B) On fixtures where a cupped washer is provided. Attach
ground wire from outlet box under cupped washer and
green ground screw, and thread into mounting strap.
If fixture is provided with ground wire. Connect fixture
ground wire to outlet box ground wire with wire connector.
After following the above steps. Never connect ground wire
to black or white power supply wires
4) Slip wires from sockets through plastic bushing
5) Make wire connections. Reference chart below for correct
connections and wire accordingly.
6) Secure the backpan to the outlet box.
7) Anchor the backpan to the wall using the set of holes at
each end with wood screws, toggle bolts, plastic anchors,
etc.
8) Slip faceplate over sockets and backpan. NOTE: be certain
wire do not get pinched between backpan and faceplate.
9) Push and twist socket cups onto sockets.
10) It is advisable to periodically check security of socket cups,
especially after cleaning.
GREEN GROUND
SCREW
CUPPED
WASHER
OUTLET BOX
GROUND
FIXTURE
GROUND
DIMPLES
WIRE CONNECTOR
OUTLET BOX
GROUND
GREEN GROUND
SCREW
FIXTURE
GROUND
A
B
Connect Black or
Red Supply Wire to:
Connect
White Supply Wire to:
Black White
*Parallel cord (round & smooth) *Parallel cord (square & ridged)
Clear, Brown, Gold or Black
without tracer
Clear, Brown, Gold or Black
with tracer
Insulated wire (other than green)
with copper conductor
Insulated wire (other than green)
with silver conductor
*Note: When parallel wires (SPT I & SPT II)
are used. The neutral wire is square shaped
or ridged and the other wire will be round in
shape or smooth (see illus.)
Neutral Wire
ILLUSTRATION B
1) At the center of the backpan is a hole, remove the 7/8”
diameter knockout and one of the slotted knockouts oppo-
site the 7/8” diameter knock out.
2) Run wire from Romex®/conduit through 7/8” diameter hole
and secure in place with locknut.
3) Anchor the backpan to the wall using the set of holes at
each end with wood screws, toggle bolts, plastic anchors,
etc.
4) Grounding instructions for United States installation only:
(See Illus. A or B).
A) On fixtures where mounting strap is provided with a
hole and two raised dimples. Wrap ground wire from
outlet box around green ground screw, and thread into
hole.
B) On fixtures where a cupped washer is provided. Attach
ground wire from outlet box under cupped washer and
green ground screw, and thread into mounting strap.
If fixture is provided with ground wire. Connect fixture
ground wire to outlet box ground wire with wire connector.
After following the above steps. Never connect ground wire
to black or white power supply wires.
5) Make wire connections. Reference chart below for correct
connections and wire accordingly.
6) Slip faceplate over sockets and backpan.
NOTE: Be certain wire do not get pinched between backpan
and faceplate.
7) Carefully center mirror panel over two sockets then push
and twist socket cups onto sockets to secure in place.
Repeat for each panel.
8) If mirror panels do not stay aligned, disassemble socket
coups and mirror panels and affix double face tape above
and below each large hole in faceplate then re-assemble.
Fixture is suppled with double face tape for permanent
mounting of mirror panels. It is suggested that tape only be
used if mirror panels do not stay aligned.
NOTE: IF USING TAPE, DO NOT USE ON END MIRROR
PANELS UNTIL FIXTURE FACE DOES NOT HAVE TO BE
REMOVED. FOR ANY REASON, SUCH AS FOR ELECTRICAL
INSPECTION.
9) Insert recommended lamps and turn on power.
10) It is advisable to periodically check security of socket cups,
especially after cleaning.
GREEN GROUND
SCREW
CUPPED
WASHER
OUTLET BOX
GROUND
FIXTURE
GROUND
DIMPLES
WIRE CONNECTOR
OUTLET BOX
GROUND
GREEN GROUND
SCREW
FIXTURE
GROUND
A
B
Connect Black or
Red Supply Wire to:
Connect
White Supply Wire to:
Black White
*Parallel cord (round & smooth) *Parallel cord (square & ridged)
Clear, Brown, Gold or Black
without tracer
Clear, Brown, Gold or Black
with tracer
Insulated wire (other than green)
with copper conductor
Insulated wire (other than green)
with silver conductor
*Note: When parallel wires (SPT I & SPT II)
are used. The neutral wire is square shaped
or ridged and the other wire will be round in
shape or smooth (see illus.)
Neutral Wire

Date Issued: 07/05/16 IS-5018-US
We’re here to help 866-558-5706
Hrs: M-F 9am to 5pm EST
ILLUSTRATION A
ILLUSTRATION B
DESIGN OF
FACEPLATE MAY
VARY DEPENDING
UPON THE STYLE
YOU’VE CHOSEN.
OUTLET BOX
KNOCKOUT SLOTS
PLASTIC BUSHING
OUTLET BOX SCREWS
SOCKET CUP
FACEPLATE
SCREW
BACKPAN
SOCKET
PLASTIC
ANCHOR
DESIGN OF
FACEPLATE MAY
VARY DEPENDING
UPON THE STYLE
YOU’VE CHOSEN.
SOCKET CUP
FACEPLATE
SCREW
BACKPAN
KNOCKOUT SLOTS
ROMEX® CONDUIT CONNECTOR
LOCKNUT
SOCKET
PLASTIC
ANCHOR
/