Page is loading ...

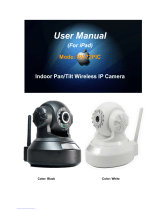
IPcam-SD User’s Manual
WiFi Security Camera
for Smartphone, Tablet, and Computer

© Copyright 2013
This manual is furnished under license and may be used or copied only in accordance with the terms
of such license. Except as permitted by such license, no part of this publication may be reproduced,
stored in a retrieval system, or transmitted, in any form or any means, electronic, mechanical,
recording, or otherwise, including translation to another language or format, without the prior written
permission of SecurityMan. The content of this manual is furnished for informational use only, is subject
to change without notice, and should not be construed as a commitment by SecurityMan. SecurityMan
Inc assumes no responsibility or liability for any errors or inaccuracies that may appear in this book.
FCC Information
Notes on FCC’s “Consistent Statement of Information” This product meet the requirements specified in
Part 15 of FCC Regulation. Operation rests with the following two conditions:
(1) The equipment should not cause any harmful interference.
(2) The equipment must receive and process any interference, including any
possible interference caused by operation mistakes.
After testing the product, we confirm that the camera complies with the provision for class C digital
equipment in the 15th part in FCC regulations; and the receiver complies with the limitations for class B
digital equipment in Part 15 of FCC regulation. The product generates, applies and emits radio waves.
It might cause harmful interferences to wireless communication if not be installed and used following
the description of the manual.
The product may cause interference in residential area, and the customer should take remedies to
eliminate the interference on their own costs.
If the product causes any harmful interference to wireless equipment or disturbs the receiving of TV
signals (it can be identified by turning on and off the product), you can solve the trouble by following
methods:
• Readjust the product or put it in another place.
• Extend the distance between the equipment interfered and the product.
• Refer to dealers or experienced radio electrician for help.
Warranty
SecurityMan Inc warrants that this product will be free from defects in title, materials and
manufacturing workmanship for one year or otherwise specified on the product packaging. This
limited warranty shall commence from the date of purchase. SecurityMan products warranty is not
transferable and is limited to the original purchaser. If the product is found to be defective then,
as your sole remedy and as the manufacturer’s only obligation, SecurityMan will repair or replace
the product. This warranty shall not apply to products that have been subjected to abuse, misuse,
abnormal electrical or environmental conditions, normal wear and tear, or any condition other than
what can be considered normal use.
Warranty Disclaimers
SecurityMan Inc, makes no other warranties, express, implied or otherwise, regarding this product,
and specifically disclaims any warranty for merchantability or fitness for a particular purpose. The
exclusion of implied warranties is not permitted in some states and the exclusions specified herein may
not apply to you. This warranty provides you with specific legal rights. There may be other rights that
you have which vary from state to state.
Limitation of Liability
The liability of SecurityMan Inc, arising from this warranty and sale shall be limited to a refund of the
purchase price. In no event shall SecurityMan be liable for costs of procurement of substitute products
or services, or for any lost profits, or for any consequential, incidental, direct or indirect damages,
however caused and on any theory of liability, arising from this warranty and sale. These limitations
shall apply not withstanding any failure of essential purpose of any limited remedy.
For Tech Support Call: 888-977-3777
SecurityMan
4601 E. Airport Drive, Ontario, CA, 91761, USA
Tel: 909-230-6668 Fax: 909-230-6889
Email: info@securitymaninc.com Website: www.securitymaninc.com
Copyright 2013 by SecurityMan v1.0

Table of Contents
Introduction
Features
Important
Restrictions
Conditions
Package contents
Product Basics
Camera Setup
Software (CMS) Installation
IPcam-SD IP Adress Setup
CMS Quick Connect (Intranet)
CMS Graphic User Interface
Menu Area
PTZ Control
Color
SYSTEM
PC Config
Base Config
Log Maintenance
Snapshot
Local Record
Device
Sync Time With PC
Start Up
Alarm Setting
I/O Trigger
Video Motion
Video Blind
Device Disconnect
Record Setting
Basic Settings
Device List
Schedule Type Selector
Plan Template Window
Schedule View
Version Info
IPCAM/CMS Account
Group
Add Group
Delete Group
Group List
Group Rights List
User
User Account Window
Add User
Delete User
Modify PW (Password)
Local Log
Log Type
Operation/Alarm
Begin Time
End Time
Detail Screen
Search
Next Page
Pre Page
Log Export
Add/Remove IPCam
Area List
Add Area
Add Devcie
Device List
IP Search
Device Name
Login Type
IP Address
Port
User Name
Password
Zone
1
1
1
2
3
4
5
6
6
9
11
13
15
16
18
19
20
21
22
23
24
25
26
27
29
30
33
35
37
38
39
39
39
40
44
44
45
46
47
47
47
47
49
49
49
50
50
51
52
52
52
52
52
53
53
53
53
54
55
55
56
57
57
57
57
57
57
57
57
58

Domain
Cloud
Edit Device
Add Device
Example How to Add the IPcam-SD to the CMS
Modify
Delete
Import Config
Export Config
Connection Test
IPCam Config
Device List
Sub-Menu Icons
Main Menu Icons
REC/Playback
Video
Snapshot
Alarm
Video Motion
Video Blind
Alarm Inpu
Alarm Output
Abnormal
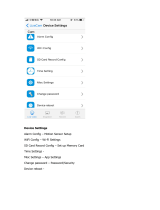
System
General
System Time, Date Format, Date Separator, Time
Format, Language, HDD Full, Video Standard, DST
(Daylight saving Time).
Encode
Compression, Resolution, FPS, Bit Rate Type, Quality,
Bit Rate (KB/s), Frame Interval (Sec), Video/Audio,
Snapshot, Static Configuration of.
Network
Net Card (Wifi, PPPoE), DHCP Enable, IP Address,
Subnet Mask, Gateway, Primary DNS, Secondary DNS,
Media Port, HTTP Port, MAC Address, Remote Access
Full Bandwidth, Remote Access Priority.
Net Service
IP Filter, DDNS, Email, NTP (Network Time Protocol),
ARSP, Mobile Monitor, UPnP, FTP, Real Time Streaming
Protocol, Cloud.
GUI Display
CAM Name, Anti-Jitter, Transparency, Area Masking,
Date/Time Stamp, Camera Name (Position), Mirror
Image, Flip Image, Anti Flicker, IRSwap.
Advanced
SD Card Manage
Read/Write, Snapshot, Format Disk, Partition.
IPCam/CMS Account
Modify User, Modify Group, Modify PW (Password),
Add User, Add Group, Delete User, Delete Group.
Maintenance
IPCam Reboot, Delete Files (SD).
Default
Select All, General, Video, Network, GUI Display,
Encode, Alarm Set, NetService, IPCam/CMS Account.
Import/Export
Import (cfg), Export (cfg).
Upgrade
File Name (Browse), Upgrade.
Info
SD Card Info
Playback
IPCam Playback Tab
PC Playback Tab
Logout
Remote Access
Internet Explorer Remote Access
Smartphone Remote Access (iPhone, iPad/Tablet)
Smartphone Remote Access (Android)
Smartphone Remote Access (Blackberry)
Smartphone Remote Access (Windows Mobile)
P2P Remote Access
Specifications
58
58
58
59
59
63
63
63
63
63
64
65
65
66
67
68
70
72
73
76
79
81
83
84
85
88
91
95
102
105
106
108
113
114
116
117
118
118
123
124
126
126
127
128
131
135
141
143
144
146

1
Introduction
Stay connected wherever you go with the SecurityMan IPcam-SD. You can remotely
access your IPcam-SD from anywhere in the world; monitor your home or business
through a secure and password protected connection from your PC, Mac, iPhone,
iPad, iPod Touch, or any compatible Smartphone. Simply connect the IPcam-SD
to a router over wireless network (Wi-Fi) or wired Ethernet, install the software on
your PC, or register online with our P2P server made easy for remote access and
configuration free, and download the free App for your Smartphone. Then, remote
video surveillance is right at your finger tips.
Features
• Quick and easy installation: Do-it-yourself (D.I.Y) easy to setup and use. The CMS
(Central Management Software) detects the IPcam on the network automatically.
• Mobile Viewing: With the latest H.264 video compression technology for longer
recording time and the best video streaming with multiple devices including
Smartphone (iPhone and Android), Tablet, PC, MAC.
• Live monitor and record from almost anywhere: You can view and record live
video remotely from almost anywhere where you have access to a computer, web
browser, and broad Internet connection.
• Wired or wireless: The IPcam-SD can be accessed through a wired connection
using the 10/100 RJ45 connector. It also supports wireless 802.11 b/g/n as well as
WEP, WPA, and WPA2 encryption.
• Notifications: Receive email notifications to your email account when an alarm is
triggered. It also supports uploading images to your email and FTP.
• Infrared Nigh vision: The integrated infrared LEDs automatically turn on in low
light environment to provide night vision up to 50ft.
• Multi-client access: The IPcam-SD supports up to 8 users to remote access
simultaneously. It also can be configured to view up to 64 IPcam-SDs from the
same interface.
Important
This guide provides important information on the use and operation of your
IPcam-SD. Please read all the information carefully prior to using the product
for the best performance and to prevent any damage/injuries or misuse of the
device(s). Customers are entitled to have read through this complete user’s manual
before using IPcam-SD. Any unapproved changes or modifications will void
your warranty. Please ensure to have a complete understanding of the following
restrictions.

2
Restrictions
When using this product, the safety precautions below must be taken to avoid
possible legal liabilities and damages. Retain and follow all product safety and
operating instructions. Observe all warnings in the product operating instructions.
To reduce the risk of bodily injury, electric shock, fire and damage to the equipment,
observe the following precautions.
PLEASE NOTE that under certain circumstances, audio/video recording may
be PROHIBITED by law. This device should be used only in compliance with all
applicable federal, state and local statutes.
• DO NOT attempt to move the pan/tilt functions of the IPcam-SD by hand as this
may result in damage to the internal motors.
• DO NOT use this product near water, for example, near a bathtub, washbowl,
kitchen sink, or laundry tub, in a wet basement, or near a swimming pool.
• DO NOT place this product on an unstable cart, stand, or table. The product may
fall, causing serious damage to the product.
• DO NOT disassemble this product. Opening or removing covers may expose you to
dangerous voltages or other risks. Incorrect reassembly can cause electric shock
during subsequent use.
• DO NOT place this product too close to medical equipment.
1. This product may cause medical equipment to malfunction
2. Place the product at least 22cm from the heart pacemaker. Radio waves can
potentially influence the pacemaker and can lead to respiratory disturbance.
• DO NOT use this product to infringe on one’s privacy, spying intercepting and
related activities are illegal and punishable by law. Monitoring one’s private
activities without consent is illegal and this product is not designed or
manufactured for these purposes.
• DO NOT use this product to carry out any illegal activities such as sneak preview,
etc. SecurityMan shall not be responsible for any consequences of illegal conducts
made by users.
• DO NOT put the plastic packaging bags in reach of children or babies. Plastic bags
can create a suocation hazard when placed over the nose and mouth.
• DO NOT plug the AC adapter into the outlet in improper situations.
• Plugging in an AC adapter with wet hands might cause electric shock.
• Plugging in the AC adapter unsteadily might cause re or electric shock.
• DO NOT cover the AC adapter when it is connected to an outlet, place the adapter
near heaters, or put it on the floor which is equipped with a heater. The above
mentioned operation might cause fire or incidents.

3
Conditions
Please read the following messages to make sure your working environment is suitable.
• Please read the following messages to make sure your working environment
is suitable.
• The temperature should be kept between –10˚C and 50˚C (14˚F to 122˚F).
The relative humidity should be kept between 20% and 80%.
• Avoid putting the product in places where temperature or humidity may
change rapidly.
• Keep it dry, dustless and avoid lens exposure in direct sunlight.
• Keep product away from heat sources such as electric heaters.
• Do not use the camera near harmful chemicals.
• Do not place product near any strong magnetic objects
• It might influence the normal operation of the product if used at the fringe range
of normal temperature. Please turn o the power when not in use.
• Do not disassemble the product.
• Do not shake or strike the product.
• Please obey the local government’s environment protection policy.

4
Package Contents
Ceiling/Wall mount bracket
(with screws)
2 x Mounting bracket
(IPcam-SDX2, screws)
CD (PC software and
manual)
IPcam-SD
2 x IP cameras (IPcam-SDX2)
Quick Start Guide
I/O terminal
(1 IN, 1 OUT)
2 x I/O terminals (IPcam-SDX2)
Ethernet cable
2 x Ethernet cable (IPcam-SDX2)
Power adapter
2 x Power adapters (IPcam-SDX2)
Antenna
2 x Antennas (IPcam-SDX2)

5
Product Basics
Infrared LEDs
Light Sensor
Camera Lens
Front View
Network Port Antenna Mount Micro SD Slot
Power SocketAlarm In/OutSpeakerMicrophone
Rear View
Bottom View
Mounting Hole
Reset Button
Base
NOTE: The reset button located at the bottom of the camera is used to reset the
IPcam-SD to its original “factory default” settings. To apply, power up your camera
then press and hold-in the reset button using a small non-pointed/non-metallic
instrument (paper clip or other stationary) for 5 seconds.

6
We strongly recommend that you plug in and configure your IPcam-SD prior to
mounting it.
NOTE: The IPcam-SD must be configured through a “wired” Ethernet connection
before it can be used wirelessly (no Ethernet cable).
1. Attach the antenna to the back of the camera.
2. Insert a Micro SD card (not included) into the Micro SD slot.
3. Using the Ethernet cable provided, connect one end into the “Network”
port of the camera and the other into your network router/switch.
4. Power up the camera by plugging in the cameras power adapter
(5VDC, 2.0A) into the power socket located on the back of the
IPcam-SD and the other end into a power outlet.
NOTE: The IPcam-SD will perform a 30 second self test every time it is powered up.
This test will include the head rotating in a range of motions before coming to a stop.
Next, is to proceed to CMS installation below to complete camera setup.
Camera Setup
Software (CMS) Installation
System Requirements
• Operating System: Windows XP, Vista, 7 and 8 (32-bit/64-bit OS)
• Processor: Intel Pentium 4 (2.0GHz or above)
• Video Card: NVIDIA GeForce 6800 equivalent or better
• Memory: 2GB RAM
• Storage: 1GB available hard drive space
• Internet: Broadband Internet connection

7
1. Insert the Installation CD into the CD-ROM drive, and double click the “Open
folder to view files” option from the the AutoPlay window.
2. Next, double-click on the “CMS_V3.0.9.14.T.20130410.exe” file to start the
software installation process as shown above.
NOTE: Please note that software revision may change with noticed.
3. The CMS (Central Management Software) Setup screen will appear as shown
below. Select “Yes” in the User Account Control window and then click “Next” to
continue or “Cancel” to cancel the installation.

8
4. Input the user name and company name. Then click “Next” to continue as
illustrated above.
5. The default Install CMS directory is C:\Program Files\CMS, click “Change” to select
a dierent destination folder, or click “Next” to continue (recommended).
6. The default shortcut icon folder is CMS. Click the drop-down menu for
more selections, or click “Next” to start installing the CMS to your computer
(recommended) as illustrated above.
7. Click “Next” in the Ready to Install window and then click “Finish” to complete
the CMS software installation as shown below.
NOTE: When you first launch the central management software you will be
prompted with a pop up stating that your device list is empty “please add a device”.
Click OK to proceed.
8. After the installation is complete, a “CMS” short-cut icon will automatically be
created on your desktop as shown above. Double-click on the “CMS” icon to
open the CMS software for IPcam-SD.

9
IPcam-SD IP Address Setup
1. Double-click on the “CMS” short-cut icon on your desktop. Select “English”
or other languages and then click “OK” to advanced to “Device list is empty,
please add device...” prompt. Next, input the User Name and Password at the
login window as illustrated below. The default User Name is “super” and the
default Password is empty. Click the “Login” button to login to CMS. A “Device
list is empty, add your...” window will appear as shown below, click on “OK” to
continue.
NOTE: The default User Name is “super”, password leave blank.
2. At the CMS main screen, click on “System”, and then “Add/Remove IPCam” to
open the device manager window to configure as illustrated below.
3. In “Add/Remove IPCam” window, click on “ADD AREA” to open the “Zone”
window as illustrated above. The “zone” could be the location where the
IPcam-SD camera is installed, example Oce, Warehouse, etc.
4. In “Zone” window, please enter a zone name, and then click “OK” to confirm
and go back to the Add/Remove IPCam window. In this Quick Start Guide, we
use “Demonstration” as illustrated below.

10
5. In “Add/Remove IPCam” window, click to highlight “Demonstration” then
click “ADD DEVICE” to open “Edit” device window as shown below.
6. In “Edit” device window, put a check mark on “IP Address” then click on
the “IP Search” button to start searching for IP address of IP camera. After
clicking on the “IP Search” button, it will detect and list two IP addresses:
192.168.1.10 (Ethernet) and 192.168.1.11 (Wifi), and they are the default
IP addresses of the IPcam-SD. Put a check mark on the first IP address
(Ethernet), and then click on “EditDevice” button as illustrated below.
7. In “EditDevice” window, please modify the default IP Address (Ethernet),
Subnet Mask, and Gateway to match your local area network settings.
IMPORTANT NOTE: To find your local area network settings on your
computer click “Start” “All Programs” ”Accessories” ”Command Prompt”.
At the DOS “Command Prompt” screen, type “ipconfig”, and then press
“Enter” as illustrated below. Please write down your local “IPv4 Address”
or the IP address, the “Subnet Mask”, and the “Default Gateway”. Exit from
the “Command Prompt” window by typing “exit”.
8. Go back to the “EditDevice” window to change the “Subnet Mask” and
“Default Gateway” to what you wrote down on Step 7. The final step is to
assign an IP address to the IPcam-SD. There are 4 sets of numbers in an IP
address. The first three sets have to be the same as “Default Gateway” and
then assign the 4th set of numbers between 100~200 (for example 189) as
illustrated below. Then click “Modify” to confirm the changes. If everything is
setup correctly, you will get “Save Config to device successful” window, click
“OK” to advance to the “ADD DEVICE” window. In this Quick Start Guide, we
use 192.168.248.189 for demonstration purpose only.

11
NOTE: Repeat Steps 2 ~ 9 to setup IPCam-SD wireless connection. Be sure
to select the Wifi IP address in step 9 to complete Wifi setup.
NOTE: please jot down the IPcam-SD’s IP address above, the HTTP
port, and the Media port.
9. In “Edit” device window, click the “IP Search” button to re-scan for
the IPcam-SD addresses as illustrated below. Then click on the new
IP address (Ethernet) to make the change and then click the “OK”
button to confirm the change and to go back to the “Add/Remove
IPCam” window. Click “OK” again to go back to main CMS window.
CMS Quick Connect (Intranet)
1. In the main CMS screen, double-click on the IP address, and then double-click
on CAM01 to connect to the IPcam-SD and the camera image should appear
on your screen.

12
2. To record video files to your computer, click “System”, and then click “PC
Config”.
3. In “PC Config” window under “Base Config”, the default directory are C:\
Program Files\CMS\Record(Picture) folders, click “Browse” to choose a
dierent destination folder. Next, select the “Record Setting” and make sure
“Overwrite” is checked and then select the disk/partition you want save the
video/picture files as illustrated below. Click “Apply” or “OK” to confirm the
changes, and click
to go back to main CMS screen.
4. To start recording, right-click on camera image and choose “Local record” as
illustrated below.

13
CMS Graphic User Interface
A. Device Display Area
The DEVICE DISPLAY AREA lists all the devices (IPcam-SD’s) that are accessible
through the CMS software. Device display area can be added through the “Add/
Remove IPCam” under System in the menu area.
NOTE: You can add up to 64 devices to the CMS (Central Management Software).
B. Display Screen
The DISPLAY SCREEN displays the live feed of the camera(s) selected from the
Device Display Area.
C. Horizontal Expand
Clicking on the HORIZONTAL EXPAND will hide the device display area giving
you a wider look at the live feed from your camera.
D. Multi-Screen View
The MULTI-SCREEN VIEW area allows you to partition the live view screen
according to the amount of channels (cameras) you want to monitor. Options
include: 1, 4, 6, 8, 9, 16, 25, 36, 64, and View Full (full screen display).
A. Device Display Area
B. Display Screen
C. Horizontal Expand
D. Multi-Screen View
E. Vertical Expand
F. Operation Log
G. Time
H. Local Disk Status
I. Right Click Menu
J. Menu Area

14
E. Vertical Expand
Clicking on the VERTICAL EXPAND will hide the operation log area giving you a
larger view of your cameras live feed.
F. Operation log
The OPERATION LOG area displays real time alarms based on the IPcam-SD
alarm notification settings. For example, if you set up “Video Blind” warnings for
camera 1, the operation log window will display a message showing the event
type, date/time, IP address, user and the channel number when an event occurs.
G. Time
The TIME section on the CMS interface displays the IPcam-SD’s current date and
time.
H. Local Disk Status
The LOCAL DISK STATUS area represents the total amount of disk space
available and remaining on the local computer.
I. Right-click menu
The live view window provides you with a RIGHT-CLICK MENU which consists of
a set of options that can be used by right clicking on any of the selected live feed
windows. These options include:
• Close Window – Stops the live monitor for the selected channel.
• Close All Window – Stops the live monitor for all connected channels.
• Audio – Enables/Disables sound for the selected channel.
• Local Record – Starts manual recording for the selected channel. (all recordings
are stored to the local computer). Check System/PC Config for local storage
directory.
• Zoomed - Enables/Disables the digital zoom feature. Once zoomed is selected,
left-mouse click and drag on the camera image for digital zoom, uncheck
zoomed for normal camera view.
• Snapshot – Takes a snap shot of the selected channel. (all snapshots are stored
to the local computer) Check System/PC Config for local storage directory.
• Start Talk – Enables/Disables Two-Way audio communication between the local
computer and the IPcam-SD.
• Device Config – Opens the device or IPCam configuration interface for the
selected channel.
• Color Setting – Used to adjust the color levels on the selected channel.
• View Full - Expands the CMS interface to “Full Screen” mode.
J. Menu Area
The MENU area consists of menu categories that are used to access and
configure CMS options and features such as PTZ, Playback, color and System.
NOTE: The area above the MENU area will change to correspond with options
that are related to the menu option selected. For example, the image shows PTZ
controls because PTZ was selected from the menu area.

15
Menu Area
The MENU AREA is located at the bottom right corner of the CMS interface and is
designed to give you quick access to the most commonly used features such as PTZ
Controls, Color Adjustment, IPcam-SD and CMS configuration and Playback. The
menu area consists of the following:
NOTE: The area above the MENU area will change to correspond with options that
are related to the menu option selected. For example, the image shows PTZ controls
because PTZ was selected from the menu area.
PTZ
System
Logout
Color
Playback

16
PTZ
Selecting the PTZ option from the menu area of the CMS interface will bring up the
PTZ control window which will allow you to maneuver and control your camera(s). To
access the PTZ control menu simply click on the “PTZ” option from the CMS interface
screen located on the bottom right hand corner of the screen. Once selected, the PTZ
control screen will pop up providing you with the following options:
A. Navigational Arrows
B. Speed Bar
C. Pan
D. Preset
E. Tour
A. Navigational arrows
The NAVIGATIONAL ARROWS allow you to move your camera in the
corresponding direction when you click them, giving you a full 360 degree
horizontal motion and 120 degree vertical motion for pan and tilt. To zoom you can
single click for stop-and -go motion or click and hold for a continuous pan.
B. Speed bar
The SPED BAR allows you to set/change the current speed rate (8 speed levels
ranging from fast to slow, system default to speed 5). Set to 8 to navigate at a
higher rate when panning or tilting the IP camera set to 1 to slowly navigate when
panning or tilting the IP camera.
C. Pan
The PAN feature Enables/Disables the IPcam-SD’s “Auto Pan” (full left-to-right
movement) feature.
/