EN
CONTENT
1. Safety and EMC Instructions ................................................................. 1
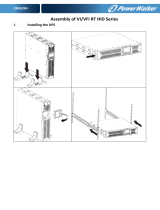
1.1 Installation ............................................................................................... 1
1.2 Operation ................................................................................................ 9
1.3 Maintenance, servicing and faults ........................................................ 10
1.4 Transport ............................................................................................... 13
1.5 Storage ................................................................................................. 13
1.6 Standards .............................................................................................. 14
2. Description of Commonly Used Symbols .......................................... 15
3. Introduction ........................................................................................... 16
4. Panel Description ................................................................................. 17
5. Connection and Operation ................................................................... 19
5.1 Inspection .............................................................................................. 19
5.2 Connection ............................................................................................ 19
5.3 Battery charge ....................................................................................... 21
5.4 Turn on the UPS ................................................................................... 21
5.5 Test function ......................................................................................... 21
5.6 Turn off the UPS ................................................................................... 22
5.7 Audible alarm mute function ................................................................. 22
5.8 Operation procedure of external battery for long backup time model (“S”
model) ......................................................................................................... 22
6. Operating Mode for All Models ............................................................ 24
6.1 Line mode ............................................................................................. 24
6.2 Battery mode ......................................................................................... 25
6.3 Bypass mode ........................................................................................ 25
6.4 NO output mode .................................................................................... 26
6.5 EPO (Emergency Power Off) ................................................................ 26
6.6 ECO mode (Economy mode) ................................................................ 26
6.7 Converter mode .................................................................................... 27
6.8 Abnormal mode ..................................................................................... 27
7. Setting by LCD Module ........................................................................ 28
8. Trouble Shooting .................................................................................. 30
9. Maintenance .......................................................................................... 33
EN
9.1 Operation .............................................................................................. 33
9.2 Storage ................................................................................................. 33
9.3 Battery Replace .................................................................................... 33
10. Technical Data ..................................................................................... 34
10.1 Electrical specifications ....................................................................... 34
10.2 Operating Environment ....................................................................... 34
10.3 Typical backup time (Typical values at 25°C in minutes:)....................... 34
10.4 Dimensions and weights ....................................................................... 35
11. Communication Port ........................................................................... 36
11.1 RS-232 and USB communication ports .............................................. 36
11.2 RS-232 port ......................................................................................... 36
11.3 USB port ............................................................................................. 37
11.4 Installing a Serial Network Management Card (optional) ................... 37
11.5 Dry Contact port .................................................................................. 37
12. Software Installation ........................................................................... 39
Appendix: Rear panel ............................................................................... 40
EN
1. Safety and EMC Instructions
SAVE THESE INSTRUCTIONS This manual contains important instructions
for models PowerWalker VFI 1000/1500/2000/3000RT LCD that should be
followed during installation and maintenance of the UPS and batteries.
1.1 Installation
This product is specially designed for PCs and it is not recommended
for use in any life-supporting system and other specific important
equipment.
Do not connect household or other appliances or items of equipment
which would overload the UPS (e.g. laser printers, hair dryers, etc) to
the UPS output.
This unit intended for installation in a controlled environment
(temperature controlled, indoor area free of conductive
contaminants).
Condensation may occur if the UPS is moved directly from a cold to a
warm environment. The UPS must be absolutely dry before being
installed. Please allow an acclimatization time of at least two hours.
Risk of electric shock, do not remove cover. No user serviceable parts
inside. Refer servicing to qualified service personnel.
The utility power outlet shall be near the equipment and easily
accessible. To isolate UPS from AC input, remove the plug from the
utility power outlet.
If UPS is to be stored for a long time, it is recommended to recharge
the batteries (by connecting the utility power to UPS, switch “ON”),
once a month for 24 hours to avoid a full battery discharge.
Please do not use the UPS in excess of the rated load capacity.
The UPS contains large-capacity batteries. So the shell shall not be
opened, otherwise such dangers as electric shock will be caused. If
any internal overhaul or replacement of the battery is required, please
contact the distributor.
Please read carefully the following user manual and the safety
instructions before installing the unit or using the unit!
1
EN
The internal short circuiting of the UPS will lead to dangers such as
electric shock or fire, therefore, no water containers (such as a water
glass) shall be placed on the top of the UPS so as to avoid such
dangers as electric shock.
Do not dispose of battery or batteries in a fire. The battery may
explode.
Do not open or mutilate the battery or batteries. Released electrolyte
is harmful to the skin and eyes. It may be toxic.
Icon Φ on the rating label stands for phase symbol.
A battery can present a risk of electrical shock and high short circuit
current. The following precautions should be observed when working
on batteries :
Remove watches, rings, or other metal objects from the hand.
Use tools with insulated handles.
Servicing of batteries should be performed or supervised by
personnel knowledgeable of batteries and the required precautions.
Keep unauthorized personnel away from batteries.
When replacing batteries, replace with the same type and number of
the sealed lead-acid batteries.
This pluggable type A equipment with battery already installed by the
supplier is operator installable and may be operated by laymen.
During the installation of this equipment it should be assured that the
sum of the leakage currents of the UPS and the connected loads does
not exceed 3.5mA.
Attention, hazardous through electric shock. Also with disconnection
of this unit from the mains, hazardous voltage still may be accessible
through supply from battery. The battery supply should be therefore
disconnected in the plus and minus pole of the battery when
maintenance or service work inside the UPS is necessary.
The mains socket outlet that supplies the UPS shall be installed near
the UPS and shall be easily accessible.
Place cables in such a way that no one can step on or trip over them.
Assure to connect the UPS and external battery pack with the earth
reliably
Do not block ventilation openings in the UPS´s housing. Ensure the
air vents on the front and rear of the UPS are not blocked. Allow at
2
EN
least 25cm of space on each side.
In case smoke is found coming out from the device, please cut off the
power supply quickly and contact the distributor.
An appropriate disconnect device as short-circuit backup protection
should be provided in the building wiring installation. Please see the
disconnect device specification in chapter 5.2
Do not keep or use this product in any of the following environments:
- Any area with combustible gas, corrosive substance, heavy dust,
standing water or running water.
- Any area with extraordinarily high or low temperature (above 40˚C
or below 0˚C) and humidity of more than 90%.
- Any area exposed to direct sunshine or near any heating
apparatus. (Maximum ambient temperature rating is 40°C.)
- Any area with serious vibrations.
- Outdoor.
In the event that there is fire occurring in the vicinity, please use
dry-power extinguishers. The use of liquid extinguishers may give rise
to the danger of electric shock.
1.1.1 Inspection of Unit
Inspect the UPS upon receiving. If the UPS is apparently damaged during the
shipment, please keep the box and packing material in original form for the
carrier and notify the carrier and dealer immediately.
1.1.2 Unpacking the Cabinet
To unpack the system:
1. Open the outer carton and remove the accessories packaged with the
cabinet.
2. Carefully lift the cabinet out of the outer carton and set it on a flat, stable
surface.
3. Discard or recycle the packaging in a responsible manner, or store it for
future use.
1.1.3 UPS Setup
All model series are designed for tower and rack purpose. They can be
installed into a 19 inches equipment rack. Please follow the instruction for
3
EN
Tower Setup and Rack-Mount Setup.
Tower setup
This series of UPS can be placed horizontally and vertically. As a tower
configuration, it is provided with the optional UPS stands to stabilize the UPS
when the UPS is positioned in vertical. The UPS stand must be attached to
the bottom of the tower. Use the following procedure to install UPS in UPS
stands.
1. Slide down the UPS vertically and put two UPS stands at the end of the
tower.
2. Place down the UPS into two stands carefully.
3. Pull out the LCD box and rotate it in a clockwise direction to 90 degree and
then push it back in the front panel.
Rack-mount setup
The series can be installed in 19 inches racks. Both the UPS and external
battery enclosure need 2U of rack space.
Use the following procedure to install UPS in a rack.
1. Align the mounting ears with screw holes on the side of the UPS, and
tighten the screw.
2. Assemble the rack rails with the rack-mounting.
3. Slide in the UPS into the rack rail and lock it in the Rack-mounting.
4. Tighten the screw, and then the load can be connected.
4
EN
1.1.4 EBM Installation (Optional)
Connecting the EBM in Tower form:
1. Slide down the UPS and EBM vertically and place two UPS stands with the
extend part at the end of the tower.
2. Tighten the screw on the metal sheet for stabilization
3. Connect the Earth line from UPS (port A ) to EBM (port B)
4. Take off the front panel, and connect the battery terminal (A) from UPS to
EBM terminal (B) shown as below. Users need to remove the small gate(C)
on side of the front panel to allow the outlet wire of the EBM to pass through
the gate and then reassemble front panel.
5
EN
Connecting the EBM in a rack form
1. Using the same method as assembling UPS in a rack form, assemble EBM
into the rack-mounting on the top or bottom of the UPS.
2. Connect the earth line from UPS (port A ) to EBM (port B )
3. Take off the LCD box, and unscrew the internal screws.
4. Take off the front panel, and connect the battery terminal (A) from UPS to
EBM terminal (B) shown as below. Users need to remove the small gate(C)
on side of the front panel to allow the outlet wire of the EBM to pass through
the gate and then reassemble front panel.
5. After installing the UPS into rack, the load can then be connected to UPS.
Please make sure the load equipment is turned off before plugging all loads
into the output receptacle
Connecting the Multiple EBMs
1000VA/1500VA/2000VA and 3000VA UPS include external battery port that
allows users to connect multiple EBM in order to provide additional backup
5
7
EN
time. Follow the procedure to install multiple EBM as below.
Connecting multiple EBMs in Tower form
1. Connect Earth line between UPS and the first EBM, and then connect Earth
Line between the first EBM and the second EBM.
2. Take off the front panel, and connect the battery terminal (A) from UPS to
EBM terminal (B) shown as below. And then connect the battery terminal
(D) from the first EBM to the battery terminal (E) from the second EBM.
Users need to remove the small gate(C) on side of the front panel to allow
the outlet wire of the EBM to pass through the gate and then reassemble
front panel.
Connecting the Multiple EBMs in rack form
1. Connect Earth line between UPS and the first EBM, and then connect
Earth Line between the first EBM and the second EBM.
2. Take off the front panel, and connect the battery terminal (A) from UPS to
EBM terminal (B) shown as below. And then connect the battery terminal
(D) from the first EBM to the battery terminal (E) from the second EBM.
Users need to remove the small gate(C) on side of the front panel to allow
the outlet wire of the EBM to pass through the gate and then reassemble
front panel.
8
EN
Note: Three or more EBMs can be connected to the UPS in the same way as
shown above.
Note: After connect the EBMs, please do not forget to set the number of
EBMs on LCD, please refer to chapter 7 “Setting by LCD module” for setting
method. If use the nonstandard EBMs, please call local dealer or distributor for
setting method.
1.2 Operation
Do not disconnect the mains cable on the UPS or the building wiring
socket (grounded shockproof socket) during operation as this would
remove the ground to the UPS and of all connected loads.
The UPS features its own, internal current source (batteries). You may be
electric shock when you touch the UPS output sockets or output terminal
block even if the UPS is not connected to the building wiring socket.
In order to fully disconnect the UPS, first press the OFF button to turn off
the UPS, then disconnect the mains lead.
Ensure that no liquid or other foreign objects can enter the UPS.
Do not remove the enclosure. This system is to be serviced by qualified
service personnel only.
Remove the protective panel only after disconnecting the terminal
connections.
9
EN
Use No. 12 AWG (for 3KS input wire), 90°C copper wire and 4.4 lb-in
Torque force when connecting to terminal block.
Use No. 10AWG (for all models battery wire), 90°C copper wire and
Anderson PP45 connectors for user’s external battery cabinet.
1.3 Maintenance, servicing and faults
The UPS operates with hazardous voltages. Repairs may be carried out
only by qualified maintenance personnel.
Caution - risk of electric shock. Even after the unit is disconnected from
the mains power supply (building wiring socket), components inside the
UPS are still connected to the battery which are potentially dangerous.
Before carrying out any kind of service and/or maintenance, disconnect
the batteries. Verify that no current is present and no hazardous voltage
exists in the capacitor or BUS capacitor terminals.
Batteries must be replaced only by qualified personnel.
Caution - risk of electric shock. The battery circuit is not isolated from the
input voltage. Hazardous voltages may occur between the battery
terminals and the ground. Verify that no voltage is present before
servicing!
Batteries have a high short-circuit current and pose a risk of shock. Take
all precautionary measures specified below and any other measures
necessary when working with batteries:
remove all jewellery, wristwatches, rings and other metal objects
use only tools with insulated grips and handles.
When changing batteries, replace with the same quantity and the same
type of batteries.
Do not attempt to dispose of batteries by burning them. It could cause
explosion.
Do not open or destroy batteries. Effluent electrolyte can cause injury to
the skin and eyes. It may be toxic.
Please replace the fuse only by a fuse of the same type and of the same
amperage in order to avoid fire hazards.
Do not dismantle the UPS, except the qualified maintenance personnel.
10
EN
1.3.1 UPS and Battery Care
For the best preventive maintenance, keep the area around the UPS clean
and dust-free. If the atmosphere is very dusty, clean the outside of the system
with a vacuum cleaner. For long battery life, keep the UPS at an ambient
temperature of 25°C (77°F)
1.3.2 Storing the UPS and Batteries
When the UPS is intended to store for a long period, recharge the battery
every 6 months by connecting the UPS to utility power. The batteries charge
to 90% capacity in approximately 4 hours. However, it is recommended that
the batteries charge for 48 hours after long-term storage.
1.3.3 Time to Replace Batteries
When the discharging time is less than 50% of specified after full charged, the
battery may need to be replaced. Please check the battery connection or
contact your local dealer to order new battery.
WARNING:
Turn off the UPS and disconnect the utility power cord from the wall outlet.
Servicing should be performed by qualified service personnel
knowledgeable of batteries and required precautions. Keep unauthorized
personnel away from batteries
Batteries can present a risk of electrical shock or burn from high short
circuit current. The following precautions should be observed:
1. Remove watches, rings, or other metal objects.
2. Use tools with insulated handles.
3. Do not lay tools or metal parts on top of batteries.
4. Wear rubber gloves and boots.
5. Disconnect the charging source prior to connecting or disconnecting
battery terminal.
When replacing batteries, replace with the same type and number of
batteries or battery packs. Contact your service representative to order new
batteries.
Do not dispose of battery in a fire. Batteries may explode when exposed to
flame.
Proper disposal of batteries is required. Refer to your local codes for
disposal requirements.
11
EN
Do not open or mutilate the battery. Released toxic electrolyte is harmful to
skin and eyes.
1.3.4 Replacing UPS Internal Batteries
Follow the steps and Charts as below to replace batteries:
1. Take off the LCD box, and remove the screws.
2. Slide and Pull the front panel leftward and then take it off.
3. Disconnect the cable from the UPS and battery pack.
4. Remove the right inner battery bracket.
5. Pull the battery pack out onto flat area.
6. Install new battery pack into UPS.
7. Screw up the battery bracket and reconnect the battery cable A and B
8. Re-install the front panel back to UPS.
Note: If you are not qualified service personnel to replace the battery, do
not attempt to open the battery cabin. Please call local dealer or
distributor immediately.
5
7
12
EN
1.3.5 Testing New Batteries
For a battery test, please check:
The batteries must be fully charged.
The UPS must be in Normal mode with no active alarms.
Dont take on/off the load.
To test batteries:
1. Connect the UPS to utility power for at least 48 hours to charge the
batteries.
2. Press and hold the “I” button 1 second to start the battery test on line mode
or HE mode. The status display string showsTEST
1.3.6 Recycling the Used Battery:
To recycle properly the used battery, please do not discard the UPS, battery
pack and batteries into the trash bin. Please follow your local laws and
regulations; you may contact your local recycling waste management center
for further information to dispose properly of the used UPS, battery pack, and
batteries.
1.4 Transport
Please transport the UPS only in the original packaging (to protect against
shock and impact).
1.5 Storage
The UPS must be stockpiled in the room where it is ventilated and dry.
Warning:
Never dispose the batteries in a fire. It may explode.
Do not open or mutilate the batteries. Released electrolyte is harmful to
the skins and eyes. It may be toxic. A battery can present a risk of
electrical shock and high short circuit current.
13
EN
1.6 Standards
* Safety
IEC/EN 62040-1
* EMI
Conducted Emission..........................:IEC/EN 62040-2 Category C1
Radiated Emission.............................:IEC/EN 62040-2 Category C1
Harmonic Current...............................:IEC/EN 61000-3-2
Voltage Fluctuation and Flicker..........:IEC/EN 61000-3-3
ESD...................................................:IEC/EN 61000-4-2 Level 3
RS.....................................................:IEC/EN 61000-4-3 Level 3
EFT....................................................:IEC/EN 61000-4-4 Level 4
SURGE.............................................:IEC/EN 61000-4-5 Level 4
CS……………………………………...:IEC/EN 61000-4-6 Level 3
MS……………………………………..: IEC/EN 61000-4-8 Level 3
Voltage Dips………………………….: IEC/EN 61000-4-11
Low Frequency Signals.....................:IEC/EN 61000-2-2
14
EN
2. Description of Commonly Used Symbols
Some or all of the following symbols may be used in this manual. It is
advisable to familiarize yourself with them and understand their meaning:
15
EN
3. Introduction
This On-Line-Series is an uninterruptible power supply incorporating
double-converter technology. It provides perfect protection specifically for
Novell, Windows NT and UNIX servers.
The double-converter principle eliminates all mains power disturbances. A
rectifier converts the alternating current from the socket outlet to direct
current. This direct current charges the batteries and powers the inverter. On
the basis of this DC voltage, the inverter generates a sinusoidal AC voltage,
which permanently supplies the loads.
Computers and periphery are thus powered entirely by the mains voltage. In
the event of power failure, the maintenance-free batteries power the
inverter.
This manual covers the UPS listed as follows. Please confirm whether it is
the model you intend to purchase by performing a visual inspection of the
Model No. on the rear panel of the UPS.
“S” Model: Extended backup time
Model No.
Type
Model No.
Type
1K
Standard
1KS
Extended backup
time
1.5K
1.5KS
2K
2KS
3K
3KS
16
EN
4. Panel Description
The Display Panel
Switch
Function
ON-Button
Turn on UPS system: By pressing the ON-Button “I” the UPS
system is turned on.
Deactivate acoustic alarm: By pressing this Button an acoustic
alarm can be deactivated in the battery mode. By short touch this
Button all acoustic alarms can be deactivated in all mode.
Do the battery test: By pressing this Button the UPS can do the
battery test in the Line mode or ECO mode or Converter mode.
OFF-Button
When mains power is normal, the UPS system switches to No
output or Bypass mode by pressing OFF-Button “
“, and the
inverter is off. At this moment, if Bypass is enabled, then the
output sockets are supplied with voltage via the bypass if the
mains power is available.
Deactivate acoustic alarm: By pressing this Button an acoustic
alarm can be deactivated in the bypass mode.
Release the UPS from fault mode and EPO status.
Select-Button The output voltage, frequency, Bypass disable/enable and
operating mode in No output or Bypass mode, Two Load
segments in output mode, The number of EBM in all mode, could
be selected by pressing Select-Button, and confirmed by
pressing Enter-Button.
Enter-Button
LC
D Screen
ON Button/
Alarm Silence
OFF-Button Select-Button Enter-Button
17
EN
The LCD Display
Display
Function
Display
Function
Input Information Output Information
It indicates input
voltage/frequency value,
which are displayed
alternately.
It indicates output
voltage/frequency value,
which are displayed
alternately.
It indicates the input is
connected with mains,
and the input power is
supplied from the mains.
It indicates the Output
plug.
It indicates the Number of
the input supplied from
the mains.
It indicates the Number of
the output connected with
load.
Battery Information Load Information
It i
ndicates the battery
capacity. E
very grid
represents the capacity of
20%.
It indicates the load level.
Every grid represents the
level of 20%.
Mode/Fault/Warning Information Else
It Indicates the operating
mode or Fault kind or
Warning kind, several
warning kinds at the same
time could be displayed
alternately.
It indicates the UPS is in
setting mode.
It indicates the UPS is in
Fault mode or has some
warnings.
18
EN
5. Connection and Operation
5.1 Inspection
Inspect the packaging carton and its contents for damage. Please inform the
transport agency immediately should you find signs of damage.
Please keep the packaging in a safe place for future use.
Note: Please ensure that the incoming feeder is isolated and secured to
prevent it from being switched back on again.
5.2 Connection
(1) UPS Input Connection
If the UPS is connected via the power cord, please use a proper socket with
protection against electric current, the user can refer to below table. If the
UPS is connected via wires, it is recommended to select the 2.5mm
2
wire,
and the GND terminal should be grounded first.
The UPS System has no input breaker on the standard cabinet. When
installing the UPS, the user needs to connect the external breakers and
protective components in the input terminals. It is recommended to select
the NFB(Non-Fuse Breaker) instead of the traditional combination kit
including breaker and fuse.
When selecting the NFB, the user can refer to below table.
Model No.
UPS INPUT NFB & Power Cord & Socket
VOLTAGE CURRENT
1K(S) 300Vac 10A
1.5K(S)
300Vac
12A
2K(S)
300Vac
16A
3K(S)
300Vac
20A
The system may be installed and wired only by qualified electricians in
accordance with applicable safety regulations!
When installing the electrical wiring, please note the nominal
amperage of your incoming feeder.
19
  • Page 1 1
  • Page 2 2
  • Page 3 3
  • Page 4 4
  • Page 5 5
  • Page 6 6
  • Page 7 7
  • Page 8 8
  • Page 9 9
  • Page 10 10
  • Page 11 11
  • Page 12 12
  • Page 13 13
  • Page 14 14
  • Page 15 15
  • Page 16 16
  • Page 17 17
  • Page 18 18
  • Page 19 19
  • Page 20 20
  • Page 21 21
  • Page 22 22
  • Page 23 23
  • Page 24 24
  • Page 25 25
  • Page 26 26
  • Page 27 27
  • Page 28 28
  • Page 29 29
  • Page 30 30
  • Page 31 31
  • Page 32 32
  • Page 33 33
  • Page 34 34
  • Page 35 35
  • Page 36 36
  • Page 37 37
  • Page 38 38
  • Page 39 39
  • Page 40 40
  • Page 41 41
  • Page 42 42
  • Page 43 43
  • Page 44 44
  • Page 45 45
  • Page 46 46
  • Page 47 47
  • Page 48 48
  • Page 49 49
  • Page 50 50
  • Page 51 51
  • Page 52 52
  • Page 53 53
  • Page 54 54
  • Page 55 55
  • Page 56 56
  • Page 57 57
  • Page 58 58
  • Page 59 59
  • Page 60 60
  • Page 61 61
  • Page 62 62
  • Page 63 63
  • Page 64 64
  • Page 65 65
  • Page 66 66
  • Page 67 67
  • Page 68 68
  • Page 69 69
  • Page 70 70
  • Page 71 71
  • Page 72 72
  • Page 73 73
  • Page 74 74
  • Page 75 75
  • Page 76 76
  • Page 77 77
  • Page 78 78
  • Page 79 79
  • Page 80 80
  • Page 81 81
  • Page 82 82
  • Page 83 83
  • Page 84 84
  • Page 85 85
  • Page 86 86
  • Page 87 87
  • Page 88 88
  • Page 89 89
  • Page 90 90
  • Page 91 91
  • Page 92 92
  • Page 93 93
  • Page 94 94
  • Page 95 95
  • Page 96 96
  • Page 97 97
  • Page 98 98
  • Page 99 99
  • Page 100 100
  • Page 101 101
  • Page 102 102
  • Page 103 103
  • Page 104 104
  • Page 105 105
  • Page 106 106
  • Page 107 107
  • Page 108 108
  • Page 109 109
  • Page 110 110
  • Page 111 111
  • Page 112 112
  • Page 113 113
  • Page 114 114
  • Page 115 115
  • Page 116 116
  • Page 117 117
  • Page 118 118
  • Page 119 119
  • Page 120 120
  • Page 121 121
  • Page 122 122
  • Page 123 123
  • Page 124 124
  • Page 125 125
  • Page 126 126
  • Page 127 127
  • Page 128 128
  • Page 129 129
  • Page 130 130
  • Page 131 131
  • Page 132 132
  • Page 133 133
  • Page 134 134
  • Page 135 135
  • Page 136 136
  • Page 137 137
  • Page 138 138
  • Page 139 139
  • Page 140 140
  • Page 141 141
  • Page 142 142
  • Page 143 143
  • Page 144 144
  • Page 145 145
  • Page 146 146
  • Page 147 147
  • Page 148 148
  • Page 149 149
  • Page 150 150
  • Page 151 151
  • Page 152 152
  • Page 153 153
  • Page 154 154
  • Page 155 155
  • Page 156 156
  • Page 157 157
  • Page 158 158
  • Page 159 159
  • Page 160 160
  • Page 161 161
  • Page 162 162
  • Page 163 163
  • Page 164 164
  • Page 165 165
  • Page 166 166
  • Page 167 167
  • Page 168 168
  • Page 169 169
  • Page 170 170
  • Page 171 171
  • Page 172 172
  • Page 173 173
  • Page 174 174
  • Page 175 175
  • Page 176 176
  • Page 177 177
  • Page 178 178
  • Page 179 179
  • Page 180 180
  • Page 181 181
  • Page 182 182
  • Page 183 183
  • Page 184 184
  • Page 185 185
  • Page 186 186
  • Page 187 187
  • Page 188 188
  • Page 189 189

Ask a question and I''ll find the answer in the document

Finding information in a document is now easier with AI