Page is loading ...

Green Wave Fusion Professional-Grade
Backwashing Filter
For Iron, Sulfur and Manganese
Visit us online at
www.uswatersystems.com
REVISION # 1.1
REVISION DATE May 4, 2015
US Water Systems Corporate Office
1209 Country Club Road
Indianapolis, IN 46234
1-800-608-8792
info@uswatersystems.com
Owners Manual
Models:
385-GWFS-1000, 385-GWFS-1500, 385-GWFS-2000

2
Table of Contents
Unpacking/Inspection……………………………………………………………...2
Safety Guide………………………………………………………………………..2
Proper Installation………………………………………………………………….3
Component Introductions…………………………………………………………3
Overhead Installation Drawing…………………………………………………...6
Importance of Contaminant Removal Prior to the GreenWave Tank………..9
Fusion Superfilter Installation Instructions and Specifications…..………….10
Superfilter Tank and Control Valve Preparation……………………………...10
20 Micron Sediment Filter Installation Instructions..….……………………...12
Superfilter Katalox Tank Installation Instructions..………………..…...……..16
5 Micron Sediment Filter Installation Instructions……………………..……...18
GreenWave Tank Installation Instructions……………………………………..22
US Water UV Light Installation Instructions…………………………..………..23-24
1 Micron Sediment Filter Installation Instructions…………………………….26
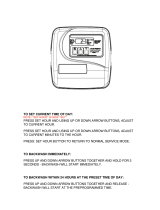
Control Valve Keypad Functions and Backwash Initiation…...………......…30
Control Valve Programming……………………………………………..…...…31
System Start-up Instructions…………………………………………………....32
GreenWave Tank Startup Instructions…………………………………………33
What To Expect and Routine Maintenance……………………………...........34
Boil Test…………………………………………………………………………...35
Maintenance Schedule…………………………………………………….........36
Limited Lifetime Warranty………………………………………………..………37
Safety Guide
Be sure to check the entire system for any shipping damage or parts loss. Also note damage to the shipping
cartons. Contact US Water Systems at 1-800-608-8792 to report any shipping damage within 24 hours of de-
livery. Claims made after 24 hours may not be honored.
Small parts, needed to install the system, are in a parts bags. To avoid loss of the small parts, keep them in the
parts bag until you are ready to use them.
Unpacking / Inspection
Check and comply with your provincial / state and
local codes. You must follow these guidelines.
Use care when handling the water treatment sys-
tem. Do not turn upside down, drop, drag or set on
sharp protrusions.
The carbon Superfilter system works on 12 volt-60
Hz electrical power only. Be sure to use only the
included transformer.
Transformer must be plugged into an indoor 120
volt, grounded outlet only.
WARNING: This system is equipped with a UV
light to remove biological contaminants. Although
this treatment system is in place, US Water Sys-
tems recommends that bacteria levels be checked
periodically to ensure the UV light system is operat-
ing properly. Coliform and E.coli most importantly.
Installation, Operation and Maintenance Manual
385-GWFS-1000, 385-GWFS-1500, 385-GWFS-2000

3
Proper Installation
This water treatment system must be properly installed and located in accordance with the
Installation Instructions before it is used or the warranty will be void.
Do not install or store where it will be
exposed to temperatures below freezing or
exposed to any type of weather. Water
freezing in the system will break it. Do not
attempt to treat water over 100°F.
Do not install in direct sunlight. Exces-
sive sun or heat may cause distortion or
other damage to non-metallic parts.
Properly ground to conform with all govern-
ing codes and ordinances.
Use only lead-free solder and flux for all
sweat-solder connections, as required by
state and federal codes.
Maximum allowable inlet water pressure is
125 psi. If daytime pressure is over 80 psi,
night time pressure may exceed the maxi-
mum. Use a pressure reducing valve to re-
duce the pressure.
WARNING: Discard all unused parts and
packaging material after installation. Small
parts remaining after the installation could
be a choke hazard.
The Fusion Superfilter system provides iron, sulfur and manganese removal throughout the
home. The Fusion Superfilter system should be installed at the point of entry to treat your
entire home, both hot and cold water.
The Fusion Superfilter system backwashing tank removes iron, sulfur and manganese using
oxidation. When water is used in the home, the Fusion Superfilter will remove the
contaminants by splitting the ions in the water. The Katalox Light media in the Fusion Carbon
Superfilter system tank provides filtration when the system is in service to collect contaminants
oxidized during the ion splitting process. These contaminants are backwashed from the media
surface when the system regenerates.
Fusion Superfilter Benefits
Iron, Manganese & Sulfur Removal
Virtually maintenance free.
Improves the efficiency of water-using appliances
Simple installation
Safe for landscaping and lawn watering.
Compatible with all on-site and community wastewater treatment systems
Fusion Superfilter System Introduction
Installation, Operation and Maintenance Manual
385-GWFS-1000, 385-GWFS-1500, 385-GWFS-2000

4
The GreenWave Fusion system provides protection from scale formation throughout the home.
The GreenWave system should be installed after the Fusion Superfilter system to treat your
entire home, both hot and cold water, or it can be located directly before a water heater or
other device (e.g. sauna, etc) that requires protection from hard water.
The GreenWave Fusion reduces or eliminates scale formation on internal and external
plumbing surfaces as well as reducing spotting and streaking normally associated with hard
water.
The GreenWave Fusion prevents scale by transforming the normal dissolved hardness
minerals into undissolved crystal micro-particles. These crystals stay suspended in the water
and dramatically reduce the scaling potential of hardness minerals. Therefore the problem of
internal buildup of scale in pipes, water heaters, water fixtures and glass is greatly reduced.
The GreenWave Fusion is not a water softener – Low or phosphate-free cleaning products are
recommended to achieve optimum results. Modern surfactant or detergent based, liquid soaps
are preferred over old-fashioned fashioned caustic solid soaps.
Unlike softened water, the GreenWave Fusion treated water maintains the beneficial essential
mineral content of your water and is safe to drink.
GreenWave Tank Benefits
Chemical Free Scale Prevention. Cost savings and environmental benefits
Virtually Maintenance Free. No salt bags or other chemicals to buy, transport and store
Beneficial minerals retained for more healthful drinking water
Improves the efficiency of water-using appliances
Simple installation – no electrical and drain hookup
Safe for landscaping and lawn watering. No need for costly plumbing bypasses
Compatible with all on-site and community wastewater treatment systems
Not subject to water softener restrictions and "bans"
GreenWave Tank Introduction
Installation, Operation and Maintenance Manual
385-GWFS-1000, 385-GWFS-1500, 385-GWFS-2000

5
US Water UV Light Introduction
Installation, Operation and Maintenance Manual
385-GWFS-1000, 385-GWFS-1500, 385-GWFS-2000
This point-of-use system allows for simple installation and operation due to its high output
lamp and compact reactor. The reactor is an axial flow design with superior hydraulics, com-
pact design and 1” NPT connections. The controller is a simple plug in device connecting to
the lamp with a safety cap.
Water Quality Guidelines
Iron < 0.3 ppm (0.3 mg/L)
Hardness < 7 gpg (120 mg/L)
Turbidity < 1 NTU
Manganese < 0.05 ppm (0.05 mg/L)
Tannins < 0.1 ppm (0.1 mg/L)
UV Transmittance > 85%
The UV light system uses ultraviolet let to kill bacteria and other organics in the water source.
The light from the UV bulb passes through the water and destroys the organic contaminants.
The UV bulb is utilizes a quartz sleeve on the outer portion to isolate the water from the UV
bulb element.
WARNING!
If this quartz sleeve becomes coated or stained it will reduce the light that can pass
through the water in the chamber, thus inhibiting the bacteria removal by the UV light.
It is crucial that the iron, manganese and any tannins in the water are removed prior to
the UV to ensure the light is penetrating the quartz sleeve and its’ full intensity.

6
US Water UV Light Introduction
Installation, Operation and Maintenance Manual
385-GWFS-1000, 385-GWFS-1500, 385-GWFS-2000
Operation
The US Water Systems UV comes with a feature laden controller that incorporates both the lamp driver
(ballast) and control features in one water-tight case. CAUTION: Prior to performing any
maintenance on your UV system, you must always disconnect the power.
USWATER 5.0 & USWATER 6.0 Controller
This controller features a power factor corrected, constant current lamp
driver with a universal power input. A full color LCD screen provides
the user with a detailed description of the system's performance in
addition to providing any applicable fault messages and system
diagnostics. The controllers used in both the USWATER5.0 and USWATER6.0
are identical. The difference is that the USWATER 6.0 series of products
includes a UV intensity monitor. All USWATER 5.0 and USWATER 6.0 controllers
include an "infinite expandability port" located on the right side of the
controller. Simply plug in an optional UV sensor module into the
expandability port of a USWATER 5.0 controller and the system will now
monitor the UV intensity of the system!

7
US Water UV Light Introduction
USWATER 5.0 & USWATER 6.0 Power-up Sequence
Upon start up, the 5.0 & 6.0 controller will run through a diagnostic start-up and the sequence will
be displayed as follows on the color LCD:
Next, the controller checks for the installation of any optional modules that may be installed on the
system. It first checks to see if a module is installed and then either initializes the module to
function with the controller or returns a "not detected" screen and moves on to the next module.
The screens will appear as follows:
UV Sensor
Module Check
Solenoid
Module Check
4-20 mA
Module Check

8
US Water UV Light Introduction
Ethernet
Module Check
Remote Alarm
Module Check
Once the controller has finished checking for the installation of all available modules a single screen is dis-
played showing which specific modules are installed and activated on this particular system. Please Note:
If the corresponding module icon is not displayed on this screen, then that module is not installed on this
system. If you believe this module is installed correctly, recheck the applicable connections to ensure a
solid connection point and then restart the controller. The controller then continues to optimize the lamp
efficiency by waiting 60 seconds to allow the lamp to reach its optimum output. Finally, a final "start-up
complete" screen is displayed. These screens will appear as follows:
USWATER 5.0 Operational Screens
On USWATER5.0 systems (without the UV monitor), the default screen shows the US Water Systems Home
Screen. At any poi nt d ur ing o perat ion t he u ser is abl e to s cro ll th rou gh t he US Water Systems
Home Screen, Lamp life remaining and QR Code/Contact Info screens by simply pressing the button
located on the front of the controller.

9
US Water UV Light Introduction
USWATER 6.0 Operational Screens
On systems that have the UV module installed (and on all USWATER6.0 systems), the default screen
shows the % UV Intensity. At any point during operation the user is able to scroll through the % UV
Intensity, Lamp life remaining and QR Code s c reens b y si m p l y pr es si n g t h e bu tt o n l o cat ed
on the
front of the controller.
USWATER 6.0 % UV Intensity
If your system is equipped with a UV sensor the % UV Output screens will indicate the level of UV intensi-
ty that is being detected within the reactor by the sensor. This will always be visible on the Home Screen
of the controller. Things that can affect the % UV Output are poor water quality, scaling of the quartz
sleeve and/or sensor, lamp failure, expired lamp life and sensor failure. The following screens show the
% UV Output dropping on a monitored system.

10
US Water UV Light Introduction
Once the UV output drops below 56%, the numbers and warning sign switch to red and a 15 second intermit-
tent audible chirp is given off by the ballast. When the output drops below 51%, the display switches to a
solid red and a constant audible signal is provided. The screens alternate between this solid red
screen and another screen indicating "water may be unsafe for consumption". At this point, the controller
also provides a signal to de-activate the solenoid valve, shutting off the flow of water if a solenoid valve is
installed on the system.
USWATER5.0 & USWATER6.0 Lamp Countdown Sequence
The USWATER5.0 & USWATER6.0 counts down the number of days until a lamp change is required. The
operation is as follows:
Once the lamp has seven days remaining until a lamp change is required, the screen changes to a yellow
caution screen. At this point, an audible chirp is given off by the ballast to draw your attention to the
pending lamp change condition. When the controller passes the zero day threshold, the screen chang-
es to solid red and cycles between a red "lamp expired" screen and a "water may be unsafe for consump-
tion" screen. The same intermittent audible chirp is heard throughout this lamp expired sequence.
At any point during this sequence, the audible chirp can be deferred by holding the controller button
down for a period of five seconds. The screen shown below will appear for five seconds indicating that
the audible deferral has been activated and then the system switches back to the cur-
rent lamp change or lamp expired screen. This audible deferral will last for seven
days after which then the alarm will sound once again. This audible deferral feature can
be activated as many times as you wish. PLEASE NOTE: During the condition of lamp
expiration and audible deferral, the water may be unsafe for consumption and should
not be consumed without another form of disinfection.

11
US Water UV Light Introduction
USWATER5.0 & USWATER6.0 Lamp Countdown Reset Sequence
After changing the lamp on the USWATER5.0 & USWATER.0 systems, the controller must be reset in
order for the system to begin its countdown function on the newly installed lamp. To perform this
reset, you must firmly depress the button on the front of the controller and then manually plug the
power cord back into the wall outlet initiating power to the unit. Keep holding down the button for five sec-
onds until you hear an audible chirp indicating the controller has reset the internal timer.
Release the switch and the lamp countdown feature has now been reset. The following two screens will be
displayed during this process.
USWATER5.0 & USWATER6.0 Failure Modes
The US Water Systems controller continuously monitors your UV system and if there is a problem with the
system the controller will provide both a visual and audible signal indicating the specific fault that may be
adversely affecting the operation of your system. The fault conditions are listed in a priority sequence as
follows:
LAMP FAILURE: If at any tim e d uri ng t he op er atio n o f t he
system, the UV lamp fails to be illuminated, the controller will
return both an audible and visual signal indicating lamp failure. In
addition, a constant audible buzzer will sound during lamp failure.
UV SENSOR FAILURE: Assuming the system has a UV Sensor
installed, if at any time during the operation of the system, a UV
sensor fails, the controller will return both an audible and visual
signal indicating sensor failure. For sensor failure, the controller
will cycle between "sensor failure" and "water may be unsafe for con-
sumption" screens as an added precaution. In addition, a con-
stant audible buzzer will sound during sensor failure.

12
US Water UV Light Introduction
SOLENOID MODULE FAILURE: Assuming the system has an o p t io n al So le-
noid Module installed, if at any time during the operation of the system, a
solenoid valve fails to operate, the controller will return both an audible and
visual signal indicating solenoid failure. In addition, an intermittent (15 sec)
audible buzzer will sound during solenoid failure.
4-20 mA MODULE FAILURE: Assuming the system has an opt io n al 4-20 mA
Module installed, if at any time during the operation of the system, a 4-20
mA module fails, the controller will return both an audible and visual signal
indicating a 4-20 mA failure. In addition, an intermittent (15 sec) audible
buzzer will sound during a 4-20 mA failure.
REMOTE ALARM MODULE FAILURE: Assuming the system has an op-
tional Remote Alarm Module installed, if at any time during the operation of
the system, a remote alarm module fails, the controller will return both an
audible and visual signal indicating remote alarm failure. In addition, an in-
termittent (15 sec) audible buzzer will sound during remote alarm failure.
ETHERNET MODULE FAILURE: Assuming the system has an optional Ethernet
Alarm Module installed, if at any time during the operation of the system, an
Ethernet module fails, the controller will return both an audible and visual
signal indicating Ethernet failure. In addition, an intermittent (15 sec) audi-
ble buzzer will sound during Ethernet failure.
USWATER 5.0 & USWATER 6.0 QR Codes
A QR code (abbreviated from Quick Response code) is a type of matrix barcode (or two-dimensional
code) first designed for the automotive industry. US Water Systems uses the QR code to store a link to a
specific page on our website. Users with a camera phone equipped with the correct reader application
can scan the image of the QR code and over a wireless network connect to a US Water Systems web page
in the phone's browser. US Water Systems' QR webpage has information on how to purchase replacement
components as well as a helpful video directory on system servicing
(i.e. How to change a UV lamp or quartz sleeve). To access the QR code on the USWATER5.0 or
USWATER6.0 controller simply press the control button twice and the QR code screen will appear as
follows:

13
Installed System Overhead View
Installation, Operation and Maintenance Manual
385-GWFS-1000, 385-GWFS-1500, 385-GWFS-2000

14
Installed System Overhead View
Installation, Operation and Maintenance Manual
385-GWFS-1000, 385-GWFS-1500, 385-GWFS-2000
US WATER UV

15
Installed System Overhead View
Installation, Operation and Maintenance Manual
385-GWFS-1000, 385-GWFS-1500, 385-GWFS-2000

16
The Importance of Contaminant Removal Prior to the GreenWave Tank
Iron and Manganese
Just as with conventional water softening media, the GreenWave media needs to be protected
from excess levels of certain metals that can easily coat the active surface, reducing its
effectiveness over time. Public water supplies rarely, present a problem, but if the water supply is
from a private well confirm that the levels of iron (Fe) and manganese (Mn) are less than 0.3 mg/L
and 0.05 mg/L respectively. Copper should be less than 1.3 mg/L.
Copper
Copper usually originates from new copper plumbing upstream of the GreenWave Fusion system.
If this condition exists, we recommend waiting 3-4 weeks before placing the system in operation.
This will allow the copper surfaces to be fully flushed and develop a natural protective surface. To
further minimize any problem with excess copper the installers should be advised to avoid applying
excess flux on the inner surfaces of the pipe and to use a low-corrosivity water soluble flux listed
under the ASTM 8813 standard. Once the plumbing connections are complete, place the
GreenWave Fusion system in bypass prior to following the startup procedure and flush the
plumbing for at least 10 minutes.
Cautions!
Do not let the system freeze. Damage to the tank and pre-filter may result.
The system must be operated in a vertical position. Do not lay it down during operation. The
system may be placed in any position for shipping and installation but must be operated in the
vertical position.
Place the system on a smooth, level surface. Because the system operates in an UP-Flow,
fluidized bed mode, having a level surface is more important than with a softener or media filter.
A bypass valve should be installed on every system to facilitate installation and service
(supplied).
Observe all local plumbing and building codes when installing the system.
Notes to the Installer
The GreenWave Fusion system differs from a conventional softener or media filter in a number of
key respects.
The system is light and only partially filled with media. This is normal. The UP-flow operation of
the system requires a large area of freeboard in the tank to allow the bed to fully fluidize.
The GreenWave tank has no under-bed so you can tip the system over without any fear of
upsetting the media. This makes transportation and installation much easier than conventional
systems. The Fusion Superfilter does have under-bedding and should not be moved once
filled.
Because the GreenWave Fusion system operates in the UP-Flow mode (GW Tank), the tank
connections are opposite of what a normal softener will use.
Please see the "important note about iron, manganese and copper" above.
Installation, Operation and Maintenance Manual
385-GWFS-1000, 385-GWFS-1500, 385-GWFS-2000

17
WATER PRESSURE: A minimum of 20 pounds of water pressure is required for re-
generation valve to operate effectively.
ELECTRICAL FACILITIES: An uninterrupted alternating current (A/C) supply is
required. Note: Other voltages are available. Please make sure your voltage supply is
compatible with your unit before installation.
EXISTING PLUMBING: Condition of existing plumbing should be free from lime
and iron buildup. Piping that is built up heavily with lime and/or iron should be replaced.
LOCATION OF FUSION SUPERFILTER TANK AND DRAIN: The Fusion Superfilter
tank should be located close to a drain to prevent air breaks and back flow.
BY-PASS VALVES: Always provide for the installation of a by-pass valve if unit is not
equipped with one. The Fusion Superfilter is equipped with a bypass valve.
CAUTION: Water pressure is not to exceed 80 psi, water temperature is not to exceed
110°F (43°C), and the unit cannot be subjected to freezing conditions or direct sunlight.
1. Use a piece of duct tape to cover the top of the distributor tube in the tank. Be sure the
distributor tube is centered in the tank. The distributor tube should be flush with the top
of the tank or no more than 1/4” below flush. Install the supplied funnel and pour the
gravel in the tank first. Each system will ship with gravel and Catalytic Carbon media.
Pour the gravel in the tank first then pour in all the Katalox Light media that was
shipped in the tank last. US Water does not ship “extra” media. Fill the Katalox tank
with water and allow it to soak for at least 1 hour while the other components are in-
stalled. This will reduce the backwash/ rinse time needed to flush out the Katalox fines
during the startup procedure. Katalox must be flushed until the pH of the water is be-
low 8.8 S.U. This is done during the startup procedure.
Fusion Superfilter Installation Instructions and Specifications
Superfilter Tank and Control Valve Preparation
Installation, Operation and Maintenance Manual
385-GWFS-1000, 385-GWFS-1500, 385-GWFS-2000

18
2. Lubricate the distributor O-ring and the tank O-ring. Then install the upper basket (may
look different than the pictures below) on the bottom of the valve by lining up the tabs then
turning the basket clockwise to lock it in place. Place the upper basket over the distributor
tube and push the valve on the tank. Thread the valve on the tank by turning it clockwise.
Be sure not to cross-thread the valve on the tank. Tighten the valve hand tight, then snug it
further by tapping it with the palm of the hand. DO NOT use tools to tighten the valve or
damage could occur. Move the carbon unit to the side and start the injection panel installa-
tion
Superfilter Tank and Control Valve Preparation
Installation, Operation and Maintenance Manual
385-GWFS-1000, 385-GWFS-1500, 385-GWFS-2000

19
1. Install the 20 Micron sediment filter after the well pressure tank. The sediment filter is
marked “IN” and “OUT” on the top of the housing.
2. Mount the housing to the bracket using the supplied screws.
20 Micron Sediment Filter Installation Instructions
Installation, Operation and Maintenance Manual
385-GWFS-1000, 385-GWFS-1500, 385-GWFS-2000

20
3. Now mount the filter housing to the wall using the appropriate fasteners for your wall materi-
al. It is preferred that this is mounted on a secured board or wall stud as it will be heavy
when full of water.
4. The outlet plumbing from the well pressure tank will connect to the “IN” port on the filter
housing. The outlet plumbing from the sediment filter housing will be connected to the Fu-
sion Superfilter inlet.
Sediment Filter Installation Instructions
Installation, Operation and Maintenance Manual
385-GWFS-1000, 385-GWFS-1500, 385-GWFS-2000
/