3
Identifying printers ...........................................................................................................................................6
Understanding the printer operator panel ........................................................................................................ 9
Windows ........................................................................................................................................................ 11
Macintosh ...................................................................................................................................................... 15
UNIX/Linux ..................................................................................................................................................... 16
Printing a network setup page ....................................................................................................................... 17
Assigning a printer IP address ....................................................................................................................... 17
Verifying the IP settings ................................................................................................................................. 18
Windows ........................................................................................................................................................ 18
Macintosh ...................................................................................................................................................... 22
UNIX/Linux ..................................................................................................................................................... 24
NetWare ......................................................................................................................................................... 24
Installing input options ................................................................................................................................... 25
Installing a duplex unit ................................................................................................................................... 27
Installing memory or option cards .................................................................................................................. 28
Accessing the printer system board ............................................................................................................... 28
Installing or removing a memory card ............................................................................................................ 30
Installing or removing a flash memory or firmware card ................................................................................ 32
Installing an option card ................................................................................................................................. 34
Replacing the shield ...................................................................................................................................... 35
Sending a job to print ..................................................................................................................................... 36
Printing from a USB flash memory device ..................................................................................................... 36
Canceling a print job ...................................................................................................................................... 38
Printing the menu settings page .................................................................................................................... 39
Printing a network setup page ....................................................................................................................... 39
Printing a font sample list ............................................................................................................................... 40
Printing a directory list ................................................................................................................................... 40
Printing confidential and held jobs ................................................................................................................. 40
Printing on specialty media ............................................................................................................................ 43
Loading standard trays and optional trays ..................................................................................................... 44
Downloaded From ManualsPrinter.com Manuals
Learning about the printer
6
Identifying printers
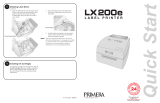
Use the following table to determine the features and options of your Lexmark™ T640, T642, or T644 printer.
The illustrations aid you in determining the installation location of options attached to the printer. For more information
about installing input options, see or the instructions that came with the option.
Models
The printer is available in three base models The following table indicates some of the differences between the models.
Do not set up this product or make any electrical or cabling connections, such as the power cord or
telephone, during a lightning storm.
Input capacity 250 sheets 500 sheets 500 sheets
Output capacity 250 sheets 500 sheets 500 sheets
Standard memory, non network/network 64MB/64MB 64MB/128MB 128MB/128MB
Maximum memory capacity, non network/network 576MB/576MB 576MB/640MB 640MB/640MB
Option card connectors 1 2 2
Downloaded From ManualsPrinter.com Manuals
Installing drivers for local printing
11
2
Installing drivers for local printing
A local printer is a printer attached to the computer using a USB or parallel cable. The local printer is intended to be used by
the computer to which it is attached. If attaching a local printer, you must install the printer driver on the computer before
setting up the printer.
The printer driver is software that lets the computer communicate with the printer.
The procedure to install drivers depends on the operating system used. Use the following table to find driver installation
instructions for the particular operating system. For additional help, see the documentation that shipped with the computer
and your software.
Windows
Some Windows operating systems may already include a printer driver that is compatible with the printer.
Note: Installing a custom driver will not replace the system driver. A separate printer object will be created
and appear in the Printers folder.
Use the drivers CD that shipped with the printer to install the custom printer driver and obtain enhanced printer features and
functionality.
Drivers are also available in downloadable software packages on the Lexmark Web site at www.lexmark.com.
Using Windows Server 2003, Windows 2000, Windows XP, Windows 98 SE,
Windows Me, or Windows NT
Note: Install the printer software before connecting the USB cable.
1 Insert the drivers CD.
If the CD does not launch automatically, click Start Æ Run, and type D:\Setup.exe in the Run dialog (where D is
the letter of the CD-ROM drive).
Note: USB support is not available for Windows NT operating systems. To use a Windows NT operating
system, you must have an optional Parallel 1284-B Interface Card installed and use a parallel cable.
Operating system Go to page
Windows 11
Windows Server 2003, Windows 2000, Windows XP, Windows 98 SE, Windows Me,
Windows NT 4.x
11
Windows 95 and Windows 98 (first edition) 12
Serial printing 12
Macintosh 15
UNIX/Linux 16
Downloaded From ManualsPrinter.com Manuals
Installing drivers for network printing
17
3
Installing drivers for network printing
Printing a network setup page
If the printer is attached to a network, print a network setup page on the printer to verify the network connection. This page
also provides important information to configure the printer for network printing.
1 Make sure the printer is on.
2 Press on the operator panel.
3 Press until Reports appears, and then press .
4 Press until Network Setup Page appears, and then press .
Note: If an optional MarkNet™ N8000 series internal print server is installed, Print Net1 Setup appears
on the display.
5 Check the first section on the network setup page, and confirm that Status is “Connected.”
If Status is “Not Connected,” the LAN drop may not be active, or the network cable may be malfunctioning. Consult
a system support person for a solution, and print another network setup page to verify the printer is connected to
the network.
Assigning a printer IP address
If the network is using DHCP, an IP address is automatically assigned connecting the network cable to the printer.
1 Look for the address under the “TCP/IP” heading on the network setup page printed in Printing a network setup
page.
2 Go to Verifying the IP settings, and begin with step 2.
If the network is not using DHCP, then manually assign an IP address to the printer. One of the easiest ways is to use the
operator panel:
1 Press on the operator panel.
2 Press until Network/Ports appears, and then press .
3 Press until TCP/IP appears, and then press .
Standard Network appears if the printer has a network port on the printer system board. If a MarkNet N8000
series internal print server is installed, you see Network Option 1.
4 Press until Address appears, and then press .
5 Using the numeric pad, enter the IP address. When the address is entered, press .
Submitting Selection appears briefly.
6 Press until Netmask appears, and then press .
7 Using the numeric pad, enter the IP netmask. When the address is entered, press .
Submitting Selection appears briefly.
8 Press until Gateway appears, and then press .
Downloaded From ManualsPrinter.com Manuals
Installing and removing options
25
4
Installing and removing options
Installing input options
Order of installation
Floor-mounted configurations require additional furniture. You must use either a printer stand or printer base if you are
using a 2000-sheet drawer, a duplex unit and an input option, or more than one input option. If you purchased an MFP that
scans, copies, and faxes, you may need additional furniture. More information is available on our Lexmark Web site at
www.lexmark.com/multifunctionprinters.
Install the printer and any options you have purchased in the following order:
CAUTION: If you are installing options after setting up the printer, turn the printer off and unplug the power cord
before continuing.
Printer stand or printer base
2000-sheet drawer
250-sheet or 500-sheet drawer
Duplex unit
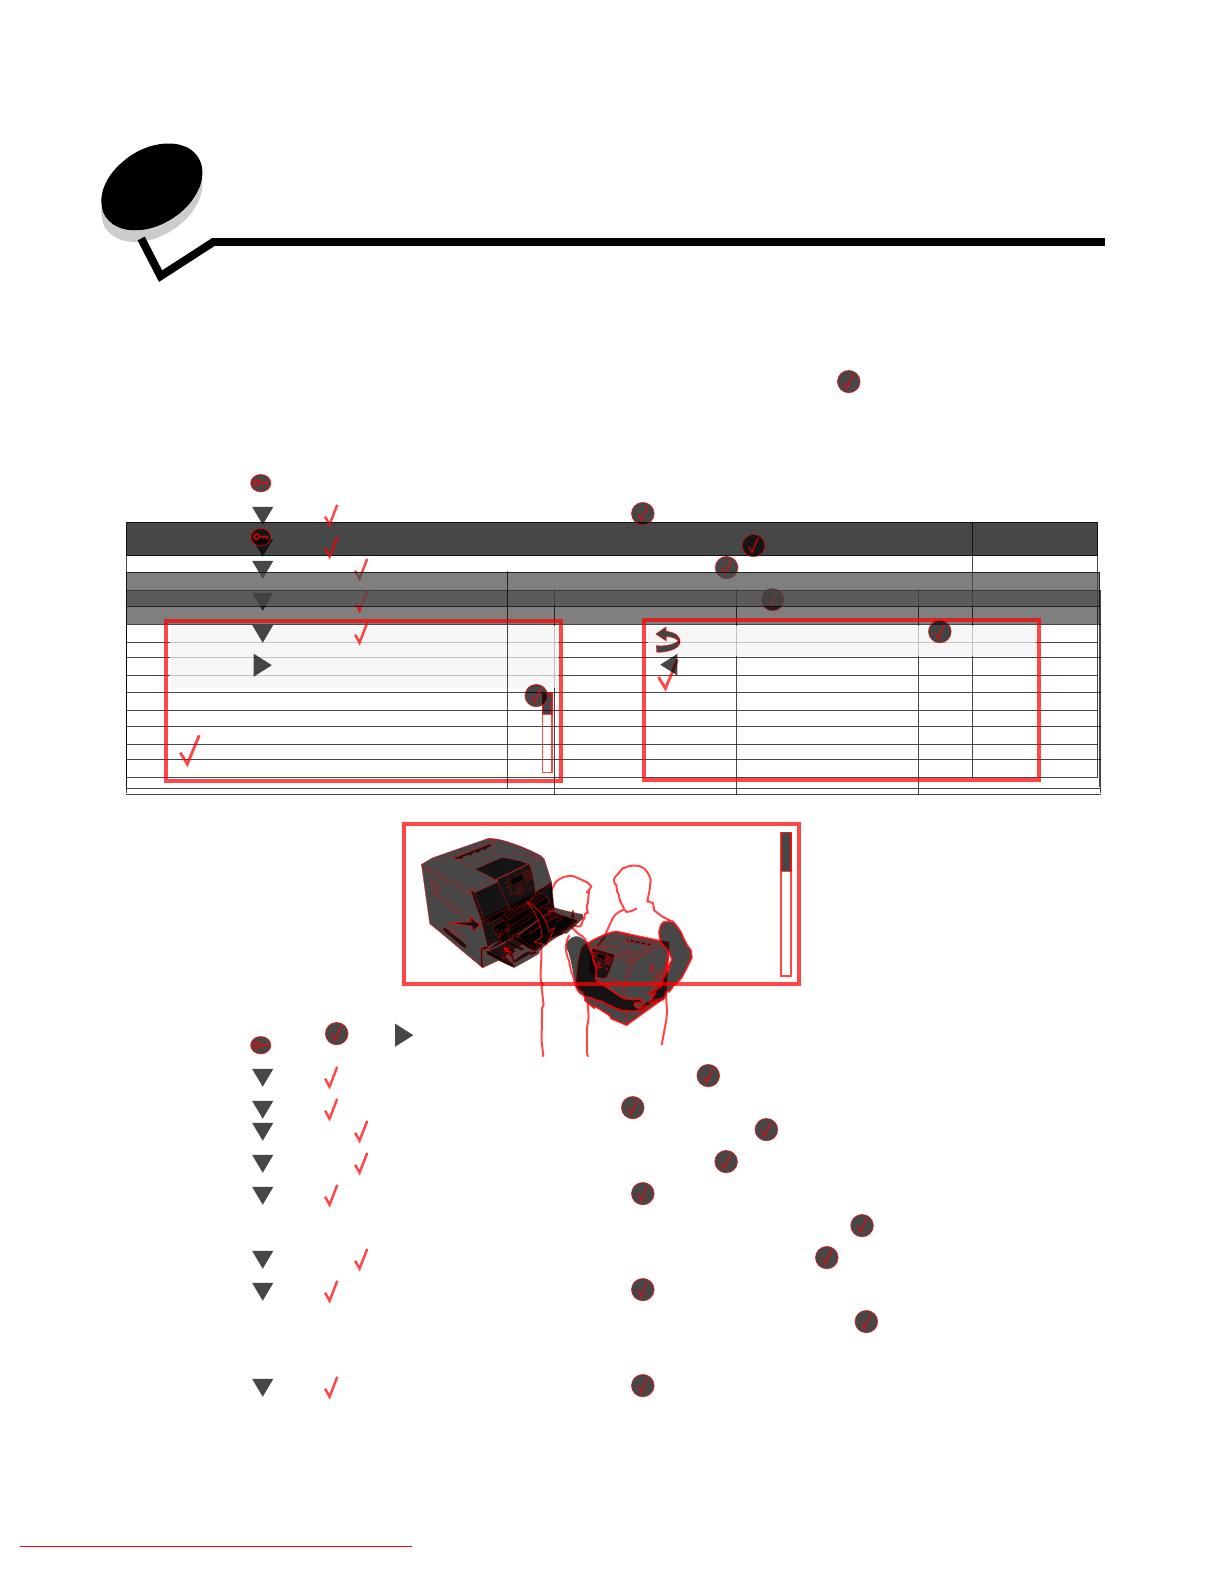
Printer
CAUTION: The printer requires two people to lift it safely.
For information on installing a printer stand, printer base, or 2000-sheet drawer, see the instructions included with the
option.
Downloaded From ManualsPrinter.com Manuals
Printing
36
5
Printing
This chapter covers information about sending a job to print, printing confidential jobs, canceling a print job, printing a menu
settings page, a font list, and a directory list. This chapter also provides information on printing folio and statement size
media. For tips on paper jam prevention and print media storage, see Avoiding jams or Storing print media.
Sending a job to print
A printer driver is software that lets your computer communicate with the printer. When you choose Print from a software
application, a window representing the printer driver opens. You can then select the appropriate settings for the specific job
you are sending to the printer. Print settings selected from the driver override the default settings selected from the printer
operator panel.
You may need to click Properties or Setup from the initial Print dialog to see all of the available printer settings you can
change. If you are not familiar with a feature in the printer driver window, open the online Help for more information.
To support all the printer features, use the Lexmark custom printer drivers supplied with the printer. Updated drivers, as well
as a complete description of the driver packages and Lexmark driver support, are available from the Lexmark Web site.
To print a job from a typical Windows application:
1 Open the file you want to print.
2 From the File menu, select Print.
3 Select the correct printer in the dialog. Modify the printer settings as appropriate (such as the pages you want to
print or the number of copies).
4 Click Properties or Setup to adjust printer settings that were not available on the first screen, and then click OK.
5 Click OK or Print to send the job to the selected printer.
Printing from a USB flash memory device
A USB Direct interface is located on the operator panel so you can insert a USB flash memory device and print PDF
documents. Printing a document from a USB flash memory device is similar to printing a held job.
For information regarding tested and approved USB flash memory devices, see our Lexmark Web site at http://
support.lexmark.com, and click KnowledgeBase to search for Direct USB printing.
Note the following when using a USB flash memory device with the printer USB Direct Interface:
USB devices must be compatible with the USB 2.0 standard.
Hi-Speed USB devices must support the Full-Speed standard as well. Devices only supporting USB low speed
capabilities are not supported.
USB devices must use the FAT file system. Devices formatted with NTFS or any other file system are not
supported.
You cannot print encrypted files or files without printing permissions.
Downloaded From ManualsPrinter.com Manuals
Maintaining the printer
74
7
Maintaining the printer
Periodically, you need to complete certain tasks to maintain optimum print quality. These tasks are covered in this chapter.
If several people are using the printer, you may want to designate a key operator to do the setup and maintenance of the
printer. Refer printing problems and maintenance tasks to this key operator.
In the U.S., contact Lexmark at 1-800-539-6275 for information about Lexmark Authorized Supplies Dealers in your area. In
other countries or regions, visit the Lexmark Web site at www.lexmark.com, or contact the place where you bought the
printer.
Storing supplies
Choose a cool, clean storage area for the printer supplies. Store supplies right side up in their original packaging until you
are ready to use them.
Do not expose supplies to:
Direct sunlight
Temperatures above 35°C (95°F)
High humidity (above 80%)
Salty air
Corrosive gases
Heavy dust
Downloaded From ManualsPrinter.com Manuals
Clearing jams
80
8
Clearing jams
By carefully selecting print media and loading it properly, you should be able to avoid most paper jams. For more
information on avoiding paper jams, see Avoiding jams. If jams do occur, follow the steps outlined in this section.
To resolve the paper jam messages, you must clear the entire paper path and then press to clear the message and
resume printing. The printer prints a new copy of the page that jammed if Jam Recovery is set to On or Auto; however, the
Auto setting does not guarantee the page will print.
Identifying jams
If the printer jams, the appropriate jam message will be displayed on the printer operator panel. If you select Show areas
on the operator panel, you can view one or more images to help you clear the jam.
See the diagram on page 81 for an overview of the paper path and areas where jams may occur. The path varies
depending on the paper source and output bins.
23<x> Paper jam,
3 pages jammed
Continue
Show areas
1. Open
manual feed
door.
Show areas
Show duplex
Show rear door
Downloaded From ManualsPrinter.com Manuals
Administrative support
96
9
Administrative support
Adjusting operator panel brightness and contrast
If you are having trouble reading your operator panel display, the LCD contrast and brightness can be adjusted through the
utilities menu.
The LCD Brightness and LCD Contrast settings are adjusted separately. To change the LCD Brightness or LCD Contrast
settings:
1 Make sure the printer is on.
2 Press on the operator panel.
3 Press until the appears next to Settings, and then press .
4 Press until the appears next to Utilities Menu, and then press .
5 Press until the appears next to the LCD setting you want to change, and then press .
6 Press to increase the brightness or contrast, or press to decrease the brightness or contrast.
7 When the adjustment is complete, press .
This saves this setting as the new user default, and the printer returns to Ready.
Disabling operator panel menus
Since many people could be using the printer, an administrator may choose to lock the operator panel menus to keep
others from changing menu settings from the operator panel.
To disable the operator panel menus so that changes cannot be made to the printer default settings:
1 Turn the printer off.
Note: Disabling the operator panel menus does not prevent access to Print and Hold functionality.
2 Press and hold and while turning the printer on.
3 Release the buttons when you see a clock.
CONFIG MENU appears on the first line of the display.
4 Press until the appears next to Panel Menus, and then press .
5 Press until the appears next to Disable, and then press .
The following messages appear briefly: Submitting selection and Disabling Menus.
The operator panel returns to Panel Menus.
6 Press until the appears next to Exit Config Menus, and then press .
Activating Menu Changes appears. The menus are disabled, and the printer returns to Ready.
Downloaded From ManualsPrinter.com Manuals
Troubleshooting
103
10
Troubleshooting
Understanding printer messages
The printer displays three types of messages: status messages, attendance messages, and service messages. Status
messages provide information about the current state of the printer. They require no action on your part. Attendance
messages alert you to printer problems that require your intervention. Service messages also alert you to problems that
require intervention. However the printer will stop printing and the errors are non-recoverable. It may be possible to power
the printer off and back on to temporarily recover from the service message error condition. For more information about
printer messages, see the Menus and Messages book on the publications CD.
If you receive the following message, see Ordering a print cartridge.
Online technical support
Technical support is available on our Lexmark Web site at www.lexmark.com.
Checking an unresponsive printer
If the printer is not responding, first make sure:
The power cord is plugged into the printer and a properly grounded electrical outlet.
The electrical outlet is not turned off by any switch or breaker.
The printer is not plugged into any surge protectors, uninterrupted power supplies, or extension cords.
Other electrical equipment plugged into the outlet is working.
The printer is turned on.
The printer cable is securely attached to the printer and the host computer, print server, option, or other network
device.
Once you have checked each of these possibilities, turn the printer off and back on. This often fixes the problem.
Message Action
42.xy Cartridge region mismatch
Note: x = the printer region, y = the cartridge
region
Install the correct cartridge for the printer region.
Region codes are:
0 = Worldwide
1 = Americas
2 = EMEA
3 = Asia
9 = Undefined
Downloaded From ManualsPrinter.com Manuals
123
Index
Numerics
2000-sheet drawer 7
250 sheet drawer 7
42.xy Cartridge region mismatch 103
500 sheet drawer 7
5-bin Mailbox 7
A
adjust paper tray 44, 45
adjusting
Power Saver 98
automatic size sensing 57
automatic tray linking 57
B
Back button 9
brightness, LCD 96
button
back 9
menu 9
stop 9
C
canceling a print job 38
card stock
guidelines 72
loading 44
cartridge region mismatch 103
characteristics, paper 69
characteristics, print media 69
paper 69
charge roll 78
clearing jams 80
confidential jobs 40
entering a PIN 40
sending 40
Configured models 7
contrast, LCD 96
D
disabling operator panel menus 96
Duplex unit 7
E
edition notice 2
electrical emission statement 116
Embedded Web Server
setting security 99
using secured 100
emission statement 116
enabling operator panel menus 97
Envelope feeder 7
envelopes
guidelines 70
loading
envelope feeder 55
F
FCC statement 116
G
guidelines
print media 69
H
held jobs
confidential jobs 40
entering a PIN 40
I
Identifying printers 6
integrated forms 65, 68
Internet Protocol Security 100
J
jams
avoiding 73
clearing 80
L
label fuser cleaner 78
labels
guidelines 71
laser notices 120
LCD brightness 96
LCD contrast 96
letterhead
loading
input tray 46, 50, 54
Lexmark Authorized Supplies Dealers 74
linking 57
trays 57
Linux 16, 24
Downloaded From ManualsPrinter.com Manuals