Page is loading ...

FOR MORE INFORMATION
13 POND (13 7663)
bigpond.com
visit a telstra store or partner

gETTINg TO
kNOw yOuR
BIgPOND
®
wI‑FI
4g ADvANcED
FOR MORE INFORMATION
13 POND (13 7663)
bigpond.com
visit a telstra store or partner

Your BigPond
®
Wi-Fi 4G Advanced has
been tested to highest standards to
deliver you the best possible coverage
and speed experience on the network
without equal.
This guide will help you get connected
as quickly and as easily as possible.
It’ll guide you through installation
and run through all the handy extra
features that are included.
If all goes to plan you’ll be up and
running in no time.
LET’S gET THIS
SHOw ON THE ROAD

2
wHAT’S
INSIDE
03 Safety rst
05 Let’s get started
11 Getting connected
23 Using the LCD touchscreen
29 Using the Web Interface
38 Problem solving
44 Extra bits you should know

3
SAFETy
FIRST
Please read all the safety notices before using this
device.
Do not use the BigPond
®
Wi-Fi 4G Advanced near fuel
or chemicals or in any prescribed areas such as service
stations, reneries, hospitals, and aircraft. Obey all
warning signs where posted.
RADIO FREquENcy SAFETy INFORMATION
The BigPond
®
Wi-Fi 4G Advanced has an internal
antenna. For optimum performance with minimum
power consumption, do not shield the device or
cover with any object. Covering the antenna affects
signal quality, and may cause the BigPond
®
Wi-Fi
4G Advanced to operate at a higher power level than
needed, and may shorten battery life.
RADIO FREquENcy ENERgy
Your BigPond
®
Wi-Fi 4G Advanced is a low-power
radio transmitter and receiver. When switched on it
intermittently transmits radio frequency (RF) energy
(radio waves). The transmit power level is optimised
for best performance and automatically reduces
when there is good reception. Maximum power is
only used at the edge of network coverage so under
most circumstances, the power output is very low.
Under poor network conditions the BigPond
®
Wi-Fi 4G
Advanced transmits at a higher power, may get hot and
have signicantly shorter battery life.

4
DEcLARATION OF cONFORMITy —
MAXIMuM PERMISSIBLE EXPOSuRE
The BigPond
®
Wi-Fi 4G Advanced is designed to be
used at least 20 cm from the body. We declare that the
product detailed in this manual, and in combination
with our accessories, conforms with the essential
requirements of the Radio Communications Standard
(Electromagnetic IC Radiation Human Exposure)
2003 and the Australian Communications and Media
Authority Section 376 of the Telecommunications Act
1997 when used at a distance of not less than 20cm
from the body. The worst case SAR test result for 10g
tissue size measured at 10mm distance is 1.45mW/g.
ROHS DEcLARATION
(RESTRIcTION OF HAzARDOuS SuBSTANcES)
This device is compliant with the REACH Regulation
(Regulation EC No 1907/2006) and RoHS Directive
Recast (Directive 2011/65/EU). Batteries are compliant
with the Battery Directive (Directive 2006/66/EC).
N10947

5
LET’S gET
STARTED
yOuR PAckAgE cONTAINS THE FOLLOwINg:
•BigPond
®
Wi-Fi 4G Advanced device and battery
•This Getting Started Guide
•Micro USB charging cable
•Jump Boost cable
•AC adapter
yOu cAN ALSO PuRcHASE THE FOLLOwINg
AccESSORIES FOR yOuR DEvIcE:
•External antenna (MIMO Dual TS9 port) – improves
performance in areas with low signal strength. See
your local Telstra store or partner for assistance with
picking the best antenna option for you as well as
help with installation.
Information on accessories is available at:
http://www.netgear.com/telstraaccessories
yOu cAN uSE yOuR BIgPOND® wI‑FI
4g ADvANcED wITH THESE OPERATINg
SySTEMS:
•Windows
®
8 (32/64-bit)
( Windows
®
RT is not compatible for initial activation)
•Windows
®
7 (32/64-bit)
•Windows Vista
®
(SP2 32/64-bit)
•Windows XP (SP3, Media Centre Editions 32/64-bit)
•Mac OS
®
X 10.6 or later

6
MAkE A NOTE OF
yOuR BIgPOND
®
DETAILS
Your username and password have been emailed
to you, however you may want to note these details
below for easy reference.
EMAIL ADDRESS
Remember, your email address is your
username@bigpond.com
It’s a good idea to protect yourself by writing down a
reminder, rather than your actual password.
PASSwORD

7
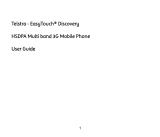
1 LCD touchscreen
Resistive touch screen with options to manage device
settings, data connection, and Wi-Fi network usage.
2 Status LED
Shows data connection status
• Ready (slow blue blink)
• Transferring data (double blue blink)
• Not ready (slow amber blink)
3 Power key
•Turn the device on or off — Press the key for a few
seconds. The LED blinks blue when the device is ready.
•Wake the device and Wi-Fi radio — Press and quickly
release the Power key.
4 SIM slot
See page11.
yOuR BIgPOND
®
wI‑FI 4g ADvANcED
7
2
3
1
4
8
5
8
6

8
5 AC adapter / Micro USB port
Recharge the battery faster by using the adapter.
(See page21.)
6 Device status icons
Icons on the top row of the screen indicate device and
network status. See page9 for details.
7 Conguration / status elements
8 External antenna ports
Connections for an optional MIMO Dual TS9 port
antenna, which is available from your retailer.
Connect the antenna carefully to avoid damage to
your device (see page41 for instructions).
Data usage — Tap to view details
(page23).
Devices — Shows number of connected
devices. Tap to view device details
(page24).
Wi-Fi — Lit when on. Tap to congure Wi-Fi
settings (page24).
Settings — Tap to congure device settings
(page 14).

9
IcONS
ICON DESCRIPTION
Signal
strength/
roaming
1 bar — low level
5 bars — excellent
Triangle — roaming (con-
nected to a network other than
Telstra’s)
Network
type
4G and 4G CA (Carrier
Aggregation)
HSPA+ Dual-Carrier
3G
Alert Tap to view alerts.
GPS Continuous tracking or search-
ing for satellite x. Glows while
searching / tracking.
Battery
level
Green — 26%-100% charged
Yellow — battery low
Red — critical
(Less than 10% charge)
Trafc Outline — Connected
Solid — Sending / receiving
None — Not connected
Hub Appears when docked in a hub
(sold separately).

10
quIck REFERENcE SEcTION
Web Interface
(home page)
http://m.home
Web Interface
Password
admin
Printed on the label under the
battery.
Default Main
Wi-Fi name and
password
Displayed on the LCD screen.
Tap Wi-Fi > Main Wi-Fi to view
or update.
Guest Wi-Fi name
and password
Displayed on the LCD screen
(when Guest Wi-Fi is enabled).
Tap Wi-Fi > Wi-Fi Proles to
view or update.
Restore Defaults Tap Settings > Reset.
PC installation will be required
with username and password.
Enable/Disable
Dual-band Wi-Fi
Tap Wi-Fi > Wi-Fi Proles to
select a suitable Wi-Fi prole.
Jump charge
another device
Use the Jump Boost cable to
connect to another device, then
tap Settings > JumpBoost.
Update software Tap Settings > More > About,
then tap Software Updates.

11
1. INSERT BATTERy
Remove the back cover by lifting at the notch above
either external antenna port. Then insert the battery
as shown and replace the cover.
2. SIM
Your microSIM is already inserted and is designed
to operate with a BigPond
®
plan. However if you are
replacing the microSIM, remove the SIM slot cover,
then insert the microSIM card as shown below and
close the slot cover.
gETTINg
cONNEcTED

12
3. SwITcH DEvIcE ON
Press and hold the Power key for a few seconds to
turn on your BigPond
®
Wi-Fi 4G Advanced.
4. SEARcH FOR wIRELESS NETwORkS
Make sure your computer or other device has Wi-Fi
enabled and search for wireless networks. Refer to
your Wi-Fi enabled device’s manual for further details
on searching for wireless networks.
Mac users: Make sure AirPort is turned on
Important: The activation process can only
be completed on a computer with Windows8,
Windows7, WindowsXP, Vista or Mac OS X 10.6
and above.
Tablets (Windows RT, Android and iPad) or mobile
handsets can be used with this device once initial
activation is complete.

13
5. SELEcT SSID AND ENTER SEcuRITy kEy
•Select the Wi-Fi name displayed on the LCD of your
device, then click Connect.
•Type in the Wi-Fi password as it appears on the LCD
screen and click OK.
Note: You can modify the Main Wi-Fi or Guest Wi-Fi
names and passwords from the LCD touchscreen
(tap Wi-Fi > Main Wi-Fi or Wi-Fi > Wi-Fi Proles), or the
web interface (device home page) at http://m.home.
See page24 for more details.

14
6. OPEN AN INTERNET BROwSER AND START
THE INSTALLER
•Once your Wi-Fi is connected open an internet
browser and you will be automatically directed to the
web interface (device home page) to complete the
setup process.
If the web interface does not automatically
open, enter http://m.home in the address bar or
http://10.0.0.138
•From the setup screen press Start to open the
Windows or Mac Installer.
Note: The following screen shots are for Windows
XP. Other systems will follow a similar process.
•Follow the on-screen instructions to continue setup.

15
7. FOLLOw THE PROMPTS
•Click Next to continue
•Once you have reviewed Our Customer Terms, select
‘I conrm that I wish to proceed’ and click Next.

16
•Your device will now connect to BigPond
®
.
•You will need your username/BigPond
®
email and
password or your billing details if you haven’t signed
up yet
.

17
Existing Username
You may have already provided your credentials
during the sign up process and created a username
and password. Select ‘I have an email address and
password for my new Mobile Broadband account’.
Enter your username and password.
No Username
•If you did not sign up to an account in store, you will
need to register your billing details and create a user
name and password. Select ‘I don’t have a Mobile
Broadband account yet’ and click Next. Then select
‘I’m new to BigPond® and Telstra’ and click Next.
Follow the prompts to set up your account.
• If you’re an existing BigPond
®
or Telstra customer,
but have not created an account, select ‘I don’t have
a Mobile Broadband account yet’ and click Next.
Then select ‘I am an existing BigPond or Telstra
Customer, but don’t have a username or password’
and click Next. Follow the prompts to set up your
account.
Note: Your username/Bigpond email and
password have been emailed to you. You can
access your password online at
http://myacct.bigpond.com

18
8. cOMPLETE yOuR AcTIvATION
•Click Finish to complete the activation.
/