Page is loading ...

Manufactured in the USA
LIFETIME WARRANTY. Please register at www.ezaccess.com/warranty-satisfaction.
© EZ-ACCESS®, a division of Homecare Products, Inc. All rights reserved.
All text and images contained in this document are proprietary and may not be shared, modified, distributed,
reproduced, or reused without the express written permission of EZ-ACCESS.
16397 REV 05-26-2023
Assembly Manual
PATHWAY® 3G Modular Access System
Image shown with multiple ramp and
platform handrail options.

1
PATHWAY® 3G Modular Access System Assembly Manual Page 2 of 77
INTRODUCTION
Throughout this manual, the term “system” refers to the entire PATHWAY® 3G Modular Access System, including
ramps, platforms, stairs, handrails, gates, transition plates, landing pads, and any/all hardware and components
which are intended to be assembled on the PATHWAY 3G Modular Access System.
SYMBOLS
The WARNING symbol indicates a potentially hazardous condition/situation. The safety warnings
throughout this manual, and on your equipment, if any, are for the protection of people and property.
Failure by any operator to abide by safety warnings will result in a waiver of all liabilities, loss of your
warranty, and could result in equipment damage and or failure, property damage, risk of serious bodily
injury, and or death. The symbol may appear in various colors and in conjunction with other symbols and
with or without the written word “WARNING”.
The NOTE symbol indicates important information. Failure to obey all notes could result in improper
operation, less-than-optimum equipment performance, and at the sole discretion of the equipment
manufacturer, may void your warranty. The symbol may appear in various colors and in conjunction with
other symbols and with or without the written word “NOTE”.
WARNINGS
Maximum weight capacity is 1,000 lbs.; never exceed weight capacity.
Prior to assembly and use, read and follow all instructions, warnings, and labels. Following all instructions
and obeying all warnings before and during use is necessary for safe operation. Do not remove labels. For
additional information or to obtain copies of instructions or labels, call 1-800-451-1903.
For residential use only.
Consult local building codes regarding securing the system for wind loads.
Before use with mobility equipment, refer to your mobility equipment's owner guide for acceptable ramp
usage, including proper slope/incline, chair direction, etc.; never exceed its recommendations.
If needed, use a qualified helper when using the system.
Always use a lap belt if using the system with mobility equipment.
Handrails are required and must be installed.
Only use components supplied by the manufacturer with the system.
Before each use, check the system for worn, loose, or damaged parts. If you find any of these conditions, do
not use the system and contact your installer for service or repairs. Failure to do so may result in serious
injury.
Do not use the system if it is damaged or unstable.
Do not tamper with, attempt to repair, or modify any portion of the system.
Ensure that the landings the system will be placed on are substantial and of sound construction.
Use only if the secure, unobstructed, level landings can support the weight capacity of the system (1,000 lbs.).
Before each use, confirm the system is secure and assembled per the instructions. Contact your installer for
any necessary adjustments.
Use only if sufficient maneuvering room is available at both ends of the system to assure safe travel when
entering and exiting the system.
The system may be slippery in wet conditions; use caution as traction may be reduced.
Before each use, remove ice, snow, dirt, leaves, and other debris on contact surfaces. Please refer to
‘MAINTENANCE AND SAFETY’ and ‘DEICING’ sections in the assembly manual for more information.
Do not lean on, walk on, or otherwise bear weight on the system until assembly is complete.
Do not run, jump, or play on or around the system.
Do not sit, stand, or climb on handrails or gates.
Do not place anything on, under, or attach anything to the system including, but not limited to, planters,
lights, decorations, etc.
Improper use of the system could result in serious injury.
Always exercise caution when handling, assembling, and or using the system.

1
PATHWAY® 3G Modular Access System Assembly Manual Page 3 of 77
WARNINGS, CONT’D.
Aluminum conducts electricity. Do not use the system during electrical storms or in proximity to damaged
or exposed wiring.
Properly support and restrain the system in transit or storage.
For additional care, usage, or general safety information, please call 1-800-451-1903.
TOOLS AND HARDWARE TYPICALLY REQUIRED
✓ 1/2” SOCKET OR 1/2” WRENCH
✓ BOX KNIFE
✓ 9/16” SOCKET OR 9/16” WRENCH
✓ HAMMER
✓ 5/16” SOCKET OR 5/16” WRENCH
✓ LEVEL
✓ POWER DRILL
✓ FILE
✓ #2 PHILLIPS SCREWDRIVER
✓ RUBBER MALLET
✓ PLIERS
✓ 1/4” MASONRY DRILL BIT (IF INSTALLING TO CONCRETE)
✓ 1/8” DRILL BIT
✓ DIGGING TOOLS (IF AN OBSTACLE NEEDS TO BE REMOVED)
✓ 5/16” DRILL BIT
✓ HACKSAW (FOR OPTIONAL HANDRAIL KITS)
✓ 5/32” ALLEN WRENCH
✓ 25’ TAPE MEASURE
✓ 3/16” ALLEN WRENCH
✓ CONSTRUCTION ADHESIVE

1
PATHWAY® 3G Modular Access System Assembly Manual Page 4 of 77
TABLE OF CONTENTS
SECTION 1: BASIC SYSTEM COMPONENTS
IDENTIFYING COMPONENTS ......................................................................................................................... 5-11
SECTION 2: PLATFORMS
INSTALL PLATFORMS ........................................................................................................................................ 12
INSTALL SUPPORT TUBES AND FEET, THEN ADJUST PLATFORM HEIGHT .................................................... 13-14
CONNECT TWO PLATFORMS TOGETHER ..................................................................................................... 14-15
45-DEGREE ANGLE PLATFORM ......................................................................................................................... 16
8’ X 5’ TURN BACK PLATFORM ......................................................................................................................... 16
LOW PROFILE PLATFORM ............................................................................................................................ 17-23
INSTALL UNIVERSAL ANGLE BRACE – PLATFORMS ........................................................................................... 23
INSTALL UNIVERSAL CROSS BRACE ................................................................................................................... 24
SECTION 3: RAMPS
CONNECT RAMP SECTIONS .............................................................................................................................. 25
INSTALL RAMPS ON PLATFORMS ..................................................................................................................... 26
ATTACH SUPPORT LEG BRACKETS AND LEGS TO RAMPS ............................................................................ 27-29
INSTALL UNIVERSAL ANGLE BRACE – RAMPS ................................................................................................... 29
INSTALL RAMP GROUND TRANSITION ........................................................................................................ 30-31
INSTALL A SINGLE RAMP RUN TO AN EXISTING STRUCTURE ........................................................................... 32
ANCHOR RAMP UPPER TRANSITION ................................................................................................................ 33
ANGLE RAMPS WITH RESPECT TO PLATFORMS, PORCHES, OR DECKS ............................................................ 34
SECTION 4: HANDRAILS
RAMP WITHOUT HANDRAILS ........................................................................................................................... 35
RAMP HANDRAILS ....................................................................................................................................... 35-36
ASSEMBLE STANDARD PLATFORM HANDRAILS .......................................................................................... 36-37
INSTALL STANDARD PLATFORM HANDRAILS .............................................................................................. 37-38
8’ X 5’ TURN BACK PLATFORM HANDRAILS (OPTIONAL EQUIPMENT) ........................................................ 39-40
45-DEGREE ANGLE PLATFORM HANDRAILS (OPTIONAL EQUIPMENT) ....................................................... 40-47
SECTION 5: CLOSURES
TOP RAIL AND CURB .................................................................................................................................... 48-51
TWO-LINE CLOSURE LOWER RAIL ..................................................................................................................... 52
VERTICAL PICKET CLOSURE .......................................................................................................................... 53-54
HORIZONTAL PICKET CLOSURE .................................................................................................................... 55-56
TWO-LINE AND VERTICAL PICKET TURN BACK CLOSURE ............................................................................ 56-59
SECTION 6: FINAL PLATFORM/RAMP STEPS AND CHECKS
SECURE RAMPS TO PLATFORMS ...................................................................................................................... 60
INSTALL RAMP HANDRAIL END LOOPS ........................................................................................................ 61-62
INSTALL RAMP HANDRAIL END CAPS ............................................................................................................... 62
INSTALL RAMP CORNER PROTECTORS ............................................................................................................. 62
TOUCH-UP ARCHITECTURALLY FINISHED HANDRAILS ..................................................................................... 62
FINAL CHECKS ................................................................................................................................................... 62
SECTION 7: OPTIONAL EQUIPMENT
RAMP SUPPORT TOP ........................................................................................................................................ 63
RAMP LOWER TRANSITION .............................................................................................................................. 64
SINGLE BRIDGE PLATE ...................................................................................................................................... 64
LANDING PAD .............................................................................................................................................. 65-66
PLATFORM TIE STRAPS ..................................................................................................................................... 66
LIGHTNING GROUND ROD ................................................................................................................................ 67
TIE DOWN .................................................................................................................................................... 68-69
GATE ............................................................................................................................................................ 70-71
CONNECT 45-DEGREE ANGLE PLATFORM WITH TWO-LINE RAILS TO STANDARD PLATFORM ................... 72-75
SECTION 8: MAINTENANCE AND SAFETY
PERIODIC MAINTENANCE AND SAFETY ............................................................................................................ 76
SECTION 9: DEICING ................................................................................................................................................ 76

1
PATHWAY® 3G Modular Access System Assembly Manual Page 5 of 77
1. BASIC SYSTEM COMPONENTS
Because each ramp configuration will differ from one another, your system may or may not contain all these
basic system components. Identify your system components before you begin.
All ramp handrail frames, regardless of fill (two-line, vertical, or horizontal pickets) install identically.
SURFACE OPTIONS
SOLID SURFACE
EXPANDED METAL SURFACE
RAMP AND RAMP HANDRAIL OPTIONS
RAMP W/O HANDRAILS
RAMP W/ TWO-LINE HANDRAILS
RAMP W/ VERTICAL PICKETS
RAMP W/ HORIZONTAL PICKETS

1
PATHWAY® 3G Modular Access System Assembly Manual Page 6 of 77
KEY RAMP COMPONENTS
PSLXXPR – SUPPORT LEG PAIRS
PRGT & PRGT48
RAMP GROUND TRANSITION 18” X 36” and 18” X 48”
PRHBPR – RAMP HANDRAIL END BRACKET (PAIR)
PRRUC – UNIVERSAL CONNECTOR – RAMP TO RAMP
PRSUT – UNIVERSAL RAMP SUPPORT – TOP
RAMP HANGER PAIR
XX DENOTES USABLE
LENGTH (LENGTHS
AVAILABLE 10”
THROUGH 100” IN 6”
INCREMENTS)
INCLUDES
COMPONENTS TO
CONNECT RAMPS
AND RAMP
HANDRAILS
SHOWN ASSEMBLED
USED WHEN LEGS
SUPPORT UPPER OR
LOWER END OF RAMP
ONLY

1
PATHWAY® 3G Modular Access System Assembly Manual Page 7 of 77
KEY RAMP COMPONENTS, CONT’D.
PRHRLU – UPPER HANDRAIL
END LOOP
PRHRLL – LOWER HANDRAIL
END LOOP
PHREC – HANDRAIL END CAP
PRUT – RAMP UPPER TRANSITION
PRLT – RAMP LOWER TRANSITION
INCLUDES RAMP CORNER
PROTECTORS

1
PATHWAY® 3G Modular Access System Assembly Manual Page 8 of 77
PLATFORMS AND PLATFORM HANDRAIL OPTIONS
PLATFORM (STRAIGHT CONFIGURATION)
W/ TWO-LINE HANDRAILS
PLATFORM (TURN CONFIGURATION)
W/ TWO-LINE HANDRAILS
PLATFORM W/ VERTICAL PICKET HANDRAILS
PLATFORM W/ HORIZONTAL PICKET HANDRAILS
PLATFORM (8’ X 5’ TURN BACK)
W/ TWO-LINE HANDRAILS

1
PATHWAY® 3G Modular Access System Assembly Manual Page 9 of 77
PLATFORM AND PLATFORM HANDRAIL OPTIONS, CONT’D.
PLATFORM 45-DEGREE ANGLE
W/ TWO-LINE HANDRAILS
NOT AVAILABLE WITH HORIZONTAL PICKET HANDRAILS
PLATFORM 45-DEGREE ANGLE
W/ VERTICAL PICKET HANDRAILS
NOT AVAILABLE WITH HORIZONTAL PICKET HANDRAILS
LOW PROFILE PLATFORM W/ TWO-LINE HANDRAILS
LOW PROFILE PLATFORM W/ TWO-LINE HANDRAILS
SHOWN USED AS A LANDING PAD

1
PATHWAY® 3G Modular Access System Assembly Manual Page 10 of 77
KEY PLATFORM COMPONENTS
PPPC – CONNECTOR – PLATFORM TO PLATFORM
PPTS – PLATFORM TIE STRAP
PBP36, PBP48, PBP60 – BRIDGE PLATE
PRLWALP – RAMP LEG WELDED ALUMINUM –
LOW PROFILE PAIR
PPLPGT06, PPLPGT08, PPLPGT10, PPLPGT12, PPLPBT48
LOW PROFILE GROUND TRANSITION OR BRIDGE TRANSITION

1
PATHWAY® 3G Modular Access System Assembly Manual Page 11 of 77
CLOSURE OPTIONS
PPCTL – TWO-LINE CLOSURE HANDRAIL
PPCVP4, PPCVP5, PPCVP6
VERTICAL PICKET CLOSURE HANDRAIL
PPCHP – HORIZONTAL PICKET CLOSURE HANDRAIL
ADDITIONAL OPTIONS
PTDK – TIE DOWN KIT
PUAB – UNIVERSAL
ANGLE BRACE
PUCB4, PUCB5 & PUCB8 – UNIVERSAL CROSS BRACE
PLP – LANDING PAD
PUG36 – UNIVERSAL GATE 36”
• PUCB4 USED
ON 4’
PLATFORM
SIDE
• PUCB5 USED
ON 5’ & 6’
PLATFORM
SIDES
• PUCB8 USED
ON 8’
PLATFORM
SIDE

1
PATHWAY® 3G Modular Access System Assembly Manual Page 12 of 77
2. PLATFORMS
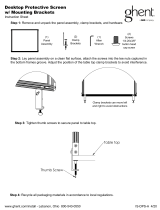
2.1. INSTALL PLATFORMS
If your system does not include a platform, skip to ‘CONNECT RAMP SECTIONS’.
Platform handrails are shown for clarity on how to orient platforms in various configurations. It
is strongly suggested that all platforms and ramps be assembled before installing handrails (see
‘HANDRAILS’ section).
2.1.1. There are four basic platform arrangements (one or more of these arrangements may be
used in an installation). All four require the same procedure for assembly except for FIG. 2.3
which requires an additional PPPC (PLATFORM TO PLATFORM CONNECTOR).
FIG. 2.1 Straight configuration
FIG. 2.2 Turn configuration
FIG. 2.3 Turn back configuration (two 5’ x 4’ platforms shown combined to
make a 5’ x 8’ turn back)
FIG. 2.4 8’ x 5’ turn back
FIG. 2.1
FIG. 2.2
FIG. 2.3
FIG. 2.4

1
PATHWAY® 3G Modular Access System Assembly Manual Page 13 of 77
2.2. INSTALL SUPPORT TUBES AND FEET, THEN ADJUST PLATFORM HEIGHT
2.2.1. Support tubes, plugs, and feet come in pairs. Support tubes will come in lengths sufficient
for the heights at specific locations.
2.2.2. Loosen all set screws in the platform corner pockets.
2.2.2.1. The set screws on the outside of the platform are for the platform support tubes.
2.2.2.2. The set screws on the inside of the platform (one above the deck and one below
the deck) are for the handrail posts.
2.2.3. Tip the platform on its side, then slide the support tubes into the four platform corner
pockets (FIG. 2.5). Adjust the support tubes to the approximate platform height needed.
2.2.4. Use a 3/16” Allen wrench to tighten the upper of the two set screws in the corner pocket,
just enough to hold the support tube in place but do not over tighten (the second set
screw will be tightened after final height adjustments are complete).
Platforms configured as a turn back platform (FIG. 2.3) will have six tubes to adjust.
Do not attempt to walk on the platform until all support tube set screws have been
tightened securely.
2.2.5. Place the platform (with support tubes attached) into the upright position.
Do not let the weight of the platform bear on the support tubes while tipping the
platform upright.
FIG. 2.5

1
PATHWAY® 3G Modular Access System Assembly Manual Page 14 of 77
2.2.6. Lift each corner of the platform and install a base foot on each support tube oriented so that
the foot extends under the platform (FIG. 2.5).
The feet can be oriented in other directions if necessary due to site conditions but
may present a tripping hazard if not oriented under the platform.
It is the installer’s responsibility to install the system in a manner that is safe for
the people on and around the system and clearly mark any hazards created by
the installation.
2.2.7. Make sure each foot is fully engaged on the tube and tighten the thumb screw securely.
If installing on soft soil it may be necessary to set the base foot on a concrete pad.
2.2.8. Adjust the final height of the platform by adjusting legs, one at a time, by loosening the
outer set screws in the platform corner pockets. Using a level, adjust the platform height
and re-tighten.
2.2.9. Once the final height has been adjusted, tighten the second, lower set screw in each platform
corner pocket.
2.2.10. To allow access to the lowermost hole in the platform post, the support tubes must not
extend more than 1/2” above the platform corner pockets. Trim the support tubes as needed
before installing plugs.
2.2.11. Insert a plug into the top of each support tube. Use a rubber mallet or similar tool as
needed (FIG. 2.5).
2.2.12. Ensure all set screws are tightened securely.
2.3. CONNECT TWO PLATFORMS TOGETHER
2.3.1. Assemble the first platform as described in the previous steps except on the side where the
second platform will connect and install two PPPC (CONNECTOR – PLATFORM TO PLATFORM)
before installing feet onto the support tubes.
2.3.2. Make sure the platform connector set screws are oriented outward so they will be accessible.
Any two platforms of the same width can be connected. However, two 5’ x 4’
platforms are usually connected to make a turn back platform.
2.3.3. Slide the platform connectors up until they contact the bottom of the platform and tighten
the set screws securely (FIG. 2.6).
2.3.4. Install a support tube stub into the open pocket in each connector until the bottom of the
stub is flush with the bottom of the connector and tighten the set screws securely.
2.3.5. Install a plug in the top of each support tube stub (FIG. 2.6).
2.3.6. Assemble the second platform as described in the previous section except only install support
tubes, plugs, and feet on the opposite side of where the platforms will connect (FIG. 2.7).
2.3.7. Lift the second platform and slide the open corner pockets over the support tube stubs
extending up from the platform connectors. Tighten the set screws in the platform corner
pockets securely.
2.3.8. Adjust the platform heights and level as needed.
Make sure all the set screws in both the platform corner pockets and the platform
connectors are tightened securely before proceeding with the installation.

1
PATHWAY® 3G Modular Access System Assembly Manual Page 15 of 77
FIG. 2.6
FIG. 2.7

1
PATHWAY® 3G Modular Access System Assembly Manual Page 16 of 77
2.4. 45-DEGREE ANGLE PLATFORM
This platform is used between two ramps to make a 45-degree turn and features a symmetrical design,
making it usable in either direction.
2.4.1. There are two handrail options for 45-degree Angle Platforms: Two-Line and Vertical
Pickets. The platform includes the handrail components needed for the option ordered.
Platform handrails are shown for clarity on how to orient platforms in various
configurations. It is strongly suggested that all platforms and ramps be assembled
before installing handrails (see ‘HANDRAILS’).
2.4.2. Set platform on one of the sides where the ramp will attach and install legs and feet, then
adjust height as described previously in this section. The two legs on the short side must
be installed in the orientation shown (FIG. 2.8).
Use “low profile foot” for platform heights under 4”.
FIG. 2.8
2.5. 8’ X 5’ TURN BACK PLATFORM
This platform is used to create a turn back (or switchback) instead of connecting two 5’ x 4’ platforms. It
includes two standard 5’ platform handrails and handrails for the 8’ side with a curb (FIG. 2.4).

1
PATHWAY® 3G Modular Access System Assembly Manual Page 17 of 77
2.6. LOW PROFILE PLATFORM
2.6.1. Low profile platforms are 1-9/16” thick (tall) as compared to standard platforms which
are approximately 3-1/2” thick (tall).
2.6.2. There are three types of low profile platforms (one or more of these platform
arrangements may be used in an installation).
FIG. 2.9 Low profile platform straight configuration
FIG. 2.10 Low profile platform turn configuration
FIG. 2.11 Low profile platform turn back configuration (two 5’ x 4’ platforms
shown combined to make a 5’ x 8’ turn back)
2.6.3. All three require the same procedure for assembly except for the turn back (FIG. 2.11)
which requires an additional PPPC (PLATFORM TO PLATFORM CONNECTOR).
2.6.4. Low profile platforms can be elevated when used with support tubes and feet or set
directly on the ground and used as a landing pad (FIG. 2.12). When used as a landing pad, it
may be used with or without handrails and will require a low profile ground transition.
FIG. 2.9
FIG. 2.10
FIG. 2.11
FIG. 2.12

1
PATHWAY® 3G Modular Access System Assembly Manual Page 18 of 77
2.6.5. INSTALL RAMPS ON LOW PROFILE PLATFORMS
This section addresses the attachment of a ramp (or ramp run) to a platform. If the
ramp needs to be angled with respect to the platform section, skip to ‘ANGLE RAMPS
WITH RESPECT TO PLATFORMS, PORCHES, OR DECKS’ in SECTION 3.
2.6.5.1. Locate the PRHPLP (RAMP HANGER PAIR LOW PROFILE). Install two hangers onto
the side of the platform where the ramp will be attached.
2.6.5.2. Hold the hanger perpendicular to the platform side rail, then bring the hanger
upward until it is against the side rail lip. Rotate the hanger and continue pushing
upward in such a manner that the “hook” at the top of the hanger goes behind and
catches on the lip in the top of the platform side rail and the hanger sits on the
ledge at the bottom (FIG. 2.13).
FIG. 2.13

1
PATHWAY® 3G Modular Access System Assembly Manual Page 19 of 77
2.6.5.3. Set the ramp on the hangers, ensuring that the hangers are positioned as close as
possible to the ramp side rails (FIG. 2.14). The procedure is the same at both the
top and bottom of ramp runs which end at a platform unless a low profile ground
or bridge transition is used.
Do not attempt to walk on system until installation is complete.
2.6.5.4. Proceed with the system installation. Secure all ramps to platforms as described in
the ‘SECURE RAMPS TO PLATFORMS’ section as part of the final steps and checks.
FIG. 2.14

1
PATHWAY® 3G Modular Access System Assembly Manual Page 20 of 77
2.6.6. INSTALL LOW PROFILE PLATFORM HANDRAILS
2.6.6.1. Handrail assembly for low profile platforms is the same as standard platforms.
Refer to ‘HANDRAILS’ and assemble for desired configuration.
The only installation difference between low profile platforms and
standard platforms is where the handrail inserts into the platform corner
pockets. On the low profile platform, both handrail set screws are above
the platform walking surface (FIG. 2.15) instead of having one
underneath the deck as they are on a standard platform.
2.6.6.2. Tighten two set screws per handrail post on the inside of each corner pocket.
FIG. 2.15
2.6.7. INSTALL LOW PROFILE GROUND TRANSITION OR BRIDGE TRANSITION
2.6.7.1. Low profile ground transitions for the 5’ side of the low profile platform are
available in four slope options:
• 1:6 slope at 59-1/8” x 7.32”
• 1:8 slope at 59-1/8” x 9.70”
• 1:10 slope at 59-1/8” x 11.95”
• 1:12 slope at 59-1/8” x 14.13”
Only use the 1:6 slope 59-1/8” x 7.32” low profile ground transition as
a bridge transition for the 5’ side of a low profile platform. A bridge
transition is a level transition from the low profile platform to another
level surface. The other slope options for the 5’ side of a low profile
platform are only for use as a transition from the low profile platform
to the ground.
/