Page is loading ...

Questions? Our Customer Experience & Design Support Team is here to assist you Mon-Fri: 9AM to 5PM EST at (800) 651-4223.MA03GB 06/22
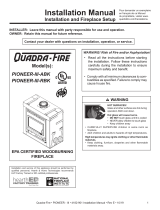
Tools:
Quick Start Guide
Mantel Installation Instructions
WARNINGS:
• Be sure to obey all safety rules and recommendations set forth by tool manufacturers.
• Always follow any, and all, local, state, and federal building codes.
• Always comply with clearances set forth by the manufacturer of stoves, replaces, furnaces,
and any other heat source.
• Our faux mantels are durable, but are for decorative use only. Mantels are not intended to
support heavy weight.
• Wear safety glasses during the entire installation process.
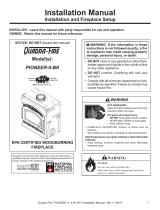
Mantel Installation
1. Using a stud nder mark each stud with a pencil.
2. Create a level line one inch below where you want the top of the
installed mantel.
3. Attach the lumber to the wall at the level line by screwing the deck
screws through the lumber and into the studs. Use mollies/anchors
if there are no studs.
4. Apply Loctite PL Premium Advanced 3X Construction Adhesive to
the top of the mounted lumber. Slide the mantel over the mounted
lumber.
5. At the top of the mantel, use the deck screws and toe screw the
mantel to the lumber. Recess the screws about 1/8”. Be careful not
to over tighten.
6. Apply color complimenting textured caulk to ll screw holes. Blend
caulk into adjacent surfaces while it is still wet. Use paint from the
touch-up kit to paint over the caulk or wood ller. Do not sand the
mantel. Sanding will ruin the nish and the grain.
Consult full, project-specic installation guide before starting:
https://www.barrondesigns.com/beams-installation/mantel-installation-instructions/
1
23
Screw Gun /
Drill Driver &
Bits
Tape
Measure
Loctite® PL®
Premium®
3X Construc-
tion Adhesive
Color
Complimenting
Textured Caulk
Clean Cloth
Deck
Screws
Mantel
Mounting
Strip
Touchup Kit Small
Paint Brush
Cotton
Swabs
Caulk Gun
Pencil
Stud Finder
Level/ Laser
Mollies/
Anchors
Safety
Glasses
4 5
6
24 Hours Before Starting
• Ensure surface is structurally sound
and in good condition.
• Acclimate all materials by storing
them at in the installation location
(but away from moisture and direct
sunlight or other heat sources) for
at least 24 hours.
• Gather all tools and materials.
/