Page is loading ...

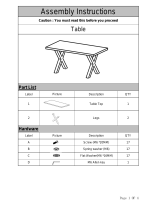
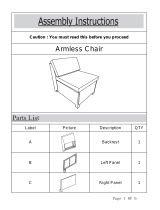
Label Description QTY
A Table Top 1
B Table Legs 2
Label Description QTY
Screw (M8*25) 17
Spring washer 17
Flat Washer 17
Allen key 1
Hardware
Picture
Assembly Instructions
Caution : You must read this before you proceed
Table
Part List
Picture

OVERVIEW
Assembly Steps
This Table has multiple parts and may require up to 30 minutes to assemble.
To give you an overview of the Table parts, the above picture is to help you put the
various Table parts into perspective.
Please read through the instructions below to familiarise yourself with the parts and
steps before assembly.
Assembly Preparation
Before
Beginning
Assembly:
*Before beginning assembly of product, make sure all parts are present.
Compare parts withpackage contents list. If any parts is missing or
damaged,do not attempt to assemble the product.
Table Top(A)
Table Leg(B)

Step 1
Hardware Used
M8 Screw
Spring Washer
Flat Washer
Allen key
Step 2
Position the bottom of the Table top(A) as shown.
And then insert the Legs(B) into the mounting position of Table Top(A).
Attach the Legs(B) by using M8 Screw(1) + Spring Washer(2)+ Flat Washer (3), onto
metal plate of Legs(B), with Allen Key(4).
Do not over tighten Screws(1) while assembling the Legs(B) in order to adjust the
Legs(B) as needed while assembling and make sure you follow the steps fully.
Stand the Table up.
If the Table wobbles, adjust the Pre-installed Levellers at the bottom of the Legs until the
Table is level.
This Table can only be used on a flat, level surface.
This side is
toward outside.
B
B
A

Step 3
Make sure all parts are connected and securely locked into position.
Your Table is ready for use.

/