Page is loading ...

USA
SERVICE OFFICE
Dometic, LLC
2320 Industrial Parkway
Elkhart, IN 46516
574-294-2511
CANADA
Dometic, LLC
46 Zatonski, Unit 3
Brantford, ON N3T 5L8
CANADA
519-720-9578
For Service Center
or Dealer Locations
Please Visit:
www.eDometic.com
Read these instructions carefully. These
instructions MUST stay with this product.
Form No. 3313534.038
Replaces 3313534.020
(French 3314923.016)
©2013 Dometic, LLC
LaGrange, IN 46761
Released: 06/13
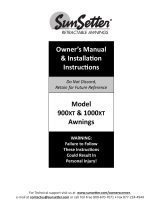
INSTALLATION INSTRUCTIONS
INSTALLATION INSTRUCTIONS AR05XX00XX
ALUMAROOM

2
DOCUMENT SYMBOLS
Indicates additional information that is NOT related to physical injury.
Indicates step-by-step instructions.
INTRODUCTION
These instructions apply to AlumaRoom (hereinafter referred to as “AlumaRoom,” or “product”). Use these instructions to
ensure a properly installed, and properly functioning product.
ATTENTION:
BELOW ARE ITEMS TO REMEMBER WHILE ENJOYING THE LUXURY AND CON-
VENIENCE OF YOUR NEW ALUMAROOM.
● This product is a temporary soft-side aluminum structure, designed for seasonal use only as an outdoor RV room addi-
tion. It is not designed or intended for use when weather temperatures are at or below 32°F (0°C), or when there is the
potential for snow or ice. It is mandatory to take this room down and stow the awning during winter conditions.
● Your new AlumaRoom is a temporary soft-side aluminum structure, designed for outdoor RV room additions intended
for installation under an RV awning. All vinyl or acrylic awnings have instructions that recommend awnings be placed in
the stored position in high winds or are sold with a wind sensor to help protect the awning at winds above approximately
18mph. This structure and the rafter system will disable wind sensors and prevent the stowing of the awning during windy
weather. Please be aware that consistent high winds may cause the vinyl material of the awning and the upper side skirts
of the room to billow and may disconnect sections of the Dual Lock™ fasteners. If you incur windy days or storms with
sudden strong winds you may need to periodically check the room’s upper fabric, the front wall valance, the Dual Lock
™ fasteners, and the awning’s fabric over the rafters to see if any adjustment is necessary. This room is not designed to
withstand consistently strong winds or extreme wind gusts during storms.
● The New AlumaRoom is a temporary soft-side aluminum structure, designed for outdoor RV room additions. It is rain
resistant. The Rafter System provided with this room will shed water and prevent pooling on the awning. However,
downpours and driving rain may cause the infi ltration of water in the seams of the windows and screen channels, the
seams between the joining pieces of the room, and may, if there is enough rain water runoff, overfl ow the bottom track.
PLEASE READ THESE INSTRUCTIONS THOROUGHLY BEFORE ATTEMPTING THE CONSTRUCTION OF THIS ROOM.
FAILURE TO FOLLOW THESE DIRECTIONS IN THE ORDER AND SEQUENCE DEFINED HEREIN MAY CAUSE THE
INSTALLER TO HAVE TO DISASSEMBLE PORTIONS OR ALL OF THE ROOM IN ORDER TO ASSEMBLE THE ROOM
CORRECTLY.
Dometic, LLC reserves the right to modify appearances and specifi cations without notice.

3
TABLE OF CONTENTS
INTRODUCTION ....................................................................................................................................................................2
DOCUMENT SYMBOLS ........................................................................................................................................................2
IMPORTANT SAFETY INSTRUCTIONS ................................................................................................................................4
A. Recognize Safety Information ...................................................................................................................................4
B. Understand Signal Words ..........................................................................................................................................4
C. Supplemental Directives ............................................................................................................................................4
D. General Safety Messages .........................................................................................................................................4
PROCEDURE .........................................................................................................................................................................5
A. Site Preparation: ........................................................................................................................................................6
B. Position awning: ........................................................................................................................................................7
C. Installation of valance: ...............................................................................................................................................8
D. Installation of rafter assemblies: ................................................................................................................................8
E. Bottom track installation: .........................................................................................................................................10
F. Installing the tubular corner posts: ...........................................................................................................................12
G. AlumaRoom wall, setup: ..........................................................................................................................................13
H. Installation of upper skirts: .......................................................................................................................................16
I. RV wheel skirt installation: .......................................................................................................................................19
J. Main skirt installation: ..............................................................................................................................................20
K. Securing the AlumaRoom front wall to the valance: ................................................................................................21
L. Installation of door handles: .....................................................................................................................................22
GENERAL CARE AND USE .................................................................................................................................................23
A. AlumaRoom maintenance. ......................................................................................................................................23

4
IMPORTANT SAFETY INSTRUCTIONS
This manual has safety information and instructions to help
users eliminate or reduce the risk of accidents and injuries.
A. Recognize Safety Information
This is the safety alert symbol. It is used to
alert you to potential physical injury hazards.
Obey all safety messages that follow this
symbol to avoid possible injury or death.
B. Understand Signal Words
A signal word will identify safety messages and
property damage messages, and will indicate the
degree or level of hazard seriousness.
indicates a hazardous situation that,
if NOT avoided, could result in death or serious in-
jury.
indicates a hazardous situation that,
if NOT avoided, could result in minor or moderate
injury.
is used to address practices NOT
related to physical injury.
C. Supplemental Directives
Read and follow all safety information and
instructions to avoid possible injury or death.
Read and understand these instructions be-
fore [installing / using / servicing / performing
maintenance] on this product.
Incorrect [installation / operation / servicing /
maintaining] of this product can lead to seri-
ous injury. Follow all instructions.
The installation MUST comply with all ap-
plicable local or national codes.
D. General Safety Messages
Failure to obey the following warn-
ings could result in death or serious injury:
●This product MUST be [installed / serviced] by a
qualifi ed service technician.
●Do NOT modify this product in any way. Modifi ca-
tion can be extremely hazardous.
● IMPACT OR CRUSH HAZARD. Prior to winter
weather conditions ALWAYS disassemble screen
room including the rafters and return awning to
the closed position.

5
● 3 roller tube valances
● 2 wall seal fl anges
BOX 2-Side Wall Panel Kit
● 4 wall panels with sliding windows
● 4 panel joiners
TOOLS REQUIRED:
●Electric or battery operated drill
●Hammer
●Standard Screwdriver
●Scissors
●Measuring tape
●Plumb bob
●13/32” metal drill bit
●Pencil
●Chalk line
●Level
●Silicone caulk
●Center punch
●Ladder
●7/64” metal drill bit
●Framing Square
●¼” Hex Bit
●#2 Phillips Bit
●Rubber Mallet
●Emory Cloth or De Burring Tool
ALUMAROOM comes in 5 boxes.
PARTS FOR ASSEMBLY: Please locate each of these
and organize them by part name.
BOX 1-Rail and Extrusion Kit
● 5 bottom tracks
● 5 top rails
PROCEDURE

6
● 2 door posts
● 2 pcs of wool pile
BOX 3-Rafter and Corner Post Kit
● 2 tubular corner posts
● 5 curved (2-pc) rafters for the 10’ 11” room
● 6 curved (2-pc) rafters for the 14’ 8” room
● 8 curved (2-pc) rafters for the 18’ 5” room
● 9 curved (2-pc) rafters for the 22’ 2” room
BOX 4-Front Wall Panel Kit
● 3 wall panels with sliding windows for the 10’ 11” room
● 4 wall panels with sliding windows and 1 panel joiner
for the 14’ 8” room
● 5 wall panels with sliding windows and 2 panel joiners
for the 18’ 5” room
● 6 wall panels with sliding windows and 3 panel joiners
for the 22’ 2” room
● 2 pcs of wool pile
PROCEDURE
BOX 5-Accessory and Skirt Kit
● OPEN BOX 5 AND CHECK THE CONTENTS SHEET.
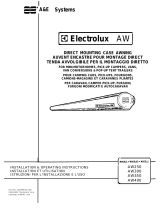
A. Site Preparation:
Make sure when your awning is fully extended ,
that the distance perpendicular from the RV wall
to the center of the roller tube is between 92"
and 94", and the height from the bottom of the
roller tube to the ground is between 77 ¾" and
80". Awning must be in carport position. See Fig-
ure (FIG. 1).
FIG. 1
77¾"-80"
92"-94"
This section is an extremely important for the success-
ful installation of your patented AlumaRoom. In order to
proceed with the installation please verify the following:
2. Make sure that the RV has been properly lev-
eled. If necessary make the needed adjust-
ments to level the unit.
3. Look in the area under the entire awning fabric
when the awning is fully extended. This is the
area 92” to 94” from the wall of the RV for the
full length of the awning. Make sure that there
are no obstructions present in the area where
you intend to place the room. This means that
you need to check for the fl atness of the surface
(concrete or wood deck) that you intend to use
as your patio and the surface that you will use to
mount the tracks and walls of the room.
Whereas the surface does NOT need to be
absolutely level, consideration MUST be
made as to how rain water run-off will fl ow
when planning your room installation. A fl at
surface that allows rain water run-off to run
away from the room and RV are essential.

7
B. Position awning:
Extend the awning on the RV. Locate the roller
tube so that it is 77 3/4" to 80" from the bottom of
the awning roller tube to the patio surface. Mea-
sure this down the entire length of the awning.
Also make sure that the extension of the awning
from the Side wall of the RV is between 92 and
94” to the center of the roller tube. Check at both
ends of the awning.
2. Position awning arms in the carport position and
secure them to the deck.
For awnings which cannot be placed in
the Car Port position, the side door pro-
vision will NOT be possible. In this situa-
tion all 4 side panels MUST be placed in
the fi xed track postion, and the side door
posts are NOT used.
3. Position the roller tube such that the accessory
groove is pointed directly down at the patio sur-
face. See Figure (FIG. 2).
FIG. 2
4. The concrete or wood deck patio surface where
you intend to install your AlumaRoom should not
have uneven spots, holes, or sudden rises. Pay
particular attention to where the perimeter of the
room will be. The mounting surface for the walls
must be fl at so that the bottom tracks can lay
fl ush on the patio surface. Remember the bot-
tom track is where the doors slide. Any change
in the fl atness of the surface under the bottom
track will restrict the sliding action of the doors
or make them impossible to move.
5. The angle between the patio surface and the
wall of the RV should be 90° to 91°.
6. When the awning is fully extended, the distance
from the bottom of the roller tube to the surface
of your concrete or wood deck patio should be
between 77 ¾" to 80”.
7. If your patio surface is a wood deck, the bot-
tom tracks will be secured with the wood screws
provided with your room kit. If you are using a
concrete patio as the surface where you mount
the bottom tracks, you will need to purchase up
to 32 masonry fasteners to replace the wood
screws that will secure the bottom tracks around
the perimeter of the room. Any masonry fasten-
ers must have a head size no larger than 5/16”
diameter and 3/16” high.
8. Once you have leveled your RV, have acquired
a patio surface of concrete or wood that is 90°
to 91° from the sidewall of the RV where the
AlumaRoom is to be installed, and you have as-
sured that the patio surface is fl at, you are ready
to begin the installation procedure.
9. Become familiar with the service, luggage, and
entry door as well as window locations on your
RV. Select a room size from the 4 available room
sizes that will not interfere with these locations.
10. Decide whether you wish to enter your RV from
within the AlumaRoom or whether you wish the
RV entry door to be outside of the room. Make
the size selection of your room, based on your
preferences from the 4 available room sizes.
You must maintain at least 6” of awning fabric
outside of the side walls of the room.
11. Your AlumaRoom comes with 2 doors. One for
the front wall and one for the side wall of your
choice.
PROCEDURE

8
C. Installation of valance:
At one end of the roller tube where you intend to
put one side wall of the AlumaRoom, at the loca-
tion where the awning fabric is partially wrapped
around the roller tube, measure in 6 inches from
the edge of the fabric and mark the roller tube at
the accessory groove with an erasable marker
or chalk. (If you elect to locate your side walls
under the fabric further than 6” from the edge,
you will have to calculate this based on your in-
tended location of the side walls and the size of
room you are constructing.) See Figure (FIG. 3).
FIG. 3
2. Make sure that you are not closer than 4” to the
adjustable awning arm when it is in either the
vertical “patio position” or the standard side arm
position latched into the bottom foot on the RV.
This 4” gives clearance for the operation of the
height adjustment on the awning. (The door end
of your AlumaRoom will require that the adjust-
able awning arm on that end of the room be se-
cured in the “patio” position.)
3. Locate the other end of the AlumaRoom as fol-
lows:
a. You may choose to install a room of a dif-
ferent size based on preference of RV door
location and locations of windows and other
service doors. Make sure that your vertical
wall placement will not interfere with these
important locations.
STANDARD ROOM SIZES ARE:
10’ 11” 14’ 8” 18’ 5” 22’ 2”
b. Locate which awning end cap has the open-
ing for adding accessories into the accessory
groove of your awning roller tube. Find the
sections of roller tube valance in your Alu-
maRoom kit. Install the number of valances
shown below into the accessory groove of
the awning roller tube by sliding them into
the groove from the opening in the end cap
that you have just located. Slide all valances
until they butt against each other. Tape them
together at the seams with regular masking
tape so that they stay together.
Standard Room Sizes 10'11" 14'8" 18'5" 22'2"
Number of Valances
Required
2 233
Cut The Last Valance To 3'-4 ½" 7’ -1 ½” 3’- 4” 7'-1”
(NOTE: When you cut the valances mark
them with a square before you cut.) We
suggest that you mark the last valance
you install according to the chart above.
Then, prior to cutting you slide it in place
and measure the complete dimension
across the entire Valance to determine if
it sums to the room sizes shown above.
Once the dimension of all valance sec-
tions in place between the outside end of
the fi rst piece and the mark that you have
made for the cut matches the appropriate
room size then slide the valance back out
and cut off the excess valance material at
the mark.
4. Position the valance where the room side wall is
going to be. Maintain a minimum of 6" from both
ends of the fabric edge. See Figure (FIG. 4)
FIG. 4
Edge of
Fabric
Edge of
Valance
D. Installation of rafter assemblies:
WARNING IMPACT OR CRUSH HAZARD. Prior
to winter weather conditions always disassemble screen
room including the rafters and return awning to the closed
position.
Check the placement of the valance to make
sure that the leading end of the valance is where
you placed the mark on the roller tube at least 6
inches in from the edge of the fabric.
PROCEDURE

9
FIG. 7
6. Install pipe insulation provided in BOX 5 onto the
rafter, starting at the round end and work it up to
about 12” from the fl at end. Insert the short raf-
ter tube into the long curved tube. See Figures
(FIG. 8) and (FIG. 9).
FIG. 8
FIG. 9
7. Install the fi rst curved rafter assembly by adjust-
ing the length so that it is two notches too long
for insertion with the spring tension relaxed.
Then insert the fl at end of the curved rafter into
the aluminum rafter channel and compress the
pin end of the rafter so that you can fi t the pin of
the rafter end into the 13/32” hole that you have
drilled in the roller tube. Use care not to scratch
the roller tube. Make sure that the curve of the
rafter points up and provides tension on the aw-
ning fabric. See Figure (FIG. 10) and (FIG. 11).
2. On the roller tube, under the awning fabric,
measure down ½” from where the fabric reten-
tion groove is located. Draw a line on the roller
tube, clear across for the full dimension of the
selected room, at this ½” distance. See Figure
(FIG. 5).
FIG. 5
3. At the leading end of the valance, measure in ½”
from the end of the valance and mark that spot
on the awning roller tube. Using a center punch
make an indentation to start a 13/32” hole. Us-
ing your drill and a 13/32” drill bit drill a hole at
that location. Make sure that you remove any
sharp edges or metal burrs from the hole that
you drill in the roller tube to avoid damage to
fabric when rolling up. See Figure (FIG. 6).
FIG. 6
4. On the RV wall, just below the awning rail, on
the same end of the awning where you have
drilled the fi rst rafter hole on the roller tube,
measure in from the edge of the fabric 6” or the
same distance as measured on the roller tube
valance to the hole you drilled in step (3). Mark
that location.
5. Using the aluminum rafter channel and the ny-
lon bushings with the #8-18 x 1” hex head self-
drilling screws supplied for the rafters, center
the rafter channel horizontally in place over the
mark and screw into the side wall of the RV. See
Figure (FIG. 7).
PROCEDURE

10
11. Using the aluminum rafter channel and the nylon
spacer with the screws supplied for the rafters,
center each rafter channel horizontally in place
over the mark and screw into the side wall of the
RV. See FIG. (FIG. 12)
FIG. 12
12. Repeat steps (5) through (7) for each rafter.
E. Bottom track installation:
Drop a plumb line from the front edge of the
room valance that is installed in the awning roll-
er tube’s accessory groove. Drop the plumb line
from a point about an inch from the end of the
valance, then make a mark where the plumb line
meets the fl oor surface.
2. Go to the other end of the valance and repeat
step (1) to make a mark on the fl oor near that
end.
3. At one front corner of the room, drop a plumb line
from the endmost rafter. Do this by passing the
plumb line up from the outside of the room and
over the insulation on the endmost rafter, about
an inch from the end of the insulation near the
roller tube. Make a mark where the plumb line
meets the fl oor surface. Keeping the plumb line
located over the end rafter, slide it back toward
the RV wall to a point about an inch from the end
of the insulation. Make a 2nd mark where the
plumb line meets the fl oor surface.
4. Go to the other front corner and repeat step (3)
to make two more mark on the fl oor near that
end.
5. Using a chalk line, connect the marks on the
fl oor to make three lines, one for the front wall
and two for the side walls of the room.
6. Locate the bottom track pieces that will form the
front corners of your room. These will have left
and right 45° angle cuts so that the corners will
fi t together. (Left and right are determined by
standing with your back to the RV.) When install-
ing the bottom tracks, caulk the bottom or the
outer perimeter so that it will seal the room bet-
ter with clear silicone.
FIG. 10
FIG. 11
8. Use Table 1 below to fi nd the distance between
rafters: Table 1:
Standard Room sizes 10’ 11” 14’ 8” 18’ 5” 22’ 2”
No. of Remaining Rafters 45 7 8
Distance Between Raf-
ters
32 ½” 35” 31 7/16” 33 ⅛”
9. Locate the centers of the rafter pin locations
along the ½” line that you marked on the roller
tube earlier. Using a center punch mark these lo-
cations. Then drill the holes using the 13/32” drill
bit and electric drill. Make sure that you remove
any sharp edges or metal burrs from the holes
that you drill in the roller tube. You can use em-
ery cloth to remove any sharp edges and burrs.
Install the fi rst and last rafter 1/2" from the
valance. Then install the remaining raf-
ters.
10. Locate and mark the centers of the remaining
rafter channel locations on the RV wall, just be-
low the awning rail using the same dimension
between rafters that you used to locate the rafter
pins in the roller tube.
PROCEDURE

11
12. Using the Table 2 below select the correct bot-
tom track for the next piece to be fastened to the
fl oor along the chalk mark that represents the
front wall of the room.
Table 2:
ROOM SIZE WITH APPROPRIATE
LENGTH OF BOTTOM TRACK
10'-11" 14'-8" 18'-5" 22'-2"
TRACK SECTION
DESCRIPTION
LEFT 45°
ANGLE 90-1/2" 90-1/2" 90-1/2" 90-1/2"
STRAIGHT
SECTION
NOT
USED
NOT
USED 40" 85"
RIGHT 45°
ANGLE 40-1/2" 85-1/2" 90-1/2" 90-1/2"
DO NOT CUT THE 45° ANGLE END OFF
OF THIS TRACK.
13. Locate the section of bottom track that has two
90° angle edges on the ends. Check Table 1
"STRAIGHT SECTION" row to see if it is used
with your room. If it is NOT used in your room
set it aside and skip to step (18).
14. If it is used for your room cut it to either 40” or
85” according to the "STRAIGHT SECTION"
row in Table 1 above. Do not cut this piece with
a 45° angle.
15. If you have cut this piece, position it so that it
mates against the front left bottom track that you
have already fastened to the fl oor. Make sure
that the slide tracks and the snap tracks align
perfectly with the same tracks on the left front
bottom track that is already secured and that the
front edge of the bottom track is up against the
chalk line for the front of the room.
16. Repeat step (8).
17. Take the right front bottom track and position it
so that it mates with the piece that you have just
secured to the fl oor. The outside of the track
should lay right against the chalk mark at the
front of the room.
18. Check the length of this bottom track. Depend-
ing on the length of your room this bottom track
will either be just right or too long to make up the
entire front bottom track of your room. Check
the mark that you made on the fl oor that inter-
sects the chalk line representing the front of the
room.
7. Take the left side bottom track and position it
along the room's left side chalk mark. The out-
side of the track should lie against the chalk
mark. See Figure (FIG. 13).
FIG. 13
Use square for accuracy of corners.
8. Using (4) #8 x ¾” wood screws, secure the track
to the fl oor in the holes provided in the track. (If
you are using masonry fasteners you will have
to locate your securement points on the con-
crete, prepare the threaded portion in the brick,
mortar or concrete fl oor.). See Figure (FIG. 14).
9. Take the left front bottom track and position it so
that it mates with the left side bottom track that
forms the front left corner of your AlumaRoom.
The outside of the track should lay right against
the chalk mark at the front of the room.
10. Repeat step (8) for opposite side. See Figure
(FIG. 14)
FIG. 14
11. From the outside edge of the front left corner
of the bottom track that you have just fastened
down measure along the chalk line that repre-
sents the front of the room, the overall dimen-
sion of the room you have selected. Mark this
length across the chalk line.
PROCEDURE

12
FIG. 16
FIG. 17
4. Locate the foot of each post such that the clamp
that you just tightened is pointing to the outside
and the long sides of the foot are resting against
the back of the bottom track.
5. Center pole to center of snap track. The dis-
tance must be equal between the RV wall to the
pole at the top and bottom. Adjust the foot's po-
sition toward the RV if needed to maintain this
distance.
6. Push up to provide additional tension on the
post and then tighten the clamp so that the post
stays in place. See Figure (FIG. 16).
7. Secure each post in place using (2) #8 x ¾” wood
screws and washers. (If you are using masonry
fasteners (not included) you will have to locate
your anchor points on the concrete, prepare the
threaded portion in the brick, mortar or concrete
fl oor and then secure the posts with 2 appropri-
ate fasteners for each post).
19. Review Table 2 above in Step (12). The "RIGHT
45° ANGLE" row indicates the proper length of
this section of bottom track depending on the
length of the room. Cut the right front bottom
track to the dimension shown in the "RIGHT 45°
ANGLE" row, from the 90° angle end of the track.
DO NOT CUT THE 45° ANGLE END OFF
OF THIS TRACK.
20. Once you have cut the right front bottom track to
size (if applicable), re-position it so that it mates
with the section that you last fastened to the
fl oor. Make sure that the slide tracks and the
snap tracks align perfectly with the same tracks
on the bottom track section that is already se-
cured and that the front edge of the bottom track
is up against the chalk line for the front of the
room.
21. Repeat step (8).
22. Make sure that the right side bottom track forms
the 90° angle of the right front corner of the room.
23. Repeat Step (8).
24. Take the right side bottom track and position it
so that it mates the 45° angle of the right front
bottom track and rests along the room’s right
side chalk mark.
25. Repeat step (8).
26. Using clear silicone caulk, fi ll the cracks at the
90° corners where the tracks meet. Make sure
that you do not extend the caulk into the tracks
away from the corners. See Figure (FIG. 15)
FIG. 15
F. Installing the tubular corner posts:
Locate the two metal tubular corner posts out of
box 3.
2. Take them to the two outer most rafters of the
room.
3. Extend them in the vertical position until the
pin of each post engages the hole in the rafter
adjacent to the RV wall. The foot of each post
should rest on the fl oor. See Figure (FIG. 16)
and (FIG. 17).
PROCEDURE

13
FIG. 19
PANEL
JOINER
PANEL
JOINER
FABRIC SIDE
FABRIC SIDE
2 WALL PANELS
6. Starting at the top or bottom snap the loose side
of one of the panel joiners already snapped into
place on the fi rst panel into the second panel.
Work your way along the snap channel of the
wall panel until the entire panel joiner is snapped
in place. See Figure (FIG. 20)
INSTALLED PANEL JOINER
ON WALL PANELS
FIG. 20
7. Bring both of the wall panels to the front left cor-
ner of the room where the bottom tracks are se-
cured to the fl oor.
8. Make sure the windows for both wall panels are
toward the inside of the room while forming the
90° corner of the room.
9. Carefully lift the fi rst front wall panel into place
in the left front bottom track and then the other
wall panel into the left side bottom track. (Left
and right are determined by standing with your
back to the RV.) Make sure that the AlumaRoom
Valance is on the outside of the front wall panel.
10. Center the front wall panel over the snap tracks
at the front of the bottom track about 1 ¾” in from
the corner. Press down fi rmly on the wall panel
until it snaps in place. Be sure you feel the snap
action while pressing fi rmly down on the panel.
See Figure (FIG. 21).
G. AlumaRoom wall, setup:
For ease of installation raise the awning roller
tube a few inches on both ends.
2. As you select each wall panel:
a. Remove protective fi lm.
b. The fabric is at the bottom.
c. The window is positioned on the inside.
Do NOT fl ip any panel end for end under the
awning fabric. This action may tear the aw-
ning if you happen to accidently brush the
fabric with one of the panel corners.
3. Take a wall panel joiner and position it along side
of a wall panel. Make sure that the panel joiner
extends the full height of the panel centered.
Double check that the panel joiner is cen-
tered such that it is equal distance from both
ends of the panel.
4. Starting at one end, snap the panel joiner in by
inserting one side of the snap section into the
track on the wall panel side and then snapping
the other side into place. Work your way up
the panel until the entire panel joiner has been
snapped in place. See Figure (FIG. 18).
FIG. 18
5. Position second wall panel adjacent to the fi rst
wall panel with in 1"-2". Both wall panels should
have the fabric positioned as shown, with the
windows on the inside. See Figure (FIG. 19).
PROCEDURE

14
FIG. 22 TOP RAIL 1 3/4"
18. Center the barbed snap tracks of the top rail
over the wall panel and press down fi rmly until
you feel the snap action of the rail barbs into the
wall panel.
19. Slide the door along the track to support the
top front left corner rail and make sure that the
door fi ts into the inside slide track of the top rail.
Slide the door all the way back to the square end
of the top rail.
20. Locate the left side top rail and position it over
the front left side wall panel at the corner. Mate
the 45° angle cut of this top rail with the 45° an-
gle cut of the left front top rail. Center the barbed
snap tracks of the top rail over the left side cor-
ner wall panel and press down fi rmly until you
feel the snap action of the rail barbs into the wall
panel.
21. Locate the roll of white duct tape and cut a strip
4”-6” long off of the roll. Carefully place this tape
on the top of the intersection of the two top rail
sections at the left front corner of the room. See
Figure (FIG. 23).
FIG. 23
WHITE
TAPE
22. Locate another wall panel.
23. Locate another panel joiner.
24. Repeat steps (3) through (6) of this section.
FIG. 21
WALL
PANEL
BOTTOM
TRACK
11. Work your way over to the side wall panel and
center it on the snap tracks at the front of the
side bottom track about 1 ¾” in from the out-
side end of the corner. Press down fi rmly on the
panel until it snaps in place. Be sure you feel
the snap action while pressing fi rmly down on
the panel.
12. Check outside of the room at the corner and
straighten any of the pleats in the panel joiner.
Check again to make sure that the panel joiner
is snapped in place on both sides.
13. Locate another wall panel section. This wall
panel may be used as a door or another section
of the wall depending on the size of the room.
Standard Room Sizes 10'11" 14'8" 18'5" 22'2"
No. of Front Wall Panels 2 3 4 5
Doors on Front Wall 1 1 1 1
14. (If you have a 14’ 8” or 22’2” room, the door will
not be centered so you need to decide where
you want the door.) For the 10’11” and 18’5”
rooms the door is located right in the center.
You are able to change this around if you wish
but a door cannot be located on the ends of the
front wall without an additional door post being
ordered.
15. If your room is 10’11” this second wall panel will
be your door. Position the wall panel over the
bottom track, centered on the inside slide tracks.
The door will slide easily back and forth on these
tracks.
16. Locate the top rail section that will go along the
front panels on the left side. It has a 45° cut end.
17. Place this section over the fi rst stationary panel
at the front left corner of the room with the panel
1 ¾” in from the end of the outside corner. See
Figure (FIG. 22).
PROCEDURE

15
(Note: the Wall sealing fl ange does NOT
have to be fl at against the RV.)
FIG. 25
38. From inside of the room, work your way along
the right side wall and even out the panel joiners
and straighten the pleats.
39. Locate the right side top rail and position it over
the right side wall panels. Mate the 45° angle cut
of this top rail with the 45° angle cut of the right
front top rail. Center the barbed snap tracks of
this top rail over the wall panels and press down
fi rmly until you feel the snap action of the rail
barbs into the panel.
40. Repeat step (21) except at the right front corner
of the room.
41. If you have a 10’11” room the front and right side
walls are complete. Skip to step (45).
42. If you have larger rooms you need to add front
wall panels and panel joiners as previously in-
structed until the front wall has all of its wall pan-
els in place. Refer to step (13).
43. Once all of the front wall panels are in place, you
may need to add an additional front wall top rail
section. The following table shows how many
top rails are needed for each size room. Cut the
45° top track if the straight cut end hangs over
the door way.
Top Rail Section
Description
(Below):
Room Size With Appropriate
Length of Top Rail
10'11" 14'8" 18'5" 22'2"
Left Front 45°
Angle
90 1/2" 90 1/2" 90 1/2" 90 1/2"
Straight Front
Section
Not
Used
Not
Used
40" 85"
Right Front 45°
and Angle
40 1/2" 85 1/2" 90 1/2" 90 1/2"
44. If applicable, snap the additional top rail into
place.
45. At each seam of the top rail sections apply a 4”
piece of White Duct tape with an even amount
on both sides of the seam, on top of the rail.
25. Bring both of the wall panels to the front right
corner of the room.
26. Repeat step (8).
27. Carefully lift the fi rst front wall panel into place
in the right front bottom track and then the other
wall panel into the right side bottom track. Make
sure that the AlumaRoom valance is on the out-
side of the front wall panel.
28. Repeat steps (10) through (12), except substi-
tute right for left.
29. Locate another wall panel.
30. Locate another panel joiner.
31. Repeat steps (3) and (4) on the open side of the
front right side wall panel that you have already
snapped into place
32. Position the new wall panel in the right side bot-
tom track adjacent to the front right side wall
panel with the new panel joiner snapped in
place.
33. Repeat step (6) with the panel joiner snapped
into the front right side panel to connect it to the
new panel.
34. Center the wall panel on the snap tracks of the
side bottom track about 2” from the front side
wall panel. Do not snap the wall panel into the
bottom track at this time, let it rest there.
35. Locate one of the wall seal fl anges. Position the
wall seal fl ange along the open side of the wall
panel from step 34. Snap the fl ange in place on
the wall panel just like you snapped the panel
joiner in place on the other side of the panel.
See Figure (FIG. 23)
FIG. 24
36. Spread the fl anges apart and place each fl ange
leg on either side of the tubular corner post. Al-
low the fl ange legs to rest against the RV wall.
37. Push the wall panel toward the RV until the
fl ange legs spread out and seal the back corner
of the room against the RV. Press down fi rmly
on the panel until it snaps in place into the bot-
tom track.
PROCEDURE

16
54. Place a 4” piece of white duct tape on the inside
and outside of the door post frame, where the
two door posts meet at the top. This will add
strength and provide an aesthetic look at the top
of the door opening. See Figure (FIG. 27).
FIG. 27
H. Installation of upper skirts:
Locate the Dual Lock™ in box 5.
Dual Lock™ and duct tape - The adhesive
qualities of the fasteners and tape are strictly
dependent on outside temperature, humidity,
and set time, at the proper conditions. Since
the seller has no control over the installers’
application method we can only state the re-
quirements for optimal adhesion. All sections
of Dual Lock™ MUST be installed with equal
force applied from the backing side as well
as the applied side at temperatures above
70ºF with relative humidity levels below 55%.
The set time for the adhesive is 2 hours.
Dirt and grime will affect the adhesive char-
acteristics and life of the duct tape on the
corners.
Lack of adhesion is NOT a Warranted Item.
2. Locate the two upper side skirts in box 5.
3. At the back of the room, on one of the sidewalls,
against the RV where the vertical post for the
room has been installed, measure the distance
from the underneath side of the awning fabric
right next to the awning channel down to the wall
seal fl ange. Write the measurement down.
4. Lay out one of the upper side skirts. The bottom
of each skirt will be the edge that has a bead
sewn into it. Measure up from the bead along
the sleeved foam end of one of the skirts, the
distance you have written down in step (3) and
make a mark on the seam next to the foam. See
Figure (FIG. 28).
46. Locate the last panel. This is the second door
to your room. Position this panel inside the slide
track of the left side bottom track and within the
slide track of the left side top rail. Slide the door
all the way forward so that the stationary door
posts and the left side wall seal fl ange may be
installed.
47. Locate the fi rst door post.
48. Locate the second wall seal fl ange.
49. Snap the wall seal fl ange into the snap track on
the side of the door post. See Figure (FIG. 24).
50. Position the door post on the snap track side of
the left side bottom track so that both legs of the
wall seal fl ange rest on either side of the tubular
corner post and against the RV.
51. While one person holds the door post and ap-
plies pressure on the Wall Seal Flange against
the wall of the RV secure the post to the top rail
and fl oor as follows:
a. The top horizontal portion of the door post
snaps into the top rail in the same manner as
the wall panels.
b. The bottom of the door post has a bracket.
Screw the bracket through the plastic bottom
track using (2) #8 X 1” self drilling screws.
Make sure door posts are perpendicular to
the ground, and the bracket is centered on
the bottom track's snap-track as shown in
Figure (FIG. 26).
FIG. 26
52. The second door post is located by butting the
top horizontal portion against the fi rst door post,
and snaps into the top rail. The side of the sec-
ond door post also snaps into the panel joiner
located on the panel adjacent to it. Fasten the
bottom of this door post in the same manner as
the fi rst. This will give a door frame opening of
approximately 40 1/4 inches from the fi rst door
post to the second door post.
53. Snap the rest of the left side top rail in place
along the left side wall.
PROCEDURE

17
FIG. 28
BEAD
5. Take the other upper side skirt and repeat the
same process using the measurements you ob-
tained at the other end of the room.
6. Cut the fabric wrapped foamed section off of
each upper skirt at the marks you have made on
the fabric. See Figure (FIG. 29).
FIG. 29
ROLLED FOAM
BEAD
7. The upper side skirts have now been cut for spe-
cifi c ends of the room.
8. Measure the distance between the RV wall and
the front of the top rail at the top of one side wall.
Write this dimension down.
9. Using the upper side skirt for the room end you
have just measured, measure and mark the di-
mension you wrote in step (8) from the inside
of the sleeved foam toward the other end of
the skirt along the beaded edge. See Figure
(FIG. 30) and (FIG. 31).
FIG. 30
ROLLED
FOAM END MARK
LOCATION
FIG. 31
10. Cut in from the end of the skirt along the bead
until you reach the mark you made on the bead.
See Figure (FIG. 32).
FIG. 32
AFTER
BEFORE
DO NOT
CUT BEAD
11. Repeat this process for the other upper side skirt
using the same steps above for the other end of
the room.
PROCEDURE

18
FIG. 35
CORNER
POST
ROLLED
FOAM
RV WALL
17. Repeat step (15) on the other upper side skirt.
18. If you raised the awning roller tube in section (G)
step (1) lower it down to the top rail of the wall.
Then raise it to the nearest lock position of the
awning arm.
19. The fabric you have pulled over each end rafter
must be trimmed to 6” below the rafter with a
pair of scissors. See Figure (FIG. 36).
FIG. 36
20. Cut (60) 1” pieces of Dual Lock™. This is im-
portant; follow the instructions exactly. You will
need all of the remainder of the Dual Lock™ for
later use. See Figure (FIG. 37).
12. Starting with sleeved foam end of one of the up-
per side skirts, at its intended sidewall, thread
the bead edge into the top rail until you have
pulled it all the way to the RV wall.
13. Thread the bead into the top rail on the front wall
of the room. See Figure (FIG. 33)
FIG. 33
14. Repeat steps (12) and (13) with the other upper
side skirt.
15. Take the top loose end of the upper side skirt
and pass the material between the rafter and the
awning fabric. Pull it over the rafter the entire
length of upper side skirt. Work the wrinkles in
the fabric out as you work your way back to the
RV wall. See Figure (FIG. 34).
FIG. 34
16. At the RV wall push the sleeved foam between
the vertical corner post and the RV wall. Rolled
foam should be on the inside of the room. See
Figure (FIG. 35).
PROCEDURE

19
FIG. 39
26. Repeat steps (23) through (25) on the other up-
per side skirt. See Figure (FIG. 40).
FIG. 40
I. RV wheel skirt installation:
The wheel skirt and main skirt are used to seal
off the area beneath the RV fender and wall. Lo-
cate the wheel skirt in box 5. The wheel skirt
measures approximately 72” long by 24” high.
Locate the main skirt in box 5. This skirt should
measure approximately the same length as your
room, i.e., either 10’11”, 14’8”, 18’5”, or 22’2”.
2. Install the wheel skirt fi rst. Two persons will be
needed for this operation. Center the wheel skirt
over the RV’s wheel well, and position the top of
the wheel skirt about 2 inches above the top of
the wheel well. Mark the corner positions. See
Figure (FIG. 41).
For the best results and lasting adherence
of the adhesive on the Dual Lock™, the am-
bient temperature should be 70°F or above.
(The warmer the better.)
FIG. 37
21. For the best results and lasting adherence of the
adhesive on the Dual Lock™ the ambient tem-
perature should be 70°F or above. (The warmer
the better.)
22. Take the (60) 1” pieces of Dual Lock™ and snap
them together in pairs. Do not peel the backing
off of the adhesive.
There will be 15 pairs of Dual Lock™ on
each upper skirt.
23. Apply the fi rst of Dual Lock™ pair 1/2" from the
edge of the fabric you have cut to 6” below the
rafter at the roller tube end. Peel off one side of
the adhesive backer and press fi rmly in place.
Make sure that you apply fi rm pressure from
both sides of the fabric where you are applying
the “Dual Lock” to assure the adhesive is solidly
bonded to the surface.
24. Continue to apply pairs of Dual Lock™ along
the fabric edge every 6". See Figure (FIG. 38).
FIG. 38
25. Starting at the roller tube end. Remove the Ad-
hesive Backer from the fi rst Dual Lock™ pair
and while holding the fabric taut fi rmly press it
against the fabric on the outside of the rafter.
You will need an assistant to push against the
other side of the fabric from outside the room.
Continue for each Dual Lock™ pair. See Figure
(FIG. 39).
PROCEDURE

20
2. Position the left end of the main skirt at the
outside of the left wall’s bottom track. When
stretched out, the other end of the skirt should
line up approximately with the outside of the
right wall’s bottom track.
3. Determine the how you will fasten down the bot-
tom of the skirt, and allow enough material for
that purpose. Then mark on the RV wall the
height of the top of the main skirt. Make a series
of marks all along the length of the room on the
RV wall. See Figure (FIG. 42)
FIG. 42
MAIN SKIRT
4. Lay out the main skirt with the back side up. Cut
2 - 1” pieces of Dual Lock™ and snap them to-
gether in a pair. Peel the backing off one side
and apply the Dual Lock™ to the left top corner
of the wheel skirt, on the folded seam about ¼”
from the top and ¼” from the end. Cut and ap-
ply another 1” pair of Dual Lock™, measure 12
" and apply the Dual Lock™ ¼”, from the top
of the skirt. Repeat this across the remainder of
the fabric edge, until reaching the end every 12"
apart. Place the fi nal piece ¼” from the end of
the fabric.
5. Position the skirt on the RV at the marks made
in step (3). Starting at one end, peel the Dual
Lock™ backing off one at a time and adhere
them to the RV wall from left to right. Maintain
tautness of the fabric as you move along.
6. Depending on how much RV wall extends below
the top of the main skirt, you may also want to
install additional pieces of Dual Lock™ on the
ends of the wheel skirt. Use your judgment. See
Figure (FIG. 43).
FIG. 41
WHEEL SKIRT
2" ABOVE WHEEL WELL
3. Cut (14) 1” pieces of Dual Lock™ and snap
them together to make (7) pairs. Apply the fi rst
Dual Lock™ pair to the left top corner of the
wheel skirt, on the folded seam about ¼” from
the top and ¼” from the end (peel backing from
one side of the pair only). Apply fi rm pressure to
assure solid bonding to the fabric skirt. Continue
across the top edge of the skirt and apply the (6)
remaining Dual Lock™ pairs evenly spaced ap-
proximately every 12”.
4. Position the skirt on the RV at the marks made
in step (2). Starting at one end, peel the Dual
Lock™ backing off one at a time and adhere
them to the RV wall from left to right. Maintain
tautness of the fabric as you move along.
5. Depending on shape of the RV wheel well, you
may also want to install additional pieces of Dual
Lock™ on the ends of the wheel skirt. You may
or may not need to do this, as the chassis skirt
will cover up the lower portion of the wheel skirt.
Use your judgment as to whether these are nec-
essary.
J. Main skirt installation:
The bottom of the main skirt is the edge with
the row of grommets. These grommets are
provided for you in order to fasten the bottom
of the skirt down. Due to the wide variety
of applications, these instructions can NOT
specify exactly how to fasten the bottom
down, but some suggestions will be given
for common applications at the end of this
section.
1. Beginning at the left end of the room, stretch out
the main skirt along the inside of the room. At
least two persons will be required to position the
skirt on the RV wall. The skirt will need to be
tucked behind the fl exible wall seal that was in-
stalled in section "G. AlumaRoom wall, setup:"
on page (13).
PROCEDURE
/