Page is loading ...

Armstrong Do-It-Yourself Tile Installation System
Installation Materials
Tools:
• Utility knife
• Pencil
• Medium grit sandpaper
• Sanding block
• Smooth edge trowel
• Tape measure
• Short nap paint roller
• Chalk and chalk line
• Rolling pin
• Carpenter’s square
• S-183 Underlayment
• S-184 Patch and Skim Coat for patching or filling textured surfaces
• S-194 Patch, Underlayment & Embossing Leveler
• S-195 Underlayment Additive
• S-185 Latex Primer
Installation Requirements
• Store tile in the room in which you plan to install for 48 hours. Keep room at minimum of 65° F (18° C)
during that time and during installation. After installation, temperature should not fall below 65° F (18°
C) for the first 48 hours, and not below 55° F (13° C) after that.
• If room is heated by radiant coils in the subfloor, the temperature of the floor surface should not exceed
85° F (29° C).
• The subfloor should be level, clean, and free of wax, grease, oil or dust.
• If necessary, patch or fill any cracks in the subfloor with Armstrong patch or latex underlayment.
• If installing over existing vinyl, use liquid underlayment or embossing leveler ro smooth any texture or
embossing on the old floor.
• Install over smooth, well-bonded resilient floors, ceramic, terrazzo, marble or over dry concrete and
wood floors with a plywood overlay.
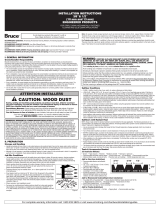
Estimating
Find your room size on chart. Number in square is how many cartons you need. Charts include at least five extra
tiles per 100. These extra tiles are needed to allow for waste and odd room size. NOTE: Armstrong® vinyl tile
flooring is packaged in different quantities. Be sure you use the correct estimating chart.
6’ 8’ 10’ 12’ 14’ 16’ 18’ 20’ 6’ 8’ 10’ 12’ 14’ 16’ 18’ 20’
6’
2
2
3
3
3
4
4
5
6’
1
2
2
2
2
3
3
3
8’
2
3
3
4
4
5
5
6
8’
2
2
2
3
3
3
4
4
10’
3
3
4
5
5
6
7
7
10’
2
2
3
3
4
4
5
5
12’ 3 4 5 5 6 7 8 9 12’ 2 3 3 4 4 5 5 6
30 TILES PER CARTON 45 TILES PER CARTON

Precautions
• When using tile from two or more cartons, check to be sure all pattern and lot numbers are the same for
proper color match.
Prepare Subfloor
Step 1. Inspect and prepare subfloor. Subfloor must be clean, dry, and smooth. A subfloor is the surface over
which your new Armstrong® tile flooring is installed.
NOTE: Do not install over particleboard, waferboard or single-layer STURD-I-FLOOR® panels, existing resilient tile
floors that are on or below grade, existing cushioned-vinyl flooring, carpet, strip wood or plank flooring.
IF INSTALLING OVER...
VINYL FLOORING (only single-layer)
Must be noncushioned-backed and firmly bonded. Check for loose vinyl, gapped seams, cuts, tears, rips, or other
damage. Do not install over tile below grade level.
PREPARE
• Use a utility knife to remove loose vinyl.
• Use New Beginning Extra-Strength Floor Stripper to remove dirt and wax buildup.
• S-194 Patch, Underlayment & Embossing Leveler mixed with the S-195 Underlayment Additive to create
embossing leveler or S-199 One Part Embossing Leveler fills and levels embossing on your old vinyl
flooring.
• Use smooth edge trowel for applying S-194 and S-195 mixture or S-199.
• Use medium grit sandpaper and a sanding block for smoothing rough areas of S-194/S-195 mixture
and/or underlayment.
Precautions
• When installing over an existing resilient floor, lay out the installation so the new seams are a minimum
of 6˝ away from the original seams.
• When installing over tile floors, seams should fall in the center of the tile.
PLYWOOD
If installing a new plywood subfloor, use APA Underlayment Grade. For new or existing plywood subfloors, check
for loose panels, gapped joints, knots, nail holes, or other damage.
PREPARE
• S-184 Patch & Skim Coat or S-194 Patch, Underlayment & Embossing Leveler mixed with the S-195
Underlayment Additive to smooth and fill damaged areas or textured surfaces.
• Use smooth edge trowel for applying S-184 or S-194 and S-195 mixture.
• Use medium grit sandpaper and a sanding block for smoothing rough areas of S-194/S-195 mixture.
• Use S-185 Latex Primer for a superior bond.
• Use short nap paint roller for applying S-185.
CONCRETE/CERAMIC
Must be clean, dry and dust-free. Check for cracks, scaling, levelness, and other damage. Tiles can be installed
over a painted concrete floor (self-stick only). If installing over ceramic tile, terrazzo, or marble, ensure that the
tiles are firmly bonded.

PREPARE
• S-183 Underlayment or S-184 Patch & Skim Coat or S-194 Patch, Underlayment & Embossing Leveler
mixed with the S-195 Underlayment Additive to smooth and fill damaged areas and for patching or
leveling.
• Use smooth edge trowel for applying S-183, S-184 or S-194 and S-195 mixture.
• Use medium grit sandpaper and a sanding block for smoothing rough areas of the underlayment.
• Use S-185 Latex Primer for a superior bond.
• Use short nap paint roller for applying S-185 Latex Primer.
Plan the layout
Step 2. Find the center of each of the end walls and strike a chalk line at the center of the room.
Step 3. At the midpoint of the center line, create a perpendicular line using a carpenter’s square.
Step 4. Leave release paper on back of tile, and position tiles in one quadrant of the room to determine border
tile size. Shift the starting line(s) 1/2 the dimension of the tile; i.e. shift 6" for a 12" tile to maximize border tile
size, if necessary.
Install tile
Step 5. Peel release paper from tile and install at intersection. Install one quadrant of tile at a time. Make sure
arrows on back of all tiles point in the same direction. Lay tiles in pattern shown below, using chalk lines as a
guide. Make sure tiles are butted tightly at all edges to prevent separation.

Cutting the border tile
Step 6. For straight cuts place a loose tile (A) face up exactly on top of the last full tile, making sure the arrows
are pointed in the proper direction. Place another full tile (B) on top of tile (A) with its edge against the wall.
Using tile (B) as a guide, mark the face of tile (A) with a pencil. Cut border tiles with utility
knife. For irregular cuts, make a pattern and transfer it to a tile.
Finish
Step 7. Roll installed tiles to bond to floor. DO NOT wash floor for five days. This will allow the adhesive under
the tile to dry and prevent excess moisture and cleaning agents from interfering with the adhesive bond.
Replace wall base and mouldings.
/