N
BEFORE YOU BEGIN
If you do not feel comfortable installing your
Thumper Fab DEFENDER LONG TRAVEL,
please see your nearest Can-Am® Dealer for
installation.
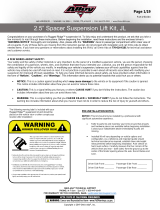
REF QTY DESCRIPTION
1 1 Driver Front Upper Arm
2 1 Driver Front Lower Arm
3 1 Driver Rear Upper Arm
4 1 Driver Rear Lower Arm
5 1 Passenger Front Upper Arm
6 1 Passenger Front Lower Arm
7 1 Passenger Rear Upper Arm
8 1 Passenger Rear Lower Arm
9 2* TF Tie-Rod
10 2* TF Elite Billet Tie-Rod
11 1 Brake Line Kit
12 4 Axles
13 4* ZBroz Shocks
14 2* OEM Shock Relocation Bracket Front
15 2* OEM Shock Relocation Bracket Rear
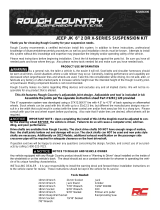
HHARDWARE KIT
A 2 Kryptonite Inner Tie-Rod
B 2 Outer Tie-Rod Heim Joint
C 2 Outer Tie-Rod Jam Nut
D 4 Outer Tie-Rod Misalignment Spacer
E 2 Steering Stop
F 4* Ball Joint Sleeve (OEM and Keller Only)
G 4* Ball Joint Housing Caps (OEM Only)
H 4 Uni-ball Snap Rings
I 4 Ball Joint Snap Rings
J 2 M10-1.5 x 110mm Bolt
K 6* M10-1.5 x 60mm Bolt
L 4 M10-1.5 Nyloc Nut
M 24 Cable Ties
N 4* M10-1.5 x 25mm Bolt (OE Shock Bracket)
O 8* M10-1.5 Nyloc Nut (OE Shock Bracket)
P 4* M10 Fender Washer (OE Shock Bracket)
Q 1 Ball Joint Press Tool
*QTY depends on options selected
TOOLS
• 13mm Socket
• 15mm Socket
• 18mm Socket
• 19mm Socket
• 27mm Socket
• 11mm Wrench
• 12mm Wrench
• 13mm Wrench
• 15mm Wrench
• 18mm Wrench
• 19mm Wrench
• 22mm Wrench
• 30mm Wrench
• Drain Pan
• Channel Locks
• Brake Fluid
• Blue Loctite
• Mallet
• Impact
• Cutting Wheel
• Crescent Wrench
• Ratchets
Driver and Passenger Side
Installation are the same
PARTS
Can-Am/Defender
Long Travel
SKU: TF042001
SKU: TF042001 CAN-AM / DEFENDER LONG TRAVEL Page 2