Page is loading ...

Page | 1
OMIX-ADA® TECHNICAL SUPPORT
PHONE: M-F 8am – 5pm EST 1-800-449-6649
FOR WARRANTY OR TECH CONCERNS, EMAIL: webmaster@omixsupport.com
Copyright © 2019 Omix-Ada®, Inc.
2.5” Spacer Suspension Lift Kit, JL
Part # 61004
460 HORIZON DR. | SUWANEE, GA 30024 | PHONE: 770-614-6101 | FAX: 844-270-0593 | www.Omix-ADA.com
Page 1/19
Congratulations on your purchase of a Rugged Ridge™ suspension kit. To fully enjoy and understand this product, we ask that you take a
few moments to read through these instructions. Before beginning the installation, read these instructions and the enclosed driver’s
“WARNING NOTICE” thoroughly and completely. Also, please affix the “WARNING” decal in passenger compartment within clear view of
all occupants. If any of these items are missing from this instruction packet, do not proceed with installation and call Omix-Ada to obtain
needed items. If you have any questions or reservations about installing this lift kit, call Omix-Ada at 770-614-6101 for technical assistance
and customer service.
A FEW WORDS ABOUT SAFETY:
Your safety and the safety of other motorists is very important. As the owner of a modified suspension vehicle, you are the person choosing
the combination of suspension, wheels, tires, and drivetrain that best fit your intended use. Likewise, you are the person responsible for the
safety and legality of the vehicle you modify. In modifying your vehicle’s suspension, balance your off-road capabilities against how the
vehicle may actually be used off-road and on-road. It is not practical or possible to warn about all hazards associated with modifying your
suspension for improved off-road capabilities. To help you make informed decisions about safety, we have provided certain information in
the form of “Notices”, “Cautions”, and “Warnings”. This information alerts you to potential hazards that could hurt you or others.
NOTICE: This is a caution against anything which may cause damage to the vehicle or its equipment if the caution is ignored.
This notice includes information about how you can avoid or reduce those risks.
CAUTION: This is a signal telling you that you or others CAN BE HURT if you don't follow the instructions. The caution box
includes information about how you can avoid those risks.
WARNING: This is a signal telling you that you CAN BE KILLED or SERIOUSLY HURT if you do not follow the instructions. The
warning box includes information about what you must or must not do in order to reduce the risk of injury to yourself and others.
The following warning label is included with your
Rugged Ridge™ suspension kit and should be
placed on the vehicle visor or other conspicuous
location after installation:
PRE-INSTALLATION NOTES:
NOTICE: This kit should only be installed by a professional with
significant automotive experience.
Refer to parts list and inventory your kit to ensure that all parts
and hardware pieces are available before beginning installation.
Contact your independent dealer immediately if parts are
missing.
Installed lift will vary depending on vehicle options and
configuration. As a reference and important guide should
technical assistance be required, establish base ride-height
measurements before beginning installation. Park vehicle on
hard, level surface. Carefully measure the four corners of the
vehicle (front and rear – both sides) from the ground up to the
center of the fender opening above the axle. Record below and
save.
Driver Side Front: ________ Passenger Side Front: ________
Driver Side Rear: ________ Passenger Side Rear: ________

Page 2/19
2.5” Spacer Suspension Lift Kit, JL
WARNING!
Improper use of air and power tools can cause serious injury. Familiarize
yourself with tool manufacturers’ warnings and instructions before use. Always wear
approved safety glasses.
WARNING!
Altering vehicle ride height affects handling dynamics. Lifted vehicles can increase
roll potential. Avoid situations where a side rollover can occur. Seatbelts and/or
harnesses should be worn at all times.
The lift kit is designed for use with 35” tires and wider wheels with wider than stock
offset for optimal performance off-road. Larger tires can be used but may result in
contact with lower control arms or sway bar links during sharp turns. It is the installer’s
responsibility to inspect fitment of tires and wheel offset to ensure that safe driving
characteristics are maintained.
TOOL REQUIREMENTS
Wrenches – sized to sockets:
6mm Allen wrench
10mm wrench
10mm socket
15mm socket
15mm wrench
18mm socket
18mm open-end wrench
21mm socket
22mm deep well socket
9/16” socket
9/16” wrench
¾” socket
Needle-nose pliers
Floor jack
Jack stands
Bolt/nut torque specifications:
½” – 95 ft./lbs. (Grade 5)
½” – 90 ft./lbs. (Grade 8)
3/8” – 30 ft./lbs. (Grade 5)
3/8” – 35 ft./lbs. (Grade 8)
12mm – 95 ft./lbs. (Class
8.8)
12mm – 90 ft./lbs. (Class
10.9)

Page 3/19
2.5” Spacer Suspension Lift Kit, JL
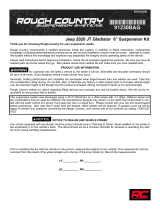
KIT CONTENT: BRACKETS / SPACERS
A. Front coil spacer (2)
B. Rear coil spacer (2)
C. Front shock bracket (2)
D. Rear shock bracket (2)
E. Front sway bar links (2)
F. Front bump stop spacer (2)
G. Rear bump stop spacer (2)
H. Rear sway bar links (2)
A
B
C
D
E
F
H
G

Page 4/19
2.5” Spacer Suspension Lift Kit, JL
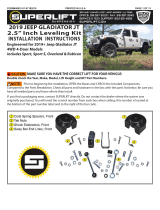
KIT CONTENT: HARDWARE BAGS
I. ½” flat washers (12)
J. ½” Nyloc nuts (2)
K. ½” x 1.25” bolts (2)
L. ½” x 2.5” bolts (2)
M. 3/8” x 1” bolt (2)
N. 3/8” x .75” bolt (4)
O. 3/8” x 3” bolt (2)
P. 3/8” flat washers (8)
Q. 3/8” flange locknuts (8)
R. 12mm x 65mm bolts (8)
S. 12mm flange locknuts (8)
T. Rear-threaded spacer washers (2)
U. Front shock bracket sleeves (4)
V. Rear shock bracket sleeves (4)
I
J
K
L
M
N
O
P
Q
R
S
T
U
V

Page 5/19
2.5” Spacer Suspension Lift Kit, JL
FRONT SUSPENSION INSTALLATION INSTRUCTIONS
1. Place vehicle in first gear or park and check rear tires. Raise front of vehicle using
floor jack and secure with jack stands along front frame rail just behind control arm
mounts. Carefully lower vehicle onto stands. The floor jack should be placed under front
axle to support during coil spring removal.
2. Using a 22mm deep well socket, remove wheels and tires.
3. Using a 21mm socket, remove the front
track bar at frame mount. Do not discard OE
hardware. It will be reused.
4. Using an 18mm socket and wrench, remove the
lower bolts to sway bar links. Do not discard OE
hardware. It will be reused. Repeat for the other
side.

Page 6/19
2.5” Spacer Suspension Lift Kit, JL
5. Using a silver marker, draw index lines
onto the front drive shaft at flange. This will
ensure proper alignment and balance of the
drive shaft when reinstalled. Using a 15mm
socket, remove the front drive shaft flange
from differential. NOTE: Suspend drive shaft
from vehicle using cord, wire, or bungees. DO
NOT ALLOW drive shaft to hang, as
damage to rubber butt may result.
6. Using a 15mm socket or wrench, remove
frame mount brake line bracket. Do not
discard OE hardware. Repeat for other side.
7. Using 18mm socket and wrench, remove
lower shock mounting bolt. Use floor jack to
raise vehicle as needed to reduce load on
bolt. Swing shock out of the way. Repeat for
other side.

Page 7/19
2.5” Spacer Suspension Lift Kit, JL
8. Using needle-nose pliers, remove wire
harness from upper control arm. Repeat for
other side.
9. Using needle-nose pliers, remove vent line
from differential.
10. Unplug the locker harness at differential, if
equipped.

Page 8/19
2.5” Spacer Suspension Lift Kit, JL
11. Using pliers, pull 4x4 actuator harness
wire from control arm and disconnect at axle
plug.
12. Using a 10mm socket, disconnect brake
line brackets from axle coil mounts. Do not
discard factory hardware. It will be reused.
13. Carefully lower floor jack and allow axle to
slowly drop downward to full droop. Remove
factory coils and isolator.

Page 9/19
2.5” Spacer Suspension Lift Kit, JL
14. If required, remove on location the nip
from rubber isolator. Install onto 2.5” spacer.
Repeat for other side.
15. Slide 2.5” spacer into place on upper
frame spring mount with factory isolator
installed. Repeat for other side.
16. Install bump stop spacer onto axle coil
spring mount. Secure using supplied 3/8” x 3”
bolt, 3/8” flat washer, and 3/8” flange nut.
Tighten using 9/16” wrench and repeat for
other side.

Page 10/19
2.5” Spacer Suspension Lift Kit, JL
17. Install factory coil spring, ensuring that the
upper coils are seated into the isolator
correctly. Repeat for other side.
18. Using a 10mm wrench, reinstall the brake
line bracket to axle coil spring mount. Use
factory hardware saved in Step 12.
19. Place front shock extension brackets over
stock axle mounts using 3/8” x 1” bolt, 3/8” flat
washer, and 3/8” flange nut. Repeat for other
side. Do not tighten at this time.

Page 11/19
2.5” Spacer Suspension Lift Kit, JL
20. Place supplied crush sleeve inside factory
shock mount and reinstall factory shock bolt
removed in Step 7. Do not tighten at this
time. Repeat for other side.
21. Placing floor jack on working side of axle,
compress suspension to allow alignment of
factory shock into upper mounting holes of
shock extension bracket. Slide 12mm x 65mm
bolt through and secure with flat washer and
12mm nut.
22. Using 9/16” socket and wrench, torque
lower bolt to 30 ft./lbs., factory bolt to 55
ft./lbs., and upper shock to shock bracket to 55
ft./lbs. Repeat for other side.

Page 12/19
2.5” Spacer Suspension Lift Kit, JL
23. Using 15mm wrench, reinstall brake line
bracket to lower control arm using hardware
removed in Step 6. Repeat for other side.
24. Remove factory sway bar link from sway
bar using 6mm Allen wrench and a 18mm
wrench. Install supplied front bent sway bar
link with supplied 12mm x 65mm bolt, flat
washer, and 12mm Nyloc nut. Torque to
60ft/lbs. Repeat for other side.
25. Reconnect 4x4 actuator harness plug and
secure wire harness to housing and upper
control arm.

Page 13/19
2.5” Spacer Suspension Lift Kit, JL
26. If equipped, reconnect locker harness to
differential plug. Reconnect locker harness,
locker wire harness, and differential vent lines
removed in Steps 8-10.
27. Reinstall wheels and tires to vehicle using
22mm deep well socket and lower vehicle to
floor. Reattach track bar to frame mount using
factory hardware removed in Step 3. Tighten
using 21mm socket to 150 ft./lbs.

Page 14/19
2.5” Spacer Suspension Lift Kit, JL
REAR SUSPENSION INSTALLATION INSTRUCTIONS
1. Place vehicle in first gear or park and check front tires. Raise rear of vehicle using floor
jack and secure with jack stands. Carefully lower vehicle onto stands. Position floor jack
under rear differential to support rear axle, but do not raise.
2. Using a 22mm deep well socket, remove rear wheels and tires.
3. Using a 21mm socket, remove rear track
bar at axle mount. Do not discard OE
hardware. It will be reused.
4. Using an 18mm socket and wrench,
remove lower bolts to sway bar links. Do not
discard factory hardware. Repeat for other
side.

Page 15/19
2.5” Spacer Suspension Lift Kit, JL
5. Using 18mm socket and wrench, remove
lower shock mounting hardware. Repeat for
other side. Do not discard hardware.
6. Bolt bump stop spacer to axle using 3/8”
bolt, 3/8” flat washer, and 3/8” flange nut (two
sets per side). Tighten bolts to 30 ft./lbs.
Repeat for other side.
7. Lower floor jack to allow axle to droop.
Remove coil springs and isolators.

Page 16/19
2.5” Spacer Suspension Lift Kit, JL
8. Using 6mm Allen wrench and an 18mm
wrench, remove factory sway bar link from
sway bar. Attach longer supplied sway bar link
to sway bar using supplied 12mm x 65mm
bolt, flat washers, and 12mm flange nut.
Tighten to 75 ft./lbs. Repeat for other side.
9. Place supplied coil spring threaded spacer
washer on top of rear coil spring frame mount.
Make sure it is centered. Repeat for other
side.
10. Install 2.5” spacer using 1/2” x 2.5” bolt.
Tighten using 3/4” socket. Tighten to 65 ft./lbs.
Repeat on other side.

Page 17/19
2.5” Spacer Suspension Lift Kit, JL
11. If required, remove on location nip from
rubber isolator and install onto 2.5” spacer.
Repeat for other side.
12. Reinstall coil spring isolator and coil
spring. Make sure coil spring is properly
seated to isolator. Repeat for other side.
13. Place rear shock extension brackets over
stock axle mounts using 3/8” x 1” bolt, 3/8” flat
washer, and 3/8” flange nut. Repeat for other
side. Do not tighten at this time.

Page 18/19
2.5” Spacer Suspension Lift Kit, JL
14. Place supplied crush sleeve inside factory
shock mount and reinstall factory shock bolt
removed in Step 5. Do not tighten at this
time. Repeat for other side.
15. Using a floor jack, compress suspension
to allow alignment of factory shock into upper
mounting holes of shock extension bracket.
Slide 12mm x 65mm bolt through and secure
with flat washer and 12mm nut.
16. Using 9/16” socket and wrench, torque
lower bolt to 55 ft./lbs. Factory bolt to 55
ft./lbs. and upper shock to shock bracket to 65
ft./lbs. Repeat for other side.

Page 19/19
2.5” Spacer Suspension Lift Kit, JL
17. Using the factory hardware removed in Step 4, install lower sway bar link to axle
mount. Tighten to 55 ft./lbs. Repeat for other side.
18. Reinstall rear wheels and tires using
22mm deep well socket. Lower vehicle to
ground and reinstall track bar using hardware
removed in Step 3. Tighten to 150 ft./lbs.
POST-INSTALLATION INSTRUCTIONS
1. Adjust steering drag link as needed to set steering back to center before the vehicle is driven.
Computer error and poor performance will result if not properly set. Perform full steering cycle to check
for tire to control arm clearance.
2. Test all vehicle functions. Ensure brakes function correctly.
3. Check for clearance of all moving parts and cycling suspension components.
4. Check all fasteners and double-check to torque specs supplied.
5. Check for clearance of all moving parts and cycling suspension components.
6. Adjust headlights to factory setting.
7. The final alignment is to be performed by a qualified alignment center.
8. After 500 miles, re-torque fasteners. At 1000 miles, re-inspect and tighten as needed.
/