Page is loading ...


TABLE OF CONTENTS
Safety Information …………………………………………
Page 1
Introduction…………………………………………… Page 3
X-Bike™ Indoor Performance Bike
X-Biking™ Indoor Cycling Programmes
Installation and Adjustment…………………………… Page 4
Setting up the X-Bike™ Indoor Performance Bike
Assembling the X-Bike™ Indoor Performance Bike
Adjusting the X-Bike™ Indoor Performance Bike
Using your X-Bike™ Indoor Performance Bike……….. Page 9
Maintenance Instructions……………………………… Page 11
Parts – Removal and Replacement……………………... Page 15
Equipment and Technical Specifications……...……….. Page 24
Exploded views and Parts Identification List ………….. Page 25
Product Features……………………………………….. Page 28
Warranty Statements and Registration Card……………. Page 32
Index …………………………………………………… Page 36

1
SAFETY INFORMATION
WARNING
TO AVOID DEATH OR SERIOUS PERSONAL INJURY
• BEFORE beginning any fitness or conditioning program, consult with your physician
or health official. This will establish the proper conditioning or fitness program that is
appropriate for your age and physical condition.
• BE SAFE. Prior to commencing each X-Biking™ Ride answer these questions:
• Have you have been ill recently?
• Have you have felt dizzy recently?
• Have you have felt breathless recently?
• Have you have had any chest pain recently?
• Do you have an injury?
• Are you pregnant?
• Is there any reason why you think they should not exercise?
• Are you over 35 years old and do not exercise regularly?
• Have you have been told by a health practitioner that they shouldn’t exercise?
IF YOU ANSWER “YES” TO ANY OF THE ABOVE QUESTIONS YOU MUST
SEEK FURTHER ADVICE AND CLEARANCE FROM A MEDICAL
PROFESSIONAL PRIOR TO UNDERTAKING AN X-BIKING™ RIDE.
• ALWAYS read the user’s manual fully and follow all instructions, which were written
to ensure your safety and to protect the cycle.
Note for Club Owners: To ensure the proper use and safety of the X-Bike™ Indoor
Performance Cycle, make sure that all users have access to and refer to this manual. The
manual should be made available to all users.
• ALWAYS operate the X-Bike™ Indoor Bike only on a solid, level surface in a well lit
and well ventilated area. Make sure the seat and handlebars are securely fastened before use.
• NEVER allow children on the bike or allow children to play unsupervised near the bike.
Serious injury could occur due to a child’s curiosity or interest in the moving parts of the
cycle.
• ALWAYS ensure the bike is properly set up for your body type. The X-Bike™ Indoor
Bike offers up/down and fore/aft adjustments that are clearly marked to ensure a quick and
easy custom fit for each workout. Ensure that the rider compartment is securely tightened
before use.
• ALWAYS check the cycle before each use.
• NEVER use the cycle if it is not completely assembled or is damaged in any way.
• NEVER use an X-Bike™ Indoor Bike when ill or in a weakened condition.

2
• NEVER exceed the weight limit for this bike. The weight limit for this bike is 300
pounds. Do not use the X-Bike™ Indoor Performance Bike if your body weight exceeds 300
pounds.
• ALWAYS wear proper attire and footwear that fully covers your feet. Long hair should
be tied back. Ensure that your laces are tucked into your shoes.
• ALWAYS warm up before beginning to exercise or at the start of a workout.
• ALWAYS use care when getting on and off the X-Bike Indoor Performance Bike.
Always wait until the pedals are completely stopped before removing your feet from the
pedals or dismounting. Do not stand or climb on the handlebars.
• ALWAYS ride or allow the X-Bike™ Indoor Performance Bike to be ridden only under
the supervision of a qualified X-Biking Instructor.
• ALWAYS keep hands away from moving parts and always ensure that hands are never
placed in a position where these is no rubber handlebar grip.
• NEVER overexert yourself or work to exhaustion. If you feel faint, dizzy, short of
breath, or if you have chest or other pains, STOP IMMEDIATELY! Consult your physician
before you continue.
• ALWAYS ensure that you have a water bottle with at least 300ml beverage and wear a
towel in the rear pocket of your riding top to absorb sweat from your body and the
handlebars.
• NEVER ride the X-Bike™ Indoor Performance Bike in a standing position at high
revolutions per minute (RPM).
• ALWAYS maintain your pelvis over the centre line of the X-Bike™ Indoor Performance
Bike.
• NEVER adjust the resistance of the flywheel and the resistance of the X-Bars™
Handlebar System when standing.
• NEVER use accessory attachments that are not recommended by the manufacturer –
such attachments might cause injury or damage to the bike and will affect the warranty of the
Bike.
• Please also note as a gesture of courtesy to the next user and to maintain the high quality
of the X-Bike™ Indoor Cycle, please ensure that it is wiped down after each use.
• If any issues arise affecting the performance of the X-Bike™ Performance Bike, please
inform the X-Biking™ Instructor immediately and ensure that wear parts are checked
regularly.
• THIS SAFETY INFORMATION AND USER’S MANUAL GENERALLY DO
NOT REPLACE THE NEED TO BE ALERT AND TO USE YOUR COMMON
SENSE WHEN USING THE X-BIKE™ INDOOR PERFORMANCE BIKE!

3
INTRODUCTION
X-Bike™ Indoor Performance Bike
Congratulations on purchasing your Trixter Enabled X-Bike™ Indoor Performance Bike, one of
the most revolutionary cycles available to the fitness market. The X-Bike™ Indoor Cycle will
offer you an unrivalled whole body workout by introducing real bike upper-body movements. It
has been designed to simulate the real physiological demands experienced throughout the body
when cycling…an exercise often mimicked yet never equalled. Climbing out-of-the-saddle,
accelerating, and recovering are dynamic total-body actions for everyone riding bicycles
outdoors. Climbing steep hills and sprinting involve significant upper body and core muscle
recruitment to control the lower-body and the movement of bicycle beneath the rider. The X-
Bike™ Indoor Cycle, featuring the X-Bars™ Handlebar System, provides an effective and
realistic means of accessing this unique level of fitness. Welcome to the X-Biking™ Indoor
Cycling revolution!
X-Biking™ Indoor Cycling Programs
Trixter's visionary X-Biking™ Group Cycling Programmes are ideal for people of all ages,
abilities, and fitness levels. Workouts are designed by experienced cycling coaches and elite
athletes to maximize the exercise benefits of the X-Bike™ Indoor Cycle. It’s the only total-body
cardiovascular group exercise workout based on a vibrant, engaging, and real outdoor sport -
mountain biking! During the immersive, fun-fit classes, you ride with a certified X-Biking™
Instructor to the sound of custom beats over a variety of simulated trails. Techniques like
"pumping" up a climb, banking the bars side-to-side to swoop through turns, and even coasting
on the X-Bike’s unique freewheeling platform provide essential and natural muscular
conditioning to dramatically enhance the rider's experience.
Before You Begin
Prior to leaving the manufacturing facility, your X-Bike™ Indoor Cycle was thoroughly
inspected and tested for proper operation. To minimize shipping damage, careful attention was
given to making the bike ready for shipment.
Dimensions of the X-Bike
Inch/lb mm/kg
Length 47.5 1205
Width 28.5 720
Height 41.5 1050
Weight 143 65
Your X-Bike™ Indoor Mountain Bike will have arrived in 1 carton. Upon arrival, fully inspect
the carton for damage. Point out any damage to the delivery person and have the delivery person
record the damage on the delivery paperwork. Contact the Customer Service Department to
report any damage (See details at the back of this Manual). Please follow these detailed
instructions and you will find that your new X-Bike™ Indoor Mountain Bike can be unpacked
and assembled with ease.

4
INSTALLATION & ADJUSTMENT
SETTING UP THE X-BIKE Indoor Performance Cycle
WARNING
NOTE THAT THE SAFETY INFORMATION ON PAGES 1 & 2 SHOULD BE FULLY
READ AND UNDERSTOOD PRIOR TO ASSEMBLING THE BIKE
A. Remove the bike and components from the shipping carton
1. With assistance, move the box to the desired location in a well-lit and well
- ventilated area. Ensure that the carton is standing upright and remove the strapping
material. Ensure that you allocate sufficient floor space for the safe operation of the X-Bike
after it has been assembled.
2. Pull the cardboard edge along the top of the box and carefully remove and dispose of the
staples. Remove the boxes of contents enclosed with the frame.
3. Open each box and ensure that you have the following parts necessary to assemble your X-
Bike™ Indoor Cycle:
• X-Bike™ Indoor Cycle Frame including Seat Post and Handlebar Assembly
comprising Gripshift System and Hand Grips.
• Separate Box with X-Bars™ Handlebar System Head Unit.
• Separate box with front base leg including feet.
• Separate box with rear base leg including feet.
• Separate package with bottom X-Bar Cover (if this has been left off the assembly).
• Separate package with Seat including Seat Slider Rail
• Separate Box with the following
o Head stock adaptor
o Bag with Head stock adaptor bolts
o Quick Release for seat slider
o Bolts, Nuts and Washers for legs (4sets)
o Handlebar clamp including bolts
o Pedals x 1L & 1R
o Bar Ends x 1L & 1R
o Square rubber gator for Frame head tube
• Separate package with the User’s manual

5
B. Assembling the Bike
All references to the right or left side and to the front or back are made as if you were sitting on
the exercise bike ready for use. For example, the chain guard is on the right side of the bike and
the flywheel is at the front.
1. You will need the following tools and materials to assemble the X-Bike™ Indoor
Performance Bike.
• Box knife
• 13mm, 15mm (Pedal Spanner) and 17mm spanners
• 4mm, 5mm and 6mm (Long) Hex Head Wrenches
• Can of PTFE (PolyTetraFlouroEthylene) spray.
2. With the help of an assistant, lift the bike frame out of the carton and remove all protective
packaging.
3. Fit the legs onto the frame ensuring that the leg with the wheels is fitted to the front and the
leg without wheels is fitted to the back. Make sure that the wheels are facing towards the
front and that the feet are facing downwards. Insert the M10 bolts provided facing
downwards ensuring that you have a washer above and below the leg. Fit the M10 Nut and
tighten securely.
Note: If you are having difficulties threading the nut onto the bolt, with assistance prop up
the base leg and the frame on wooden blocks to gain easier access to the nut underneath.
4. Adjust the 4 leveller feet to ensure that each corner is fully supported on the floor. Once
adjusted, lock the position by tightening the lock wing nut inside the leveller feet.
Leveller Foot
5. Slide the seat post into the seat tube at the rear of the frame and tighten the adjustable quick
release knob until you are ready to set the height position. Slide the seat assembly onto the
seat post and fit the quick release handle provided from the bottom upwards. Fit the
thumbscrew at the top of the quick release bolt to secure until you are ready to set the fore/aft
position.
Seat Fore/Aft Adjust Lever
Seat Height Adjuster Knob
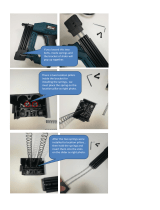
6. To fit the X-Bars™ Handlebar System Head unit, you must first fit the adaptor. This will
give access to the main X-Bars frame internally. The adaptor should be fitted so that the head
post is facing downwards and towards the rear of the assembly.

6
Insert the 4 x M8 bolts provided through the base plate of the X-Bars into the adaptor from
front towards the rear, and ensure that a washer is fitted on both the nut and bolt ends.
Tighten securely. Fit the bottom cover using the 2 x M4 Hex head screws provided.
7. Before inserting the X-Bars system into the Frame Head tube, place the square rubber gator
on the top on the head tube. The X-Bars System assembly is inserted through the rubber
gator and into the head tube with the head of the assembly facing towards the front of the
bike. Tighten the adjustable quick release knob until you are ready to set the head height
position.
Note the orientation of the
Handlebar and Bar Ends.
Height Adjuster Knob
8. Loosen the Handlebar clamp on top of the X-Bars Handlebar System Head Unit to gain
access for the handlebar fitment. Place the handlebars into the clamp so that the bar ends are
facing towards the front of the bike and the Grip-shift™ is on the right hand side of the bike.
Place the marked clamp area of the handlebars centrally in the clamp to ensure to provide
maximum grip from the clamp. Refit the clamp and tighten the bolts diagonally to ensure
there is an even pressure applied to all four bolts. Just before the clamp takes pressure, adjust
the orientation of the bars so that the exit route of the Grip-shift™ has approximately 5mm
(1/4”) clearance with the top of the Cover. Tighten securely.
Note orientation of handlebar and position of Grip-shift™
9. Fit the pedals, which are marked as if you are seated on the bike, “R” for right and “L” for
left. Carefully thread the right pedal in the crank with your fingers – do not cross thread the
pedal in the crank arm. Use a size 15 wrench tool to tighten the pedal. Repeat the step for the
left pedal. Do not over-tighten.
Note: The left pedal is reverse-threaded.
10. Using the PTFE spray, direct the nozzle into the wear pad material and apply generously to
ensure the pads are well lubricated.
11. Use a soft clean cloth to wipe off dust that may have accumulated during shipping.
12. The X-Bike™ Indoor Cycle is now ready to set up for use.

7
Adjusting the Bike
Seat Adjustment
1. Rotate the pedals so that one of the pedals is in the upward position.
2. Place your foot in the toe clip of the pedal closest to the floor and mount the bike. Ensure that
the ball of your foot is over the centre of the pedal. Your leg should be slightly bent at the
knee as shown in the picture below.
3. If your leg is too straight or your foot cannot touch the pedal, you will need to lower the seat.
If your leg is bent too much, you will need to raise the seat.
4. To adjust, dismount the bike and release the quick release knob for the seat height
adjustment. Once loosened you may slide the seat post up or down as necessary. When the
seat is in the desired position, reapply the quick release knob to lock the position. Note the
final position mark on the seat stem for future use.
5. Adjusting the fore or aft allows for better fit. To adjust, dismount the bike and release the
quick release lever under the seat and slide the seat forward or backward as desired. Re-apply
the quick release clever to lock. Note the final position mark on the seat stem for future use.
Adjusting the Flywheel Resistance
The X-Bike™ Indoor Performance Bike should arrive with the resistance system set up on
the handlebars already, and may only require minor adjustment after the handlebar assembly
has been fitted onto the X-Bars™ System Head Unit. Minor adjustment can be achieved by
turning the adjuster wheel at the cable exit on the Grip-shift™ either clockwise or counter-
clockwise depending on whether it need to be increased or decreased.
If the resistance needs more adjustment than is available in the minor adjustment block, it can
be set up as follows:
1. Turn the minor adjuster wheel on the Grip-shift™ fully counter-clockwise so that there will
be sufficient cable in the minor adjustment block for future regular checks

8
Minor Cable Adjuster Cable Release Bolt
2. Using a 6mm Hex key, loosen the bolt at the bottom of the V-Brake to release the cable for
adjustment.
3. Turn the Grip-shift™ fully clockwise to the minimum resistance setting – position 1. Using
one hand, compress the 2 pads of the V-Brake to just make contact with the flywheel. Pull
the excess cable until it is tight in the cable clamp. Retighten the bolt to secure the cable.
4. The resistance is set, when the minimum setting is free from contact with the flywheel and
position 2 just begins to make slight contact. Minor adjustment can be achieved by screwing
the minor adjustment wheel where the cable exits from the Grip-shift™.
Handlebar (Bar Height) Adjustment
1. If you own a road or mountain bike, this position can be taken from your chosen set up. Place
a straight edge ruler on top of your bikes saddle and extend it over the handlebar, making
sure that the ruler is level or parallel with the ground. Measure the distance from the bottom
edge of the ruler to the top of the handlebar and replicate this measurement on the X-Bike™
Indoor Cycle.
2. To adjust, dismount the bike and release the quick release knob on the head tube for the
handlebar adjustment. Raise or lower the X-Bar™ System headstock until the required
measurement has been achieved. Reapply the quick release knob to lock. Note the final
position mark on the handlebar stem for future use.
3. If you do not own a bike and are setting the height up for the first time it is suggested to set
the handlebars at the same height as the seat for a datum and then try different heights to get
the arrangement most suitable for you.
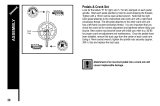
Pedal Strap Adjustment
1. Place the ball of each foot on the pedal and in the toe clip such that the ball of the foot is
centred over the pedal spindle (centre of the pedal)
2. Rotate one foot to within arms reach and pull up on the toe clip strap. Repeat for the other
foot.
3. Keep your knees over your foot as you pedal.

9
USING YOUR X-BIKE INDOOR PERFORMANCE BIKE
WARNING
SAFETY FIRST –
PLEASE REFER TO THE SAFETY INFORMATION ON
PAGES 1 & 2 OF THIS MANUAL.
THESE GUIDELINES ARE DIRECTED
TO YOU AS THE OWNER OF THIS EXERCISE EQUIPMENT AND YOU
SHOULD INSIST THAT ALL USERS FOLLOW THE SAME GUIDELINES.
YOU SHOULD MAKE THIS MANUAL AVAILABLE TO ALL USERS.
General Exercise Guidelines
You should only undertake an exercise program using an X-Bike™
Indoor Cycle, under the supervision of a qualified X-Biking™ Instructor.
Trixter, Its Distributors and Sales Agents do not accept responsibility for
any injury, which may occur whilst riding unsupervised and without
proper instruction.
Pedalling
1. Obtain a complete physical examination from your medical doctor and ensure to follow
the recommended training profiles suitable for your current health status.
2. The speed and duration of your exercise program should always be subject to how you
feel. Never permit peer pressure to exceed your personal judgement while exercising.
3. When working out for the first time, start out slowly for a minimum of five minutes.
After your muscles have warmed up, gradually increase the pedalling rate and/or
resistance to a speed that allows you to attain a comfortable training threshold. If you
have access to a heart rate monitoring device, you can set your speed and resistance that
allows you to attain your target heart rate zone.
Pumping the X-Bars
1. Once you are confident with the pedalling motion of the X-Bike, set the flywheel
resistance to a comfortable setting and get into a standing position on the bike while
continuing to pedal at a steady rate. To familiarise yourself with the pumping motion, set
the handlebar resistance to minimum by twisting the handlebar resistance knob at the side
of the X-Bars™ Handlebar System fully counter-clockwise and begin to “pump” the bars
left and right in time with your pedalling rhythm in a similar fashion as if you were riding
a bike. This natural cycling movement comes by ensuring that your right arm and left leg
go down at the same time and your left arm and right leg go down at the same time.
2. Overweight individuals should be particularly cautious when using the equipment for the
first time. Even though such individuals may not have histories of serious physical
problems, they may perceive the exercise to be far less intense than it really is, resulting
in the possibility of overexertion or injury.
3. Although all equipment manufactured by Trixter has been thoroughly inspected by the
manufacturing facility prior to shipment, the purchaser is responsible for proper assembly
and installation of the X-Bike indoor performance bike.

10
Mounting and Dismounting
Once sitting comfortably on the Bike, make sure to tighten each toe strap securely before
commencing exercise. Dismount the bike by first loosening each toe clip and then
removing your feet from the pedals. Carefully step off the bike.
Your First Workout
Basic Instructions
Once an instructor has helped you to properly adjust the bike to your body size and you are
sitting comfortably on the bike, slowly begin pedalling. Allow your hands to rest comfortably on
the handlebars.
WARNING
If at any time during your workout you feel any chest pain, experience severe muscular discomfort, feel
faint, or are short of breath, STOP EXERCISING IMMEDIATELY. If the condition persists, you should
consult your medical doctor immediately.
Pedalling Resistance
Pedalling resistance is controlled by the turning of the Twist-grip™ located on the right side of
the handlebar. The minimum resistance setting is located with the Twist-Grip™ turned fully
clockwise – increasing to a maximum Resistance when the Twist-Grip™ is turned fully counter-
clockwise. It may be adjusted at any time during exercising by turning the Twist-grip™ to the
desired resistance setting.
X-Bar™ Handlebar System Resistance
Handlebar resistance is controlled by the knob located at the end of the resistance damper on the
right side of the head section. There are seven settings from minimum to maximum. The
resistance can be adjusted at any time by twisting the knob anti-clockwise for minimum and
clockwise to maximum setting.
* Your instructor will advise you on the correct use of the X-Bars™ System.

11
MAINTENANCE INSTRUCTIONS
Helpful Hints
The safety level given by the design of X-Bike™ Indoor Performance Bike can only be
maintained when the equipment is regularly examined for damage and wear. Inoperable
components should be replaced or the equipment should be put out of use until it is repaired.
Read all maintenance instructions before beginning work.
All references to the right or left side and to the front or back are made as if you were sitting on
the exercise bike ready for use. For example, the chain guard is on the right side of the bike and
the flywheel is on the front.
For identification purposes, the serial number of the X-Bike™ Indoor Cycle is located on the
front support Leg and the serial number for the X-Bars™ System is located internally on the
main base plate, which can be accessed by removing the bottom cover.
Front of Bike Frame
Serial Number
Tool List
The following tools will be needed to carry out service and maintenance:
• Spanners including 10mm, 13mm, 15mm (Pedal Spanner) and 17mm
• Metric Hex Keys (long) set including 2.5, 3, 4, 5, 6, and 8mm.
• Genuine X-Bike BB Lock Ring removal tool.
• Phillips screwdriver
• Bicycle crank arm puller
• Bottom Bearing Cup tool
• Shimano® compatible bottom bracket tool and 1/2 “ driver
• Trixter Spring Fitting tool

12
Preventative Maintenance
Refer to the appropriate Parts Removal and Replacement section on PAGES 19-28 for all
disassembly and assembly instructions. If you experience any problems, contact your Matrix
Fitness Systems service department (Details found at www.trixter.net).
Daily
1. Wipe down the X-Bike after each use to remove sweat and moisture. Use soap and water,
or a diluted non-abrasive domestic cleaner solution. Rinse to remove detergent residue
and then dry off.
2. If the bikes are used frequently in group exercise sessions, inspect for loose components
such as pedals or cranks prior to commencing the next class. Tighten up any loose parts.
Weekly
1. Inspect the resistance wear pads for excessive wear or dryness. If necessary lubricate the
pads with GT-85 or another PTFE based lubricant. As the pads wear with use, it will be
necessary to adjust the resistance cable to compensate. The resistance cable can be
adjusted as follows;
o Turn the minor adjuster wheel on the Grip-shift™ fully clockwise so that there
will be sufficient cable in the minor adjustment block for future checks.
o Using a 6mm hex key, loosen the bolt at the bottom of the V-Brake to release the
cable for adjustment.
CHECKLIST OF ROUTINE MAINTENANCE REQUIREMENTS
Daily
1.
Wipe Down the X-Bike Indoor Cycle
2. Inspect for loose components and tighten where necessary
Weekly
1. Inspect the Wear Pads for excessive wear or dryness
2. Lubricate the Flywheel
3. Lubricate the Drive Chain
4.
Clean the X-Bars System and X-Bike Indoor Cycle
Monthly
1. Inspect the Chain Tensioning
2.
Inspect the X-Bars System damper performance
3.
Inspect the X-Bars System ‘Return to Zero’ Performance
4.
Inspect the rigidity of the X-Bars System to check for looseness in the mechanism.
5. Inspect the Centre Slider for wear
6. Inspect the Damper slider for wear
7. Inspect the seat and handlebars post adjustment for secure height adjustment tightening

13
Minor Cable Adjuster Cable Release Bolt
o Turn the Grip-shift™ fully clockwise to the minimum resistance setting. Using
one hand, compress the 2 pads of the V-Brake to just make contact with the
flywheel. Pull the excess cable until it is tight in the cable clamp. Retighten the
bolt to secure the cable.
o The resistance is set, when position 1 or minimum setting is free from contact
with the flywheel and position 2 just makes contact. Use minor adjustment if
required.
o If the pad thickness is reduced to less than 4mm, they need to be changed. (See
Pad Changing instructions in Parts – Removal and Replacement)
2. Wipe down the flywheel with WD-40® or equivalent light oil spray. This lubricant will
clean the surface of the flywheel and help prevent rust.
3. Lubricating the chain – Using a spray can with an extension nozzle; you can gain access
to the chain from the front of the chain guard with general light maintenance oil.
4. To keep the X-Bike looking new, wipe the general bodywork of the X-Bike and X-Bars
with a clean damp cloth. Use conventional dish washing detergent but never use abrasive
materials to clean the bike. Be certain to wipe off all traces of perspiration when you are
finished as it contains salt and other corrosive substances that can damage surfaces and/or
leave a white residue.
5. If you should need assistance or service, contact your service department
(See details at www.trixter.net)
Monthly
1. Chain Tensioning
Inspect the chain for tensioning by rotating the crank to drive the flywheel forward. Do
this motion in ¼ turns to assess if there is free play between the crank and the flywheel.
Tensioning the flywheel is achieved by adjusting the bolts in the front forks of the bike,
which set the position on the flywheel axle in the frame. To Tension the chain, undo the
axle nuts on either side of the flywheel enough to release the grip and allow the flywheel
to move.
Axle Position Markings Chain Adjusting Bolts
Turn the chain tensioning bolts on both sides of the frame by the same amount to ensure
correct alignment. Continue to adjust in small amounts until the chain slack is eliminated
and the flywheel can rotate freely without pulling the pedals around with it.
2. X-Bars Handlebar System Damper Performance

14
Examine the damper for smoothness and consistency of movement. This is determined by
testing the movement in the handlebars firstly in minimum and then in maximum
resistance setting.
a. Air Cavitations - At minimum, the movement should be light and smooth
without the presence of the sound of air cavitations. This would be a sound you
could expect with the presence of tiny air bubbles in the system, which will affect
the consistency and quality of resistance. If cavitations are present, the damper
should be replaced. See replacing the damper in Parts – removal and replacement
section.
b. Sticking - At maximum setting, the handlebars should move from fully left to
fully right consistently without any sticking action. Over time, the moving parts
can wear and lead to resistance tolerances being affected. If the movement in the
handlebars experiences sticking, the damper should be replaced. See replacing the
damper in Parts – removal and replacement section.
3. X-Bars Handlebar System ‘Return to Zero’ Performance
Examine the action of the ‘Return to Zero’ springs on the handlebar system by setting the
resistance at maximum. Move the bars to the extreme right and release and then extreme
left and release. At this setting the mechanism should return close to centre under its own
action. If it is found that the handlebars remain unreasonably fixed to one side or the
other, the springs will need to be replaced. See replacing the ‘Return to Zero’ springs in
Parts – removal and replacement section.
4. Looseness in the X-Bars Handlebar Mechanism
a. Mechanism Hardware - Examine the handlebar system assembly for general
mechanism looseness. Check all 4 main pivot bolts, the 2 large bolts in the centre
of the assembly, and the main damper pin through the end of the damper. If any
looseness is present, tighten before reassembly. In the event that any of these bolts
have been found to be loose, they should be checked again at the next weekly
maintenance routine and if they have re-loosened, please contact your authorised
dealer. (Details for your closest dealer found at www.trixter.net)
Main Pivot Bolts Centre Bolts
Centre Slider Damper Slider
b. Slider wear – There are three sliders in the mechanism, 1 in the centre swinger
and the other 2 running in the damper rails. If the clearance between these sliders
and the rails in which they run exceeds 1.5mm, they should be replaced.
5. Height Adjustment

15
Dryness or prolonged use may cause the height and reach adjustments for the bars and
seat to become tight. If this is the case, the sliding assembly should be removed from the
frame and have a smear of light duty grease applied along the sliding surface before
reassembly. Similarly, apply some light grease to the clamping assembly to ensure it does
not seize up. Clean off excessive grease before reassembly.

16
PARTS – REMOVAL AND REPLACEMENT
WARNING:
It is vitally important to keep the X-Bike Indoor Cycle properly maintained but if you are
unsure about any of the procedures for the removal or replacement of parts, you are
recommended to contact your authorised dealer.
NOTE: When carrying out any service or maintenance procedures, it is vital to ensure that
ALL hardware has been fully tightened and the assembly is returned to its original assembly
state prior to allowing the X-Bike Indoor Cycle to be used. If in doubt, contact your
authorised dealer.
Replacing the Resistance Pads
1. If the pad thickness is reduced to less than 4mm, they need to be replaced.
2. Using a 6mm hex key, loosen the bolt clamping the resistance cable to release the V-
brake mechanism.
Cable Release Bolt
3. Remove the screw at the back of the pad housing to release. Drop the pad out of the
assembly.
4. Fit new pad into the V-Brake assembly on both sides. Refit the screws complete with the
spring and washers. Tighten to within 2 full turns from the end.
5. Turn the Grip-shift™ fully clockwise to the minimum resistance setting. Using one hand,
compress the 2 pads of the V-Brake to just make contact with the flywheel. Pull the
excess cable until it is tight in the cable clamp. Retighten the bolt to secure the cable.
6. The resistance is set, when the minimum setting is free from contact with the flywheel
and position 2 just makes contact.
Removing the Chain Guards
Outer Guard
1. Remove the 3 bolts holding the outer guard to the frame. These bolts are 1 at the rear, 1
underneath and 1 between the flywheel and the right hand fork (Left if you look into the
bike from the front where it is accessed)

17
Bolt 1 Bolt 2 Bolt 3
2. Turn the right hand crank arm vertically downwards as this allows the outer guard to be
removed more easily.
3. Ease the outer guard away from the inner guard taking care not to damage the protective
seals between it and the inner guard. Once free, remove the seal from the bottom of the
cover to allow a little more room for removal.
4. Carefully manoeuvre the guard, bottom first away from the frame and orientate it to fit
around the crank and the pedal. Once removed, you have full access to the drive train.
5. Refitting the chain guard is simply to carry out actions 1 to 4 in reverse.
Inner Guard
1. Follow procedure for “removing the pedal crank arms” below.
2. Undo 3 bolts fastening the inner guard to the frame.
3. To refit follow steps 1 and 2 in reverse.
Removing the Flywheel
1. Follow the procedures shown above for removing the chain guard.
2. Loosen the nuts on either side of the flywheel axle enough to allow the flywheel to move
freely in the axle slide on the frame.
3. Turn the 2 chain tensioning bolts on the front forks counter-clockwise until they are fully
removed from the flywheel bracket.
4. The flywheel axle can then be removed from the slide taking care to support its’ weight
when it drops out (40 pounds/18.2kg). Care should also be taken not to drop the flywheel
onto the frame below, as the paintwork will be damaged.
5. The chain can now be eased off over the front chain sprocket.
6. The flywheel is replaced by following steps 1 to 5 in reverse.
7. To Tension the chain, turn the chain tensioning bolts on both sides of the frame by the
same amount to ensure correct alignment. Continue to adjust in small amounts until the
chain slack is eliminated and the flywheel can rotate freely without pulling the pedals
around with it.
Replacing the Chain
1. Follow the procedures shown above for removing the outer chain guard.
2. Follow the procedures shown above for removing the flywheel.
3. Replace with new chain in a similar fashion and repeat the procedures above in reverse to
re-assemble.
4. To Tension the chain, turn the chain tensioning bolts on both sides of the frame by the
same amount to ensure correct alignment (Check the alignment by counting the marks on
the flywheel bracket on both sides of the frame). Continue to adjust in small amounts
/