Page is loading ...

!
!
!
!
!
!
!
!
!
!
!!
!
!
!
!
!
!
!
!
!
!
!
!
!
!
!
!
!
!
!
!
!
!
!
!
!
!
!
!
!
!
"#$%&'()!*+',-),%!($!./012!3-'4!56!0+'7(,#!8,)+9-)!:#,!;#$(,'(,%!56!<=!":(,-(!*:>!:-%!3-(,#-:(+$-:?!@$;6!
A+97(!*:>4!"#$(,'(,%!":(,-()!+-'?&%,!<=!":(,-(!BCDEEFEGH!BCEFIEJKH!BFIKCLJL4!M(7,#!;:(,-()!:-%!
'$-(+-&: -',)!;,- %+ -94!. /012!;#$%&'(!'$-N+9&#:(+$-)!:?)$!;#$(,'(,%!56!3-(,#-:(+$-:?!O#:%,!8#,))!*:>4!1??!
8,)+9-) !:-%!" :( ,-( !+-N#+ -9,P ,-()!>+? ?!5,!;#$),' &(, %!( $!(7,!N&?? !,Q(,-(!$N!(7,!?:>4!!
!
!
0$#!O,'7-+':?!=&;;$#(H!"?,:),!@:??!LEK/EEJ/CGLL!
./012!3-'4H!KLGJL!=7+?$7!@7&#'7!A%4H!R$&)($-H!OS!FFJCC!
Installation)Instructions)
=(,;!=6)(,P)!
JF/KG!@7,T6UVW@!
1??!W$%,?)!
!
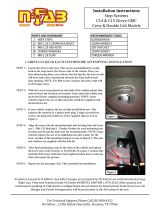
Nerf-Step Installation Instructions for 2007-20013 Chevy/GMC
All Models
Bolt Kit:
4)8mmx1”bolts (crew cab only)
6) 5/16 fender washers (large washers)
6) 5/16 tinnerman clips (2 needed for crew cab, 6 needed for quad/extended cab)
6)3/8” hex nuts
6)3/8”x1.5”carriagebolts
6)3/8”flat washers
6)5/16”x1”hexheadbolts(2for crew cab, 6 for quad/extended cab)
Tools Needed:
13mm socket wrench
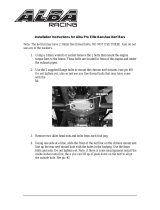
Step 1. Start by locating the driver side nerf-step. To do so, locate the shorter tail bend. The short end will
go towards the front of the vehicle. NOTE: Some models have a straight cut end with a cap, straight cut
end goes towards the rear tire.
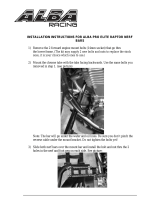
Step 2. Locate the factory threaded mounting holes located under the door on the vertical part of the floor
pan. Next, locate the last mounting position on the pinch weld near the back of the cab. Install a 8mm
metal clip in the upper hole right above the pinch weld mount. NOTE: Quad/Extended Cab models will
use three clips in the upper mounts on both sides. NOTE: Some models may have existing 8mm nuts
welded in the pinch weld on eachside.Fouradditional8mmx1”hexboltsmayberequired.
Step 3. Align the nerf-step brackets with the factory bolt hole locations. NOTE: Be sure the shorter tail
bendistowardsthefrontofthevehicle.Startallthreeupper8mmx1”hexbolts, 3/8 fender washers, and
handtighten.Next,startthe3/8”carriagebolts,3/8nutsand3/8flatwashersonthebottompartofthe
bracket and hand tighten. NOTE: The carriage bolts will start at the bottom of the bracket and then go
through the pinch weld with the nut and washer on top.
Step 4. After final positioning, there will be a small gap in between the lower part of the bracket and the
pinch weld. Starting with the lower bolt hole locations, torque each bolt to 15-20 ft/lbs. This will load the
brackets to the body. Next, torque the upper bolt locations to 15-20 ft/lbs.
Step 5. Repeat steps 2-4 for the passenger side.
This concludes the installation.
Questions? Call 281-880-6322
Products licensed to N-fab Inc. by Fichter Designs are protected by US patent law and International Copy Right law. US Patent #
6855783, # 6874801, # 7416202. Other patents and continuances pending. N-fab products configuration also protected by
International Trade Dress Law. All Design and Patent infringements will be prosecuted to the full extent of the law.
/