Page is loading ...

User's Guide
PDC 1300
Digital Camera
Creative Kit
Rev. 1, June 10, 2002

i
Contents
Introduction . . . . . . . . . . . . . . . . . . . . . . . . . . . . . . . . . . . . . . .1
The PhotoMAX PDC 1300 Digital Camera Creative Kit . . .2
Attaching the wrist strap . . . . . . . . . . . . . . . . . . . . . . . . . .3
Camera Features . . . . . . . . . . . . . . . . . . . . . . . . . . . . . . . . . . .4
Power Supply . . . . . . . . . . . . . . . . . . . . . . . . . . . . . . . . . . . . . .6
To load the batteries . . . . . . . . . . . . . . . . . . . . . . . . . . . . .6
To connect the AC adapter . . . . . . . . . . . . . . . . . . . . . . . .7
Using the Memory Card . . . . . . . . . . . . . . . . . . . . . . . . . . . . .8
Using the Camera . . . . . . . . . . . . . . . . . . . . . . . . . . . . . . . . .11
Changing Camera Settings . . . . . . . . . . . . . . . . . . . . . . . . . .14
To switch between the menus: . . . . . . . . . . . . . . . . . . . .14
Changing camera settings . . . . . . . . . . . . . . . . . . . . . . . .15
Managing stored images . . . . . . . . . . . . . . . . . . . . . . . . .19
Taking Photos . . . . . . . . . . . . . . . . . . . . . . . . . . . . . . . . . . . . .25
Tips for Great Photos . . . . . . . . . . . . . . . . . . . . . . . . . . . . . .26
Installing Polaroid PhotoMAX Image Maker Software . . .27
Minimum System Requirements . . . . . . . . . . . . . . . . . .27
To install the software . . . . . . . . . . . . . . . . . . . . . . . . . . .27
Transferring Photos to Your Computer . . . . . . . . . . . . . . . .29
Connecting the camera to a computer . . . . . . . . . . . . .30
Troubleshooting . . . . . . . . . . . . . . . . . . . . . . . . . . . . . . . . . . .38
FCC Notice . . . . . . . . . . . . . . . . . . . . . . . . . . . . . . . . . . . . . . .43
Camera Precautions . . . . . . . . . . . . . . . . . . . . . . . . . . . . . . . .43
Battery Handling . . . . . . . . . . . . . . . . . . . . . . . . . . . . . . . . . .44
Contacting Polaroid . . . . . . . . . . . . . . . . . . . . . . . . . . . . . . . .44
Internet support . . . . . . . . . . . . . . . . . . . . . . . . . . . . . . . . . . .44
One Year Limited Warranty . . . . . . . . . . . . . . . . . . . . . . . . .45


1
Introduction
Thank you for purchasing the Polaroid PhotoMAX PDC
1300 Digital Camera Creative Kit. This kit contains
everything you need to enter the world of digital imaging.
After you take photos, you will find it easy to transfer them
to your computer, edit and correct your images!
Once the images are on your computer, use the Polaroid
PhotoMAX Image Maker Software version 3.3 (or later) to
change them in many creative ways, include them in email,
or use them to create greeting cards and T-shirts.
Polaroid digital cameras and Polaroid PhotoMAX Image
Maker Software are easy to use, and are designed to work
together to produce high-quality results. Use your
imagination. Have fun!
This user’s guide covers basic camera features, startup, and
installation procedures, and how to take photos and transfer
them to your computer.
Please fill out and mail in your registration card!

2
Polaroid PDC 1300 Digital Camera User’s Guide
The Polaroid PhotoMAX PDC 1300
Digital Camera Creative Kit
Your Polaroid PhotoMAX PDC 1300 Digital Camera
Creative Kit contains everything you need to take digital
photos and transfer them to your computer.
a
Polaroid PDC 1300 Digital Camera
b
Wrist strap (and removable memory clip)
c
8 MB removable memory card
d
Four AA batteries
e
Camera case
f
Polaroid PhotoMAX Image Maker Software CD-ROM
g
AC power adapter
h
User’s Guide
i
Quickstart Card
j
RS-232C serial cable
k
Mini-USB cable
a
c
d
e
f
g
h
b
i
j
k

3
Attaching the wrist strap
Attach the wrist strap to the camera by sliding the strap
through the opening on the bottom of the camera as shown.
The wrist strap includes a clip to use when removing the
memory card from the camera.

4
Polaroid PDC 1300 Digital Camera User’s Guide
Camera Features
Front view
a
Shutter button
b
Flash
c
Optical viewfinder
d
Lens
e
Hand grip
f
Tripod socket
a b c
f e
d

5
Back view
a
Optical viewfinder
b
Ready indicator
c
Wait indicator
d
Status panel
e
LCD
f
Power switch
g
LCD switch
h
Menu Dial
Side view
a
AC adapter connection
b
Serial cable connection
c
Mini-USB cable connection
d
Memory card slot
e
Battery compartment
1300
g
dcb
h
a
f
e
a
b
c
d
e

6
Polaroid PDC 1300 Digital Camera User’s Guide
Power Supply
You can operate the Polaroid PDC 1300 Digital Camera on
battery power or with the AC adapter. To conserve battery
life, the camera shuts itself off after 3.5 minutes of inactivity
and the LCD shuts off after 30 seconds of inactivity. To turn
on the camera power, slide the power switch (back of
camera) to the middle (OFF) position.
The camera displays a low battery icon on the LCD menu
when battery power is weak. When you see this icon, replace
the batteries as soon as possible.
Using AA batteries, the camera operates for about 30
minutes in RECORD mode.
Note:
For longer battery life use high-capacity super
alkaline, lithium disposable, or NiMH rechargeable
batteries with your camera.
Note:
Limiting the use of the LCD also saves batteries.
Use the AC adapter whenever possible to extend the life of
your batteries. It is a good idea to keep a set of extra batteries
handy, especially on a trip when it may not be possible to
find replacement batteries easily.
To load the batteries
1
Open the battery compartment (side of camera) by
sliding the cover lock to the unlocked position (
a
).
b
a

7
2
Slide the cover forward so that it can swing open (
b
).
3
Insert four AA-size batteries into the compartment.
Make sure the + and – terminals are oriented correctly
as shown inside the battery compartment.
Note:
Do not mix old batteries with new batteries, or
different types of batteries together.
4
Close and lock the battery compartment cover.
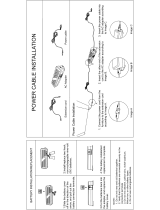
To connect the AC adapter
Here are some important notes for using the AC adapter
with your camera:
•
Only use the AC adapter that came with your camera.
Using a different AC adapter may cause damage to your
camera.
•
Turn the camera power off before connecting or
disconnecting the AC adapter.
Warning
: Unplugging
the camera with its power turned on may damage the
CompactFlash memory card.
•
Grasp the plug, not the cord, when you unplug the
adapter from an outlet. Avoid bending, pulling, or
twisting the AC adapter cord. Do not try to lengthen the
cord by splicing it with another wire.
•
Replace a damaged power cord with a new one (to avoid
electrical shock).
Note:
The AC adapter may become warm to the touch
after extended periods of use. This is no cause
for alarm.

8
Polaroid PDC 1300 Digital Camera User’s Guide
1
Connect one end of the AC power adapter to the AC
power adapter connector on the camera.
2
Connect the other end of the cable to a grounded
electrical outlet.
Using the Memory Card
The images you take with your PDC 1300 camera are stored
on a removable CompactFlash memory card. An 8MB
memory card is provided with the camera.
Note:
The PDC 1300 camera is compatible with all Type I
CompactFlash memory cards.
You must insert the memory card before you can use the
camera. If the memory card is not installed, the Status panel
displays a flashing CF symbol and a zero representing the
number of available photos.
Caution:
Do not insert or remove the CompactFlash card
while the power is on. Doing so may damage the
memory card.

9
To insert the memory card
1
Turn the camera power off.
2
Open the memory compartment as shown:
3
Carefully insert the memory card into the slot. The card
fits only one way.
Make sure the card is pushed firmly into the slot.
4
Close the memory compartment cover.
Note:
If the
CE
icon flashes on the status display, the
memory card must be reformatted. The memory
card will be unable to contain as many photos as
an empty (reformatted) card. The memory card
must also be reformatted in the event that the

10
Polaroid PDC 1300 Digital Camera User’s Guide
memory card becomes corrupted and unusable.
For more information, see “Delete photos from
your memory card” on page 21.
To remove the memory card
1
Turn off the camera.
2
Open the memory compartment on the side of the
camera.
3
Use the clip on the wrist strap to pull out the memory
card.
4
Close the memory compartment cover.

11
Using the Camera
You must insert the memory card before you can turn on the
camera (see “Using the Memory Card” on page 8).
To turn on the camera power
1
Slide the power switch on the rear of the camera (
a
) all
the way up to turn on the camera in RECORD mode;
slide the power switch all the way down to activate it in
PLAY mode. To turn off the camera, slide the power
switch to the OFF setting.
2
To turn on the LCD, slide the LCD on/off switch (
b
) up
and release it (slide it up and release again to turn it off).
The Status panel displays information about the
camera (
c
).
To use the Menu Dial
Use the Menu Dial to operate the camera menu:
•
Press the Menu Dial to:
•
Display camera menus
•
Make a menu selection
•
Turn the Menu Dial to scroll between different menu
choices and settings.
1300
a
c
b

12
Polaroid PDC 1300 Digital Camera User’s Guide
a
Memory card and battery status
b
Number of images remaining in memory
c
Pixel resolution setting
d
Flash setting
e
Lens setting
f
Exposure setting
g
Self timer
a b c d e f g

13
To set the date and time
The camera records a date and time with each photo. To set
the date and time:
1
Slide the power switch to RECORD mode.
The camera turns on in RECORD mode.
2
Press the Menu Dial.
The RECORD menu displays.
3
Turn the Menu Dial to scroll to the
MENU
icon.
4
Press the Menu Dial to display the
ADVANCED
menu.
5
Turn the Menu Dial to highlight
Time & Date
.
6
Press the Menu Dial.
The date and time settings for the camera display.
7
Turn the Menu Dial to highlight the date.
8
Press the Menu Dial to underscore the month.
9
Turn the Menu Dial to change the month.
10
Press the Menu Dial to enter the month and underscore
the day.
11
Use the Menu Dial to highlight and set the day and year.
12
Use the Menu Dial to set the time. All times are set to a
24-hour clock.
Note:
For example, a 24-hour clock understands
1:30pm as 13:30, 2:30pm as 14:30, etc.
13
Press
Set
to save your date and time settings and return
to the
ADVANCED
menu.
14
Press
Exit
.

14
Polaroid PDC 1300 Digital Camera User’s Guide
Changing Camera Settings
Using options on the PDC 1300 LCD menu you can change
camera settings for taking and reviewing photos. Depending
on which mode you switch it to, the camera displays one of
the following LCD menus:
•
RECORD to take photos.
•
PLAY to review photos stored in memory.
To switch between the menus:
1
Slide the power switch up to RECORD mode, or down
to PLAY mode. (Slide the power switch to the middle to
turn it off.)
2
Press the Menu Dial to display the menu of the current
mode.
3
Turn the Menu Dial to select a menu icon and press to
select.
RECORD
PLAY

15
To display the RECORD menu
1
Slide the power switch to RECORD mode.
2
Press the Menu Dial (
a
).
The RECORD menu is displayed (
b
). Use these menu
options to change camera settings.
Changing camera settings
The first time you turn on the camera, the camera settings
allow you to take pictures in most indoor and outdoor
conditions. These settings are the default settings. You can
change any of the default settings by using the RECORD
menu:
1
Slide the power switch to RECORD mode.
2
Press the Menu Dial.
The RECORD menu displays.
3
Turn the Menu Dial to highlight the item you want to
change.
4
Press the Menu Dial to display the possible settings.
5
Turn the Menu Dial once again to highlight the setting
you want to use.
6
Press the Menu Dial to select the setting and save it.
All of the available LCD menu camera settings are described
below.
1300
a b

16
Polaroid PDC 1300 Digital Camera User’s Guide
Pixel resolution
The resolution setting refers to the number of pixels in a
digital photo. The higher the pixel resolution, the more
pixels that are contained in your photo. A higher pixel
resolution takes up more space on the memory card, but
produces a higher quality digital image when printed.
Icon Resolution
•
1280X960 pixels
•
600K per photo
•
12 photos (8 MB memory card)
• Highest quality resolution for
printed images
• 1280X960 pixels
• 360 per photo
• 18 photos (8 MB memory card)
• Good quality resolution for printed
images
• 1024x768 pixels
• 240K per photo
• 32 photos (8 MB memory card)
• Minimum recommended resolution
for printing.
• 640x480 pixels
• 90K per photo
• 78 photos (8 MB memory card)
• Best for images used online
(digitally) in web sites, email, etc.

17
Flash
Choose how the camera flash is used. The default setting is
Auto.
Focusing distance
Determine the distance from the camera at which a subject
will be properly in focus. The default setting is Autofocus.
Icon Flash setting
The flash fires automatically when
needed.
• The flash does not fire.
• Use in places where flash is
prohibited or may be distracting.
• Use when shooting toward a
reflective background, such as a
window or a mirror.
• Each flash is preceded by a preflash
to reduce red-eye effect.
• The flash fires automatically when
needed.
• Flash is on.
• Flash fires for every photo.
Icon For subjects
From 2 feet to infinity (60 cm to
infinity) from the camera.
From 4 inches to 3 feet (10 cm to 1 m)
from the camera
/