Page is loading ...

Stainless Steel T ops and Boating Accessories t
C.E. Smith Company Greensboro, NC USA
Installation Instructions for
Model 52100 Stainless Steel Ttop
The
52100 Ttop provides a bolt together custom fit on virtually any
center console boat. Bolt together construction relieves the stresses from engine
vibration and wave shock that can crack 100% welded Ttops. Made from 316L
stainless steel, your
52100 Ttop will provide years of service with
minimum maintenance including occasional polishing and hosing off salt spray
after use. Your
Ttop is designed to provide shade to the boater
and to support optional accessories such as antennas, rod holders, a storage
bag or electronics box. It is very strong, but is not to be used as a pylon for
skiing, wake boarding or for towing. The
Ttop’s range of
adjustment allows it to fit over a wide variety of console sizes and shapes.
However, there are boats the
Ttop will fit that are not built strong
enough to support a Ttop. Such boats will require additional reinforcement to
the deck and or console above and beyond what is provided with this product or
discussed in these instructions. It is the responsibility of the purchaser to
determine when additional reinforcements are needed and to install these
reinforcements where needed for the Ttop installation to be strong and safe.
- 1 -

52100 MAIN KIT includes:
• Canopy Frame.
• Left Upright Frame, (
plugged hole for wires in front leg.)
• Right Upright Frame, (plugged hole for wires in rear leg.)
• Pair of front V-Brace Bars with integrated clamp ends.
• V-Brace Console Castings: Front Casting & Top Casting (you will use one)
• Installation Hardware Kit
PARTS to be Purchased Separately from Your Dealer:
• Canopy Cover (your choice of color to best compliment your boat.)
• Standoffs (4 usually required, lengths to be determined for each boat.)
• Rod holders.
• Electronics box 54100.
• Navigation light.
TOOL List:
Your
Ttop can be installed using common hand tools. One person
can do it alone; however, it is much easier with two people. Allow 3-5 hours for
installation.
Required Tools: With these common tools you can install your Ttop.
1. Hand drill
2. sharp 1/4” drill bit
3. sharp 3/16” drill bit
4. ½” countersink bit
5. #3 Phillips screwdriver
6. tape measure
7. pencil
8. sharpie marker
9. 3/16” Allen wrench
10. 7/32” Allen wrench
11. 1/8” Allen wrench
12. 7/16” end wrench
13. 9/16” end wrench
Recommended Tools: We recommend you have the tools listed below,
especially the long drill bits and long screwdriver extension to make the install
easier.
1. Cordless variable speed drill
with torque control
2. 12” 1/4” drill bit
3. 12” 3/16” drill bit
4. #3 Phillips screwdriver tip
5. 12” drill extension for #3 tip
6. 7/16” deep socket ratchet
7. 9/16” ratcheting box end
wrench
8. Rubber mallet
9. Dremel tool (if windshield
notching is called for)
- 2 -

Required Customer Supplied Materials:
1. 3M 5200 or equivalent marine sealant to seal the holes you will drill in your
deck and console.
2. A small amount of heavy grease.
Fitting the Ttop to your Boat:
Fitting the
52100 Ttop to your boat is an easy step by step
procedure. Take time to read thru all the steps below. Become familiar with
all
the decisions you will be making
before you get out your drill. Consider asking a
friend help you make important choices.
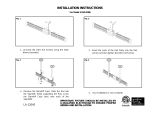
See (figure 1.) to help you visualize how the Ttop will fit on your boat.
1. Start by parking your boat such that the deck will be level. This will allow
you to stand back from the boat and eye the inward lean of your uprights
and to admire your progress during the install.
2. Lift your uprights onboard and lean them against your console.
3. Check that you can access all your console openings. (fuel fill cap, access
doors, etc.) You may need to shift position to make everything clear.
a. Most console access doors will swing clear under the standard
angled uprights. However, if you have a large console side access
door, too tall to swing under the standard Upright angled mid-bar,
you may need to special order High Bar Uprights. With a full 43”
clear under their horizontal mid-bars, High Bar Uprights will
accommodate most taller console doors.
4. Next, you will choose standoffs and their mounting locations.
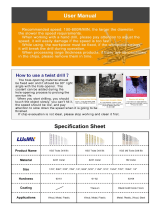
a. Take a good look at the different styles and lengths of standoffs
available to you. (Figure 3.)
b. Standoffs may clamp anywhere on the uprights.
c. Choose your locations and standoff styles such that the base of the
standoff lands on a good mounting location on your console.
d. You may find a combination of standoff styles and lengths works
best on your boat.
e. We recommend 4 standoffs, one for each corner of the console.
3

f. Choose the shortest standoffs you can, so the room you have to
walk around your console is maximized.
g. Position your standoffs as high on the console as possible. Higher
mounting provides increasingly better support to the Ttop canopy.
h. Be sure to leave at least 1-1/4 inches of ”hand hold grab-clearance”
especially around the front upright tube near the windshield.
5. Locate your upright feet close to the console sides, on strong deck
suitable to carry the stress the Ttop will transfer to the deck when in use.
You may angle each foot to best compliment the shape of your console
and to fit around any irregularities.
a. On most boats, screws must be used to mount the feet to the deck
because there is no access to the underside of the deck to allow
through bolting. For this reason, quality stainless screws are
provided with your Ttop. It is the purchaser’s responsibility to be
sure the deck is made of a material suitable for screws.
b. For any accessory you attach to your boat, if you have access to
the back side of the mounting location it’s always best to thru-bolt
and back plate anything you attach to your boat for maximum
strength.
c. Be very cautious when drilling holes in your deck. Especially if you
are not absolutely sure how thick the deck is, what structure is
under it, do electrical wires run there, fuel lines, and most
importantly, don’t drill a hole in your fuel tank or anything else under
the deck that should not be drilled into.
d. That said, on many boats it is difficult to know what’s under the
deck and there is no access for visual inspection, so accessories
must be installed via “blind” drilling. Do so very slowly and pay
close attention to the chips coming out of the hole. If you see any
non-deck material in the chips or if you feel any change in
resistance to drilling, stop and evaluate if you should proceed.
Never let the bit run deeper than the length of the screw.
6. You may find you need to shift the uprights fore or aft to find the best
combination of standoff mounting locations and foot mounting locations.
7. See #8 and #9. Lightly clamp the standoffs onto the upright frames and
test your length and style selection.
8. As you do #7, be sure to clamp the standoffs on with the standoff cap on
top. That way if you ever remove your Ttop for storage you can remove
4

the standoff caps and lift the top off without disturbing the bedding of the
standoffs to the console.
9. As you do #7, be sure to turn all 4 swivel feet so the cap is to the outside.
That way if you ever remove your Ttop for storage you can remove the
caps and lift the top free of the feet without disturbing the bedding of the
feet to the deck.
10. Stand well back from the boat and eye the look of your Ttop uprights
taking careful note of their inward lean. About 3 degrees of inward lean on
each side is usually best. Of course you may decide your boat looks best
with vertical uprights or some other degree of inward lean.
11. The mounting bases of the standoffs you select should land squarely on
the console.
a. On boats with extremely curved consoles it may be necessary to
fabricate tapered mounting shims to achieve a flush mounting base
fit for your standoffs.
b. Starboard® is an excellent material to use for this purpose.
12. Fit your front V-braces.
a. Take out your front V-brace bars and two console mount castings.
b. Remove the clamp caps from the brace bar end clamps.
c. Hold the clamp up high against an upright tube and hold the
flattened end near the centerline of the console.
i. Look at the clearance between your windshield and the
brace bar.
ii. You may need to move the uprights to get the best
windshield clearance for the V-braces.
iii. You can mount your V-brace clamps on the front or rear
upright tubes.
d. Your windshield angle will determine if you should mount your V-
braces behind the windshield
or in front of the windshield.
i. If you use the console front casting, choose a location as
high as possible on the front of the console.
5

1. On some boats there is not enough room to mount
the console front casting between the seat cushion
and the windshield. A good solution is to use a
Dremel® tool sanding drum to fashion a notch in the
bottom edge of the windshield to open up some space
for the casting to mount.
a. To do this, put masking tape on the windshield
and trace the casting onto the masking tape.
Use the Dremel® tool drum sander to shape a
notch in the bottom edge of the windshield.
This yields a very custom looking installation.
e. For best appearance, your V-brace center casting must be
mounted at the center of the Ttop, as measured between the
uprights. Mount the casting at Ttop center, not console center.
i. Find the true center by assembling the V-brace bars to the
console casting and checking that both bar end clamps are
the same distance down from the Ttop canopy. Locate your
console casting accordingly.
f. Mounting both brace bars to one center casting is best, but space
limitations may dictate that each brace bar land to its own casting.
g. You may need to bend the flat end of the brace bar slightly to align
with the console mounting casting on your console.
13. OK you are almost ready to start mounting. Stand back and make a triple
check of overall fit, and triple check the location of all holes to be drilled.
a. Check for back side access and working clearance behind each
standoff.
i. Don’t forget to account for the thickness of the console at
corners. The front and back of the console each have
thickness. For example, if your console is 3/4” thick, you can
drill a hole no closer than 1-1/2” from the front edge and still
get a nut on the back side.
b. measure the distance between the top channels fore and aft to be
sure they are somewhere between 28 ” and 45 ” apart.
c. Take out your canopy, loosen all four; 1/8” Allen key setscrews in
the slide bar ends. Slide the canopy slide bars to the same fore
and aft widths. Keep them centered about the canopy midline.
6

Installing the Canopy Cover:
The first step in assembling your Ttop is to lace on the Sunbrella cover
(purchased separately in the color of your choice). Since you are installing a
new Ttop, you will find lacing the cover is much easier if you do it on a table
before mounting the canopy frame onto the uprights. Or you may choose to
wait until after the Ttop is fully installed and do the lacing while standing on
your boat’s gunnels. If possible, work in a clean open area as you will have
70 feet of cord to lace. It is easier to avoid tangles if you can straighten out
the cord as you proceed from grommet to grommet and you don’t want to get
the white cord dirty.
1. It is easiest to lace the canopy with the frame on a table at a comfortable
working height. This process will take about 45 minutes.
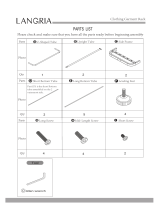
2. Figure # 4 shows how to center the canopy on the frame using the 8 ties
supplied. Orient the cover with the SMITH label down and aft. (the
navigation light bracket on the frame is located toward front.)
3. Figure # 5 shows how to run the lacing. Begin lacing from any eyelet and
just lightly snug the cord as you go so as to keep the canopy centered on
the frame.
4. Lace only one grommet at the time. Pull all the cord thru each grommet
before moving to the next grommet. As you lace to a grommet with a tie,
remove the tie and discard it. (Don’t try to lace several eyelets and then
pull the cord thru them all at once. If you do, the cord will kink and make
you cuss.)
5. Figure #5 shows the best way to tie off the lacing with the least visible
knots.
6. Figure #6 shows what the finished lacing should look like after you tighten
the lacing and work the two knots (one on top and one on the bottom)
snug to the lace start/stop grommet.
7. When finished, clip the cord close to the knots and flame melt a nice ball
of nylon to prevent un-raveling and to set the knot.
8. The nylon cord and the Sunbrella will stretch and you will need to re-
tighten the cord to take a foot or two of cord out in a few days.
Drilling and Installation:
9. The hard part is behind you and you are ready to begin installation.
10. Being very careful not to disturb the feet as you move from one to the
next, use the Sharpie to mark all 16 foot screw holes.
11. Use the feet as drill guides to avoid drill bit walking. ( a big problem on
textured decks)
7

12. Put your drill in reverse. (with some downward pressure a drill in reverse
will cut into gel coat, but in reverse there is no risk of the bit accidentally
catching and biting into your boat deeper than you intended.) Using the
long 1/4” drill bit, make center mark indentions into your deck at each
Sharpie mark.
13. When all 16 hole centers have been made set the uprights to the side.
a. If at this point you have chosen to thru bolt the feet:
i. Use the ¼” drill bit or other appropriate size for the fastening
system you have chosen being very careful not to let the drill
bit run thru the deck where it could damage something
hidden underneath.
b. If at this point you are using the screws supplied with the kit to
mount the feet:
i. Use the 3/16”-drill bit and carefully drill the16 screw holes
being very careful not to let the drill bit run thru the deck
where it could damage something hidden underneath.
14. Very carefully, use the countersink bit to shave off
only the deck gel coat
around all 16 deck holes being careful
not to cut into the fiberglass
underneath. (This shave prevents the screw from pressing out directly
against the gel coat which would cause future spider cracking around the
screw holes.)
15. For deck mounting using the supplied screws, (from this step down,
complete one Upright installation at a time.)
a. Pump all 8 deck holes full of sealant. Don’t be stingy; fill each hole
thru and out the bottom.
b. Mound a bead of sealant around each hole to be sure the hole
remains sealed when the upright is moved in place.
c. Detach the feet from the upright and individually bed each foot into
the sealant being careful not to smear the sealant. The feet are
concave underneath so the excess sealant should disperse into the
cavity and not squish out beyond the foot.
d. One by one, coat each screw’s threads lightly but completely with
sealant. Using a low torque setting run the screw in taking care
not to over tighten and strip out the holes. (You can always go
8

back and tighten them more before the sealant sets up after all the
screws are in place.)
e. Now that you have the feet attached to the deck, re-connect the
upright to the feet and turn attention up to the standoffs.
i. Be aware if you pre-drill all the holes for both standoffs at
one time, you may discover the alignment has changed
slightly for the second standoff after you have tightened the
mounting of the first standoff. You may choose to
completely install each standoff in rotation to avoid this
pitfall.
ii. Lean on the upright and press the standoff’s mounting flange
firmly and as squarely as possible against the console and
use the long 1/4” drill bit to drill thru the standoff screw flange
holes straight through the console.
iii. If the curvature of your console is great at the mounting
location you may discover too much gap under the foot
flange. Fashion a taper ship from a material like Starboard
if needed.
iv. (If you discover you are drilling into wood reinforcing inside
the side of the console, stop and coat the inside of the hole
with sealant to prevent rot before continuing.)
v. Install the screws, backing plate and nuts and tighten down
the standoffs.)
16. Repeat the process on the other side.
17. With both uprights now fastened solidly, mount the front V brace casting
as planned earlier in fitting step #12.
18. Lift and place the canopy into the upright channels.
19. Coat the first ½” of the threads of the canopy bolts with a small amount of
heavy grease to prevent the large nuts from possibly seizing on the large
bolts. Install bolts head down, nut on top using the Allen wrench and 9/16
wrench. You need only snug the bolts, don’t over tighten.
20. Check that the canopy slide castings are centered and then tighten the
slide casting setscrews using your 1/8” Allen key.
9

Congratulations on your new Ttop!
Please, share with us your thoughts about the product and installation.
If you e-mail in photos of your boat and new Ttop
we will add you on our website.
Thanks for choosing
!
10

top mount V-brace
and a narrow console
side view showing
possible standoff
locations
front mount V-brace
and wide console
figure 1.
Top Mount Front Mount
V-brace mount: Front if you land your V-brace in front of the windshield on the
front of the console. Top if you choose to land your V-brace behind your
windshield on top of your console.
figure 2.
5 ¼” 3 ¾” 3 ¼” 3” 2 ¾” 2 ¼” 1 ¾”
52408 52404 52403 52414 52402 52405 52401
Standoffs: Select long standoffs such as 52408 to fit around windshield rails or
built-in rod holders. Select standoff 52414 for added reach to fit smaller
consoles. Always choose the shortest standoff that will do the job.
figure 3.
11

Canopy Cover Tie Locations: Working on your boat or on a work table center
your canopy cover on the frame using the 8 ties provided as shown.
figure # 4
Canopy Lacing and Knotting: Lace only one grommet at the time pulling all
cord thru before lacing the next grommet.
figure # 5
12

Completed Canopy Lacing and Knotting: When finished your lacing and
knotting should look like this.
figure # 6
13

C.E. Smith Company Limited Warranty
C.E. Smith Company, Inc., (SMITH) warrants all stainless steel components of
this product to be free from defects in material and workmanship for a period of
two (2) years, One (1) year for the Sunbrella® canopy, from the date of original
purchase when properly installed, used and maintained.
This warranty does not apply to damage or loss caused by any or all of the
following circumstances or conditions:
• Damage caused during installation.
• Misapplication, misuse and failure to follow the directions or observe
cautions and warnings on installation and application.
• Use of the product for any application other than those described in
SMITH product information materials.
• Damage caused by customization
If any SMITH products are found upon inspection by SMITH or its duly appointed
representative to have been defective when supplied, SMITH will at its sole
discretion repair or replace the defective product(s). SMITH will not pay for
expenses incurred in returning the product for inspection without written
permission from SMITH. In any case, SMITH will not be liable for any other
expenses the purchaser incurs to remedy any defect
Limitation of Liability: It is expressly agreed that the liability of SMITH is limited
and SMITH does not function as an insurer. The remedies set forth in this
warranty shall constitute the exclusive remedies available to the purchaser or
user and are in lieu of all other remedies, express or implied. The liability of
SMITH, shall not exceed the purchase price of the product manufactured, sold or
supplied by SMITH.
This warranty excludes all implied warranties or merchantability or fitness for a
particular purpose of any purpose.
This warranty does not cover nor extend to incidental or consequential damage.
Some states do not allow the exclusion or limitation of incidental or consequential
damages, so the above limitation or exclusion may not apply to you. This
warranty gives you specific legal rights, and you may also have other rights
which vary from state to state.
No representative has authority to make any representation, promise or
agreement except as stated in this Limited Warranty. There are no warranties
which extend beyond those described above. Effective January 2003 this
warranty supersedes all prior warranties, written or implied.
WARRANTY REVISION 06-28-2004
14
/