Page is loading ...

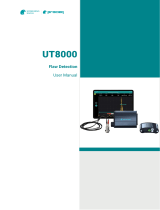
Proceq Flaw Detector 100
Design Patent Pending
Operating Instructions
Proceq Flaw Detector 100

2 © 2016 Proceq SA
Table of Contents
1. Introduction .................................................................. 3
2. Disclaimers and Notices .............................................. 3
3. Risks and Hazards ....................................................... 3
3.1 Operating Conditions ........................................................3
3.2 Disposal .............................................................................3
4. Hardware Overview ...................................................... 4
4.1 Connectors ........................................................................4
4.2 Keypad ...............................................................................6
5. User Interface ............................................................... 8
5.1 Configuration mode ..........................................................8
5.2 Live mode ..........................................................................9
6. Menus ......................................................................... 10
7. Configuration and Operation Workflow ..................... 12
7.1 Loading and Saving Files ................................................12
7.2 Creating a New Configuration ........................................13
7.3 Defining the Part to Inspect .......................................... 13
7.4 Loading and Defining Probes .........................................14
7.5 Loading and Defining Wedges .......................................16
7.6 Positioning the Probe on the Part ..................................18
7.7 Setting up the Encoder or Time Based Scan .............. 19
7.8 Defining Inspection Parameters .....................................20
7.9 Selecting a View Layout ..................................................20
7.10 TOFD ................................................................................20
7.11 Starting Data Acquisition ................................................22
8. Calibration Wizards .................................................... 22
8.1 Available Calibrations ......................................................22
8.2 Cursors ............................................................................24
8.3 Using the Extractor Cursor .............................................25
8.4 Using the Extractor Box ..................................................26
9. Customizing the Measurement Bar ........................... 26
10. Taking Screen Captures and Creating Reports ....... 27
11. Managing Files Using the Media Browser ................ 28
12. Data File Analysis............................................................28
13. Troubleshooting and Support .................................... 29
13.1 Troubleshooting Tips .......................................................29
13.2 Update Procedure ...........................................................29
13.3 Service and Warranty Information .................................29
14. Ordering Information ................................................. 30
14.1 Units .................................................................................30
14.2 Software upgrades ..........................................................30
14.3 Software upgrades after purchase of the main unit ......30
14.4 Accessories .....................................................................30
14.5 Conventional weld inspection ........................................30
14.6 Phased array inspection .................................................30
14.7 Adaptors ..........................................................................30

© 2016 Proceq SA 3
1. Introduction
This manual provides information for the Proceq Flaw Detector 100 in-
strument. The user guide has been designed considering that users al-
ready have a good knowledge of basic ultrasonic non-destructive test-
ing. It is important that users understand the critical nature of ultrasonic
non-destructive testing before operating this instrument. The user guide
contains procedure on how to use the Proceq Flaw Detector 100, how
to care for it, and explains the functionalities and parameters available
according to the type of inspection to be made.
2. Disclaimers and Notices
The following information must be read and understood by users of the
Proceq Flaw Detector 100. Failure to follow these instructions can lead to
serious errors in test results or damage to the unit. Decisions based on
erroneous results can lead to property damage, personal injury, or death.
Anyone using this instrument should be fully qualified by their organiza-
tion in the theory and practice of ultrasonic testing, or under the direct
supervision of such a person.
All statements, technical information, and recommendations contained
in this manual or any other information supplied by Proceq in connection
with the use, features, and qualification of the Proceq Flaw Detector 100
are based on tests believed to be reliable, but the accuracy or complete-
ness thereof is not guaranteed. Before using the product you should de-
termine its suitability for your intended use based on your knowledge of
ultrasonic testing and the characteristic of materials. You bear all risk in
connection with the use of the product.
3. Risks and Hazards
The Proceq Flaw Detector 100 contains a high-energy, precision trans-
mitter allowing optimum testing results to be obtained by matching the
pulse width to the probe characteristics. This circuitry may be damaged
by voltage spikes. It is recommended that the instrument be turned off, or
the transmitter stopped before changing transducers (probes).
This user guide provides instruction in the basic operation of the Proceq
Proceq Flaw Detector 100. In addition to the methods included, many
other factors can affect the use of this product. Specific information
regarding these factors is beyond the scope of this manual. The user
should refer to appropriate textbooks on the subject of ultrasonic testing
and thickness gauging for more information.
3.1 Operating Conditions
If the equipment is used in a manner not specified by the manufacturer,
the protection provided by the equipment may be impaired.
!
WARNING!
• Do not operate under water
• Do not operate with fans obstructed
• Operating temperature: -10°C to 45°C (14°F to 113°F)
• Storage temperature: -25°C to 60°C (-13°F to 140°F)
• Maximum relative humidity: 5 to 95% non-condensing
• IP rating: IP66
3.2 Disposal
Disposal of electric appliances together with household waste is
not permissible. In observance of European Directives 2002/96/
EC, 2006/66/EC and 2012/19/EC on waste, electrical and elec-
tronic equipment and its implementation, and in accordance with nation-
al and local law, electric tools and batteries that have reached the end of
their life must be collected separately and returned to an environmentally
compatible recycling facility.

4 © 2016 Proceq SA
4. Hardware Overview
See Proceq Flaw Detector 100 Quick Start Guide for scope of delivery.
4.1 Connectors
Tx/Rx A
(BNC or LEMO)
Rx A (BNC or
LEMO)
Phased array
(I-PEX)
Tx/Rx B (BNC
or LEMO)
Rx B (BNC
or LEMO)
Connector ports, side panel right
Power
I/O (LEMO)
Encoder
connector
Connector ports, back panel
USB ports
Mini USB
Ethernet gigabit
Connector ports, side panel left

© 2016 Proceq SA 5
Encoder Connector
Pin # Signal Name Description
1 (red dot) VCC Power 5 V, 300 mA max. Over current
protected.
2ENC1_A SE input encoder phase A
3ENC1_B SE input encoder phase B
4ENC1_A_P Differential input positive encoder phase
A
5ENC1_A_N Differential input negative encoder phase A
6ENC1_B_P Differential input positive encoder phase B
7ENC1_B_N Differential input negative encoder phase B
8
(center pin)
GND Ground
3
4
58
2
67
1
I/O (LEMO)
Pin # Signal Name Description
1 (red dot) VCC Power 5 V, 300 mA max.
2Output 1 Customized by user
3Output 2 Customized by user
4Output 3 Customized by user
5Output 4 Customized by user
6Input 1 Cannot be customized
7Input 2 Cannot be customized
8
(center pin)
GND Ground
3
4
5
2
6
8
1
7

6 © 2016 Proceq SA
4.2 Keypad
Button Button Name USB
Keyboard Short Function Description
CANCEL Escape Cancels an ongoing value change and resets to the previous value. Exit from a popup window.
Click Wheel ---
Rotate your finger clockwise and counter clockwise to scroll up and down through a menu, to increase/
decrease a parameter value, to move cursor in view area or zoom in/out in 3D view. Also acts as LEFT/
RIGHT key to move during text entry.
UP / DOWN
ARROWS Arrows Moves from one menu item to another. Changes a parameter value. Moves up and down the selected
cursor or gate.
LEFT / RIGHT
ARROWS Arrows Moves from one menu tab to another. Moves the selected cursor or gate to left and right.
OK Enter Edit and confirm new value or selection.
MENU M Get to the menu and allows menu navigation.
VIEW V Toggles between the various views. Display the Measurements bar (in Live mode).
CURSOR C Toggles between the various cursors of the currently selected view. Also acts as Backspace during text entry.
dB D Changes the gain value of the selected scan. If pressed and held for 3 seconds, it will automatically
adjust the gain to 80% of the selected gate (if RefAmplitude is set to 80%).
WELD W Shows or hides the weld overlay for the selected view.
ZOOM IN/
OUT Z Zooms in or out of the view, in analysis mode only.
MAX / MIN X Maximizes or minimizes any selected view.
GATE G Focuses or toggles between gates.

© 2016 Proceq SA 7
RANGE A Changes the range path value of the selected scan.
F1 / HELP F1 Access the Contextual Help, Quick Start Guide and User Guide Documentation.
F2 / INFO F2 Displays the view information menu or for wizards returns to previous step or page.
F3 / SET REF F3 Resets the encoders position to the origin, or for wizards advances to the next step or page.
PLAY/PAUSE P Starts or pauses live acquisition of ultrasound images.
STOP T Stops live acquisition or recording or goes a step in conguration mode.
RECORD R Starts the recording mode permitting data to be saved on completion or termination of the scan.
SAVE S Saves a le (conguration, screenshot or report).
LOAD O Loads a conguration le, displaying ale list to choose from.
REJECT --- Illuminated when “reject” mode is activated.
ALARM1 &2 --- Illuminated when any congured gates are triggered.
ON/OFF &
Battery
indicator
--- Powers the instrument on (Hold down) or shuts it down. Light is green when the device is ON.

8 © 2016 Proceq SA
5. User Interface
The user interface presents two displays; one in for the Configuration
mode and one for the Live mode.
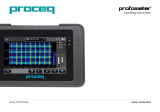
5.1 Configuration mode
234 5
1
6
7
8
10
9
1. Tab bar
Shows the list of tabs that open the corresponding menu on the left
of the screen. Tabs are placed in a logical sequence that should be
followed when doing a new inspection configuration. When a tab is
selected it is highlighted.
2. Menu bar
Presents all categories and parameters accessible from the selected
tab.
3. Summary view
Shows a quick summary of the current configuration settings. Gives
an overview of the configuration in one glance.
4. 3D view
Shows the representation of probes, wedges, scans, and part in 3D.
5. Battery status
Displays various information about the instrument state, such as the
Instrument State, the Time/Date indicator and the Battery Status
indicator.
6. Menu items
Displays the list of parameters (numerical, text, lists or action items)
that are accessible from the selected tab. The list is scrollable with
the and keys, or by rotating your finger around the Click
Wheel. The list can contain more than 10 parameters (going up or
down reveals new parameters).
7. Selected item
This item is highlighted when it is selected. The Help view displays
the help related to this item. The selected item is green when work-
ing in conventional UT only and blue when working in PA or PA and
UT combined.
8. Category
When menus contain many parameters, they are grouped in catego-
ries. When a category is selected, the Help view displays the list of
parameters contained in this category. To open or close a category,
click the key when the category is selected.
9. Information bar
Displays a short help message related to the selected parameter in
the main menu, or displays error messages.
10. Help view
Displays more detailed help text related to the selected parameter
in the main menu. It can be maximized to display the entire help text
or large images.

© 2016 Proceq SA 9
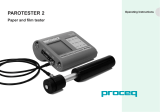
5.2 Live mode
8
7
2
3
4
5
6
1
1. Measurements bar
Displays various numerical measures extracted from the ultrasonic
data. The measures to display can be selected in Measures> Select
Measures, in the Acquisition mode. It is displayed only when the
key has been pressed, or when the Keep Meas. Bar item has
been enabled on the Prefs tab under Display.
2. Calibration indicators
Gives color coded information about calibrations that were per-
formed. Black = not calibrated, green = calibrated, yellow = partial
calibration, red = invalid calibration.
3. Instrument state
This area indicates the current device state. Possible states are
Play, Stop, Pause, and Record. The label ACQ is displayed when a
.utcfg configuration file is loaded and ready for acquisition, or FILE
when a .utdata file has been loaded for post-analysis.
4. Item selection
When multiple probes, wedges or scans are configured, their menus
are stacked together. This indicator shows which probe, wedge, or
scan properties is currently being displayed in the menu.
5. Scrollbar
Use to scroll with a USB mouse.
6. View layout
Shows the selected screen layout. The active view is always shown
in blue, and the properties of the active view are located in the View
menu.
7. Encoder position
When an encoder is plugged in and configured, the encoder posi-
tion is shown here, in mm or inches. This value is updated in Acqui-
sition mode only.
8. View measures
This area shows various measures automatically selected depend-
ing on the context. They can been hidden by using the View> Show
Measures option to increase the viewable area.

10 © 2016 Proceq SA
6. Menus
This section presents the parameters and functionalities for both Con-
figuration and Live modes including all optional features. Depending on
the type of inspection, the available categories and items will differ. Menu
tree (menu items vary according to the inspection setup)
Inspection
TTHardware Settings
•T Voltage Phased Array
•T Voltage Mono
•T Mono Pulse Damping
TTReport Info
•T Job/Customer
•T Site
•T Operator
•T Qualification
•T Procedure Ref
•T Couplant
TTReport Settings
•T Procedure Report
•T Report Type
•T Cursors Info
•T Inspection Info
•T Probe Info
•T Wedge Info
•T Scan Info
•T Encoder Info
•T DAC Info
•T DGS Info
•T 3D Views Info
•T Warnings Info
•T Logo
•T Change Logo File
•T Clear Logo File
TTMenus
•T Lock Setup
•T Short Menu
Part
TTProperties
•T Material
•T Part Geometry
•T Thickness
•T Velocity LW
•T Velocity SW
TTIdentifiers
•T Component
•T Serial #
•T Location Ref
TTWeld Geometry
•T Weld
•T HAZ
•T Root Gap
•T (Weld geometry)
TTCalibration Block
•T Cal. Block Type
•T Cal. Block Serial #
Probe
•T Add…
•T Delete…
•T Load…
•T Probe Type
TTIdentifiers
•T Manufacturer
•T Model
•T Serial
TTSettings
•T Frequency
•T Pulse Width
•T Connected To
TXAdvanced Settings
Wedge
•T Load…
•T Wedge Type
TTIdentifiers
•T Manufacturer
•T Model
•T Serial
TTSettings
•T X Offset
•T Contact Surface
•T Cut Angle
TXAdvanced Settings
Scan
•T Add…
•T Delete…
•T Scan Type
TTGain
•T Gain
•T Reference Gain
•T Set Reference Gain
•T Software Gain
•T Auto FSH%
•T Reference Amplitude
TXAcquisition Area
TXFocusing
TTTOFD
•T Ruler Lateral Wave Position
•T Theo Time Lateral Wave
•T Theoretical Time Backwall
•T PCS
•T Beam inter Pct
•T Straightening
•T LW Removal
Scan (continued)
TTTX
•T PRF
TTRX
•T Signal Rectification
•T Digital Filter
•T Analog filter
•T Sub-Sampling

© 2016 Proceq SA 11
•T Rejection
•T Reject Threshold
•T Smoothing
•T Contouring
•T Cont. Decay Rate
•T Averaging
•T IFT Active
•T Acq. Freq
TTProbe Connect
•T Probe TX/RX
TTElements
•T First Element TX/RX
•T Last Element TX/RX
TTStatistics
•T Beams Quantity
•T Samples Quantity
•T Path Resolution
Geometry
TTProbe/Wedge 1
•T W1 Index Offset
•T W1 Scan Offset
•T W1 Rotation
TTEncoding Area
•T Enc. Area CL Pos
•T Enc. Area CL Offset
•T Enc. Area Rotation
Encoding
•T Encoding Setup
•T Encoders Name
•T Reset All Position
TTScan Axis
•T Scan Axis Name
•T Scan Enc Type
•T Scan Enc Resolution
•T Scan Start Position
•T Scan Stop Position
•T Scan Distance
•T Scan Step
•T Scan Invert Direction
TTStatistics
•T Data File Size
•T Max Phys. Enc. Speed
Calibrate
•T Velocity & Zero Wizard...
•T Wedge Delay Wizard...
•T Sensitivity/ACG Wizard...
•T TCG/DAC/DGS Wizard...
•T Encoder Wizard...
•T Element Activation
Wizard...
•T Clear Calibrations
TTMeasures
•T Select Measures…
•T Encoded Axis Reference
Prefs
•T Media Browser
TTDisplay
•T Auto-Hide Menus
•T Default Amplitude Palette
•T Default Depth Palette
•T Keep Measurements Bar
•T Activate VGA Port
•T Background Color
•T Screen Brightness
TTSystem
•T Language
•T Unit System
•T Name Generation
•T Date Format
•T System Date and Time
TXNetwork
TTSupport
•T Last Calibration
•T Set Calibration Date
•T Add Option
•T System Update
•T Support Console
•T About
Cursor
•T Name
•T Type
•T Color
TTPosition
•T Level/Threshold
•T Surface Dist (Start/Stop)
•T Depth (Start/Stop)
•T True Depth (Start/Stop)
•T Encoding Scan/Index Axis
•T Focal Law
•T Angle
•T Sound Path
•T Gate Start/Stop
•T Gate Width
TTMeasures
•T Gate Follow Peak
•T Triggered By
•T Dual Polarity
TTAlarm
•T Gate Alarm
•T Delete Cursor

12 © 2016 Proceq SA
View
•T Select Layout…
•T View Orientation
•T Add Cursor…
TXPalette Properties
TTReference A-Scan
•T Reference A-Scan (list)
•T Save Reference A-Scan
•T Save Reference to CSV
File
•T Import Reference from
CSV File
•T Save Envelope to Refer-
ence List
•T Clear Reference List
TXData Extraction
TTGraph Options
•T Show B-Scan
•T Line Colors
TTOverlays
•T Envelope
•T Show Measures
•T Show DAC, DGS, and
TCC
•T Part Overlay
•T Half Skip
View (continued)
TXRulers & Grids
TXScroll & Zoom
TX3D View
TXSelect Layout
TXDisplay Mode
TXOrientation
TTDisplay
•T Part
•T HAZ
•T Wedge
•T XYZ Axis
•T Elements
•T Wire Frame Display
•T Scan Axis
•T Stream Direction
TTBeams (3D view)
•T Half Skip
•T Beams
•T Focal Law
•T Beam Divergence
•T Scan Area
•T Near Field
•T Delay
TTMeasurements (3D view)
•T Legend
7. Configuration and Operation Workflow
7.1 Loading and Saving Files
To load a file:
1. Press the key and use the Click Wheel to select one
of the file options (configuration, data, report, and recent) and press
.
2. Press the key to select the file list and use the Click Wheel to
select the desired file.
File Extension Description
.utcfg Contains the entire configuration for an inspection
(probe, wedge, type of scan, position of each cursor,
layout, color palette to use, etc.).
.utdata Contains everything a .utcfg file contains plus all the
recorded data.
.pdf Reports created with the Proceq Flaw Detector 100
PDF file. Any other PDF file can be displayed by the
Proceq Flaw Detector 100.
.png Screen captures created with the Proceq Proceq
Flaw Detector 100 PNG image standard (PNG: por-
table network graphics).
3. If there are too many items to choose from in the list, press the
key to select the left-side menu and use the Sort By item to
filter the selection.
4. If necessary, press the key to swap media.

© 2016 Proceq SA 13
Files can be loaded from or saved to the internal solid state drive , or
an external USB drive . The Proceq Flaw Detector 100 comes with
an extensive list of sample configurations stored on the internal solid
drive . These files start with “Example_....”. They are read only files.
Once a file is selected, the configuration summary is displayed in the
lower area of the window.
5. Press to open the selected file.
To save a file:
1. To save a configuration (.utcfg), a screenshot, or a report, press the
key.
2. Type the file name using the keypad as you would do with a por-
table phone.
7.2 Creating a New Configuration
If none of the already existing configuration applies to your inspection
setting, you can create a new one from scratch using the New Inspection
Wizard.
To create a new configuration:
1. Press the key and, using the Click Wheel , select Start New
Inspection Wizard.
2. Select the inspection type and press .
3. For the next steps, follow the instructions appearing on the left of
the screen and press the key to move to the next step.
NOTE! To maximize a view, pressing the key to select
the desired view and press the key. Press the key
to toggle between views. Press the key to return to the
normal display.
7.3 Defining the Part to Inspect
The part identification and its physical characteristics are entered on the
Part tab under Properties and Identifiers. Under Properties, you define
the longitudinal and/or shear wave velocities. Velocities can be manually
entered if they are known or the Velocity Wizard can be used to find them.
However, when performing a shear wave (SW) inspection, the longitudi-
nal wave (LW) velocity can be ignored as you will set the wave mode to
SW on the Scan tab under Acquisition Area> Wave Mode.
If you are performing a weld inspection, you can specify all weld char-
acteristics on the Part tab under the Weld Geometry item. Select the
appropriate weld type and adjust the bevel sizes and angles.

14 © 2016 Proceq SA
NOTE! Maximize the 3D view while defining the weld geom-
etry by selecting the 3D view using the key and the
press the key.
The calibration block used is defined under Calibration Block. There is a
list of blocks to choose from or you can enter one manually.
7.4 Loading and Defining Probes
Once the number of probes to be used has been decided, you can load
them from the probe database or define them manually.
To load a probe:
1. On the Probe tab, select the Load item and press . The probe
database is displayed.
2. Press to move to the top of the list and use the Click Wheel
to select the probe file.
3. Click to load the file.
To define a new probe:
1. On the Probe tab, select Add.
2. In the Create new probe dialog box, select the type of new probe
to configure or use an existing probe to modify it and press .
NOTE! Maximize the help view to access the complete in-
structions by pressing the key. Pressing the key
while the help view is maximized switches from view to view.
Press the key to return to the normal display.
3. Save the probe into the database using the Save item at the bottom
of the menu.

© 2016 Proceq SA 15
7.4.1. Element Layout (PA only)
The Element Layout item refers to the position of element number 1
when attached to a wedge. Element number 1 is the element where the
first delay is triggered and its position is usually engraved on the probe
casing. The available element layouts for 1D probes are listed below.
For 1D array probe
LR Left row RR Right row
The Proceq Flaw Detector 100 only supports 1D Linear PA probes at this
time.
For phased array probes, the Elmt Size Dim 1 and Elmt Size Dim 2
items refer to the size of individual elements along a dimension, either
dimension 1 (X-axis) or dimension 2 (Y-axis).
Elmt Size Dim 1
Elmt Size Dim 2
Elem ent size dimension 1 and element size dimension 2
7.4.2. Conventional Diameter
For round conventional probes, the Diameter item replaces both dimen-
sions 1 and 2.
Diameter

16 © 2016 Proceq SA
7.5 Loading and Defining Wedges
For each probe, a wedge is automatically created. This means that probe
1 is automatically linked with wedge 1 and probe 2 with wedge 2, etc.
When no wedge is attached to the probe, the wedge type has to be set
to None.
To load and define a wedge:
1. On the Wedge tab, select the Load itemand press . The wedge
database is displayed.
2. Press to move to the top of the list and use the Click Wheel
to select the probe file.
3. Press to load the file.
If you need help to define the wedge parameters, you can open the help
view by pressing the key.
4. Save the wedge into the database using the Save item at the bot-
tom of the menu.
The Wedge Type item allows you to specify the type of wedge used if
any. Select either Angular or Flat.
The Contact Surface item allows you to select the wedge surface. If
the surface is not a planar one, a list of shapes is available for curved
surfaces such as pipes, tubes, nozzles, axles, billets, etc.

© 2016 Proceq SA 17
The Cut Angle item refers to the angle
of the wedge. Unlike for conventional
testing, where the refracted angle is
usually used, phased array uses the
actual wedge angle. To convert the
refracted angle in steel to the wedge
cut angle, the Snell’s law is used. In the
formula, the incident angle correspond
to the wedge cut angle.
Cut Angle
The Radius item refers to the wedge curvature when a curved surface is
selected in the Contact Surface item under Settings.
Planar, Axial concave and Axial convex
are supported in the software.
Circumferential concave and Circum-
ference convex are unsupported in the
software.
The Back Height and Front Height items allow you to define the back
and front height of an angular wedge. The back height is crucial to the
exit points calculation. If you are using a special wedge, such as a snail
wedge, you need to measure the front height where the slope stops.
Front
Height
Back
Height
Back
Height
Front
Height
Height
Height
The Width and Length items allow you to define the area of the wedge
in contact with the inspection surface. If you are using a special wedge,
like a snail wedge or a wedge with extra parts, you have to exclude these
parts when you measure those values. See the examples below, the red
part is not included in the length measurement.
Length
Width Length Width

18 © 2016 Proceq SA
The Roof Angle item allows you to define
a complementary angle for the wedge.
Wedges with roof angle are usually used
in pitch-and-catch setups.
Roof Angle
The Probe Back Dist and Probe Side
Dist items allow you to set the distance
between the corner of the probe housing
and the edge of the wedge.
Probe Back Dist
Probe Side Dist
The Probe Inset item allows you to define
the depth the transducer is recessed into
the wedge, which is the actual depth of
the hole inside the wedge.
Probe
Inset
7.6 Positioning the Probe on the Part
The Geometry tab defines the scan plan; that is defining the location of
each probe/wedge on the part to be scanned.
As required by many codes, the position of the probe relative to the weld
needs to be known and recorded.
The index and scan offsets allow you to translate the probe/wedge while
the Rotation item allows you to rotate it around the reference point. The
Follows item defines probe position with the probe center spacing (PCS).
NOTE! Set the rotation to 90° and 270° to have two probes fac-
ing each other. The Proceq Flaw Detector 100 only supports
conventional UT and TOFD multi-probe setups at this time.
Probes rotated at 90 and 270 degrees relative to the scan axis
In a multi-probe scenario, the probes/wedges are defined relative to a
group reference (Grp Ref) mark represented by a green dot on the plan
view. The group reference point can be positioned anywhere, but a good
practice is to aligned it with the weld center line and the probe/wedge
center.
Once the group reference point has been defined, the last step is to
properly define the reference system in relation to the Part Datum ;
an arbitrary point on the part under test. All ultrasonic data collected shall
be traceable to this point called datum; which, is the (0,0) reference. When
possible, it is recommended to superpose the group reference and the
part datum points when using simple scan patterns. Otherwise, the items
Enc. Area can be use to move the group reference point.

© 2016 Proceq SA 19
7.7 Setting up the Encoder or Time Based Scan
There are 2 types of inspections:
• Manual (free running) with time based recording.
• Encoded (encoder triggered) with ultrasound pulses emitted at spe-
cific positions provided by the encoder.
To set the encoder:
1. Press the key on the Click Wheel to select the Encoding
tab.
2. Press to edit the Encoding Setup item.
3. Select:one of the following parameters:
• None for manual (free running) inspection
• Scan Axis Only for a one-axis encoded inspection
• Scan & Index Axes for a two-axis encoded inspection
Set the rest of the parameters according to your encoder setup, espe-
cially the Encoder Resolution item for each axis.
4. Press play and select appropriate layout.
If you have selected Scan Axis Only, try moving your encoder/
scanner.
If the encoder resolution is unknown, use the Encoder Wizard on the
Calibrate tab.
• The Scan Start Pos item defines the position from where the acquisi-
tion will be starting relative to the reference point.
• The Scan Distance item defines the distance over which data will be
collected.
• The Scan Step item defines the distance between each data collec-
tion position.
• Under Statistics, the Max Phys. Enc. Speed item indicates what will
be the maximum scanning speed with the current setup. Increasing
the pulse repetition frequency (PRF item on the Scan tab under Tx)
will increase this number since more data frames will be acquired per
second.
The encoder position is displayed at the bottom left corner and is active
in Acquisition mode only.

20 © 2016 Proceq SA
7.8 Defining Inspection Parameters
The Inspection tab is where you define the inspection strategy. Hard-
ware Settings contains items that are common to all scans, like the volt-
age and the acquisition frequency. This is also where general information
relative to the inspection can be entered for further reference in reports
and examination records (under Report Info and Report Settings).
7.9 Selecting a View Layout
Layouts available at a given time vary according to the number and the
types of scans selected. When these parameters change, an appropriate
layout is always selected automatically.
The type of inspection determines the views that are available. Table 9
lists the different view types.
View Description
A A-scan view
B B-scan view
C C-scan view
D D-scan view
S S-scan view
TOP Top view
END End view
TOFD TOFD view
MTOP Merged Top view
MC Merged C-scan
B-LOG Thickness B-Scan view
Select the View tab and press to open the list of available views.
Use the Click Wheel to select the desired layout.
7.10 TOFD
The TOFD category is only available when making inspection using the
time-of-flight diffraction method.
1. Ruler Lateral Wave Position
The Ruler LW Position item allows the user to set an offset (in µs) from
the start of the acquisition of the A-scan to the position of the lateral
wave (first positive peak). This offset is always positive and is shown as
a white line in the A-scan view. Changing this parameter will not affect
the A-scan signal. This offset is used to correct or fine tune the position
of the TOFD depth ruler. It is also used as straightening and lateral wave
removal tools.
2. Theoretical Time Lateral Wave
The Theo. Time LW item is a read only parameter that indicates the time
distance that represents the position of the lateral wave (theoretical).
This parameter corresponds to the shortest sound path of the scan.
/