Page is loading ...

Page ( 1 of 4 )
INSTALL INSTRUCTIONS
Jeep JK Front Bumpers (ALL)
Product : 509R0B, 509R4B, 512R0B, 512R4B
Applicaon : 2007+ Jeep Wrangler JK
( 2 Door and 4 Door )

2007+ Jeep Wrangler Front Bumper Page ( 2 of 4 )
www.ROADARMOR.com
INSTALL INSTRUCTIONS
SAFETY FIRST!
• FOLLOW ALL INSTRUCTIONS, YOUR SAFETY AND THE SAFETY OF OTHERS IS MOST IMPORTANT.
• WEAR APPROPRIATE EYE PROTECTION AND EXERCISE CAUTION WHEN DRILLING / CUTTING
REQUIRED TOOLS
INCLUDED HARDWARE LIGHTS (not included)
IWARNING
Read the instrucons completely before beginning installaon. Before ghtening bolts,
drilling or cung where required, check to make sure there are no obstrucons such as
brake, fuel or electrical lines which may be damaged. Also keep in mind this is an aer-
market product and MAY require minor shimming and/or trimming, reaming, etc. for
proper fit. Road Armor is not responsible for any damages to vehicle.
IMPORTANT NOTICE
• Be sure to inspect and test fit your product to ensure proper fitment before having it coated, painted, bed
lined, etc.
• Road Armor will not be responsible for the cost of coang your unit if any problems with fit or finish are not
Metric and SAE Socket Sets and Wrenches Phillips Screwdriver
Needle Nose Pliers Small Pry Bar or Large Flathead Screwdriver
5/16 Hex Bit Socket or Allen Wrench 9/16 Drill Bit or Step Bit
(8) 1/2-in x 1.5-in Stainless BuƩon Head Bolts Stubby : 1x 10-in LED Light Bar
(8) 1/2-in Grade 8 Nuts Stealth : 1x 20-in Light Bar and 4x Dually LED’s
(8) 1/2-in Grade 8 Lock Washers
(16) 1/2-in Small Grade 8 Washers
(8) 1.25-in PlasƟc Plugs
(1) Logo Bolt Kit
(1) Stain Steel Road Armor Logo LeƩers

2007+ Jeep Wrangler Front Bumper Page ( 3 of 4 )
www.ROADARMOR.com
INSTALL INSTRUCTIONS
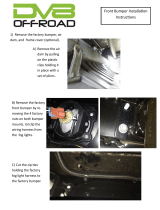
1 Unscrew the four (4) plasc screws in the center of the retainer clips securing the factory air dam
to the boom of the bumper using a phillips screw driver.
TIP If the screws just spin use a flathead screwdriver or small pry bar to pop them out.
2 There two (2) more of these plasc screw type retainers on the backside of the front cross member
which must be removed in the same fashion.
3 If your JK is equipped with factory fog lights unplug them.
4 Using a pair of needle nose pliers, pry off all the clips
holding the fog light harness loom to bumper.
1 2
4
3
5
5 Remove the nuts holding the factory bumper on, four (4) on each side using an 18mm socket and
socket wrench. Keep the backing plate for installing Road Armor Bumper.

2007+ Jeep Wrangler Front Bumper Page ( 4 of 4 )
www.ROADARMOR.com
INSTALL INSTRUCTIONS
6 Pull off factory bumper and set aside. It is not heavy, about 25lbs.
7 Now remove the plasc top plate using a phillips screwdriver as in Steps 1 and 2. Again if the
screw simply spins, employ a flathead screwdriver or small pry bar as shown.
8 Gather a drill, a
9/16-in drill bit
or a Step Bit for
the next Step.
9 Drill out the two outermost top holes on the frame as circled below to 9/16-in.
10 Install Road Armor Logo using the Stainless #10 Buon Head Bolts and Keps Nuts.
11 Install lights now if you have them. Not required, but is a bit easier with bumper off.
12 Rest the Road Armor bumper on top of the frame, and li driver side up a lile to
line up holes and insert one bolt with washer through bumper and frame. Then
put the factory spacer which you were instructed to set aside in Step 5, followed
by a washer, lock washer and nut on the backside finger ght. Repeat for
passenger side, then put all the rest of the bolts in the same way.
13 Once all the bolts are in, crank them down. It is best to hold the bolt head sll and ghten the nut.
14 Insert all the plasc plugs to cover the bolt holes.
15 If you have a winch to mount, do that now. Bolt fairlead onto included winch
plate, then bolt the winch to the top of the bumper with the included Fairlead
mount in between. If the bolts are too short buy longer ones. Finished!
/