Page is loading ...

Page 1 REV_1.0 01/01/2023
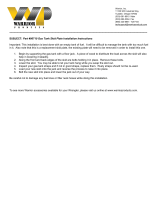
Skid Plate,
Engine / Transfer Case,
Jeep JL 4-Door
18003.52
Components and Hardware:
Components and Hardware:
1. Engine Skid UHMW Outer Panel, pyramid................(1)
2. Engine Skid UHMW Outer Panel, square .................. (1)
3. Engine Skid Aluminum ..............................................(1)
4. Transmission Skid UHMW Outer Panel ...................(1)
5. Transmission Skid Aluminum ..................................(1)
6. Engine Skid 1st Gen. Motor Mounts (Pass. & Dr.) ...(2)
7. Engine Skid 2nd Gen. Motor Mounts (Pass. & Dr.) ..(2)
8. OE Cross Member Bolt Plate ....................................(1)
9. M12 X 1.75mm Nut Plate .........................................(5)
10. M8 X 1.25mm Nut Plate ............................................ (4)
11. Cross Member for Transmission Skid .....................(1)
12. M8 X 1.25mm Nut Plate, Cross Member .................(1)
13. Spacer Plate OE Cross Member ...............................(1)
14. M12 X 1.75 25mm, Flange Bolt ................................(4)
15. M10 X 1.50 20mm, Carriage Bolt .............................(4)
16. M12 X 1.75 40mm, Flat Head Bolt ...........................(5)
17. M8 X 1.25 25mm, Flat Head Bolt ............................(18)
18. M12 X 1.75, Flange Nut ............................................. (6)
19. M10 X 1.50, Flange Nut ............................................. (4)
20. M8 X 1.25, Flange Nut .............................................(14)
OMIX-ADA® TECHNICAL SUPPORT
PHONE: M-F 8am - 5pm EST 1-800-449-6649 | EMAIL: techsupport@omix-ada.com
FOR WARRANTY INFORMATION VISIT: www.Omix-Ada.com
1.
2.
3. 4.
5.
6.
7.
11.
8.
9.
10.
12.
13.
14. 15. 16. 17.
18. 19. 20.

18003.52
Skid Plate, Engine / Transfer Case, Jeep JL 4-dr
Page 2 REV_1.0 01/01/2023
STEP 1:
Install UHMW outer panels (1 & 2) to engine skid (3).
The UHMW panels have a protective lm applied.
Remove the lm from both sides
of the panels. Attach the UHMW
panels to the engine skid using
M8 flat head bolt (17) and
flange nut (20).
STEP 2:
Remove the OE cross member below the transfer case.
This cross member is also attached to
the gas tank skid. Its attached with
4 bolts and 2 nuts.
STEP 3:
Next the gas tank skid needs to be removed. This will
require a few steps. First allow the fuel tank to be as
empty as possible. Drive until the tank is bellow 1/8 of a
tank or siphon fuel from the tank. The lighter you make
the tank the easier it will be to manage.
Support the tank with a jack. Loosen (do not remove)
all hardware. The tank is attached with 7 bolts.

18003.52
Skid Plate, Engine / Transfer Case, Jeep JL 4-dr
Page 3 REV_1.0 01/01/2023
STEP 4:
The gas tank has a strap that secures
the tank to the OE skid. This strap
must be released. Remove the bolt
on the frame rail side, then bend
the T-tab into the skid plate to release.
STEP 5:
Examine the gas tank skid for clips and retainers that
would hold any fuel lines or wire harnesses. Release all
clips to free the gas tank to drop freely.
STEP 6:
To support the tank use a ratchet
strap feed it between the gas tank
and the gas tank skid. Start at the front
of the gas tank skid and remove the
skid hardware as needed to feed the
strap to the center of the tank. Once
the strap is at the center hook to the
frame rail on one side and the cross
member in the center. Tighten strap
to hang the tank.

18003.52
Skid Plate, Engine / Transfer Case, Jeep JL 4-dr
Page 4 REV_1.0 01/01/2023
STEP 7:
With the tank still supported with and jack and racket
strap, remove all hardware holding the gas tank skid.
Now lower the jack and free the OE gas tank skid from
the Jeep and fully remove it.
STEP 8:
Install the cross member for transmission skid (11).
Use two OE bolts into the frame rails. DO NOT fully
tighten at this time, these will be removed in
another step.
STEP 9:
Determine the motor mount bracket to use for your
vehicle. The rst generation JL motor mount bracket (6)
ts JL’s between 2018-2020 3.6L. The second generation
JL motor mount bracket (7) ts JL’s 2021 to current 3.6L.
6.
7.

18003.52
Skid Plate, Engine / Transfer Case, Jeep JL 4-dr
Page 5 REV_1.0 01/01/2023
STEP 10:
Notice the mounting surface at the top of the motor
mount brackets (6 or 7), one side is flat and the other
has a bend. Match this shape with the motor mount
frame area.
Use two M12 flange bolts (14) and M12 flange nuts (18)
to attach each mount. Hand tighten at this time.
Note: The rst generation passenger side motor mount
bracket requires the rear bolt to thread up into the nut
because it’s to tight to feed the bolt down between the
motor mount. Photos shown here is of rst generation,
the second generation mounts in similar fashion.
STEP 11:
Remove OE cross member under the
transmission pan. It is attached
with three bolts.
STEP 12:
The large OE cross member that has
the transmission mount is secured on
the drivers side with two long bolts.
These bolts need to be replaced with
the cross member bolt plate (8).
Use a jack to support the weight of the cross member and
remove both bolts. Slide the bolt plate through these holes
but DO NOT secure with nuts at this time. The nuts will be
used when the skid plate is installed in a later step.
First generation Driver First generation Passenger

18003.52
Skid Plate, Engine / Transfer Case, Jeep JL 4-dr
Page 6 REV_1.0 01/01/2023
STEP 13:
Insert the large M12 nut plates (9) into
the OE cross member with transmission
mount. The outer two holes are small and
will requiring you to feed it through the
large rounded square holes in the center.
The center three span across the large
rounded square holes.
STEP 14:
Bring the engine skid (3) into place. We highly suggest to
either have a friend assist in holding it into place or use a
jack. If using a jack make sure to not scratch your UHMW.
That’s to be damaged later on the trails...
STEP 15:
With your motor mount brackets (6 or 7) in the inside
of your engine skid plate (3), use M10 carriage bolts
through the outside of the skid plate into the mount
and secure with M10 flange nuts. Attach all four carriage
bolts, but DO NOT fully tighten at this time.

18003.52
Skid Plate, Engine / Transfer Case, Jeep JL 4-dr
Page 7 REV_1.0 01/01/2023
STEP 16:
Insert spacer plate (13) between the engine skid (3)
and the OE cross member with transmission mount.
Lift engine skid to snug spacer plate to cross member.
Note: Observe the direction of the spacer plate to assure
the holes align. The hole marked with red arrow is the
driver’s side and the hole towards the rear of the vehicle.
STEP 17:
Thread the 3 M12 flat head bolt (16) into the M12 nut
plates (9) from step 13. Take your time and slowly thread
them, if you push it you run a chance of misaligned the
bolt plates, simply be patient with this step. Leave hand
tightened for now, DO NOT fully tighten.
STEP 18:
Use the four M8 nut plates (10) and secure
them to the inside of the transmission skid
plate (5) using tape. We used a doubled sided
tape but painters tape or electrical tape will
also work. The tape is necessary to hold the bolt plate in
place while moving the skid plate in position. Align them
over the outer four holes.

18003.52
Skid Plate, Engine / Transfer Case, Jeep JL 4-dr
Page 8 REV_1.0 01/01/2023
STEP 19:
Adjust the cross member bolt plate (8) from step 12
to be flush with the front of the OE cross member.
This may require lifting the cross member with a
jack to relieve any pressure.
STEP 20:
Place the long M8 nut plate (12) into the
cross member for transmission skid (11).
Align the nut plate with the holes
of the cross member. Next, support
the cross member with a jack and
remove the two OE bolts into the
frame rails from step 8.
STEP 21:
Bring the transmission skid (5) into place. We highly
suggest to either have a friend assist in holding it into
place or use a jack. Thread the three OE bolts into the
frame rails. Leave hand tightened for now, DO NOT
fully tighten.

18003.52
Skid Plate, Engine / Transfer Case, Jeep JL 4-dr
Page 9 REV_1.0 01/01/2023
STEP 22:
Press the cross member bolt plate (8) through the hole
in the transmission skid (5). It may require lifting the skid
with a jack to relieve any pressure. Thread the M12 flange
nuts (18) to the bolt plate. Only hand tighten at this time.
STEP 23:
Thread the two M12 flat head bolts (16) into the M12 nut
plates (9) from step 13. Take your time and slowly thread
them, if you push it you run a chance of misalignment the
bolt plates, simply be patient with this step.
Thread the two M8 flat head bolts (16) into the nut plate
(12) from step 20. Leave hand
tightened for now, DO NOT
fully tighten.
STEP 24:
NOTE: If installing Rugged Ridge gas tank and exhaust
skid plates refer to the instruction sheet included in
that kit at this time.
Otherwise you will need to modify the OE gas tank skid.
Trim the OE gas tank to meet up with the aluminum
transmission skid.
16.
16. 17.
17.

18003.52
Skid Plate, Engine / Transfer Case, Jeep JL 4-dr
Page 10 REV_1.0 01/01/2023
STEP 25:
Reinstall the trimmed OE gas tank skid and remove
the rachet strap supporting the tank in the reverse
manner applied in step 6.
STEP 26:
Now fully tighten ALL hardware for the engine,
transmission, exhaust, and gas tank skid.
Lift UHMW panel (4) for the transmission skid into place.
Thread M8 flat head bolt (16) into the four outer nut
plates (10) from step 18. The inside four holes of the
UHMW will attach using M8 flat head bolt (16) into
flange nuts (20).
/