Page is loading ...

EXCLLNC / 2012-07
Cafitesse
Excellence
Operator Manual

Copyright 2012 © D.E Master Blenders 1753, the Netherlands
The English version is the original version of the operator manual.
Other languages are translations of the original operator manual.
Manufacturer:
N&W Global Vending SpA
Via Roma 24
24030 Valbrembo (BG)
Italy

3
TABLE OF CONTENTS
1 - INTRODUCTION 4
About the dispenser 4
Important 4
Symbols used in this manual 4
2 - SAFETY INSTRUCTIONS 5
General safety 5
Transport and storage 6
Installation 6
Food safety instructions (HACCP) 7
Training 7
3 - OVERVIEW 8
Dispenser overview 8
Dispenser interface overview 9
Dispenser display overview 10
4 - OPERATING 11
Placing a product pack 11
Empty product packs 11
Cup/pot placement 11
Drink delivery 12
Portioned or continuous drink delivery 12
Drink delivery with preselections 13
Cold preselection 13
Volume preselection 13
Strength preselection 14
Locking/unlocking the dispenser 14
Drink delivery in locked mode (option) 14
Switching o the dispenser 15
Switching on the dispenser 15
5 - CLEANING 16
Cleaning procedures 16
When to clean the dispenser 16
Exterior cleaning 16
Flush 17
Clean & Flush 18
6 - PROGRAMMING 21
Starting the operator mode 21
Operator mode controls 21
COUNTERS 22
Drink counters 22
Preselection counters 22
VOLUME 23
STRENGTH 23
DATE/TIME 24
CLEANING DAYS 24
Determine cleaning days 24
Set days for "Clean & Flush" 25
Set days for "Flush" 25
ECO SETTINGS 26
Self-learning ECO mode 26
Enable/disable ECO mode 26
Setting the ECO start and end time 27
Setting the ECO boiler temperature 27
TELEPHONE # 27
Enable/disable telephone numbers 28
Set telephone numbers 28
7 - TROUBLESHOOTING 30
8 - SPECIFICATIONS 32

4
1 - INTRODUCTION
Thank you for choosing the Catesse Excellence dispenser.
The Catesse Excellence is a high quality dispenser specically
designed to deliver hot and cold* coee, coee based specialties,
cocoa drinks (option) and hot water for the professional food service
industry.
This manual contains comprehensive operating and safety
instructions. Please operate and maintain the machine as described
in this manual for the best machine performance and to comply
with food safety regulations / HACCP. In case of questions, please
contact your Catesse system supplier.
The following symbols are used throughout this manual in
combination with a statement to emphasize important and critical
information. Observe the statements to ensure safety and prevent
injury and product damage.
Note:
Gives additional information which may be helpful during the
dispenser operation.
Caution:
Alerts against unsafe practices. Observe to ensure food safety,
to prevent minor personal injury, or damage to the dispenser.
Warning:
Indicates a potentially hazardous situation which, if not
avoided, could result in serious injury and even death.
Danger:
INDICATES A IMMINENTLY HAZARDOUS SITUATION
WHICH, IF NOT AVOIDED, WILL RESULT IN SERIOUS
INJURY AND EVEN DEATH.
The dispenser is only to be installed in locations where it can be
overseen by trained persons.
Operation, lling and cleaning of the dispenser must be restricted
to authorized and trained persons. Ensure that new sta reads the
operator manual before they operate the dispenser and understand
the safety and hygiene aspects.
The manufacturer and D.E MASTER BLENDERS 1753
cannot be held liable in case of damage and/or injury resulting from
improper operation of the dispenser or from non-compliance with
the procedures given in this manual.
About the dispenser Symbols used in this manual
Important
* = cold drinks are not available in all dispenser versions

5
2 - SAFETY INSTRUCTIONS
The equipment is not intended for use by persons (including
children) with limited psychological or physical abilities or
deciencies. To warrant their safety, they should be supervised
and instructed by a competent person regarding the usage of the
equipment.
Danger:
NEVER TOUCH THE POWER SUPPLY PLUG WHEN YOUR
HANDS OR THE POWER CORD / PLUG ARE WET.
Warning:
Do not leave children unattended near the dispenser.
Warning:
If the power cord of the dispenser is damaged, switch
o the dispenser and contact your system supplier for
replacement.
Warning:
The products delivered by the dispenser are very hot! In
order to prevent scalds, keep your hands and other parts
of the body away from the delivery area when a delivery
button has been pressed or during ushing (machine
cleaning).
Warning:
Do not place cups, pots, or containers lled with hot liquids
on top of the dispenser.
Warning:
There is the risk of being scalded, in case the cups/pots/
General safety
containers fall down.
Warning:
Keep sucient space around the dispenser to get away
easily in case of hot liquid splashes.
Warning:
Place the dispenser on a table or counter with a minimum
height of 60 cm/24 in to avoid that young children can press
a drink button.
Caution:
Check and empty the drip tray of the dispenser regularly to
avoid the risk of being scalded and to avoid a wet oor (slip
danger) when (hot) liquids spill out of the drip tray.

6
Installation, relocation, service and programming of the dispenser is
restricted to authorized and trained service technicians.
The equipment must be installed by your Catesse system supplier
in compliance with the installation requirements:
The dispenser is designed for indoor installation only, place on a
stable at surface such as a table or a counter capable of supporting
its weight. Shield the dispenser from direct sunlight, frost and rain.
Make sure that there is sucient space around the dispenser for
ventilation, and front/back sides are accessible for service.
Only use new water hoses and connections in compliance with
EN61770 for connection to the water supply, old and/or used water
hoses are not allowed.
The dispenser must be connected to the drinking water line in
compliance with local regulations. In case of cold drink options, the
quality of the water supply must be checked to ensure delivery of
safe cold drinks according to local regulations.
Shield the dispenser from running water, splashes, spray
or steam, heat or heavy dust.
The dispenser may not be cleaned using a water jet and is not
suitable for installation on a surface where a water jet may be used
in the vicinity (e.g. for cleaning purposes).
If the dispenser is connected with a permanently wired power
supply (without mains plug), ensure the electric circuit is equipped
with a circuit breaker with a contact opening of at least 3 mm / 0.12
in that controls all poles.
If connected to a wall outlet power supply, use a grounded safety
plug socket in compliance with local regulations. Ensure that the
electric circuit is secured by means of a fault current safety switch
and that the power supply plug remains accessible after installation.
Installation
Always store and transport the dispenser in the original packaging.
Before storing or transporting the dispenser:
• Place the product packs in the refrigerator.
• Clean the dispenser.
• Contact your Catesse system supplier so that an authorized and
trained service technician can drain the water from the boiler and
protect the dispenser against frost damage.
Caution:
The dispenser may not be subject to frost during operation,
storage or transport.
Transport and storage

7
The machine is designed to comply with food safety regulations,
including HACCP, as required in the food service industry.
The operator is responsible to observe basic food safety and
hygiene. Observe the cleaning procedures given in this manual.
Please note that HACCP regulations require that these are recorded.
• Follow the instructions printed on the Catesse product packs
regarding storage and handling.
• Wash hands when handling product packs or machine parts that
come in contact with ingredients.
• Do not touch the tip of the doser. If the doser needs cleaning,
rinse with clear water only.
• Observe the "Best before" and "Expiry" date on the product pack.
Do not use a product pack if either date has expired and use the
packs that has been stored for the longest period rst (rst-in,
rst-out principle).
• Keep the area around the machine clean and tidy.
• Only use cleaning agents recommended by the food industry
and your Catesse system supplier. For safe handling observe the
instructions on the label of the cleaning agent.
Danger:
DO NOT SPRAY OR SPLASH THE DISPENSER WITH WATER.
DO NOT USE A WATER JET FOR CLEANING.
Danger:
NEVER TILT THE DISPENSER TO CLEAN BEHIND OR
BELOW IT. AVOID SCALDING!
THE BOILER CONTAINS VERY HOT WATER THAT CAN
SPILL OUT IF YOU TILT OR MOVE THE DISPENSER.
Train new sta regarding food safety instructions (HACCP).
• Inform new sta about schedules and cleaning procedures.
• Ensure that new sta reads the operator manual before operating
the dispenser.
• Keep the operator manual close to the dispenser.
If there are any questions, please contact your Catesse system
supplier.
Food safety instructions (HACCP)
Training

8
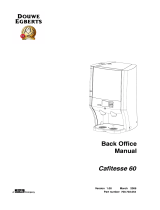
1. Dispenser interface
2. Door handle (lock optional)
3. Cup tray
4. Drip tray
3 - OVERVIEW
1
2
3
4
12
13
14
5. LOCK/Clear-Error button
6. Dispenser door
7. Cooling compartment
8. Release bar
9. Mixing bowls
10. Internal drip tray
11. Outlet compartment
12. Condensate grid
13. Water connection
14. Power cord
Dispenser overview
5
6
7
8
9
10
11

9
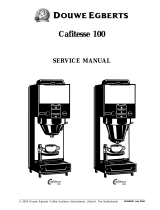
Dispenser interface overview
3
4
5
6
7
11
1 2
9
10
1. Display
2. Preselection slider
STRENGTH
3. Preselection
COLD
(option)
4. Preselection
VOLUME
5. Operator Mode: (up)
6. Operator Mode: (down)
7. Operator Mode:
(enter)
8. Operator Mode:
(back)
9. Port for USB key
10.
STOP
11. Drink selection:
Left: Milk, Cocoa, Coee or Tea*
Middle: Coee or Tea*
Right: Water
* = drink selections depend on dispenser version and settings
8

10
1.
OPERATOR MODE
the USB operator stick is inserted and
the Operator Mode is active
2.
LOCK
the dispenser is locked and cannot
dispense drinks
3.
CAUTION HOT LIQUIDS*
the dispenser is delivering hot drinks or
the dispenser is ushing
4.
FILTER
replace water lter
5.
PRODUCT PACK LEFT
6.
PRODUCT PACK RIGHT
7.
COLD
(Operator Mode only)**
cold drinks
8.
TEMPERATURE
the water temperature in the boiler is
too low and the dispenser is heating up
9.
DELIVERY BLOCKED
the dispenser cannot deliver the
selected drink
10.
VOLUME
small, medium, or large drinks
11.
HOT
(Operator Mode only)
hot drinks
12.
ECO
the energy saving mode is active
13.
CLEANING
the dispenser needs to be cleaned
14.
WEEKDAYS
15.
MESSAGE
-line
messages are displayed to guide you
through the cleaning, programming
steps, or in case of errors
16.
INFO
-eld
display of cooling compartment
temperature, time, error codes, etc.
1
33
12
4
5 7 8 9 10 13
16
15
14
6
Dispenser display overview
11
2
* = this message can be turned o in some markets | ** = cold drinks are not available in all dispenser versions

11
4 - OPERATING
If a product pack is empty, the
corresponding drink selection labels will
not light up and the drinks cannot be
delivered. The icon for empty product pack
will be shown on the display (g. 4.2).
The delivery of hot or cold water is still
possible.
If an operator telephone number is
set and enabled in the operator menu
TELEPHONE #
, the entered telephone
number will be shown on the display:
Fig. 4.2 - Empty product pack icon
Caution:
Never use a frozen or damaged
product pack. Do not use a product
pack if the "Best before" date has
expired.
1. Wash your hands before touching a
product pack.
2. Read and follow the instructions on the
rear of the pack.
3. Open the dispenser door.
4. Insert the product pack (g. 4.1).
5. Close the dispenser door.
6. Dispense a test drink.
Fig. 4.1 - Place product pack Fig. 4.3 - Cup placement
The dispenser has three product outlets:
• Left: for milk, cocoa, tea or coee drinks*
• Middle: for coee or tea*
• Right: for water
Caution:
Place your cup or pot under the
outlet below the drink button of your
selection.
Place your cup on the cup tray or drip tray
(g. 4.3).
A special dispenser foot is required when
using pots.
Placing a product pack Empty product packs Cup/pot placement
0123456789
* = drink selections depend on dispenser version and settings

12
Warning:
The liquids dispensed by the
dispenser are hot! Avoid scalding!
Keep hands and other body parts
away from the dispenser while
drinks are being delivered.
Never leave children unsupervised
near the dispenser.
To deliver a drink:
1. Place your cup directly underneath the
outlet of your selection (g. 4.4).
2. Press the drink button of your choice.
The drink will be delivered via the
corresponding outlet.
3. Press
STOP
if you want to interrupt or
cancel the drink delivery.
During installation, the service technician
programs the dispenser to operate with one
of the following delivery options:
Portioned delivery
The drink button only needs to be pressed
once. The dispenser stops automatically
after one portion is delivered. (The
respective portion volumes can be
programmed by the service technician).
Caution:
Press the
STOP
button if the cup or
pot is too small for the delivered drink
volume and when there is the risk of
scalding by spilling of hot liquids.
Fig. 4.4 - Buttons correspond to outlets
Drink delivery Portioned or continuous drink delivery
Continuous delivery (free ow)
Press the drink button until the cup or pot
is full. Delivery stops when you release the
drink button.
Note:
We recommend portioned delivery
with xed cup sizes in self-service
areas.

13
Your dispenser supports preselection
options. The service technician may activate
preselection options during installation.
When the preselection button is pressed,
the following options are displayed on the
display:
•
COLD
drinks light up*
•
VOLUME
on display
(small - medium - large)
•
STRENGTH
indicated by slider position
Note:
If you press a preselection button, but
do not press the delivery button, the
dispenser will return to the default
state after a few seconds.
1. Place your cup.
2. Press the preselection button
COLD
to
activate this preselection. The possible
selections change from amber to white.
All unavailable options are dimmed.
3. Press a drink button. The cold drink is
delivered.
4. Press
STOP
to return to the default
state.
1. Place your cup.
2. Press the preselection button
VOLUME
to activate this preselection.
A cup icon (small - medium - large) is
display (g. 4.5).
3. Press the preselection button until the
desired portion size is marked.
4. Press a drink button. The drink is
delivered with the selected portion size.
Warning:
The liquids dispensed by the
dispenser are hot! Avoid scalding!
Keep hands and other body parts
away from the dispenser.
Fig. 4.5 - Volume preselection
Drink delivery with preselections Cold preselection Volume preselection
* = cold drinks are not available in all dispenser versions
*

14
1. Place your cup.
2. Slide your nger over the
STRENGTH
-
slider to preselect the strength of your
drink (g. 4.6).
3. Press a drink button. The drink
will be delivered with the selected
strength.
Warning:
The liquids dispensed by the
dispenser are hot! Avoid scalding!
Keep hands and other body parts
away from the dispenser.
Fig. 4.6 - Strength preselection
+
-
1. Open the dispenser door.
2. Press the LOCK/Clear-Error button to
block the drink delivery (g. 4.7).
The lock icon appears on the display (g.
4.8).
Drink delivery will be disabled. The cooling
compartment and the boiler will remain in
operation.
3. To unlock the dispenser, press the
LOCK/Clear-Error button again to
enable drink delivery.
Insert the USB release key into the USB port
on the dispenser to enable temporary drink
delivery.
As long as the USB release key is inserted,
drinks can be delivered.
When the key is removed, the locked mode
is reactivated and the lock icon is shown in
the display.
Fig. 4.8 - Lock iconFig. 4.7 - LOCK/Clear-Error button
Strength preselection Locking/unlocking the dispenser Drink delivery in locked mode (option)

15
Please take the following preparations
when the machine is not to be used for a
long period, e.g. holidays:
1. Remove the product packs and check
the expiry date.
2. Store the product packs in a refrigerator
until you switch the dispenser back on
again. When the expiry date has passed,
throw the product packs away.
Caution:
Do not freeze product packs.
3. Clean and ush the dispenser.
4. Pull the power plug out of the socket.
5. Close the water tap.
1. Open the water tap.
2. Insert the power plug.
The dispenser starts heating up water
and starts cooling down the cooling
compartment. Drink delivery will be
blocked until the water in the boiler has
reached the correct temperature.
3. A ashing thermometer and the icon for
"Delivery blocked" will be shown on the
display (g. 4.9).
4. Once the water has reached the preset
temperature, the ashing thermometer
and the icon for "Delivery blocked"
will disappear from the display, the
dispenser is now ready for operation.
Fig. 4.9 - Heating up/Delivery blocked icons
Note:
Depending on the dispenser model
and ambient temperature, the
heating of the boiler can take 30 ~120
minutes. The cooling of the product
compartment can take 24 hours or
more.
Note:
If the dispenser has been shut down
for longer periods, the date and time
must be set so the programmed
cleaning cycles and eco settings are
reactivated.
Switching o the dispenser Switching on the dispenser

16
There are two dierent cleaning programs:
• "Flush" the drink outlets
• "Clean & Flush" the cooling
compartment and the drink outlets.
You can select the weekdays for "Clean
& Flush" and "Flush" programs in the
operator menu
CLEANING DAYS
.
Caution:
It is mandatory to run the "Clean &
Flush" program at least once a week
to guarantee food safety. In addition,
Milk-Coee versions also need to run
the "Flush" program at least once a
week.
5 - CLEANING
Fig. 5.1 - Cleaning & Delivery blocked icons
Note:
It is advised to clean the exterior of
the dispenser daily.
1. Open the dispenser door and press
the LOCK/Clear-Error button (g 5.2) to
lock the dispenser interface to prevent
accidentally dispensing drinks or hot
water when cleaning the external parts.
2. Remove the cup tray by lifting it from
the bar (g 5.3, 1).
3. Remove the drip tray (g 5.3, 2).
4. Empty the drip tray.
Note:
Check and empty the drip tray at
regular intervals.
5. Clean the cup and drip trays.
Fig. 5.2 - Lock the dispenser Fig. 5.3 - Remove cup & drip trays
Cleaning procedures Exterior cleaning
1
2
When to clean the dispenser
Run the cleaning program when the
cleaning icon appears in the display (g.
5.1).
If the dispenser is not cleaned and/or
ushed within 24 hours, the drink delivery
will be blocked and the delivery blocked
icon appears in the display (g. 5.1).
Start the cleaning program to resume
delivery.

17
Note:
You can ush the dispenser at
any time by using the procedure
described below.
1. Press rst
STOP
and then and hold
them pressed simultaneously for 3-4
seconds to enter the cleaning mode (g.
5.4).
Follow the instruction on the display:
PLEASE OPEN THE CONSOLE
2. Open the dispenser door.
3. Pull the red release bar to open the
outlet compartment (g. 5.5).
Fig. 5.4 - Enter cleaning mode
Flush
Follow the instruction on the display:
INSERT RINZA CLEANING
TABLETS. CLOSE THE CONSOLE
4. Insert a Rinza cleaning tablet in both
mixing bowls (g. 5.6).
5. Press the outlet compartment upwards
until you hear a beep.
6. Close the dispenser door.
Follow the instruction on the display:
CONFIRM RINZA CLEANING
TABLETS ARE INSERTED. PRESS
FOR OK
7. Press to conrm the insertion of the
cleaning tablets.
6. Put the parts back in place.
7. Clean the exterior of the dispenser with
a damp, clean cloth.
Fig. 5.5 - Pull red release bar Fig. 5.6 - Insert Rinza tablets

18
1. Press rst
STOP
and then and hold
them pressed simultaneously for 3-4
seconds to enter the cleaning mode (g.
5.4).
Follow the instruction on the display:
PLEASE REMOVE ALL PRODUCT
PACKS
2. Open the dispenser door.
3. Remove the product packs (g. 5.8).
Note:
It is recommended to use the
included exchange kit, which consists
of clean mixing bowls and sealing
rings, to save time.
Follow the instruction on the display:
PLEASE CLEAN THE COOLING
INTERIOR AND PUT BACK THE
PRODUCT PACKS
4. Clean the doser opening with a
brush and the interior of the cooling
compartment with a clean, damp cloth
(g. 5.9). Dry with a clean paper cloth.
5. Place the product packs back if they
have not passed the expiry date. Else,
place new product packs.
Follow the instruction on the display:
PLEASE REMOVE AND CLEAN
THE MIXING BOWLS OR USE
EXCHANGE KIT
Fig. 5.8 - Remove packs Fig. 5.9 - Clean cooling compartment
Clean & Flush
Fig. 5.7 - Place container
Follow the instruction on the display:
PLEASE PLACE FLUSH BIN (MIN.
4L.). PRESS TO FLUSH
8. Place the container (g. 5.7) under the
product outlets and press to start
ushing.
Warning:
The liquids dispensed by the
dispenser are hot! Avoid scalding!
Keep hands and other body parts
away from the dispenser.
The progress is shown in the display.
When done, the dispenser is ready for use.

19
6. Clean the mixing bowls:
a. Pull the red release bar to open the
outlet compartment (g. 5.5).
b. Rotate the mixing bowls counter-
clockwise to release and pull to
remove them (g. 5.10).
c. Remove the internal drip tray and
clean it, if necessary (g. 5.11).
d. Clean the mixing bowls and the
sealing rings:
• Either in a dishwasher, or
• Soak them for 15 minutes in
warm water with a food grade
cleaning agent.
Caution:
Check if the blue sealing rings are
rmly attached to the mixing bowls
(g 5.12).
g. Place the internal drip tray back (if
removed).
h. Insert a Rinza cleaning tablet in both
mixing bowls (g. 5.6).
i. Press the outlet compartment
upwards until you hear a beep.
j. Close the dispenser door.
Follow the instruction on the display:
CONFIRM RINZA CLEANING
TABLETS ARE INSERTED. PRESS
FOR OK
Fig. 5.11 - Remove internal drip tray
Note:
Comply with the safety instructions
and cleaning instructions on the
cleaning agent packaging.
e. Rinse the mixing bowls and sealing
rings under a running tap and dry
with a clean paper cloth.
Follow the instruction on the display:
REPLACE MIXING BOWLS AND
INSERT RINZA CLEANING
TABLETS. CLOSE THE CONSOLE
f. Insert clean mixing bowls with sealing
rings, then rotate them clockwise
until they cannot turn further.
Fig. 5.10 - Remove mixing bowls Fig. 5.12 - Mixing bowl sealing ring

20
7. Press to conrm the insertion of the
cleaning tablets.
Follow the instruction on the display:
PLEASE PLACE FLUSH BIN (MIN.
4L.). PRESS TO FLUSH
8. Place the container (g. 5.7) under the
product outlets and press to start
ushing.
Warning:
The liquids dispensed by the
dispenser are hot! Avoid scalding!
Keep hands and other body parts
away from the dispenser.
The progress is shown in the display.
When done, the dispenser is ready for use.
/