Page is loading ...

Assembly Instructions: 2073-LP, 2074-LP (Smyth)
IMPORTANT:
• ALL INSTALLATION WORK SHOULD BE DONE BY ACCREDITED PROFESSIONAL.
• SHUT OFF POWER SUPPLY AT FUSE OR CIRCUIT BREAKER!
• USE ONLY THE SPECIFIED BULBS. DO NOT EXCEED THE MAXIMUM WATTAGE!
PREPARING FOR INSTALLATION
Carefully remove all of the contents from the carton. See the important notes above. Shut
offthepoweratthecircuitbreakerandcompletelyremovetheoldxturefromtheceiling,
includingtheoldmountingstrap.
Removethemountingstrapassemblyfromthepartsbag.Oneendofnipple(F)shouldbe
attachedtomountingstrap(A)withwasherandhexnut(C&D)inplace.Theotherend
should have decorative nut (H) attached.
Attachmountingstrap(A)tothejunctionboxusingmountingscrews(B)andascrewdriver.
Tightensecurely.Unscrewdecorativenut(H)fromnipple(F)andplaceitasideforlateruse.
CLEANING TIPS
Treat the xture gently! Regular cleaning will reduce the need for deep cleaning. For regular cleaning, turn off the light and wipe down the
xture with a clean lint-free cotton or microber cloth. Never spray cleaner directly onto the xture.
A
B
C
E
D
F
O
P
Q
M
N
T
K
H
G
J
I
L
R
S
U
For Customer Service, contact the
place of purchase.
Smooth / Black /
Transparent (L)
Black (Hot)
Ribbed / White /
Transparent (N)
Bare Copper / Transparent with
Green Interior / Green
White (Neutral)
Green
(Ground)
CONNECTING THE WIRES
Haveanassistantsupportthexture’sweightwhilecompletingthewiring.Cutawayexcesswire.Threadthexture’swiresthrough
canopyloopandnipple.Attachthexture’swirestothepowersupplywiresfromthejunctionbox.Connectblacktosmooth/black/
transparent(L)wire;whitetoribbed/white/transparent(N)wire;groundtoground(greenorcopper).Twisttheendsofthewirepairs
together,andthentwistonawireconnector.Makesurealltwistsareinthesamedirection.Ifthereisnogroundwire(greenorcopper)
fromthejunctionbox,locategroundscrew(E)onthemountingbracket/mountingstrapandwrapthexture’sgroundwirearoundthe
greengroundscrew(E).Useascrewdrivertosecuregroundscrew(E)ontothemountingbracket/mountingstrap.Tuckallwiresneatly
intothejunctionbox.
FINISHING THE INSTALLATION
Pushcanopy(G)uptotheceilingandtightlythreadnut(H)ontotheexposedthreadsofnipple(F).Slidecandlesleeves(O)overthe
sockets.Slideglassshades(P)overthesocketandsecurebypushingtheglassdownontothesockettter.Installlightbulbs(Q)(not
included)inaccordancewiththexture’sspecications.Donotexceedthemaximumrecommendedwattage.
Yourinstallationisnowcomplete.Turnonthepowerandtestthexture.
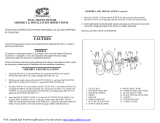
ASSEMBLING THE FIXTURE
Measuretodeterminethecorrectlengthofrodsneededforproper
hangingheight.Thereare3optional12inchrods(M)anda6inchrod
(L)includedforeachsideofthexture.Therodscanbeconnected
tothecanopyusingswiveljoint(I).Eachrodcanbeconnectedto
anotherbythreadingnipple(K)ofonerodintothebottomthreadsof
ofanotherrod.Tolengthenthexture,youmayaddadditionalrods.
Ifadditionalrodsareneeded,contacttheplaceofpurchasetoorder.
Toshortenthexture,evenlyremoveanyundesiredrodsfromeach
sideandtrimthewirestothedesiredlength,addingatleast8to
10inchesofwiretothedesiredlength.Keepinmindthatyoumust
useatleastoneoftheprovided12inchrods(M)tohangthexture.
Decidetheheightandthreadthewiresthroughonesetofrods.Pull
thewiresuntiltautbeforethreadingtherodstogether.Threadthe
bottom of rods (M or L) onto posts (N). Thread and slide the threaded
nippleofthetoprodsintoswiveljoints(I).Lockthetoprodsinplace
bytighteningscrews(J)intothesidesofswiveljoint(I).Secureswivel
joints(I)ontocanopy(G)andtightenhexnuts(T)andwashers(U)to
ensurethatswiveljoints(I)aresecure.Pullthexture’swiresthrough
the top of the rods.
/