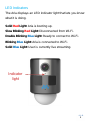
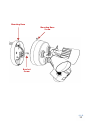
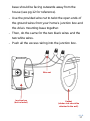
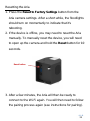
Momentum MO-SE-01 is a smart home security camera with a built-in floodlight, speaker, and microphone, allowing for remote monitoring and interaction with your surroundings. With its Wi-Fi connectivity and mobile app compatibility, you can access live video feeds, receive motion alerts, trigger the siren, and communicate through the device from anywhere. Additionally, the micro-SD card slot and Momentum Capture Cloud Storage subscription options provide flexible storage solutions for your recordings.
Momentum MO-SE-01 is a smart home security camera with a built-in floodlight, speaker, and microphone, allowing for remote monitoring and interaction with your surroundings. With its Wi-Fi connectivity and mobile app compatibility, you can access live video feeds, receive motion alerts, trigger the siren, and communicate through the device from anywhere. Additionally, the micro-SD card slot and Momentum Capture Cloud Storage subscription options provide flexible storage solutions for your recordings.


-
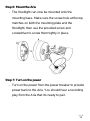
 1
1
-
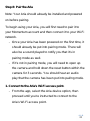
 2
2
-
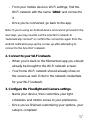
 3
3
-
 4
4
-
 5
5
-
 6
6
-
 7
7
-
 8
8
-
 9
9
-
 10
10
-
 11
11
-
 12
12
-
 13
13
-
 14
14
-
 15
15
-
 16
16
-
 17
17
-
 18
18
-
 19
19
-
 20
20
-
 21
21
-
 22
22
-
 23
23
-
 24
24
-
 25
25
-
 26
26
-
 27
27
-
 28
28
-
 29
29
-
 30
30
-
 31
31
-
 32
32
-
 33
33
-
 34
34
-
 35
35
-
 36
36
-
 37
37
-
 38
38
-
 39
39
-
 40
40


Momentum MO-SE-01 is a smart home security camera with a built-in floodlight, speaker, and microphone, allowing for remote monitoring and interaction with your surroundings. With its Wi-Fi connectivity and mobile app compatibility, you can access live video feeds, receive motion alerts, trigger the siren, and communicate through the device from anywhere. Additionally, the micro-SD card slot and Momentum Capture Cloud Storage subscription options provide flexible storage solutions for your recordings.
Ask a question and I''ll find the answer in the document
Finding information in a document is now easier with AI
Related papers
-
Momentum MOCAM-720-01 User manual
-
-
-
-
-
Momentum MOCAM-1080-01 User guide
-
-
-
-
Other documents
-
CLOUDY BAY HM1215SMXXX User manual
-
 Amped LRC200 User manual
-
Universal Remote Control HE-117W User manual
-
 Ironton 500 Watt 3-in-1 Digital Security Light Owner's manual
-
 SALIX TECHNOLOGY GOVIDEO SMC6 User manual
-
Amazon 8SF2Y7WENH Installation guide
-
ESCAM Floodlight Camera by , Wireless Outdoor Security Cameras for Home Security System Installation guide
-
CLOUDY BAY LCOWS715SMBN User manual
-
Cocoon HE200074 Quick start guide
-
Ring Floodlight Cam - White User manual


