

2
EN Table of Contents
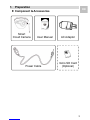
1. Preparation........................................................2
Component & Accessories.............................2
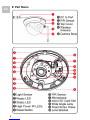
Part Name......................................................2
2. Initiate Smart Cloud Camera..............................4
Install Smart Cloud Camera...........................4
A
ccess AP Mode............................................4
3. Setup Smart Cloud Camera...............................5
Install Easy IP
A
pp.........................................5
A
dd Camera...................................................5
Easy Add Camera..........................................6
Monitor Camera.............................................6
A
dvance Function..........................................6
4. Event Record.....................................................7
Monitor Event Detection.................................8
View Event Record.........................................8
5.
A
ppendix............................................................9
Specification...................................................9


5
EN
2. Initiate Smart Cloud Camera
Smart Cloud Camera has built-in a Wi-Fi network and
can connect to the internet directly. Therefore, for the
first time use the Smart Cloud Camera, you need to set
up the Wi-Fi network and assign an available network
which can link to the internet for the camera from the AP
(Access Point) Mode.
Install Smart Cloud Camera
1. Insert a micro SD card in the micro SD card slot.
2. Adjust the Lens Bracket to the applicable angle.
3. Plug the Power Cable in the DC In Port of the
Smart Cloud Camera and screw the plug holder
tight. Plug the other side of the USB cable to the
USB port of the AC Adaptor.
4. Insert the AC Adaptor to the wall AC outlet and the
Smart Cloud Camera power on.
Access AP Mode
If the Smart Cloud Camera was never be used. It will
enter the AP Mode directly.
1. The Red Status LED light on about 8 seconds to
initiate it then blanking slowly 20 or more seconds
and active the Wi-Fi function.
2. The Ready LED blanking fast in Green when the
camera enters the AP Mode.
Note: 1. The Smart Cloud Camera has not built-in a battery. If
take out the camera from the AC outlet, the camera will
off-line and turn off.
2. All settings have saved in camera even power off.
When the power supply restore, the camera will turn
on and connect to the internet automatic.
Note: Press the Reset Button to restore the default setting of
camera in AP Mode.

6
EN 3. Setup the Smart Cloud Camera
Install Easy IP App
1. Search and find the Easy IP app from the Apple
Store for iOS or the Google Play for Android then
install it in your mobile device.
2. Press the Easy IP icon to start it.
Add Camera
1. Press the Add Camera icon to add camera.
2. Find the UID QR Code Label on the camera body or
user manual.
3. Use the QR Code Reader to read the UID of camera.
4. Enter UID Password "888888" and name the camera.
5. Enter the password of Wi-Fi network which the
camera can link to the internet then press .
6. Camera reboot within 60 sec. and the Green LED on.
7. Update device password then press .
8. Easy IP is connecting to the camera and ready for
monitor from your mobile device when camera is
on-line.
Note: 1. The max. 4 cameras can be added.
2. If the assigned Wi-Fi network of the camera has be
changed, the camera must use the AP Mode to set
the new assigned Wi-Fi network again.
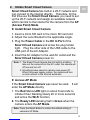
For iOS:
1. Press the Home button and go to the Wi-Fi network then
check "CamAP" and no need to enter password.
2. Around 60 sec. and make sure you see appear.
3. Press Home button again and back to Easy IP app.

7
EN
Easy Mode Add Camera
As long as the Smart Cloud Camera has initiated the
Wi-Fi network from the AP Mode. You can use the
Easy Mode to add this camera in other mobile device
and monitor it from Easy IP App.
1. Press the Add Camera icon to add camera.
2. Find the UID QR Code Label on the camera body or
user manual.
3. Use the QR Code Reader to read the UID of camera.
4. Enter Camera Password then press .
Monitor Camera
Press the camera thumbnail to monitor live-view image.
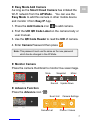
Advance Function
Press the Advance icon ʺ ʺ.
Note: This password must use the same as the new password
which has be changed in the AP Mode.
Mute Snapshot Mirror
Upside Down
Record
Camera Settings
Camera List
Event List
Photos / Videos

8
EN 4. Event Record
The Smart Cloud Camera has built-in a PIR Sensor
(Passive Infrared Sensor) which can detect the infrared
signal emitting from a moving object like human or
animal.
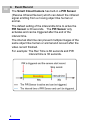
The default setting of the interval idle time to active the
PIR Sensor is 30 seconds. The PIR Sensor only
activates and can be triggered after the end of the
interval time.
The interval idle time can prevent multiple images of the
same object like human or animal and recount after the
video record finished.
For example: The Rec Time is 60 seconds and PIR
interval time is 30 seconds.

9
EN
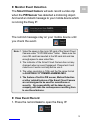
Monitor Event Detection
The Smart Cloud Camera will auto record a video clip
when the PIR Sensor has detected a motioning object.
And send an instant message to your mobile device which
is running the Easy IP.
The remind message stay on your mobile device until
you check the event.
View Event Record
1. Press the remind icon to open the Easy IP.
Note: 1. Video file saves in the micro SD card of the Smart Cloud
Camera under ʺX:\IPCAM\videoʺ folder. Make sure the
micro SD card has inserted in the SD card slot and has
enough space to save video files.
2. The Indicator of the Smart Cloud Camera has not any
changed when an event happened. Please test it and
make sure it works normally before use it.
3. The video resolution is 720p and the file name format
is ALERT0000-YYYYMMDD-HHMMSS.MP4.
4. The feature of built-in PIR sensor, Motion Detection
or other related features of the Smart Cloud Camera
are not designed to be used for surveillance or
security. No responsibility will be taken by our
company with take the consequences resulting from
to use these features.

10
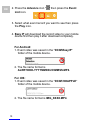
EN 2. Press the Advance icon ʺ ʺ then press the Event
List icon.
3. Select what event record you want to see then press
the Play icon.
4. Easy IP will download the record video to your mobile
device first then play it after download completely.
For Android:
1. Event video was saved in the "DCIM\EasyIP"
folder of the mobile device.
2. The file name format is
ALERT0000-YYYYMMDD-HHMMSS.MP4.
For iOS:
1. Event video was saved in the "DCIM\100APPLE"
folder of the mobile device.
2. The file name format is IMG_XXXX.MP4.

11
EN
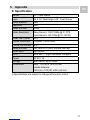
5. Appendix
Specification
※Specifications are subject to change without prior notice.
Sensor 1/3”, 3.4M CMOS
Lens 6G, F1.8, Wide Angle 128°, Fixed Focus
White Balance Auto
Exposure Auto
Video Encoder H.264
Video Resolution Video Record : FHD 1080p @ 21 FPS
Event Record : HD 720p @ 10-15 FPS
Video File Format MP4
Picture Resolution 2M pixels (1920x1080)
Picture File Format JPG
Audio Encoder AAC and AC3 mono, sample rate 48K
Audio Input Built-in MIC
Wi-Fi IEEE 802.11 b/g/n standards compliant
Power DC 5V / 1A
Storage micro SDHC up to 32GB
Dimensions Body : 122 (Ø) x 78.4 (H) mm
Include Antenna :
153.8 (L) x 122 (W) x 99.4 (H) mm

12
EN
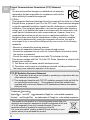
FCC RF Radiation Exposure Statement:
1. This Transmitter must not be co-located or operating in conjunction with any
other antenna or transmitter.
2. This equipment complies with FCC RF radiation exposure limits set forth for
an uncontrolled environment. This equipment should be installed and
operated with a minimum distance of 20 centimeters between the radiator
and your body.
Federal Communications Commission (FCC) Statement
15.21
You are cautioned that changes or modifications not expressly
approved by the part responsible for compliance could void the
user’s authority to operate the equipment.
15.105(b)
This equipment has been tested and found to comply with the limits for a Class
B digital device, pursuant to part 15 of the FCC rules. These limits are designed
to provide reasonable protection against harmful interference in a residential
installation. This equipment generates, uses and can radiate radio frequency
energy and, if not installed and used in accordance with the instructions, may
cause harmful interference to radio communications. However, there is no
guarantee that interference will not occur in a particular installation. If this
equipment does cause harmful interference to radio or television reception,
which can be determined by turning the equipment off and on, the user is
encouraged to try to correct the interference by one or more of the following
measures:
-Reorient or relocate the receiving antenna.
-Increase the separation between the equipment and receiver.
-Connect the equipment into an outlet on a circuit different from that to which
the receiver is connected.
-Consult the dealer or an experienced radio/TV technician for help.
This device complies with Part 15 of the FCC Rules. Operation is subject to the
following two conditions:
1) This device may not cause harmful interference and
2) This device must accept any interference received, including interference
that ma
y
cause undesired o
p
eration of the device.
Trademark Information
Apple StoreTM and iOSTM are trademarks of Apple Inc. or its related companies.
AndroidTM and Google PlayTM are trademarks of Google Inc. or its related companies.
This symbol on the product or in the instructions means that your
electrical and electronic equipment should be disposed at the end
of its life separately from your household waste. There are
separate collection systems for recycling in the EU.
For more information, please contact the local authority or your
retailer where you purchased the product.
-
 1
1
-
 2
2
-
 3
3
-
 4
4
-
 5
5
-
 6
6
-
 7
7
-
 8
8
-
 9
9
-
 10
10
-
 11
11
-
 12
12


SALIX TECHNOLOGY GOVIDEO SMC6 User manual
- Type
- User manual
- This manual is also suitable for
Ask a question and I''ll find the answer in the document
Finding information in a document is now easier with AI
Other documents
-
Axon N82E16883800004 Fanless Axon Mini PC Stick User guide
-
Foscam FLC User manual
-
Foscam S41 User manual
-
Foscam C1 User manual
-
Avtech DGM1304AQSSE Operating instructions
-
Swann QV9108SWNVK-876804B2D-AU Owner's manual
-
Swann Communications SWDVK-855804WL-US Owner's manual
-
Momentum MOBELL-1080NB01 User manual
-
-