Page is loading ...

Knok
USER MANUAL
™

2
Contents
Introduction 4
Product Features 5
LED Indicators 6
What’s Included 7
Wi-Fi Requirements 8
Mobile Device Requirements 8
Installation Requirements 9
Knok Installation 10
Storage Options 19
Your Dashboard 21
Do Not Disturb (DND) Controls 22
Siren Activation 23
Camera Functions 24
Watching Live Video 24
Taking Photos 25
Recording Videos 25
Audio Functions 25
Answering the Doorbell 26
Motion Detection Settings 27

3
Setting up Rules 29
Adding a New Rule 29
Mobile Alerts 30
Viewing Recorded Photos and Videos 31
Saving and Deleting recordings 31
Restoring Forgotten Passwords 32
Resetting the Device 33
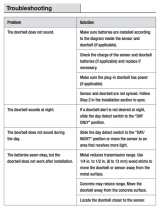
Troubleshooting 34
About Momentum 35
© 2016 Momentum
Momentum is a registered trademark in the United States. Apple and iPhone
are registered trademarks of Apple Inc. Google, Google Play, and Android are
trademarks of Google LLC. All other brands and product names are or may
be trademarks of their respective owners.
Note: Screen shots and procedures described in this manual are subject to
change without notice. The latest Momentum User Guide is always available
on our website at http://www.momentumcam.com.

4
Introduction
The Knok is Wi-Fi Video Doorbell with wireless monitoring
capabilities that can be accessed from anywhere where
you have an internet connection. It’s great for surveillance
of your doorstep and to make sure you always stay in
control no matter where you are. All you need is a(n):
1. Existing wired doorbell you want to replace, or
2. Existing chime, transformer, and wiring in the
mounting area
3. Compatible mobile device (Android or iOS)
See page #8 for device requirements.
Use your smartphone and/or tablet to use and manage
the Knok with the Momentum app functions remotely.

5
Product Features
Speaker
Camera Lens
IR LEDs
PIR
Motion
Sensor
Microphone
Light Ring
Reset button
Micro-SD
card slot
Power Input Port
Micro-USB Port

6
LED Indicators
The Knok displays an indicator light that lets you know
what it is doing.
Solid Red: Knok is booting up.
Double Blinking Blue: Ready to connect to Wi-Fi.
Solid Blue: Device is connected to the internet.
Blinking Blue: Device has no internet connection.
Indicator
Light Ring

7
What’s Included
A. Knok Doorbell B. Mounting Bracket
C. Security Screw D. Horizontal (15°) and
Vertical (5°) Angle Brackets
E. Drill Bit F. Long Mounting Screws (x4) and
Wall Anchors (x4)
G. Short Mounting Screws (x4) H. Power Connection Screws (x2)
I. Wire Clips (x2) J. Chime Adapter Kit
K. Double-sided Tape L. Doorbell Connection Wires
M. Leveler N. Screwdriver
O. Extra Color Case

8
Wi-Fi Requirements
The Knok requires a 2.4GHz (802.11b/g/n) for Wi-Fi
connectivity. This is available on almost any standard Wi-
Fi router.
You will need your Wi-Fi name and password when
pairing your mobile device and the Knok.
Note: If you are using a 2.4GHz + 5 GHz dual band
router, create separate SSID names for each band on
your Wi-Fi router settings page. This will make it easier for
you to select the 2.4GHz band for the device setup.
Mobile Device Requirements
The Momentum app requires a smart phone or tablet
device that runs on Android or iOS. Please see the in-app
description for device compatibility for the most up-to-date
info.

9
Installation Requirements
1. To install the Knok, you must already have an existing
doorbell you wish to replace or have a setup location
with an installed chime box, transformer, and wiring.
2. The Knok will work with most mechanical and
electronic chimes but will not work with wireless
battery power chimes.
3. Your doorbell’s transformer must be able to deliver 16-
24VAC and at least 10VA.
4. Installation should be performed by qualified
electricians who are informed about the standards and
technical requirements of the appliance and its proper
installation.

10
Knok Installation
Before you begin:
- Shut OFF the power for the doorbell at the fuse or circuit
breaker box.
- If you’re unsure which switch it is to turn off the doorbell’s
power, please consult with a licensed electrician.
- This equipment is intended for installation in a restricted access
location. Access can only be gained by service persons or by
users who have been instructed about the reasons for the
restrictions applied to the location and about any precautions
that shall be taken.
- If you plan to perpetually power on device, please add
appropriate disconnecting apparatus and overcurrent protection
device, outside of the device.
WARNING: Failing to shut off the power could result in a
serious injury, electrical shock, and/or risk of fire.

11
Assembly Diagram
Knok Doorbell Connections
Home’s Chime/Transformer Connections

12
Step 1: Download the Momentum App
Download and install the Momentum app on your mobile
device.
Search for Momentum on the Google Play Store for
Android devices, or on the Apple App Store for iOS
devices. You may also scan the QR code below from your
mobile device to route you directly to the app.
Make sure the app logo you download matches the one
shown below.
Create an Account
If you don’t already have a Momentum account, you will
need to create one. To create a new account, follow the
in-app instructions.

13
Notes:
- You may follow the in-app installation instructions or
read the instructions provided in this manual.
- Your power to the doorbell should be OFF already at
this point from the breaker box.
Step 2: Locate your chime box and transformer.
- Verify the chime’s transformer can support 16-24V. If
uncertain, consult with a licensed electrician.
Step 3: Connect the wires.
- Take the ends of the wires from the chime kit and
connect one wire to the FRONT terminal and the
other to the TRANS terminal on your existing chime
box.
Step 4: Mount the chime kit.
- Use the double-sided tape to mount the chime kit on
the inside of the chime box. If there’s not enough
room on the inside of the chime box, then secure it to
the outside of the box or wall.

14
Step 5: Remove existing doorbell and disconnect the
wiring.
- Verify that the power to the doorbell and chime box is
still off.
Installing an Angle Bracket (OPTIONAL)
If your wall is positioned in an angle where the doorbell
will not be able to properly monitor the area you want,
then you’ll probably want to install an angle bracket.
a. Mark the 4 corner holes for the installation using
the angle bracket. Make sure it’s straight using
the leveler.
b. If you have a stucco, stone, brick, or any other
hard surface, use the drill bit (provided) and
power drill to create the 4 screw holes, then
insert the wall anchors.
If your wall is wood or another softer surface,
then you may skip this step.
c. Align the angle bracket with the holes and drill in
the long screws to mount the angle bracket.

15
Make sure the smoother, flatter side of the angle
bracket is placed directly onto the wall.
d. Screw the mounting bracket into the angle
bracket using the short flat screws.
e. Install the mounting bracket directly onto the
angle bracket using the 4 short security screws
(provided).
f. Skip steps 6-8 below.
Step 6: Mark holes for the mounting bracket.
- Place the mounting bracket in the desired location
and mark screw holes for installation. Use the leveler
to check that it is straight.
Step 7: Drill holes in the wall and insert wall anchors (if
needed).
- If you have a stucco, stone, brick, or any other hard
surface, use the drill bit (provided) and power drill to
create the 4 screw holes first, then insert the wall
anchors. If your wall is wood or another softer
surface, then you may skip this step.

16
Step 8: Install mounting bracket.
- Align the mounting bracket with the holes and use
the 4 long screws (provided) to screw into the wall or
wall anchors. Make sure the existing doorbell wires
are accessible by pulling through the large hole in
the mounting bracket.
Step 9: Connect the wires.
- Use the included wire connectors to connect to the
doorbell terminal screws on the back of the Knok.
Connect the other end of the wires to the two orange
connectors – one wire each into the connectors.
Connect your existing doorbell wires into the other
side of each orange connector.
Step 10: Push connectors and wiring back into the wall.
Step 11: Remove the color case from the Knok and
secure the Knok onto the mounting bracket.

17
- Mount the doorbell onto the bracket and screw in the
bottom security screw, then reapply the color case to
the Knok.
Step 12: Restore power to the installation site.
- The lights will come on and you will hear a
confirmation as your Knok starts up.
Step 13: Pair the Knok
Note: Your Knok should already be installed and powered
on before pairing.
To begin using your Knok, you will first need to pair it to
your Momentum account and then connect it to your Wi-Fi
network.
- Once your Knok has been powered on the first time,
it should already be put into pairing mode. The lights
should be double-blinking blue.
- If it’s not in pairing mode, you will need to detach the
doorbell from the mounting bracket and hold down
the reset button behind the doorbell 10 seconds.

18
1. Connect to the Knok’s Wi-Fi access point.
- From the app, select the Knok device option, then
proceed until you’re instructed to connect to the
Knok’s Wi-Fi access point.
- From your mobile device’s Wi-Fi settings, find the
Wi-Fi network with the name “KNOK” and connect to
it.
- Once you’re connected, go back to the app.
Note: If you’re using an Android device and cannot proceed to the
next step, you may need to set the Knok Wi-Fi network to
“automatically connect” or confirm the connection again from the
android notification pop-up the comes up after attempting to
connect to the Knok Wi-Fi network.
2. Connect to your Wi-Fi network.
- When you’re back to the Momentum app you should
already be brought to the Wi-Fi network screen.
- Your home Wi-Fi network should already show on
the screen as well. Enter in the network credentials
for your Wi-Fi network.
- Name your devices, and then your setup is complete!

19
Storage Options
Your Momentum Knok can save your recorded videos or
pictures through the Momentum Capture Cloud Storage
subscription plan or with your own micro-SD card inserted
into the device.
The micro-SD card slot can be found behind the Knok
device (see pg. 5).
Momentum Capture Cloud Storage
After you initially pair a Momentum device to your
Momentum account, you will be provided FREE cloud
recordings that last for 24hrs.
You may also choose a different paid subscription plan
with longer days of clip storage from our website at
www.momentumcam.com. See website for more details
on our available subscription plans.

20
Micro-SD Card Storage
You also have the option to use your own micro-SD card
(up to 64GB) instead for back-up storage.
Insert the micro-SD card into Knok’s micro-SD slot on the
back of the Knok device. The camera will automatically
record events and camera photos you take directly into
the micro-SD card as back-up storage.
Once the memory capacity has been reached on the card,
the new recording will loop over and begin to overwrite the
earliest saved recordings.
To access the back-up micro-SD card recordings, go to
the camera’s settings and select “View Camera Backup”.
/