Page is loading ...

LIBERTY
ME 1243 1106.01.243
Lighting Technologies
Quick Start Guide
Issue 1.0


www.adblighting.com
Quick Start - page 1
Issue 1.0
TEXT CONVENTIONS
Panel Keys are under square brackets, e.g. [RECORD] is a panel key.
Keyboard Keys are under brackets, (CTRL).
Software functions in menus are under brackets e.g. {Browse File} is a function in the File
Menu. In this case the access path will be indicated as MENU HATHOR>FILE> (Browse
File).
[-----]&[-----] means hold the first key then push the second key.
SOFTWARE PHILOSOPHY
It can be easier to understand HATHOR if you are familiar with the philosophy of this software.
Channels (INSTRUMENTS)
A Channel (also named instrument) is the control handle used to call anything controlled by
LIBERTY. Regardless if it is a dimmer channel, a moving device, a smoke machine or
something else it will always correspond to a channel number in the Patch.
Attributes and DEVICE LINKS
The control of non-intensity parameters, for example a moving device or a scroller, are
called attributes. These are patched to the controls of LIBERTY when the Template
corresponding to that device is assigned to a control channel in the Patch.
In a sequence all attribute’s values are recorded in a specific area named DEVICE LINK.
Patch (INSTRUMENT SET-UP)
Patch is where outputs are assigned to channels, either directly in the case of dimmers or
using a Template in the case of devices. All settings pertaining to outputs, channels and
devices are also adjusted within the patch.
Groups
Frequently used combinations of channels can be stored in up to 2000 Groups, for quick
recall from the keypad, the touch screen or a remote focusing system.
Presets
This is a specific concept. Frequently used combinations of channels are stored in up to
15000 Presets, for playback in the Main Playback or Virtual Playbacks. The combination of
a Preset and a Device Link in a Sequence Step is the equivalent of a "Cue" in many other
systems. The advantage here is that Presets can be reused in any Sequence, with
different times.
Sequences
Lists of Presets are called Sequences, that can be cross faded or move faded in
consecutive order from a Playback. The system supports up to 1000 Sequences.
Looks
A look is a cue including channels with their intensity levels and their attributes, like a
snapshot, without any time information.
Looks are primarily useful for "live" performances, when you wish to be able to bring up
pre-recorded fixture settings, but in a non-sequential, spontaneous manner, such as for a
musical concert.
Looks can also be useful as building blocks where you can store an idea for future use, but
don't want to record it as a Sequence Step/ Preset (Looks are not usable in Sequence).

www.adblighting.com
Quick Start - page 2
Issue 1.0
TEXT CONVENTIONS ........................................................................................................................ 1
SOFTWARE PHILOSOPHY ................................................................................................................ 1
1. Installation and Overview ........................................................................................................ 5
Delivery and Unpacking ................................................................................................................. 5
Installing the Desk .......................................................................................................................... 5
Power Supply .............................................................................................................................. 5
Electrical Connection .................................................................................................................. 5
Caring for your LIBERTY ............................................................................................................... 5
Connecting your desk to peripherals ............................................................................................. 6
Start with your LIBERTY ............................................................................................................. 6
1.1 Software ............................................................................................................................ 7
1.2 Front panel Control ........................................................................................................... 7
1.2.1 Introduction .................................................................................................................... 7
1.2.2 Overview ........................................................................................................................ 7
1.2.3 Subfaders section .......................................................................................................... 8
1.2.4 Control section ............................................................................................................... 8
1.2.5 Access section ............................................................................................................. 12
2. Setting Up the desk / [SETUP] ............................................................................................... 13
Channels ...................................................................................................................................... 13
Attributes ...................................................................................................................................... 14
Playback ....................................................................................................................................... 15
Filestorage ................................................................................................................................... 16
User Interface ............................................................................................................................... 17
System ......................................................................................................................................... 18
3. Starting a new show (Play) and patching ............................................................................. 19
3.1 Starting a new Show : HATHOR menu > File > New / Clear Play .................................. 19
3.2 Patching: [Patch] key or [1] [.] [4] [Screen] to open Instrument Setup ............................ 20
3.2.1 Introduction .................................................................................................................. 20
3.2.2 Using the keypad Channels > Dimmers mode only .................................................... 20
3.2.3 Using the mouse .......................................................................................................... 21
3.2.4 Using the keyboard and the Dimmer Patching Tools .................................................. 21
3.2.5 Using the touch screen and the Dimmer Patching Tools ............................................ 22
3.2.6 Using the wizard .......................................................................................................... 22
4. Instruments (Channels) .......................................................................................................... 26
4.1 Introduction ..................................................................................................................... 26
4.2 The Channel grid ............................................................................................................ 26
4.3 Selecting Instruments and setting values ....................................................................... 27
4.3.1 Using the Keypad ........................................................................................................ 27
4.3.2 Using the mouse .......................................................................................................... 27
4.3.3 Using the Touch screen facilities ................................................................................. 27
4.3.4 Using the Keypad ........................................................................................................ 28
4.3.5 Using the mouse .......................................................................................................... 28
4.3.6 Using the Touch screen facilities ................................................................................. 28
4.4 Focus Mode .................................................................................................................... 28
4.5 Instruments with Scroller ................................................................................................. 28
4.5.1 Using the Keypad ........................................................................................................ 28
4.5.2 Using the mouse or the Touch Screen facilities .......................................................... 28
5. Groups [Group] , [.] ................................................................................................................ 30
5.1 Groups - Introduction ...................................................................................................... 30
5.1.1 Group functionality ....................................................................................................... 30
5.1.2 Groups - Record .......................................................................................................... 30
5.1.3 Using the Keypad ........................................................................................................ 30
5.1.4 Using the mouse: Drag&drop facilities ........................................................................ 30
5.1.5 Using the Touch screen facilities ................................................................................. 31
5.2 Working with Groups ....................................................................................................... 31
5.2.1 Using the Keypad ........................................................................................................ 31

www.adblighting.com
Quick Start - page 3
Issue 1.0
5.2.2 Using the mouse or your finger and the keyboard ...................................................... 31
5.2.3 Using the mouse or your finger and the keypad. ......................................................... 31
5.3 Groups - Using recorded levels [FETCH] ....................................................................... 32
5.4 Groups Edit Window [EDIT]&[GROUP] .......................................................................... 32
5.5 Editing a Group ............................................................................................................... 32
5.6 Groups and Subfaders .................................................................................................... 32
5.6.1 Loading a group in a subfader ..................................................................................... 32
5.6.2 Editing a group Loaded in a subfader.......................................................................... 32
6. PRESETS ................................................................................................................................. 34
6.1 Introduction ..................................................................................................................... 34
6.2 Record ............................................................................................................................. 34
6.2.1 Recording a Preset in the sequence ........................................................................... 34
6.2.2 Recording a Preset not included in the sequence ....................................................... 35
6.3 Update ............................................................................................................................. 36
6.4 Edit .................................................................................................................................. 36
6.4.1 Edit a Preset (BLIND mode) ........................................................................................ 36
6.4.2 Rename a Preset ......................................................................................................... 36
6.5 Copying levels from a preset to a selection of channels [FETCH] ................................. 36
6.6 Loading a Preset in a Subfader ...................................................................................... 36
7. SEQUENCES ........................................................................................................................... 37
7.1 Introduction ..................................................................................................................... 37
7.2 Master Playback.............................................................................................................. 37
7.2.1 Recording a new Preset .............................................................................................. 37
7.2.2 Times ........................................................................................................................... 37
7.2.3 Insert a Step ................................................................................................................ 38
7.2.4 Delete a Step ............................................................................................................... 38
7.2.5 Replace and Rename Preset ...................................................................................... 39
8. LOOKS ..................................................................................................................................... 40
8.1 Introduction ..................................................................................................................... 40
8.2 Record ............................................................................................................................. 40
8.2.1 Using the Keypad ........................................................................................................ 40
8.2.2 Using the mouse .......................................................................................................... 41
8.2.3 Using the Touch screen facilities ................................................................................. 41
8.3 Working with Looks ......................................................................................................... 41
8.3.1 Select Channels ........................................................................................................... 41
8.3.2 Playback Looks ............................................................................................................ 42
8.3.3 Using recorded values / Fetch ..................................................................................... 42
8.4 Editing ............................................................................................................................. 43
8.4.1 The Edit window .......................................................................................................... 43
8.4.2 Editing a Look .............................................................................................................. 43
8.5 Loading To a Subfader ................................................................................................... 43
9. SUBFADERS ........................................................................................................................... 44
9.1 Introduction ..................................................................................................................... 44
9.2 Fader Banks .................................................................................................................... 44
9.3 Pages .............................................................................................................................. 44
9.4 Assign Keys .................................................................................................................... 45
9.5 Flash Keys ...................................................................................................................... 45
9.6 Load / Clear ..................................................................................................................... 45
9.7 Channel Selection ........................................................................................................... 46
9.8 Editing ............................................................................................................................. 46
9.9 Times .............................................................................................................................. 47
9.10 Settings ........................................................................................................................... 47
9.10.1 Subfader Modes: Normal / Inhibit / Focusing / Disable Stage Recording ................... 47
10. CHASERS ................................................................................................................................ 48
10.1 Introduction ..................................................................................................................... 48
10.2 Recording a chaser ......................................................................................................... 48

www.adblighting.com
Quick Start - page 4
Issue 1.0
10.2.1 Using the keyboard ...................................................................................................... 48
10.2.2 Changing modes and editing Times and levels in the EDITOR window ..................... 49
10.3 Loading a Chaser in a Subfader ..................................................................................... 50
10.4 Editing a Chaser ............................................................................................................. 51
10.4.1 BLIND mode ................................................................................................................ 51
10.4.2 LIVE mode ................................................................................................................... 51
10.5 Start a Chaser ................................................................................................................. 51
11. The TRACK WINDOW [TRACK] / Ctrl F4 .......................................................................... 52
12. Screen Setup ( MENU HATHOR / Controllers) ..................................................................... 54
12.1 CONTROLLERS > MENU HATHOR / Controllers ......................................................... 54
12.1.1 FIELD EDITOR ............................................................................................................ 55
13. Utilities ..................................................................................................................................... 57
13.1 [SETUP] Preferences (Menu HATHOR / Setup / Preferences) ..................................... 57
13.2 File .................................................................................................................................. 58
13.2.1 Introduction .................................................................................................................. 58
13.2.2 Save ............................................................................................................................. 59
13.2.3 Save as ........................................................................................................................ 59
13.2.4 Open Library ................................................................................................................ 59
13.2.5 Import ........................................................................................................................... 60
13.2.6 Export .......................................................................................................................... 60
13.2.7 New/Clear Play ............................................................................................................ 60
13.2.8 Browse another ............................................................................................................ 61
13.3 System Restore (KEYBOARD and MOUSE needed)..................................................... 61

www.adblighting.com
Quick Start - page 5
Issue 1.0
1. Installation and Overview
Delivery and Unpacking
As soon as you receive your equipment, open the boxes and inspect the items received. If
you discover any damage, contact the carrier immediately and make any necessary claim
for the problems discovered.
Installing the Desk
The desk and the monitor should be installed on a table or a console.
The surface of your work area should be smooth, level and sturdy.
Make sure that there is enough clearance around the desk to:
• open the desk
• access the rear connections
• allow air circulation around vents to prevent the desk from over-heating
Power Supply
The LIBERTY has a universal power supply that will operate on voltages between 100
volts and 260 volts with a frequency range from 50 to 60 Hz.
Before powering up the desk or any of its peripherals, check that the existing voltages are
within the limits defined.
THIS EQUIPMENT MUST BE EARTHED.
Note: all connections should be made with the power turned off; otherwise functioning
may be affected and can even damage the equipment under certain conditions.
Electrical Connection
TO PREVENT THE RISK OF ELECTRIC SHOCK, DO NOT OPEN THE DESK.
THERE ARE NO USER SERVICEABLE PARTS WITHIN. REFER SERVICING TO
QUALIFIED ENGINEERS ONLY. LETHAL VOLTAGES ARE PRESENT INSIDE!
ALWAYS DISCONNECT FROM THE POWER SUPPLY BEFORE OPENING FOR
INSPECTION.
Note: As all equipment used in computer systems, your system is sensitive to the
characteristics of the network and in particular to variations and voltage peaks.
Consequently, we advise you to use an appropriate line conditioner on this
equipment.
Caring for your LIBERTY
The LIBERTY is manufactured from quality components and will give many years of
service if you take some basic precautions.
• Do not allow any liquids or foreign objects to enter the LIBERTY.
• Do not apply excessive force to any of the controls. Spare parts and service are
available from your ADB distributor, but prevention is better than cure.
• When connecting any devices to the LIBERTY, make sure that all connections are
correct before switching on the power.

Con
n
Sta
r
A
fte
r
You
Seq
u
To s
e
your
level
To r
e
To s
h
1
2
3
4
5
6
7
1
n
ecting yo
Plug the
Connec
t
Connec
t
Connec
t
Connec
t
Switch
O
Start th
e
r
t with yo
u
r
1 min, yo
u
will disco
v
u
ence wind
o
e
nd a cha
n
channel
w
in yellow.
e
cord your
f
h
utdown th
e
ur desk to
power cab
t
your mou
s
t
your keyb
o
t
your moni
t
t
your DMX
O
n the mai
n
e
desk
u
r LIBER
T
u
r LIBERTY
v
er the ch
a
o
w on the r
n
nel on sta
g
w
ill be sele
c
f
irst memor
y
e
desk: HA
T
5
ww
w
periphera
l
le
s
e and your
o
ard in the
P
t
or in DVI o
r
5 cables
n
powe
r
T
Y
will displa
y
a
nnel grid
o
ight side.
g
e, choose
a
c
ted (Red s
y
: [RECO
R
T
HOR Me
n
7
w
.adblightin
l
s
monitor us
P
S2 port
r
VGA port
y
the defaul
t
o
n the left
a
number
o
quare arou
R
D] [RECO
R
n
u>Shutdo
w
1
6
7
g.com
b cable in t
h
t
Layout on
side, the
G
o
n the keyp
nd the cha
R
D].
w
n: {YES}.
2
3
4
Qui
c
Issu
e
h
e USB po
r
your moni
t
G
roup win
d
ad, and si
m
nnel box)
a
c
k Start - p
a
e
1.0
r
ts
t
or.
d
ow below
m
ply turn th
e
a
nd you wi
l
a
ge 6
and the
e
wheel,
l
l see its

www.adblighting.com
Quick Start - page 7
Issue 1.0
1.1 Software
ADB lighting technologies has a policy of continuous improvement of its products. As the
LIBERTY is a computerized lighting desk, its software is subject to this policy as new
features are added and existing features improved.
The current software version of your LIBERTY is displayed in the HATHOR menu (Upside
Left corner) > About.
The latest version can be downloaded from the ADB website.
Whilst every care is taken in the preparation of this manual, ADB Lighting Technologies
takes no responsibility for any errors or omissions.
1.2 Front panel Control
1.2.1 Introduction
This section of the manual describes the controls and displays on the front panel of the
LIBERTY desk.
The front panel controls have been divided into the following sections:
• OVERVIEW
• SUBFADERS section
• CONTROL section
• ACCESS section
1.2.2 Overview
ACCESS section
SUBFADERS
section
CONTROL section

www.adblighting.com
Quick Start - page 8
Issue 1.0
1.2.3 Subfaders section
1.2.4 Control section
[ASSIGN] keys: upper keys
to load, select or record information or to assign a
time to that Subfader
Note: to clear the content of a Subfader, hold the
[CLEAR] key and use the [ASSIGN] key to select
the Subfader to clear.
[FLASH] keys: lower keys
to bump the content of the SUBFADERS
[LOAD]: to load selected Channels with levels,
Groups, Presets, and Palettes
[RATE]: use these key in combination with the
[ASSIGN] key (see above) of a Subfader with a
running Chaser to adapt the BPM to the current
Tempo.
[CHASER]: to load or record a Chaser directly in
the selected Subfader.
[F/B# CH/SUB]: under development
[PAGE#]: to load a Subfaders Page
[START]: to execute a Subfader automatically
regarding Time settings.
[SETUP]:
Open the Preferences
window
ATTRIBUTE GROUP
KEYS:
[FOCUS] for Pan & Tilt
parameters
[COLOR] for Color
parameters
[BEAM] for Beam
parameters
[PATTERN] for Gobo
and shutters parameters
[EXTRA] for Control
parameters
[OTHER]: under
development

www.adblighting.com
Quick Start - page 9
Issue 1.0
1.2.4.1 Fader Bank Keys
1.2.4.2 RECORD and UPDATE Key
[F/B -] and [F/B +]:
Use this key to step thru
the 8 banks of 24
submasters.
[A] and [B]:
Pushing the both keys
together switch between
A (stage) and B (Preset)
Note: in combination
with the [TIME] or the
[DELAY] keys, [A] key
corresponds to OUT and
[B] to IN.
e.g.: to input 6 seconds
in-Time,
[6] [TIME] & [B].
[RECORD]: use these
key to record:
Groups: [#] [RECORD] &
[GROUP]
Presets: [#] [RECORD]
Looks: [#] [RECORD] &
[LOOK]
Palettes: [#] [RECORD] &
[COLOR] (e.g.)
Page: [#] [RECORD] &
[PAGE]
[UPDATE]: use these key
to update an existing
Preset on stage
[LOOK]: use these key in
combination with the
[RECORD] key (see
above) or with the assign
key of a Submaster to
record a Look (levels and
parameters).
[TRACK]: opens a track
sheet for the selected
channels
[S/F]: switch between Stage mode and Field mode in the channel grid (Field Editor)
[BALANCE]: to isolate a selection of channels in the current Field.

www.adblighting.com
Quick Start - page 10
Issue 1.0
1.2.4.3 Master Playback
[TIME]: to assign
crossfade times (In/Out)
and special channel or
attribute times.
[DELAY]: to assign
crossfade delays (In/Out)
and special channel or
attribute delays.
[WAIT]: to assign wait
times
[A/B]: to switch between
A (Stage) and B (Preset)
in the current Editor
Field.
[ROLLBACK POS]: to
return to the last position
attributes values.
[RECORD POSITION]:
to force the system to
record attribute values
filtered if necessary,
independently of the
history.
[SEQ -], [SEQ +]: to step backwards or forwards in the Sequence without crossfade
times.
[GO BACK]: to go back to the precedent step using default times.
[JUMP/ JUMP TO STEP]: to move inside the sequence directly to a selected Step or
a selected Preset.
[GO] & [PAUSE] : standard crossfade keys

www.adblighting.com
Quick Start - page 11
Issue 1.0
1.2.4.4 Keypad
[CHANNEL]: to select
channels
[FRAME]: to select a
color changer Frame
[INVERT]: to switch
between selection of
channels and other
channels with level above
zero (this channels
become selected).
[ALL]: to select all
channels with level above
zero
[FETCH]: to copy
intensity or parameter
values for a selection of
channels from a selected
Preset, to stage.
[GROUP]: to record or
select a selection of
channels with levels.
[+], [THRU] & [-]:
channel selection tools
[+%], [-%]: to increase or
decrease level (absolute
or proportional) of
selected channels by a
percentage.
[AT%]: to set a level to
selected channels.
[CLEAR]/[ALT]: to clear
the selection [CLEAR]
[CHANNEL] or to clear
the current field
[CLEAR]&[CHANNEL].

www.adblighting.com
Quick Start - page 12
Issue 1.0
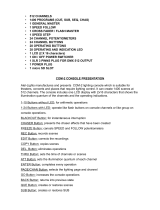
1.2.5 Access section
TOUCH SCREEN DISPLAYS:
The first four keys are direct access to specific
screens as labeled.
With the [USER DESKTOP] key, the internal
screen becomes a standard screen, exactly as
external screens.
DIRECT ACCESS:
[SAVE]: to save modifications in the current
play.
[EDIT]: to open objects Edit windows.
[INSERT] & [DELETE]: to use while editing or
browsing.
[SELECT PLAYBACK]: to load a Playback in
the Master Playback which is always the
physical Master Playback.
[HELP]: under development.
[COMPARE]: to compare stage levels with
another Preset.
e.g.: [1] [COMPARE] will open a window
displaying stage levels and levels from Preset 1.
[PATCH]: shortcut to open the Instrument
Setup.
[SCREEN]:
- use directly the [SCREEN] key to identify
connected screens.
- Enter Screen number, and subscreen
number to display directly the subscreen of
your choice in the dedicated screen.
[SCALE]: Sets a proportional level between 0
and 200% for a channel without affecting
recorded presets etc…
Note: this function is very useful to quickly set a
channel to zero%.
MASTER:
[BO]: Blackout Key
NAVIGATION KEYS:
[ESC]: To close any opened window.
[UP] / [DOWN] / [LEFT] / [RIGHT]: navigation
keys.
[ENTER]: To valid any kind of action.

www.adblighting.com
Quick Start - page 13
Issue 1.0
2. Setting Up the desk / [SETUP]
HATHOR menu > Setup > Preferences (or [SETUP])
Channels
Checked:
[At Level] will bring selected Instruments to the level set here. E.g.: 70%
Note: [At Level] [At Level] will bring selected Instruments to the Full.
[At Level] three times will bring selected Instruments to zero.
Checked:
When [Record] or [Update] are used, all the levels currently coming out of the
system will be recorded.
Unchecked:
[Record] or [Update] will record the levels from the currently active Playback Filed only.
Note: Stage mode in a Field Editor in HATHOR is just a view mode that doesn't
influence what is recorded. This means that you can activate Stage mode and still
use Field mode when recording. If the user only works in the Playback and not with
masters, it's more convenient to leave Record Stage as default unchecked.
Checked:
When [RECORD]&[LOOK] is used, it will automatically record all instruments that
have a level greater than zero.
Note: if "Record Look" is used by dragging channels, this setting is irrelevant, as it
will default to recording the selected instruments.
Sets the percentage that levels will be changed up or down by the [+%] and [-%]
keys.
1
2
3
4
1
2
3
4

www.adblighting.com
Quick Start - page 14
Issue 1.0
Attributes
Time used with [ROLLBACK POS] key.
Attributes Time. These time value will be recorded in Device Links by default for
every parameters.
Time used when executing a palette, not when recording a Preset/Device Link
using these palette.
Go On Go:
Unchecked: MOVE in DARK active.
Checked: MOVE in DARK unactive.
Rubberband:
Unchecked: when the subfader is lowered, only the intensities will restore to their
previous values.
Checked: when the subfader is lowered, the intensity AND attributes will restore to
their previous values.
Auto Execute Looks on Faders.
Unchecked: the attributes and Intensity will follow the movement of the fader.
Checked: as soon as the fader moves above zero, the attributes will move to their
positions- they will not fade with the movement of the fader.
1
2
3
4
1
2
3
4
5
6
5
6

Pla
y
2
3
1
4
y
back
Cue Onl
y
This fun
box doe
s
Unchec
k
manuall
y
Checke
d
manuall
y
Keep Mi
x
Unchec
k
field. In
t
Checke
d
newly r
e
Subfade
Tip: Ch
e
channel
s
Unchec
k
Checke
d
manual
l
A:
[x] [Tim
e
playbac
k
B:
[x] [Tim
e
playbac
k
1
2
3
4
y
ction appe
a
s
not affect
k
ed: the "
C
y
turn it ON
d
: the "Cue
y
turn it OF
F
x
on Recor
d
k
ed: the co
n
t
his way Su
d
: if check
e
e
corded pr
e
r
s for mixin
e
cked Kee
p
s
k
ed: links (
p
d
: links (pa
r
l
y crossfad
e
e
] (or [Del
a
k
(the activ
e
e
] (or [Del
a
k
(the next
s
ww
w
a
rs in the
R
whether or
C
ue only"
if required.
only" butt
o
F
if require
d
d
n
tent of on
bfade
r
s ha
v
e
d, this pre
v
e
set into t
h
g the outp
u
p
Mix on R
e
p
arameters
)
r
ameters) i
n
e
d.
a
y]) will set
e
step on st
a
y]) will set
s
tep to be l
o
w
.adblightin
R
ecord wi
n
not "Cue
o
button wil
l
o
n will app
e
d
.
the newly
v
e not prior
v
ents the
s
h
e active fi
e
u
t for the n
e
e
cord if yo
)
only exec
u
n
Sequenc
e
time value
s
age).
time value
s
o
aded on s
t
g.com
n
dow when
o
nly" will ap
p
l
appear
d
e
ar alread
y
recorded p
ity over the
s
oftware fr
o
e
ld. In this
xt Preset.
u want to
w
u
te when a
e
steps wil
s
on the Se
s
on the Se
t
age).
Qui
c
Issu
e
it is appr
o
p
ear.
d
isabled. T
y
activated.
reset is lo
a
active Fiel
d
o
m loading
way one
c
w
ork with
s
step is exe
c
l execute
w
quence St
e
quence St
e
c
k Start - p
a
e
1.0
o
priate. Thi
s
he user c
The user
c
a
ded into t
h
d
.
the conte
n
c
an keep
o
s
ubfade
r
s
a
c
uted with
[
w
hen a Pla
y
e
p currently
e
p currently
a
ge 15
s
setting
an then
c
an then
h
e active
n
t on the
o
n using
a
s single
[
GO].
y
back is
in the A
in the B

www.adblighting.com
Quick Start - page 16
Issue 1.0
Active:
[x] [Time] (or [Delay]) will set time values on the Sequence Step currently in the A
or the B playback, depending on which Playback is active : [A/B] key switches
between A and B playback.
Filestorage
Autosave time
Time between two automatic « Autosave » File recording.
Note: to use autosave file, go to MENU HATHOR/File/Open Library, open
AutoSave menu, open corresponding play menu then Right Click and choose
option LOAD or BROWSE.
1
1

www.adblighting.com
Quick Start - page 17
Issue 1.0
User Interface
Tick the box to enable the KEYBOARD shortcuts.
Tick the box to enable the Double Menu size. Menus: HATHOR and Setup
windows right click menus.
Enter the value concerning the size of Browser and Object Edit windows.
Unchecked:
Syntax is RPN
Checked:
Syntax is AT MODE
1
2
3
4
1
2
3
4

www.adblighting.com
Quick Start - page 18
Issue 1.0
System
See chapter 13 for details
See chapter 13 for details
See chapter 13 for details
See chapter 13 for details
See chapter 13 for details
See chapter 13 for details
1
2
3
4
5
6
1
2
3
4
5
6
/