Page is loading ...

Pocket mini Digital Video Recorder
PDVR-1000
Please read all the instructions completely before use
and save this manual for future reference.
USER MANUAL

Table of Contents
Preface
Copyrights & legal issue
Safety Notes
Main Features
The Name of Each Part
Basic Preparation before operation
Button Operation
Structure of Menu Tree
Main Menu & Operation
Connecting to TV or LCD
Connecting to PC for downloading and uploading
Playback on the PC
Upgrading Firmware
Application of Accessories
General Specification
Warranty Card
1
1
2
3
4
6
12
13
15
33
34
35
37
38
42
44

Preface
Thank you for purchasing PDVR-1000 manufactured by Diasonic Technology Co., Ltd.
It is important to read and understand all instructions before use. After use of the manual,
put the manual in a place you can reach easily. If you misplace this manual, you may ask
it to Diasonic Technology Co., Ltd. or a distributor for downloading the copy.
Copyrights & legal issue
ú
DIASONIC Technology has all copyrights of this user manual. Reproduction,
distribution, and commercial use of a part of or the entire user manual without
prior consent of DIASONIC Technology are strictly prohibited by laws.
ú
All information contained in this manual has been carefully studied and written,
but it is subject to change without prior notice for functional and performance
improvement. DIASONIC Technology will not take any responsibility for issues
arising due to differences between the product and information contained in
the user manual.
ú
Diasonic Technology Co., Ltd. does not take any responsibility for any issue
rose from use of any file(s), software or contents under patent or copyright.
ú
Reproduction of files is prohibited for other than personal purposes by law.
ú
User must be in charge of all responsibilities for recording and storing something
including all activities in use of the device. Therefore, use must be careful if the
activity with the device is illegal.
ú
Diasonic Technology does not take any responsible for any damage caused
by the use of this device or damage claim made by a third party.
ú
Diasonic Technology does not take any responsible for the loss of data caused
by other actions than repair services by Diasonic Technology.
ú
Diasonic does not take any responsibility for the data stored or recorded in
the device, so user must be careful to manage & keep the date.
1
Preface / Copyright & legal issue

Safety Notes
ú
Do not store the device in any place with following conditions:
- High temperature (45
ç
or higher)
- Exposure to the direct sun rays or a heating device
- Inside the car with closed windows (especially, in the summer)
- Humid place such as the bathroom
ú
When removing dust, use soft cloth in dry. Do not use organic solvents
such as thinner or benzene or wet cloth.
ú
Do not place a debit card or a bus pass near the speakers.
The magnetic interference may occur, which will damage the card.
ú
Do not place the device near a magnet. The device may not be
workable properly.
ú
Do not repair, disassemble, or remodel the device.
ú
Do not use the product in a place where use of electronic devices is
prohibited.
ú
Do not operate or set up this device while driving. If it is required to
change set up, please do it after pulling over the car or before driving.
ú
Do not heat up or short the main body or the battery.
ú
When using an auxiliary device, leave a gap between the auxiliary
device and the main device.
ú
Incorrect use of the product by the user or a third party or static electricity
or electric shock loaded on the product may cause loss of or change in
the data saved in the product during repair services or replacement of
the battery.
ú
Keep the device out of reach of children.
Safety Notes
2

1. PDVR-1000
ú
Law enforcement grade pocket mini Digital video recorder.
ú
2.4" color LCD(320x240) with LCD off/on setup function while recording.
ú
Stamping Time & Date for future evidence.
ú
The most advanced video recording format(H.264) with efficiency compression & resolution of
recording file.(720x480/30fps/Max/NTSC.)
ú
Longer Recording Time in better video quality than MPEG4 format.
ú
External micro SD card slot compatible with SDHC(16GB) for expanding the memory capacity.
ú
Recording by Motion Activation Detection.
ú
WAV Voice recording format for clear sound quality.
ú
Endless Recoding with overwriting.
ú
Changing storage while recording if a current memory is full. (Selectable)
ú
Various Recording Options.
Rec. Video+Audio/Video or Voice only.
Rec. fps(5/10/15/20/25/30fps for NTSC & 5/10/15/20/25fps for PAL) & quality(High/Std./Low)
selectable.
Timer Recording.
ú
Snap Photo Shot and slide show.
ú
NTSC or PAL selectable in the recorder.(AV-in/out)
ú
Securely recording file backup in low battery power.
ú
Built-in mic. & Speaker.(mono)
ú
Wired Remote Controller.(Stop/Record/Pause/Hold)
ú
Built-in rechargeable battery.(2hrs 30mins lasting in rec./2000mAH)
ú
Additional battery pack for expanding a recording or a playback time.(Option)
ú
Convenience carrying case for carrying PDVR-1000 & additional battery pack together.(Option)
ú
AC/DC adaptor.(DC5V 2A/Max.)
ú
USB 2.0 PC interface without any drive installation.
ú
Light Weight(98.5g) and mini size.(95 x 59.6 x 18.3(mm))
2. Camera
ú
1/3" Color Sony CCD pinhole camera.
ú
NTSC(768x492)/PAL(768x582)
ú
450 TV Line.
ú
1/60-1/110,000sec(Auto) of Electronic Shutter.
ú
0.1Lux.(Min. Illumination)
ú
90 degree of Angle of View.
ú
Auto White Balance.
ú
5V 200mA.(Max.)
ú
4 different button & screw adaptor.
ú
Separated wired microphone.(-32dB)
ú
Size: 29.4x27.8x18.2(mm)/Including button adaptor height.
ú
Weight: 22.5g/Including ext. mic & cable
Main Features
Main Features
01
3

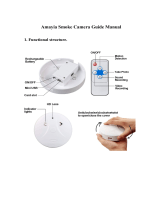
Neck Strap Holder
Air Vent
Hold Key
Stop/ESC
Rec./Pause
Menu
Volume up & down
RW & FF or
Menu Up & Down
Play/Pause/Enter/
Power On & Off
A/V-Out
A/V-In
Remote Controller
DC Jack
Built-in Microphone
micro SD card slot/
USB Jack
Built-in Speaker
Reset
1. Main Unit & Button
2. Display & Icon
Date
Time
Current Selected Memory Storage
Speaker On/Off or earphone
Volume Level
Battery Status Indicator
Current selected menu
ྙ
ྚ
ྛ
ྜ
ྜྷ
ྞ
ྟ
ྠ
ྡ
ྡྷ
ྣ
ྤ
ྥ
ྦ
ྦྷ
ྙ
ྚྛ ྜ ྜྷ ྞ
ྙྚྛྜྜྷྞ
ྟ
ྠྡ
ྡྷ
ྣ
ྤ
ྥ
ྦ
ྦྷ
ྟ
ྙ
ྚ
ྛ
ྜ
ྜྷ
ྞ
ྟ
The Name of Each Part
The Name of Each Part
02
4

3. Package
1) PDVR-1000 with Basic Accessories
2) Optional Accessories
PDVR-1000 USB Cable AC/DC Adaptor
Bracket for installment
on the wall Adaptors for Camera lens Normal Buttons and screw
20.5mm 15.2mm 11.5mm 10.3mm
Carrying Case Remote Controller AV-in Cable
AV Out Cable Hand Strap Pinhole Camera
Earphone Battery Pack
Camera Extension cable
(5m/10m)
තGThe design or shape of accessory on the above is just for reference. It would be different than real one.
The Name of Each Part
The Name of Each Part
02
5

2) Battery Charging Time & Operating Time
තGWhen plugging or unplugging the AC/DC adaptor, turning off the unit is strongly recommended.
The maker strongly recommends using a supplied AC/DC adaptor, but if it is necessary that
another AC/DC adaptor is purchased separately at a shop, please check its electric specification
is in accordance with PDVR-1000's specification.
තGIt takes approx.20hrs for charging the battery by USB cable.
Charging Time
Approx. 5hrs in Power On
Approx. 3hrs 30mins in Power Off
Continuous play time
Approx. 4hrs
Continuous recording time
Approx. 2hrs 30mins
1. Checking the battery status
1) Charging the battery
User can charge PDVR-1000 by connecting the USB cable to a computer or by using the
AC Adaptor.
ྙGCharging by connecting to PC
ྚGCharging with AC/DC adaptor
Basic Preparation before operation
Basic Preparation before operation
03
6

තGWhen connecting or disconnecting the camera please turn off the unit.
3) Battery Remaining Status
2. Connecting Camera
1) Connecting Camera
A camera must be connected to AV-in port before starting a recording. If a camera is not
connected or in loose, error message pop-up on the LCD will be blinking
when trying to record. The maker guarantees only the supplied camera for obtaining the
best quality and working proper, so if user would like to use another maker's camera, it
must be checked if it works properly before recording.
Full Charge
Power almost drained
Some Power Consumed
No Power
AV-in Port
Basic Preparation before operation
Basic Preparation before operation
03
7

2) Checking PAL or NTSL
ྙGAV-in
A camera type(PAL or NTSC) shall be selected correctly on the menu.
Setting -> Display Setup -> Video Format -> NTSC or PAL
ྚGAV-out
PAL or NTSL is only supportable system for the Video-out, so for monitoring on another
display device such as LCD or TV while recording, a right type of the camera system shall
be connected and selected on the device.
3) Extension Camera Cable(Optional Item)
If it is required to extend the camera cable, the extension camera cable on the optional
accessory may be affordable.
තGWhen using the camera extension cable, there will be some decline of the recorded quality in voice
recording, but video recording. Please keep in mind that the longer the cable is, the worse quality
is in voice recording.
Basic Preparation before operation
Basic Preparation before operation
03
8

3. Select a memory type
Before starting a recording, the memory type to store a recorded file(s) shall be selected.
Basically PDVR-1000 has a built-in memory, but user may select external memory for
storing a recorded file(s) other than the built-in memory.
1) Memory Type and capacity
3) Confirmation of the Memory Type
User can check what type of memory is selected on the LCD.
2) Select Memory Type
GGGGGතG
If SD card is selected without SD card being inserted, error pop-up ( ) is shown up.
GGGGGතGWith pressing "Menu" button for 2-3seconds, memory type is changed "Internal memory"
to "External memory" or "External memory" to "Internal memory".
ྙGInternal memory: 1GB, 2GB, 4GB or 8GB
GGGGGතGAccording to the model, the memory capacity on board may be different.
Memory capacity can be checked on the menu. (Setting->System Setup->Memory Information)
ྚGExpandable Memory(External memory): micro SD(up to 16GB compatible)
GGGGGතGmicro SD including SDHC is compatible, but it might not work properly according to a brand of
maker. So, make sure if the SD card is compatible properly with PDVR-1000 before recording.
micro SD Card made by Sandisk is strongly recommended.
GGGGGතGmicro SD card is not included in the package, so user needs to buy separately.
Main Menu
->
Go to "Setting"
->
Memory Setup
->
Storage Select
->
Internal or External
Internal Memory
External memory(SD card)
Basic Preparation before operation
Basic Preparation before operation
03
9

4) Insert micro SD card
ྙGInsert micro SD card to the slot on the device.
ྚGMake sure its direction to insert to micro SD card slot as the below diagram.
ྛGHold micro SD card's face up and insert it straightly to the slot until
micro SD card stopping with a click.
5) Eject micro SD Card
ྙGPush micro SD Card inward with finger quickly & smoothly, and it will be
ejected partially.
ྚGHold the micro SD Card straight and pull it out.
6) Format
If micro SD card is brand-new(unformatted) or used one in the other devices, please
format it on this device.
තGDo not extract the micro SD card out of the slot while recording if the storage to save a file is selected to
SD card.
තGIf inserting micro SD card in wrong way or inclined angle, the contact part of micro SD card could be
damaged or jammed inside.
තGIf micro SD card may not be inserted correctly, it may not be readable.
තGBefore formatting, make sure the stored file(s) in micro SD card is not necessary anymore.
Otherwise, back up the file(s) to another storage or PC.
Basic Preparation before operation
Basic Preparation before operation
03
10

4. Set up Time & Date
All values of the device are set up at the factory defaults if turning on first time after
purchasing. So it is necessary to set up time and date at current value for stamping
current time and date to the recorded file and other functions like Timer Recording.
5. Hold
Hold key works to prevent a mistake from unexpected operation, so this shall be checked
if it is on before starting a record.
1) Set up time & Date
Main Menu -> Setting -> System Setup -> Time Set -> Date Set(YYYY-MM-DD) ->
Time Set(HH:MM)
-> Date Display(Y/M/D or M/D/Y) -> Time Display (12H or 24H)
Moving to the next or
previous option
Changing the value
up or down
Confirming a setup ESC
තGIf Hold is on, "lock icon" is displayed on the top of the LCD and is in pop-up whenever
pressing any button.
Hold Off
Hold On
Basic Preparation before operation
Basic Preparation before operation
03
11

ත Long key: Hold a key for 2-3 seconds / Short Key: Hold a key for 1 second
ත Press any button for returning to the LCD On while LCD off in security recording.
Long Key
- Power On/Off -
Play/Pause in Playing a file
-
Enter/Select in Menu &
file list
- AV-out(TV or LCD)˩
LCD of PDVR-1000
(Only applicable
on Main Menu)
-
LCD off while recoding
or preview
- Int. Memory˩
Ext. memory in no
operation
(Only applicable
in Main Menu)
- Stop playing or recording
- Escape out of a current
menu
- Start/Pause
- Show up a submenu in
each mode (RECORD/
VIDEO/VOICE/PHOTO)
-
Go up to Main menu directly
at a submenu in SETTING
- Vol. up or down
continuously
- Value up or down
continuously
- Vol. up or down in playing
a file
- Value up or down in Time
Setup
- Move to the next or back
to the previous option
continuously
- Move to upper or lower
directory continuously
- Move to the next or back
to the previous option
- Move to upper or lower
directory
Short Key
- FF or REW in playing
Button Operation
Button Operation
04
12

Main Menu
RECORD VIDEO VOICE PHOTO SETTING
Preview
Rec.
Rec.
File List
Playback
Rec.
File List
Playback
Preview
Snap Shot
File List
Playback
Rec. Setup
Timer Rec. Setup
Play Setup
Display Setup
Memory Setup
System Setup
RECORD
Preview
Rec.
Rec. Time: Display a value set at preview & Rec. Setup in SETTING
Mic Sensitivity: High/Middle/Low
Rec. Time: Off/10/20/30/60min.
Mic Sensitivity: Low/Middle/High
VIDEO
VOICE
File List
Rec.
Rec. Time: Display a value set at preview & Rec. Setup in SETTING
Mic Sensitivity: High/Middle/Low
File Play
File Delete: No/One/All
Playback
File Protect: No/One/All
File Information: File Name/File Size/File Protection
Video Repeat: No/One/All One/All
Display Out: LCD/TV
File List
Rec.
Playback
Voice Repeat: No/One/All One/All
PHOTO
File List
Preview
Snap Shot
Snap Shot Time: Off/10/20/30/60min.
File Play
File Delete: No/One/All
File Protect: No/One/All
File Information: File Name/File Size/File Protection
Playback
Slide-Show: No/Yes
Slide-Show Time: 1/3/5/7/10sec.
Rec. Time: Display a value set at preview & Rec. Setup in SETTING
Mic Sensitivity: High/Middle/Low
File Play
File Delete: No/One/All
File Protect: No/One/All
File Information: File Name/File Size/File Protection
Structure of Menu Tree
Structure of Menu Tree
05
13

SETTING
Rec. Setup
Timer Rec. Setup
Play Setup
Input Source:Video+Audio/Video
Video Quality: High/Standard/Low
Resolution: 720x480/352x240/176x120(NTSC)
720x576/352x288/176x144(PAL)
Frame Rate: 5/10/15/20/25/30fps(NTSC)
5/10/15/20/25fps(PAL)
Motion Detection: On/Off
Time Stamp: On/Off
Rec.Time: Off/10/20/30/60min.
Endless Rec.: No/Yes
Video Repeat: No/One/All One/All
Voice Repeat: No/One/All One/All
Photo Thumbnail View: No/Yes
Slide Show: No/Yes
Slide Show Time: 1/3/5/7/10sec.
Set: Cancel/Once/Everyday
Start
End
YYYY-MM-DD
AM/PM HH:MM
YYYY-MM-DD
AM/PM HH:MM
Internal:Total & Remain
SD Card:Total & Remain
Display Setup
Video Format: NTSC/PAL
Display Out: LCD/TV
LCD Brightness: 0/1/2/3/4/5/6/7/8/9
LCD Backlight: Off/3/5/10/All sec.
Memory Setup
Storage Select: Internal/External
Format: Internal/External
Memory Change: No/Yes
Memory Information
Date Set: YYYY-MM-DD
Time Set: AM/PM HH:MM
Date Display: Y/M/D or M/D/Y
Time Display: 12H/24H
System Setup
Speaker Control: On/Off
Auto Power Off Time:Off/1/3/5/7/10min.
Time Set
Factory Default Set: No/Yes
Firmware Version
Battery Pack: On/Off
Structure of Menu Tree
Structure of Menu Tree
05
14

1. Main Menu
̻
RECORD
-
Previewing before recording.
-
Recording a video input signal from the connected camera.
- The file recorded in this mode is stored at the "VIDEO".
̻
VIDEO
-
Recording an video input signal from the connected camera.
- A recorded video file(s) is stored here and played back.
̻
VOICE
-
Recording a voice input signal from a built-in microphone or
a microphone on the camera.
- A recorded audio only file(s) is stored here and played back.
̻
PHOTO
- Previewing before snap photo.
-
Taking a snap shot.
-
A photo file(s) taken by Snap Shot is stored here and reviewed.
̻
SETTING
- User can set up setting values.
2. Operation of Each menu
1) RECORD
In this mode, user can make a video (Video+Audio or Video Only) and previews what is
recorded before starting a recording.
තGIf starting a recording, STOP won't work within 5seconds.
තGMaximum size of the file to be made in PDVR-1000 is 4GB. So when a file size is reached to 4GB in
a recording, it automatically saves the file and then start a new recording with new file index.
තGDo not take a SD card out while recording to external memory storage but if it is made, PDVR-1000
automatically powers off. The file was recording just befor taking the SD card won't be displayed on
PDVR-1000, but it might be playable on a PC.
තGBefore starting a recording, make sure the battery status. We strongly recommend to record with
AC/DC adaptor for long recording.
තGIn case of selecting "Video+Audio" as an Input source in Rec. Setup, audio is not recorded together
if 5fps is selected in frame rate. So if it is necessary to record audio together with video at 5fps, set
up the frame rate at over 10fps.
Main Menu & Operation
Main Menu & Operation
06
15

Preview -> -> Start a recording -> Stop the recording by
ii. Start a recording after preview
තGLetter of "Preview" is changed to "Rec" on the right of the LCD.
If pressing a REC button( ) again while recording, the recording is paused and
re-start the recording by pressing the REC button once again.
තGIf pressing a REC button( ) again while recording, the recording is paused and
re-start the recording by pressing the REC button once again.
තGWhen a recording is done, it takes time to save a file and are displaying
to indicate on the way to save.
Move to "RECORD" on the main display -> -> Start a recording->
Stop the recording by
ྚGQuick Recording without preview
ྛGSet up optional values
While previewing & recording, values of recording time & Microphone sensitivity can
be adjustable by pressing "MENU".
Move to "RECORD" on the main display -> Press ( ) -> Previewing
ྙGPreview
User can make sure what is recorded thru preview before starting a recording.
i. Preview
තGLetter of "Preview" is displaying on the right of the LCD.
Before starting a recording, user shall select one of recording types (Video+Audio or Video only)
SETTING -> Record Setup -> Input Source -> Video+Audio or Video.
- Recording Time: Off/10/20/30/60Min.
GGGතGSet up a recording time
- Microphone sensitivity: High/Middle/Low
̻
Previewing
Main Menu & Operation
Main Menu & Operation
06
16

- Recording Time: Display a value set at preview &
Rec. Setup in SETTING
- Microphone sensitivity: High/Middle/Low
̻
Recording
තGIf a camera is not connected to PDVR-1000 or in loose, "No Signal"( ) will be blinking
3 times.
තGThe recorded video file is stored and playable at the "VIDEO" on the main menu.
2) VIDEO
User can make a video(Video+Audio or Video according to the setup) and all recorded
file(s) at the modes of "RECORD" and "VIDEO" are stored and playable here.
තGWhen a recording is done, it takes time to save a file and are displaying
to indicate on the way to save.
Move to "VIDEO" -> Press Rec. button ( ) -> Recording -> Pause the recording
by pressing Rec. button once again -> Re-start the recording by pressing Rec.
button once again -> Stop the recording by pressing "Stop" button ( )
ྙGRecording a video
Move to "VIDEO" -> Enter into a subfolder by pressing ( ) -> Select a desired
file by & -> Play back the file by pressing ( ) -> Pause the playing
file by ( ) -> Replay the file by pressing it once again -> Stop playing by ( )
ྚGCheck or Playing a recorded file
Main Menu & Operation
Main Menu & Operation
06
17

ྜGPlayback Speed Control
While playing a file, playback speed can be adjustable with &
Playback speed has 2 options, "increasing plackback speed(x1˩x2˩x4˩x8)" and
"decreasing playback speed(x1˩x1/2˩1/4˩x1/8)". By pressing while playing
back, option(Increasing speed˩Decreasing speed) can be switchable.
ྜྷGThe recorded file format
ྛGSet up Optional Value
While operating each function(Recording, Checking a file, Playing a file), user can
change a setting value by pressing Menu button( ).
- Recording Time: Display a value set at preview &
Rec. Setup in SETTING
- Microphone sensitivity: High/Middle/Low
̻
Recording
- File Play: Play a selected file
- File Delete: No/One/All
- File Protect: No/One/All
- File Information: File Name/File size/File Protection
̻
File List
- Video Repeat: No/One/All One/All
- Display Out: LCD/TV
̻
Playing
AVM200904231640-001.
mpg
Recording Type
- M: Normal Rec. - T: Timer Rec. - E: Endless Rec.
Recording Mode
- AV: Audio+Video - VO: Video Only
Year Day File Index
Month Time File Format
Main Menu & Operation
Main Menu & Operation
06
18
/