Page is loading ...

www.lnchome.comPage: ‐1‐/4
ItemNumber:A02231
WARNING(Toreducetheriskoffire,electricshock,orinjurytopersons):
1. Wesuggestinstallationbyalicensedelectrician.
2. Pleasereadtheinstructioncarefullyandsaveitasyoumayneeditatlatertime.
3. Beforeyoustart,NEVERattemptanyworkwithoutshuttingofftheelectricityuntiltheworkisdone.A).Gotothemain
fuse,orcircuitbreaker,boxinyourhome.Placethemainpowerswitchinthe“OFF”position.B).Placethewallswitch
inthe“OFF”position.
4. Mountingsurfaceshouldbeclean,dry,flat,strongenoughand1/4”largerthanthecanopyonallside.Anygapsbetween
themountingsurfaceandcanopyexceeding3/16”shouldbecorrectedasrequired.
5. Makesurethattheceilingorwallcanstandtheweightofthelampbeforefixture.
6. Makesurethevoltageyouareusingis120V.Themaximumwattageis60Wperbulb.
7. Keepthelampawayfromacidicandbasicobjectsincaseofdamagingthesurfaceofthelamp.
8. Whenreplacingbulb,youshouldturnofforunplugthelampandyoumustwaituntilitiscoolasbulbsgethotquickly.
9. Thesafetyinstructionsappearinginthismanualarenotmeanttocoverallpossibleconditionsthatmayoccur.Itmust
beunderstoodthatcommonsense,cautionandcaremustbeusedwithanyelectricalproducts.
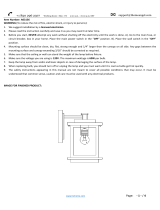
IMAGEFORFINISHEDPRODUCT:

www.lnchome.comPage: ‐2‐/4
TOOLSREQUIRED(NOTINCLUDED):
Beforedoingassemblyandinstallationpleasepreparetheneededtoolsasbelowpicture
PARTSTYPE&QTYINCLUDING:
(A) Mounting plate (1)
(C)Hexnut(1)
(D) Ground wire (1)
(E) Stem (1)
(F) Joint (1)
(G) Socket cap (1)
(H) Green ground screw (1)
(I) Plastic Wire Connectors (3)
(J) Washer (1)
(K) Back plate (1)
(L) Ball nut (2)
ACCESSORIES&QTYENCLOSED:
(B) Mounting screw (2)
(H) Plastic Wire Connectors (3)
ASSEMBLY&INSTALLATIONINSTRUCTIONS:
1. Carefullyremovethefixturefromthecartonandcheckthatallpartsand
accessoriesareincludedasshownintheaboveillustration
2. Turnoffpower
3. Makefixtureassembly
1)Unscrewballnut(L)andthengentlyremove
mountingplate(A)fromthebackplate(K)

www.lnchome.comPage: ‐3‐/4
2)Uncrewthehexnut(C)fromstem(E)
Removethehexnut(D),washer(J)fromstem(E)
3)Insertthethreadedendofstem(E)intobakplate(K),
passwiresthroughthewasher(J),groundwire(D)to
thethreadedendofstem(E),thengentlytighten
hexnut(C)tilltighttosecurethestem(D)inplace
4.Makefixtureinstallation
1)Passallwiresfromoutletboxthroughmountingplate(A)
Attachmountingpalte(A)tooutletboxwithmounting
screws(B),thesideofmountingplate(A)marked"GND"
mustfaceout.

www.lnchome.comPage: ‐4‐/4
2)Makewireconnections
Connectwiresasbelowwiresconnectingshown.TAKENOTEOFYOURWIRECOLOROFFIXTURE,NEVERCONNECT
WIRETOGROUNDWIRE
ConnectgroundwireaccordingtobelowchartConnectwiresaccordingtobelowchart
Twistplasticwireconnectoruntilwiresaretightlyjoinedtogether,wrapeachconnectorwithapprovedelectricaltapeand
carefullytuckallwiresintotheoutletbox
3)Pushbackplate(K)towall,carefullypassingmoungting
screwsthroughholesinbackplate(K),tightenballnut(L)to
securebackplate(K)inplace
4)Installbulb(Notincluded.Pleasedonotexceedthe
maximumcapacityrecommendedonthesocket.)
Loosenthestudonjoint(F)toadjusttheangleoffixture,
oncedesiredangle
offixtureisachieved,tightenthestud.
Checkeverythingalreadyisinstalledproperly,thenyoucouldturnonthelight.
CLEANING
Toclean,wipefixturewithasoftcloth.Donotuseabrasivematerialssuchasscouringpadsorpowders,steelwoolor
abrasivepaper.
ORDERINGPARTS
Keepthissheetforfuturereference,andincaseyouneedtoorderreplacementparts.Allpartsforthisfixturecanbe
orderedfromplaceofpurchase.Besuretouseexactwordingfromillustrationwhenorderingparts.
/