Page is loading ...

www.lnchome.comPage: ‐1‐/3
ItemNumber:A02974
WARNING(Toreducetheriskoffire,electricshock,orinjurytopersons):
1. Wesuggestinstallationbyalicensedelectrician.
2. Pleasereadtheinstructioncarefullyandsaveitasyoumayneeditatlatertime.
3. Beforeyoustart,NEVERattemptanyworkwithoutshuttingofftheelectricityuntiltheworkisdone.A).Gotothe
mainfuse,orcircuitbreaker,boxinyourhome.Placethemainpowerswitchinthe“OFF”position.B).Placethewall
switchinthe“OFF”position.
4. Mounting surface should be clean, dry, flat, strong enough and 1/4”largerthanthecanopyonallside.Anygaps
betweenthemountingsurfaceandcanopyexceeding3/16”shouldbecorrectedasrequired.
5. Makesurethattheceilingorwallcanstandtheweightofthelampbeforefixture.
6. Makesurethevoltageyouareusingis120V.Themaximumwattageis60Wperbulb.
7. Keepthelampawayfromacidicandbasicobjectsincaseofdamagingthesurfaceofthelamp.
8. Whenreplacingbulb,youshouldturnofforunplugthelampandyoumustwaituntilitiscoolasbulbsgethotquickly.
9. Thesafetyinstructionsappearinginthismanualarenotmeanttocoverallpossibleconditionsthatmayoccur.Itmust
beunderstoodthatcommonsense,cautionandcaremustbeusedwithanyelectricalproducts.
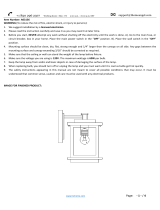
IMAGEFORFINISHEDPRODUCT:

www.lnchome.comPage: ‐2‐/3
TOOLSREQUIRED(NOTINCLUDED):
Beforedoingassemblyandinstallationpleasepreparetheneededtoolsasbelowpicture
PARTSINCLUDING:
(A) Green ground screw (1)
(B) Mounting plate (1)
(E) Hex nut (1)
(F) Ground wire (1)
(G) Washer (1)
(H) Ball nut (2)
(I ) Back plate (1)
(J) Fixture (1)
ACCESSORIESENCLOSED:
(C)Plastic Wire Connectors (3)
(D) Mounting screw (2)
ASSEMBLY&INSTALLATIONINSTRUCTIONS:
1. Carefullyremovethefixturefromthecartonandcheckthatallpartsand
accessoriesareincludedasshownintheaboveillustration
2. Makefixtureassembly

www.lnchome.comPage: ‐3‐/3
StepA1:Unscrewhexnut(E)fromfixture(J),thenremovewasher(G)fromfixture(J)
StepA2:Passwiresthroughbackplate(I)andcarefullyinsertthethreadedendoffixtureintobackplate(I)
StepA3:Putwasher(G),groundwire(F)ontothethreadedendoffixture(J)thentightenwithnut(E)
3. Turnoffpower
4. Makefixtureinstallation
StepB1:Passallwiresfromoutletboxthroughmountingplate(B)
Attachmountingpalte(B)tooutletboxwithmountingscrews(D),thesideofmountingplate(B)
marked"GND"mustfaceout.
StepB2:Connectgroundwireasbelowgroundwiresconnectingshown
Connectwiresasbelowwiresconnectingshown.NEVERCONNECTWIRESTOGROUNDWIRES
Twistconnector(A)untillwiresaretightlyjoinedtogether,wrapeachconnectiowithapprovedelectricaltapand
carefullystuffallwiresintotheoutletbox
ConnectgroundwireaccordingtobelowchartConnectwiresaccordingtobelowchart
StepB3:Pushbackplate(I)towall,carefullypassingmoungtingscrews(D)throughholesinbackplate(I).
Installbulb(Notincluded.Pleasedonotexceedthemaximumcapacityrecommendedonthesocket.)
Checkeverythinginstalledproper,thenyoucouldturnonthelight.
/