
LNC Weareheretohelp:[email protected]om
www.lnchome.comPage: ‐1‐/4
ItemNumber:A0224109
WARNING(Toreducetheriskoffire,electricshock,orinjurytopersons):
1. Wesuggestinstallationbyalicensedelectrician.
2. Pleasereadtheinstructioncarefullyandsaveitasyoumayneeditatlatertime.
3. Beforeyoustart,NEVERattemptanyworkwithoutshuttingofftheelectricityuntiltheworkisdone.A).Gotothemain
fuse,orcircuitbreaker,boxinyourhome.Placethemainpowerswitchinthe“OFF”position.B).Placethewallswitch
inthe“OFF”position.
4. Mountingsurfaceshouldbeclean,dry,flat,strongenoughand1/4”largerthanthecanopyonallside.Anygapsbetween
themountingsurfaceandcanopyexceeding3/16”shouldbecorrectedasrequired.
5. Makesurethattheceilingorwallcanstandtheweightofthelampbeforefixture.
6. Makesurethevoltageyouareusingis120V.Themaximumwattageis60Wperbulb.
7. Keepthelampawayfromacidicandbasicobjectsincaseofdamagingthesurfaceofthelamp.
8. Whenreplacingbulb,youshouldturnofforunplugthelampandyoumustwaituntilitiscoolasbulbsgethotquickly.
9. Thesafetyinstructionsappearinginthismanualarenotmeanttocoverallpossibleconditionsthatmayoccur.Itmust
beunderstoodthatcommonsense,cautionandcaremustbeusedwithanyelectricalproducts.
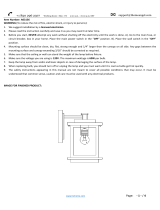
IMAGEFORFINISHEDPRODUCT:

LNC
Weareheretohelp:[email protected]
www.lnchome.comPage: ‐2‐/4
TOOLSREQUIRED(NOTINCLUDED):
Beforedoingassemblyandinstallationpleasepreparetheneededtoolsasbelowpicture
PARTSTYPE&QTYINCLUDING:
(A) Mounting plate assembly (1)
(B) Green ground screw (1)
(E) Back plate (1)
(F) Threaded ball (2)
(G) Socket cap (1)
(H) Metal shade (1)
(I) Socket ring (1)
ACCESSORIES&QTYENCLOSED:
(C) Mounting screw (2)
(D) Plastic Wire Connectors (3)
ASSEMBLY&INSTALLATIONINSTRUCTIONS:
1. Carefullyremovethefixturefromthecartonandcheckthatallpartsand
accessoriesareincludedasshownintheaboveillustration
2. Turnoffpower
Beforeyoustarttomakeinstallation,NEVERattemptanyworkwithoutshuttingofftheelectricityuntiltheworkis
done.A).Gotothemainfuse,orcircuitbreaker,boxinyourhome.Placethemainpowerswitchinthe“OFF”position.
B).Placethewallswitchinthe“OFF”position.
3. Unscrewthesocketring(I)fromthesocket,thenplacemetalshade(H)
overthesocket,securewiththesocketring(I)

LNC Weareheretohelp:[email protected]om
www.lnchome.comPage: ‐3‐/4
4. Unscrewthethreadedballs(F)fromthebackplate(E)
thencarefullyremovethemountingplateassembly(A).
5. Attachthemountingplateassembly(A)tooutletboxwith
mountingscrews(C).
Carefullyandgentlypasstheoutletboxwiresthrough
themountingplateassembly(A).
6.Makewireconnections
Connectwiresasbelowwiresconnectingshown.TAKENOTEOFYOURWIRECOLOROFFIXTURE,NEVERCONNECT
WIRETOGROUNDWIRE
ConnectgroundwireaccordingtobelowchartConnectwiresaccordingtobelowchart
Twistplasticwireconnector(D)untilwiresaretightlyjoinedtogether,wrapeachconnectorwithapprovedelectricaltapeand
carefullytuckallwiresintotheoutletbox.
7.Aligntheholesinthebackplate(E)withthemountingscrews,
thenattachthebackplate(E)usingthepreviouslyremovedthreaded
balls(F).Handtightenuntilsnug.
Note:Thebackplate(E)shouldbesnugagainstthe
wallandthethreadedballs.Ifnot,adjustthelength
ofthenipplesonthemountingplateassembly(A)by
unscrewingthepreassembledhexnutsandthenscrewing
themountingscrewsinoroutofthemountingplateuntilthe
lengthisachieved.Tightenthehexnutsandproceedtothestep7

LNC Weareheretohelp:[email protected]om
www.lnchome.comPage: ‐4‐/4
8. Installbulbs(Notincluded.Pleasedonotexceedthemaximum
capacityrecommendedonthesocket.)
9. Check everything is already installed properly, then you could turn on the light. Enjoy!
CLEANING
To clean, wipe fixture with a soft cloth. Do not use abrasive materials such as scouring pads or powders, steel wool or
abrasive paper.
ORDERING PARTS
Keep this sheet for future reference, and in case you need to order replacement parts. All parts for this fixture can be
ordered from place of purchase. Be sure to use exact wording from illustration when ordering parts.
-
 1
1
-
 2
2
-
 3
3
-
 4
4


Ask a question and I''ll find the answer in the document
Finding information in a document is now easier with AI
Related papers
-
LNC A03395 Operating instructions
-
-
-
-
-
-
-
-
LNC A02251 Operating instructions
-
Other documents
-
Global Direct 21952 Installation guide
-
Zevni Z-R7NEVAZ2-4696 Operating instructions
-
Uolfin 976RQYHD24318BB Operating instructions
-
 LALUZ A03156 Installation guide
-
-
PB Teen Emma Chandelier Installation guide
-
-
Campbell Scientific 011 Owner's manual
-
Allen + Roth LWSC0333A1 Installation guide
-
Sahara Fans 10059 Operating instructions
