Page is loading ...

WMA 109 R09
1
FLEXI FIX WALL MOUNTED
ACCESSORIES INSTRUCTIONS
ALL ILLUSTRATIONS OF THE PRODUCT ARE FOR REFERENCE
ONLY. COMPONENTS SUPPLIED WITH INDIVIDUAL PRODUCTS
MAY DIFFER
SECTION CONTENTS PAGE
1 INTRODUCTION 2
2 PRE-INSTALLATION 2
3INSTALLATION WHEN
USING EXISTING HOLES
3
4INSTALLATION WHEN
DRILLING NEW HOLES
3
5 INSTALLATION USING
ADHESIVE FIXING METHOD
4
CONTACT DETAILS (UK)
Croydex
Central Way
Andover
Hampshire
SP10 5AW
UK
Tel: +44 (0)1264 365881
Email: info@croydex.co.uk
www.croydex.com
CONTACT DETAILS (EU)
MIL
Unit 8 Purcellsinch Ind Est
Dublin Road
Kilkenny
R95 HP71
Ireland

WMA 109 R09
2
SECTION 1 - INTRODUCTION
INTRODUCTION
Thank you for purchasing this Croydex product. Please follow all
installation and product care instructions to ensure that your
product is installed safely and retains it's high quality finish.
PLEASE RETAIN THIS MANUAL FOR FUTURE REFERENCE
SECTION 2 - PRE-INSTALLATION
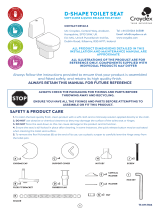
SAFETY & PRODUCT CARE
1. ALWAYS take care when using power tools, particularly if
there is any water in the working area.
2. When drilling into a tiled surface DO NOT use a hammer
drill.
3. ALWAYS use a drill bit that is suitable for the surface that is
being drilled.
4. Always use a residual current circuit breaker (RCCB/GFCI).
5. The wall plugs supplied are for use on solid walls only. For
cavity walls or plasterboard ALWAYS use specialist fixings
that are suitable for the type of wall construction.
6. ALWAYS wear eye protection when using power tools.
7. ALWAYS check for pipes and cables before drilling into
walls.
8. ALWAYS use a ceramic drill bit when drilling into tiled
surfaces.
9. The maximum safe working load for the shelf is 5kg
distributed evenly.
10. DO NOT position glass products directly above a heat
source.
11. DO NOT use abrasive or chemical cleaners as these may
damage the product.
12. To retain the best quality finish, clean product regularly
with a soft damp cloth.
13. Redecoration may be required on some painted surfaces
after removal.
PRODUCT FITTING
IMPORTANT!
Before attempting to install this product, ensure that it fits
and will function in the desired location.
15/64"
(6mm)
TOOLS REQUIRED
x1
MAX
11Ib
(5kg)
INTRODUCTION
The adhesive is suitable for use on most flat finished surfaces, such as gloss
paint, tiles, polished stone, laminates and textured surfaces. DO NOT USE
ON DECORATIVE WALL PAPER FINISHES. The adhesive is NOT suitable for
unfinished materials such as brick, block-work, wood, emulsion paint, loose,
flaky surfaces or surfaces contaminated with grease, wax or dust. In some
circumstances extreme environmental conditions or physical damage to the
adhesive tube may initiate the curing process. In the unlikely event that your
adhesive has hardened or it's tube is damaged, replacement adhesive can be
obtained from our customer services department.

WMA 109 R09
3
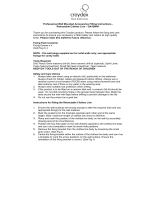
SECTION 3 - INSTALLATION
WHEN USING EXISTING HOLES
1. Remove the old wall
bracket, taking care not to
damage existing fittings.
(See Fig. 1)
fig. 1
SECTION 4 - INSTALLATION
WHEN DRILLING NEW HOLES
fig. 2
fig. 3
2. Screw the new Flexi-Fix
bracket into the existing holes.
(See Fig. 2)
3. Install the Flexi-Fix Wall
Mounted Accessory and
tighten the grub screw to
secure in place. DO NOT
overtighten the grub screw.
(See Fig. 3)
1. Place the Flexi-Fix bracket
onto the wall and mark hole
centers for drilling.
DO NOT attempt to install
with screws going into
grouting.
(See Fig. 4)
fig. 4
fig. 5
fig. 6
2. Drill holes and insert wall
plugs. Ensuring the wall plugs
sit flush with the wall.
(See Fig. 5)
3. Install the Flexi-Fix Wall
Mounted Accessory and
tighten the grub screw to
secure in place. DO NOT
overtighten the grub screw.
(See Fig. 6)

WMA 109 R09
4
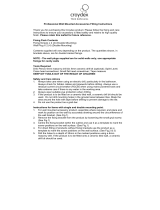
SECTION 5 - INSTALLATION WHEN USING ADHESIVE FIXING METHOD
1. Place the Flexi-Fix bracket
onto the wall and mark center
for glueing. DO NOT attempt
to install on grouting lines.
(See Fig. 7)
fig. 7
fig. 8
fig. 10
2. Assemble the Flexi-Fix
bracket as shown.
(See Fig. 8)
3. Peel o the adhesive sticker
backing and press to wall on
the marked center.
(See Fig. 9)
4. Unscrew and remove the
Flexi-Fix bracket as shown.
Be careful not to dislodge the
guide that is now adhered to
the wall.
(See Fig. 10)
fig. 11
fig.12
fig. 13
5. Open the sachet containing
the adhesive and apply to the
back of the Flexi-Fix bracket.
(See Fig. 11)
6. Re-install the Flexi-Fix
bracket onto the guide and
secure as shown.
YOU MUST wait 24 hours for
adhesive to cure.
DO NOT attempt to press the
Flexi-Fix bracket to the wall.
This will impede the bonding
process.
(See Fig. 12)
7. Install the Flexi-Fix Wall
Mounted Accessory and
tighten the grub screw to
secure in place.
Do not overtighten the grub
screw.
(See Fig. 13)
fig. 9
/