Page is loading ...

CONSTANCE /
MICHIGAN
SOFT CLOSE & QUICK RELEASE
TOILET SEAT
CONTACT DETAILS
Croydex
Central Way
Andover
Hampshire
SP10 5AW
UK
Tel: +44 (0)1264 365881
Email: info@croydex.co.uk
www.croydex.com
Please follow all assembly and product care instructions to ensure that your product
is assembled safely and retains it's high quality finish.
PLEASE RETAIN THIS MANUAL FOR FUTURE REFERENCE
SAFETY & PRODUCT CARE
1. To retain the best quality finish, clean product with a soft cloth and a mild soap solution.
2. DO NOT use abrasive or chemical cleaners as they may damage the surface of the toilet seat or hinges.
3. Spray cleaning liquids onto the cloth and not directly onto the product.
4. DO NOT force the seat down as this can cause damage to the product and its function.
5. Take care when cleaning the toilet pan with chemical cleaners. Avoid contact of the chemical cleaners
with the toilet seat or hinges. Immediately rinse o any splashes to avoid damage or discolouration to the
surface of the toilet seat and hinge parts.
ALL PRODUCT DIMENSIONS DETAILED IN
THIS INSTALLATION AND MAINTENANCE
MANUAL ARE APPROXIMATE
ALL ILLUSTRATIONS OF THE PRODUCT ARE
FOR REFERENCE ONLY. COMPONENTS
SUPPLIED WITH INDIVIDUAL PRODUCTS MAY
DIFFER
TS 074 R03
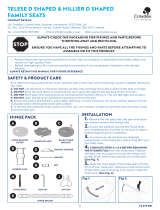
A
B
C
D
E
F
x2
x2
x2
x2
x2
x2
Gx2
H J x2
I
K
CHROME CAP SUPPORT COVER NUT KEY BOLT
FLEXI FIT BRACKET
HEX KEY
CONICAL
WASHER
WASHER
NUT
SPACER
RUBBER PLUG
1

PREPARATION
1. Remove the old seat from the pan and clean the surface around the fixing
holes.
2. Ensure the surfaces around the fixing holes are completely dry before beginning
the installation.
3. To ensure you do not lose any components down the toilet you may want to
place cling film over the bowl of the toilet.
TS 074 R03
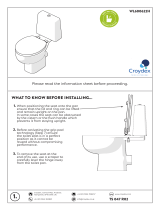
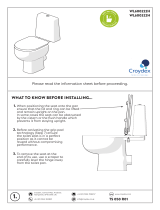
WHAT TO KNOW BEFORE INSTALLING...
1.
(See Fig. 1)
PLACEMENT
In its sealed packaging place the seat over your pan to ensure you are happy with
size and shape of the toilet seat.
FLEXI FIT
BRACKET
PROTECTIVE
FILM
SUPPORT
COVER
4. Remove the support covers
and peel back the Grip Pad
protective film on each hinge,
exposing the Grip Pad adhesive.
CHROME CAP
USE THE INNER MOST SPACER
HOLES WHEN FITTING THIS SEAT.
When positioning the seat onto the pan ensure
that the lid and ring can be lifted and remain
upright on the pan. (See Fig. 1)
Before activating the grip pad technology,
ensure the toilet seat is in a perfect position as
it can be dicult to reposition when attached.
2.
DO NOT force the seat down as this can cause
damage to the product and its function.
5.
To remove the seat at the end of its use, use a
scraper to carefully lever the hinge away from
the toilet pan.
6.
DO NOT force open the seat beyond its
mechanical limit before fitting it. This will
damage the product.
4.
DO NOT open the lid and ring before mounting
on the toilet pan.
3.
2

fig. 5
TS 074 R03
fig. 4
INSTALLATION
(Fig. 2) (Fig. 3)
2. Slide the spacer onto both pillars. Rotate the
Flexi Fit brackets if necessary.
(See Fig. 4)
CONICAL WASHER
MUST POINT UPWARDS
3. Lay the seat onto the pillars and rest it on the
spacer. Allow the seat to fall flat.
(See Fig. 5)
This installation is designed to be used on ‘standard’
toilets with access below the toilet pan.
CHOOSE BETWEEN
OR
BOTTOM FIX INSTALLATION
This installation is designed to be used on ‘back to
wall’ toilets with no access below the toilet pan.
TOP FIX INSTALLATION
Examples of Bottom Fix toilet pans. Examples of Top Fix toilet pans.
1. Identify your toilet pan style. Loosely intall the Flexi Fit bracket through the mounting holes using
either bottom installation (See Fig. 2) or top installation (See Fig. 3).
DO NOT COLLAPSE THE SUPPORTS.
fig. 6
4. Align the seat with your toilet pan by rotating
and sliding the Flexi Fit brackets. If required,
lift the seat o the pillars to help with the
adjustment. (See Fig. 6)
BRACKETS SHOULD BE SYMMETRICAL
5. Once you are confident with the position of
your seat, apply pressure on each Flexi Fit bracket
and collapse the supports.
Hold down for 20 seconds. (See Fig. 7)
fig. 7
3

TS 074 R03
TOP INSTALLATIONBOTTOM INSTALLATION
6. Carefully remove the seat, avoid disturbing the bracket positions and fully tighten the bolts to
firmly secure the Flexi Fit brackets. (See Fig. 8 and 9). Be careful not to over-tighten.
(Fig. 8) (Fig. 9)
fig. 10
7. Remove the spacer from the Flexi Fit Bracket.
(See Fig. 10)
fig. 11
8. Place the chrome caps onto the brackets.
(See Fig. 11)
fig. 13 fig. 12
9. Attach the seat onto the hinges to complete
the installation. You should hear a click to confirm
it is engaged. (See Fig. 12)
10. To activate the quick release function, press
and hold the button, then lift the seat away.
(See Fig. 13)
Note:
For Constance seat, find button at the front.
For Michigan seat, find button at the back.
4
/