KEEP DIY TOOLS OUT OF THE REACH OF CHILDREN
Please follow these fixing and care instructions to ensure your product is fitted safely and
retains its high quality finish. Please retain the leaflet for future reference .
Safety and Care Advice :
- Always take care when using power tools, particularly in the bathroom.
- Always check for hidden cables and pipework before drilling and take extreme care
if there is any water in the working area.
- It is advisable to use a residual current circuit breaker (RCCB).
- Always wear suitable eye protection when drilling.
- Always ensure that the drill hole passes through the central tiled area rather than
- If the product is to be fitted on a ceramic tiled wall, a ceramic drill bit should be used.
- Do not strike the product with hard or sharp objects.
- Do not position glass products directly above a heat source.
through the grouted area. To prevent damage to the tile, mask the area around the hole
with tape before drilling.
Additional Information :
- Maximum safe working load for the shelf is 2kg evenly distributed.
- Wall brackets can be removed by twisting the bracket in an anti-clockwise direction.
- Adhesive residue can be removed by carefully scraping the wall surface with a blunt instrument.
Fixing Pack Contents / Tools required
THESE ARE SUPPLIED
WMA 058 R05
- The adhesive is suitable for use on most flat finished surfaces, such as gloss paint, tiles,
- Do not use on decorative wall paper finishes.
- Not suitable for unfinished materials such as brick, blockwork and loose, flaky surfaces.
Important Adhesive Information :
polished stone, laminates and textured surfaces.
- Redecoration may be required on some painted surfaces after removal.

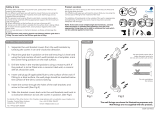
Remove old wall plate.
(PLATE SHOWN FOR REF ONLY)
FLEXI FIX WALL PLATE WILL FIT
EXISTING HOLE CENTRES OF -
MAX - 34mm apart
MIN - 15mm apart
CENTRES
Secure product to Flexi Fix wall plate
by tightening the grub screw
underneath.
MAX CENTRES
MAX CENTRES
Max Towel Rail Adjustment
Max Shelf Adjustment
i
Fitting Instructions for Flexi-Fix Wall Mounted Accessories
CAUTION!
When using existing holes DO NOT EXCEED the
maximum bracket centre dimensions printed on
the back of the shelf and towel rail packs.
In some instances existing hole centres may be
too far apart and not allow the brackets to be
positioned as desired. In such instances please
refer to the following instructions to drill new holes
or use the adhesive fixing method.
CAUTION!
SLIDE BRACKETS CAREFULLY
TO AVOID SCRATCHING
DO NOT OVERTIGHTEN
Please refer to the following pages for fitting instructions when drilling
new holes or using the adhesive fixing method.
i
CAUTION!
ENSURE HOLES
IN THE WALL
ARE SUITABLE
FOR RE-USE
IT MAY BE
NECESSARY TO
DRILL NEW
HOLES
A
WHEN USING EXISTING HOLES
WMA 058 R05

40mm
Drill holes
Secure product to Flexi Fix wall
plate by tightening the grub
screw underneath.
BRACKET CENTRES
Towel rail adjustment
BRACKET CENTRES
Shelf adjustment
i
CAUTION!
SLIDE BRACKETS CAREFULLY
TO AVOID SCRATCHING
DO NOT OVERTIGHTEN
i
TIP!
To ensure the towel
rail and shelf are
horizontal, mark
the wall using one
wall plate and
use a spirit level
of the other using
the recommended
wall plate centre
guides.
to find the position
RECOMMENDED TOWEL
RAIL WALL PLATE CENTRES
RECOMMENDED SHELF
WALL PLATE CENTRES
i
CHECK
LEVEL
440mm
600mm
NOTE
Wall plugs supplied
are suitable for a
solid wall fixing
specialist fixings
only.
For cavity walls or
plasterboard use
available from all
good DIY stores.
TIP!
To help line up
and fix the towel
rail and shelf
brackets to the
wall plates, loosen
the grub screws
on the underside
of each pillar and
adjust width as
necessary.
WHEN DRILLING NEW HOLES
Using a pencil mark the
screw hole centres for
the wall plates 30mm
apart.
30mm
Centres
B
WMA 058 R05
wall plates tightly into
Insert wall plugs into the wall and fix the
position using the
screws supplied.

Croydex Ltd,
Central Way, Andover, Hants, SP10 5AW, UK
Tel: +44 (0) 1264 365881
Fax: +44 (0) 1264 356437
website: www.croydex.com
Email: info@croydex.co.uk
WHEN USING ADHESIVE FIXING METHOD
NOTE
BEFORE STARTING
ENSURE ALL
SURFACES ARE
CLEAN AND FREE
FROM DIRT AND
SOAP RESIDUE
PARTICULARLY IF
ADHERING TO
TILED WALLS
TIP!
To ensure the
towel rail and shelf
brackets are
positioned accurately,
use a spirit level to
draw a horizontal
line on the wall
and mark the
recommended wall
plate centres on this
line. Use these as a
guide for positioning
the wall plates.
RECOMMENDED TOWEL
RAIL WALL PLATE CENTRES
RECOMMENDED SHELF
WALL PLATE CENTRES
i
CHECK
LEVEL
440mm
600mm
Place assembled wall plate in desired
location and press firmly.
Undo locking nut and remove wall plate
leaving alignment guide stuck to wall.
When the adhesive is set,
secure product to Flexi Fix wall
plate by tightening the grub
screw underneath.
BRACKET CENTRES
Towel rail adjustment
BRACKET CENTRES
Shelf adjustment
i
CAUTION!
SLIDE BRACKETS CAREFULLY
TO AVOID SCRATCHING
DO NOT OVERTIGHTEN
i
TIP!
To help line
up and fix the
towel rail and
shelf brackets
to the wall
plates, loosen
the grub
screws on the
underside of
each pillar
and adjust
width as
necessary.
Assemble wall plate, alignment guide
and locking nut as shown.
Remove backing from adhesive
pad on alignment guide.
Apply a generous amount of adhesive
to the back of the wall plate as shown.
(each tube has enough adhesive for
two wall plates)
NOTE
must be applied
Sufficient adhesive
to give a uniform
thickness of
approximately
1.5mm when the
wall plate is
positioned against
the wall.
Carefully place the wall plate over the
alignment guide and allow the rotation
of the locking nut to secure the wall plate
in position. DO NOT PRESS IN POSITION.
Leave the adhesive to set for 24 hours.
24
LEAVE
HOURS
WMA 058 R05
BATCH CODE
BATCH CODE
NOTE
If you require replacement adhesive
please contact our customer services
department quoting the batch code
number on the adhesive tube.
C
( )
Please refer to Important A
at the front of this leaflet before proceeding
dhesive Information
/

