Page is loading ...

KEEP DIY TOOLS OUT OF THE REACH OF CHILDREN
Home Safety Advice
It is recommended that two people t the mirror to ensure that it is tted safel y.
Always take care when using power tools, particularly in the bathroom.
Always check for hidden cables and pipework before drilling and take extreme care
if there is any water in the working area.
It is advisable to use a residual current circuit breaker (RCCB).
Always wear suitable eye protection when drilling.
If the product is to be tted on a ceramic tiled wall, a ceramic drill bit should be used.
Always ensure that the drill hole passes through the central tiled area rather than
through the grouted area. To prevent damage to the tile, mask the area around the hole
with tape before drilling.
Do not strike the product with hard or sharp objects.
Do not position glass components in close contact with a heat source
.
Please follow these xing and care instructions to ensure that your product is tted safely and
that it retains its high quality nish. Please retain this leaet for future reference.
This instruction leaet applies to the following products:
QM461041 Worcester Mirror
QM441041 Chester Mirror
Product Care
To retain the best quality nish, clean product regularly with a soft damp cloth.
Do not use abrasive or chemical cleaners, as these will damage the product.
Fixing Pack Contents / Tools Required
THESE ARE SUPPLIED
WMA 086 R01
QM411041 Pendle Mirror
QM751041 Wimborne Mirror
QM741041 Romsey Mirror

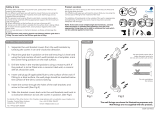
Locate the rubber grommets (a) into
the mirror holes from behind the glass.
Carefully place the mirror onto the
pillars ensuring the mirror glass holes
are aligned with the threaded studs on
the pilla r. If necessary adjust the pillar
positions to t. Thread the locking
bushes (b) onto the studs and push t
the caps (c) onto the bushes to nish
the installation.
NOTE
DO NOT OVERTIGHTEN
the locking bushes onto the
threaded studs.
40mm
Drill holes
NOTE
Wall plugs supplied
are suitable for a
solid wall xing
only.
For cavity walls or
plasterboard use
specialist xings
available from all
good DIY stores.
MIRROR INSTALLATION
A
WMA 086 R01
Croydex Ltd,
Central Way, Andover, Hants, SP10 5AW, UK
Tel: +44 (0) 1264 365881
Fax: +44 (0) 1264 356437
website: www.croydex.com
Email: [email protected]
Insert wall plugs into the wall and x the
wall plates tightly into position using the
screws supplied. Before
tightening screws ensure the
mirror hole centre marks
are located in the
middle of the
wall plate.
Secure pillars to Flexi Fix wall
plate by tightening the grub
screw underneath.
If necessary tighten or loosen
the mirro r’s tilt mechanism by
using a at head screwdrive r.
7.6.5.
1.
USE A SPIRIT LEVEL
TO CHECK LINE IS LEVEL
Pendle/Romsey - 330mm
Worcester/ Wimborne - 270mm
Place the mirror in position on the
wall surface and use as a template
to mark the hole centre positions.
MIRROR
HOLE CENTRE
Ensure the mirror hole centre marks
are located in the middle of the
wall plate and using a
pencil, mark the screw hole
centres for the wall
plates 30mm
apart.
30mm
Centres
MIRROR
HOLE CENTRE
MIRROR
HOLE CENTRE
(a)
(b)
(c)
Flexi-Fix is a registered trademark of Croydex Ltd, Andove r, Hampshire, UK
Chester - 330mm
/