•
•
•
•
•
•
•
Safety Instructions
Safety & Certications
NOTE:
•
•
•
IMPORTANT NOTES:
Radiation Exposure Statement
CAUTION:
FCC Compliance
•
•
Safety Certication
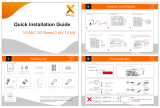
1. Mount the PVS6
2. Wire the PVS6 power
Danger! Hazardous voltages! Do not power up the system until after you
complete Sections 1 through 3.
°
•
•
•
Note:
L1
L2NGND
3. Install and wire the consumption CTs
Danger! Hazardous voltages! Do not power up the system until after you
complete Sections 1 through 3.
Refer to the Consumption Meter CT Installation Instructions.
THIS SIDE TOWARD SOURCE toward the utility meter and away from the
loads.
• L1 CT
• L2 CT
• Running CT wires:
• Extending CT leads:
L1 CT and L2 CT CONS L1 and CONS L2
Caution!
4. Verify CT voltage phases
•
•
5. Connect the system communication
Warning!
• AC modules
• SMA US-22 inverter: RS-
485 2-WIRE
• SMA US-40 inverter: LAN1
6. Connect the PVS6 to the internet
• Ethernet cable:(recommended method)
• Customer’s WiFi network:
7. Commission with the PVS Management App
• AC module or SMA US-22: LAN 1
• SMA US-40 inverter: (A or B) in
Routing wire and cable:
• Fill all openings in the enclosure with components
rated NEMA Type 4 or better to maintain the integrity
of the enclosure’s environmental system.
• do not
•
•
•
•
Kit includes:
•
•
•
•
•
You will need:
•
•
•
•
•
•
•
•
•
PVS6 Residential Installation Quick Start Guide
Refer to the Equinox Installation Guide (518101) for the
complete Equinox system installation instructions.
Intended Use:
–
Input
−OR
−
If the equipment is used in a manner not specied by SunPower, the protection provided by the equipment may be impaired.
Environmental Ratings
−°°