Page is loading ...

A product of Central Aquatics
(Division of Central Garden & Pet Company)
Franklin, WI 53132 888.255.4527
Aqueon, It’s all about the fish and QuietFlow are registered
trademarks of Central Garden & Pet Company
© 2016 Central Garden & Pet Company Made in China
Please read these instructions
in their entirety before attempting
to use this product.
QuietFlow
®
Canister Filters
Instructions
200G 100107312, 120V, 60Hz, 0.25A
300G 100107313, 120V, 60Hz, 0.45A
400G 100107314, 120V, 60Hz, 1.32A
For indoor household use only.
Aqueon
®
QuietFlow
®
Canister Filters provide efficient
and effective filtration for aquarium set ups.
Gallons Per Hour Ideal for
Model Canister Filter Description (gph) Aquariums
100107312 Aqueon
®
QuietFlow
®
Canister Filter 200G 200 gph Up to 55 Gallons
100107313 Aqueon
®
QuietFlow
®
Canister Filter 300G 300 gph Up to 75 Gallons
100107314 Aqueon
®
QuietFlow
®
Canister Filter 400G 400 gph Up to 155 Gallons

BOUCLE
D’ÉGOUTTEMENT
DRIP LOOP
2
IMPORTANT SAFETY
INSTRUCTIONS
WARNING – To guard against injury, basic safety precautions should be
observed including the following:
READ AND FOLLOW ALL
SAFETY INSTRUCTIONS
DANGER – To avoid possible electric shock, special care should be taken
since water is employed in the use of aquarium equipment. For each of the
following situations, do not attempt to repair yourself; return the appliance
to an authorized service facility for service or discard the appliance.
1. A. If the appliance shows any sign of abnormal water leakage, immediately
unplug it from the power source.
B. Carefully examine the appliance after installation. It should not be
plugged in if there is water on the parts not intended to be wet.
C. Do not operate any appliance if it has a damaged cord or plug, or
if it is malfunctioning or if it is dropped or damaged in any manner.
D. To avoid the possibility of the appliance
plug or receptacle getting wet, position
aquarium stand and tank to one side of the
wall mounted receptacle to prevent water
from dripping onto the receptacle or plug.
As shown in the figure below, a “drip loop”
should be arranged by the user for each
cord connecting an aquarium appliance to
the receptacle. The “drip loop” is the part
of the cord below the level of the
receptacle, or the connector if an extension
cord is used, to prevent water travel along
the cord and coming in contact with the
receptacle. If the plug or the receptacles do
get wet, DON’T unplug the cord.
Disconnect the fuse to the circuit breaker
that supplies power to the appliance. Then
unplug and examine for the presence of
water in the receptacle.
2. Close supervision is necessary when any appliance is used by or near
children.
3. To avoid injury, do not contact moving parts or hot parts such as heaters,
reflectors, lamp bulbs, etc.
4. Always unplug an appliance from the outlet when not in use, before
putting on or taking off parts, and before cleaning. Never yank the cord
to pull plug from the outlet. Grasp the plug and pull to disconnect.
5. Do not use an appliance for other than intended use. The use of
attachments not recommended or sold by the appliance manufacturer
may cause an unsafe condition.
6. Do not install or store the appliance where it will be exposed to the
weather or to temperatures below freezing.
7. Make sure an appliance mounted on a tank is securely installed before
operating it.
8. Read and observe all the important notices on the appliance.
9. If an extension cord is necessary, a cord with a proper rating should be
used. A cord rated for less amperes or watts than the appliance rating may
overheat. Care should be taken to arrange the cord so that it will not be
tripped over or pulled.
ONLY FOR POLARIZED ATTACHMENT PLUG APPLIANCES
10. If this appliance has a polarized plug (one blade is wider than the other)
as a safety feature, this plug will fit in a polarized outlet only one way.
If the plug does not fit fully in the outlet, reverse the plug. If it still does not
fit, contact a qualified electrician. Never use with an extension cord unless
plug can be fully inserted. Do not attempt to defeat this safety feature.
SAVE THESE INSTRUCTIONS
CONSIGNES DE SÉCURITÉ
IMPORTANTES
AVERTISSEMENT – Pour protéger contre les blessures, respecter les
consignes de sécurité de base, notamment ce qui suit :
LIRE ET RESPECTER TOUTES
LES INSTRUCTIONS DE
SÉCURITÉ.
DANGER – Pour écarter les risques de décharge électrique, faire preuve de
précautions particulières en raison de la présence d’eau dans l’aquarium.
Dans chacune des situations ci-dessous, ne pas tenter de réparer soi-même ;
renvoyer l’appareil à un centre de réparation agréé ou le mettre au rebut.
1. A. Si l’appareil présente des signes de fuites d’eau anormales, le débrancher
immédiatement de la source d’alimentation.
B. Examiner l’appareil avec soin après son installation. Ne pas le brancher
s’il y a de l’eau sur des pièces non destinées à être mouillées.
C. Ne pas utiliser un appareil s’il a un cordon ou une fiche endommagés,
s’il fonctionne mal, s’il est tombé ou s’il a été endommagé d’une
quelconque façon.
D. Pour écarter le risque de mouiller la fiche
de l’appareil ou la prise de courant, placer
le socle et la cuve de l’aquarium sur le
côté par rapport à la prise murale, afin
d’éviter que l’eau ne goutte sur la prise
ou la fiche. Prévoir une « boucle
d’égouttement », illustrée ci-dessous, sur
chaque cordon qui raccorde un appareil
de l’aquarium à la prise de courant. La
« boucle d’égouttement » est la portion
de cordon en dessous du niveau de la
prise, ou du connecteur si un cordon de
rallonge est utilisé, pour empêcher l’eau
de s’écouler le long du cordon et de venir
au contact de la prise. Si la fiche ou la
prise sont mouillées, NE PAS débrancher
le cordon. Couper l’électricité au niveau
du disjoncteur qui alimente l’appareil.
Débrancher ensuite le cordon et voir
s’il y a de l’eau dans la prise de courant.
2. Une supervision étroite est nécessaire lors de l’utilisation de tout appareil
électrique par des enfants ou à leur proximité.
3. Pour éviter les blessures, ne pas toucher de pièces en mouvement ni de
pièces chaudes telles que radiateurs, réflecteurs, ampoules, etc.
4. Toujours débrancher un appareil de la prise de courant lorsqu’il n’est pas
utilisé, avant de poser ou d’enlever des pièces et avant de le nettoyer. Ne
jamais tirer sur le cordon pour sortir la fiche de la prise. Saisir la fiche et
tirer pour débrancher.
5. Ne pas utiliser un appareil à d’autres fins que celles prévues. L’emploi
d’accessoires non recommandés ni vendus par le fabricant de l’appareil
peut produire une situation dangereuse.
6. Ne pas installer ni entreposer l’appareil dans un endroit exposé aux
intempéries ou à des températures inférieures au gel.
7. S’assurer qu’un appareil monté sur un aquarium est solidement installé
avant de le mettre en marche.
8. Lire et respecter toutes les consignes importantes figurant sur l’appareil.
9. Si un cordon de rallonge est nécessaire, utiliser un cordon de capacité
suffisante. Un cordon prévu pour des intensités (A) ou des puissances (W)
inférieures à celles de l’appareil peut surchauffer. Veiller à disposer le
cordon de manière à éviter tout risque de trébuchement ou d’arrachement.
APPAREILS À FICHE POLARISÉE SEULEMENT
10. Si cet appareil comporte une fiche polarisée (une lame plus large que
l’autre) par mesure de sécurité, cette fiche ne peut être branchée dans une
prise polarisée que dans un sens. Si la fiche ne rentre pas complètement
dans la prise, retourner la fiche. Si elle ne rentre toujours pas, contacter un
électricien qualifié. Ne jamais utiliser avec un cordon de rallonge si la fiche
ne s’enfonce par complètement. Ne pas tenter de contourner ce dispositif
de sécurité.
CONSERVER CES
INSTRUCTIONS

3
Hoses
Smaller Hose
Y Fitting
(Model 100107314 only)
Model 100107312 - 200G
Model 100107314 - 400G
Model 100107313 - 300G
Parts Diagrams
Hooked
Inlet Pipe
Filter Intake
Strainer
Outlet U Tube
L Connector
Water Director
Locking Ring
Outlet U Tube
L Connector
Spray Bar Tubes
Suction Cups
Locking Ring
Hang-on-Back (HOB) Water Polishing Unit
HOB Water
Polishing
Unit Top
HOB Water
Polishing
Unit Body
Hose Barb
Flow
Deflector
Filter
Cartridge
Holster
Leveler
Pump Head
Inlet
Port
Inlet
Port
Outlet
Port
Outlet
Port
Vent Cap
Quick Disconnect Valves
Filter Media Basket
Filter Media Basket
Filter Media Basket
Filter Plate
Canister Body
Locking
Ring
Extender

4
Note: for optimal filtration effectiveness it is best to arrange the media as follows:
100107312 (200gph) 100107313 (300gph) 100107314 (400gph)
Top Media Basket Foam pad Foam pad and carbon Foam pad
Middle Media Basket Activated carbon Not applicable Activated carbon
Bottom Media Basket Bio-Ceramic Rings and Bio-Balls Bio-Ceramic Rings and Bio-Balls Bio-Ceramic Rings and Bio-Balls
Important Setup Requirements
NOTE: This canister is gravity fed; for it to function properly, please
follow setup requirements.
- Canister must not be more than 4.5 feet below the aquarium
water level.
- Do not install canister filter above the aquarium water level.
- The water line should never be more than 8 inches below the frame
of the aquarium.
- Hosing should be straight to allow for easy water flow. Hosing should
not have twists or major bends.
Arranging Media
NOTE: Media is individually prepacked in the Filter Media Baskets located within the
Canister Body. The media needs to be removed from packaging, rinsed under cold
water and deposited directly into the Filter Media Baskets. Follow these steps.
1. Unlock all 4 Pump Head Clips and pull Pump Head upward to remove from
Canister Body.
2. Remove Top Filter Plate; doing this will grant access to the Filter Media Baskets.
Make note of the order in which the baskets are placed.
3. Reach into the Canister Body to remove media by lifting up on the center handle.
Empty the contents of each media into their respective basket. In most cases, each
basket will hold only one type of media.
4. Return Filter Media Baskets to Canister Body. Make sure the basket handles are
completely lowered and the water downspout holes are aligned. This will ensure
baskets stack properly within the canister.
5. Return Filter Plate to top of the Filter Media Baskets aligning the holes.
6. Return Pump Head into place. It should align with holes in the Top Filter Plate.
7. Lock all 4 Pump Head Clips.
Canister
Body
Pump Head
Pump Head
Clips
Top
Filter Plate
Top
Media
Basket
Middle
Media
Basket
Bottom
Media
Basket
Water
Downspout
Holes
Top
Filter Plate
Top
Media
Basket
Middle
Media
Basket
Bottom
Media
Basket
Water
Downspout
Holes
Top
Filter Plate
Middle
Media
Basket
Bottom
Media
Basket
Water
Downspout
Holes
Instructions
4.5 ft
MAX

5
Connect INTAKE Mechanism
1. Connect one of the long flexible tubes to the
Hooked Inlet Pipe. Push tube as far up as
possible to help provide a secure seal. Then
twist Locking Ring to securely fasten hose to
Inlet Pipe.
2. Connect Filter Intake Strainer to opposite end
of the Hooked Inlet Pipe.
3. Place Hooked Inlet Pipe mechanism on the rim
of the aquarium. The Filter Intake Strainer
should rest towards the center to bottom of the
aquarium.
NOTE: If needed, the Inlet Pipe can be
extended to accomodate the depth of your
aquarium. Simply pull Filter Intake Strainer
to extend.
5. Attach the other end of the flexible tube to one
of the Quick Disconnect Valves. Push tube as
far up as possible to help provide a secure seal.
Then twist Locking Ring to securely fasten
tube to Quick Disconnect Valve. (Figure 1)
6. Attach Quick Disconnect Valve assembly to
the threaded inlet port on the Pump Head
labeled “IN”. Make sure the Quick Disconnect
Valve is fully threaded onto the pump head.
Hooked
Inlet Pipe
Long
Flexible
Tube
Locking Ring
Extender
Filter Intake Strainer
Quick Disconnect Valve
Locking
Ring
Quick
Disconnect
Valve
FIGURE 1
Water
Polishing
Unit
Long
Flexible
Tube
Y Fitting
Quick
Disconnect
Valve
FIGURE 2
Locking
Ring
Quick
Disconnect
Valve
FIGURE 3
Connect OUTPUT Mechanism
Aqueon
®
QuietFlow
®
Canister Filters feature three
options for returning the water to the aquarium.
1. Connecting Hang-on-Back (HOB) Water
Polishing Unit to OUTPUT
a. Connect the other long flexible tube to the hose
barb on the bottom of the Water Polishing Unit(s).
Push tube as far up as possible to help provide a
seal. Secure with Locking Ring.
NOTE: For Model 100107314 you will need to do
this twice with the two shorter pieces of tubing.
Secure by pushing hose over barbed ends of
Y Fitting. (Figure 2)
b. Place the Water Polishing Unit(s) on the back rim
of aquarium tank. Be sure the sloped front of the
unit is facing forward towards the center of the
tank. This ensures that water will be returned back
into the aquarium.
c. Remove large filter cartridge(s) from plastic bag(s),
rinse under cold water and insert into Water
Polishing Unit(s).
d. Connect the other end of the flexible tube to the
hose barb on the Quick Disconnect Valve. Push
tube as far up as possible to help provide a secure
seal. Then twist Locking Ring to securely fasten
tube to Quick Disconnect Valve. (Figure 3)
e. Attach Quick Disconnect Valve assembly to the
threaded outlet port on the Pump Head labeled
“OUT”. Make sure the Quick Disconnect Valve is
fully threaded onto the Pump Head. (Figure 3)
Locking Ring
Locking Ring

6
Spray Bar L Connector
Outlet
U Tube
Suction Cups
Long
Flexible
Tube
Quick
Disconnect
Valve
Locking
Ring
Quick
Disconnect
Valve
FIGURE 5
FIGURE 4
2. Connecting Spray Bar to OUTPUT
a. Connect flexible tube to the Outlet U Tube. Secure
hose by twisting Locking Ring over the end of the
hose, securely fastening onto hose.
b. Connect L Connector to opposite end of Outlet U
Tube. Then hook the Outlet U Tube onto the edge
of the aquarium so the L Connector is located within
the interior of the aquarium.
c. Locate and connect Spray Bar Tubes. To connect,
align connection points and snap together. (Figure 4)
d. Connect Spray Bar to L Connector.
e. Snap Suction Cups to the Spray Bar, spacing them
evenly to help distribute weight throughout the
length of the Spray Bar.
f. Connect the other end of the flexible tube to the hose
barb on the Quick Disconnect Valve. Push tube as far
up as possible to help provide a secure seal. Then
twist Locking Ring to securely fasten tube to Quick
Disconnect Valve. (Figure 5)
g. Attach Quick Disconnect Valve assembly to the
threaded outlet port on the Pump Head labeled
“OUT”. Make sure the Quick Disconnect Valve is
fully threaded onto the Pump Head. (Figure 5)
Locking
Ring
Quick
Disconnect
Valve
FIGURE 6
3. Connecting to Water Director OUTPUT
a. Connect flexible tube to the Outlet U Tube. Secure hose by twisting
Locking Ring over the end of the hose, securely fastening onto
hose.
b. Connect L Connector to opposite end of Outlet U Tube. Then
hook the Outlet U Tube onto the edge of the aquarium, so the
L Connector is located within the interior of the aquarium.
c. Fasten Water Director to the open end of L Connector.
f. Connect the other end of the flexible tube to the hose barb on the
Quick Disconnect Valve. Push tube as far up as possible to help
provide a secure seal. Then twist Locking Ring to securely fasten
tube to Quick Disconnect Valve. (Figure 6)
g. Attach Quick Disconnect Valve assembly to the threaded outlet
port on the Pump Head labeled “OUT”. Make sure the Quick
Disconnect Valve is fully threaded onto the Pump Head. (Figure 6)
L Connector
Water
Director
Outlet
U Tube
Long
Flexible
Tube
Quick
Disconnect
Valve
Locking Rings
Locking Rings

7
Priming Canister
In order for the filter to function properly the air must be evacuated from
the system. This process is called priming. There are several ways to prime
an Aqueon
®
QuietFlow
®
Canister Filter depending on how it is being
setup. To expedite priming of a partially filled canister, fill unit up to the
top media basket prior to attaching Pump Head.
Priming Canister Filter with the
HOB Water Polishing Unit attached
1. Remove lid from Water Polishing Unit, then slowly pour water directly
into the Housing. The amount of water poured into the HOB Housing
will vary depending on the size of the canister filter. Be sure both
Quick Disconnect Valves are in the open position. Continue filling the
HOB Housing until water will no longer flow into the canister.
2. Fill aquarium the rest of the way with water.
3. Plug the motor in. Water should pump out
of the Water Polishing Unit. Slowly at first,
increasing in flow as the remaining air is
evacuated from the canister. You will hear
a distinctive gurgling sound until the air
is completely evacuated from the system.
4. If no water is flowing out of the Water
Polishing Unit, unplug the canister filter
and wait 10 seconds. Loosen the Vent Cap
located on top of the Pump Head and
allow air trapped in the top of the
Pump Head to escape. Quickly replace
the Vent Cap once water starts to come
out of the vent funnel (Figure 7). Plug
motor back in.
FIGURE 7
Vent Cap
(closed)
Quick Disconnect
Valves
Lid
Water
Polishing
Unit
Housing
Priming Canister Filter when using Spray Bar or Water Director
1. With both Quick Disconnect Valves closed, remove Vent Cap from
the top of Pump Head. Slowly pour water into Canister Filter through
hole in the center of the Fill Funnel. The amount of water poured into
the Pump Head will vary as needed. (Figure 8)
2. Replace Vent Cap when no more water will flow into the canister.
Open the “OUT” Quick Disconnect Valve first if using the HOB
Water Polishing Unit(s). If there is any water in the line it should flow
down into the canister and purge out air in the canister. (Figure 9)
3. Make sure Vent Cap is securely tightened, then open the “IN”
Quick Disconnect Valve. (Figure 10)
4. Plug motor in. Water should begin to flow out of the water outlet.
Slowly at first, increasing as air is purged out of the system. If water
does not begin flowing immediately, unplug the motor, wait a few
seconds for air to rise, then remove the Vent Cap and vent air or
add more water as necessary. Replace the Vent Cap and plug motor
back in. Repeat purging process as needed.
When the canister has been primed the first time, it will not be
necessary to repeat the processes above to prime again after regular
filter maintenance. Simply close the Quick Disconnect Valves before
disconnecting the canister for maintenance and the siphon will be
maintained in the inlet line. After cleaning the canister and reconnecting
to the lines, open the Quick Disconnect Valve on the “IN” side first and
loosen the Vent Cap . Allow the canister to refill with water from the
aquarium. Once filled, replace the Vent Cap and then open the Quick
Disconnect Valve on the “OUT” side before plugging the motor in.
Canister will resume normal function.
Pump Head
Vent
Cap
Vent Cap
Quick Disconnect
Valves (Closed)
"OUT" Quick
Disconnect
Valve (Opened)
"IN" Quick
Disconnect
Valve (Opened)
FIGURE 8 FIGURE 9 FIGURE 10

8
Maintenance
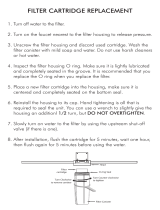
Changing/Cleaning HOB Water Polishing Unit
(Uses Large Aqueon
®
Filter Cartridge[s])
1. Remove lid from HOB Water Polishing Unit.
2. Pull cartridge and holster out of unit. Tilt sideways to allow water
to drain.
3. If not too dirty, cartridge and holster can be rinsed under tap
water to dislodge trapped dirt and debris.
4. If cartridge cannot be cleaned thoroughly or is more than 3 weeks old
it should be replaced with a new cartridge.
5. Insert cleaned/new cartridge into holster. Be sure the FRONT marking
on the cartridge is facing the holster and the notch in the bottom of
the cartridge and holster are aligned.
6. Insert the cleaned/new cartridge and holster back into the unit and
replace the cover.
7. Cartridge should be cleaned or replaced when water begins to bypass
over the top of the cartridge.
Changing/Cleaning Canister Media.
1. Unplug unit from power supply.
2. Close both the “IN” and “OUT” Quick Disconnect Valves. Separate
valves from Pump Head by unscrewing the Locking Rings.
3. Take filter to sink or outdoors for cleaning.
4. Tilt filter over to allow some water to drain out of the water inlets/
outlets. You don’t have to empty it completely.
5. Remove the media baskets one at a time. Dump out old activated
carbon in a garbage can.
6. Rinse the Bio-Ceramic Rings, the foam or any biological media to
remove trapped debris.
7. Replace carbon with or any other desired type of chemical filter media.
8. Reinsert baskets back into the canister. Be sure to align downdraft
holes with each basket.
Cleaning the Motor Unit and intake strainer.
1. Remove the impeller well cover.
2. Remove impeller and wipe down with a paper towel.
3. Replace impeller and impeller well cover.
4. Remove any debris trapped on the strainer by cleaning under
a tap or hose.
5. Thoroughly clean inside of impeller well to remove any buildup.
Excess build up can cause the motor to heat up.
Trouble Shooting
If Canister Filter does not prime...
1. Check to make sure that both Quick Disconnect Valves are open.
2. Check to make sure the downdraft holes in the filter baskets
are all aligned.
3. Check to make sure that all tubing connections are secure.
4. Check to make sure that all air is purged out of the lines according
to the priming instructions.
If Canister Filter is leaking...
1. Check to make sure all hose connections are locked on and tight.
2. Check to make sure the Vent Cap is in the locked position.
3. Check that there is not any dirt or debris between the top of the
canister body and the sealing gasket on the underside of the Pump
Head. Clean periodically and apply silicone grease to keep the gasket
supple and smooth.
4. Check to make sure the difference in height from the top of the
aquarium to the top of the canister filter is less than 6’. There is a
maximum amount of pressure that the canister clips and sealing
gasket can hold. If the differential between the canister top and top
of aquarium is too high, water will leak out of the sealing gasket
when the motor is shut off.
Helpful Hobbyist Hints:
1. There are many different ways and different media that can be used inside
a canister filter. None of these are wrong and often are entirely up to the
personal preference of the hobbyist. The recommended arrangement
described in these instructions places the coarsest media at the bottom
(upstream) of the canister with the media becoming finer and finer as you
move from upstream to downstream. The finest media is in the HOB
polisher which can be accessed and cleaned without shutting down the
canister. This arrangement traps the particulate debris in multiple layers
from largest to smallest. This is the most ideal way to reduce maintenance
on the canister and will function efficiently biologically and chemically as
any other method. Another popular method is to put the finest mechanical
media upstream (bottom) with the biological and chemical media
downstream. This will theoretically keep the biological and chemical media
from getting clogged with debris. However, this will also trap all debris on a
single layer vs. multiple layers and will require more frequent cleaning of
the canister.
2. Many hobbyists will recommend cleaning the media only in non-
chlorinated aquarium water vs. chlorinated tap water. There is nothing
wrong with this other than you lose water pressure which makes cleaning
more difficult. Cleaning the media with chlorinated tap water will kill off
some of the beneficial bacteria in the biological filter. However, the surfaces
within an established aquarium are so heavily colonized with beneficial
bacteria, that even a completely sterilized canister filter will recolonize with
beneficial bacteria within hours and any effect on water quality will be
negligible if at all.
3. If using a spray bar, it is important to keep the holes in the spray bar clean
to maximize water flow. Use a bottle or filter brush to periodically clean the
holes in the spray bar out. To provide the most dissolved oxygen in the
aquarium, the spray bar or outlet return should be placed near the water
surface so that water coming out of the canister can exchange gases at the
surface.
4. Flexible vinyl tubing becomes hard with time. Eventually the sections that
expand out over the hose barbs develop “memory” and may not seal
tightly again if removed from the hose barb. If necessary, the tubing may
need to be trimmed to remove the sections with memory and insert the
hose barbs into a new section without memory. Soaking the tubing in hot
water can soften it and make inserting the hose barbs into new and old
tubing easier.
12 MONTH LIMITED WARRANTY
WHAT THE WARRANTY COVERS:
Central Aquatics (Company) warrants this product (see Exclusions below) to
the original purchaser against defective material and workmanship that
occurs during normal use for 12 months from the date of original purchase.
Company will, at Company’s option, either repair or replace same without
charge (but no cash refunds will be made).
EXCLUSIONS:
1. Damage resulting from accident, misuse, abuse, lack of reasonable care,
subjecting the product to any but the specified electrical service, other
than normal and ordinary use of the product, subjecting the product to
abnormal working conditions or any other failure not resulting from defects
in materials or workmanship.
2. Damage resulting from modification, tampering with or attempted repair
by anyone other than the Company.
3.
Transfer of product to someone other than the original consumer purchaser.
FOR WARRANTY OR TECHNICAL SERVICE:
1. Contact the Company by mail or telephone: Central Aquatics, 5401 West
Oakwood Park Drive, Franklin, WI 53132; Telephone: (888) 255-4527 to
obtain a return authorization number.
NOTE: Be sure to provide contact information when requesting
return authorization number.
2.
Deliver, mail or ship the product, together with a copy of the original bill of
sale, to: Central Aquatics , 5401 West Oakwood Park Drive , Franklin, WI 53132
You must pay any postage, shipping charges, insurance costs and other
expenses to return the product to Central Aquatics, Franklin, WI 53132.
However, if the necessary repairs are covered by the warranty, Company will
pay the return shipping charges to any destination within the United States
or Canada.
LIMITATION OF IMPLIED WARRANTIES AND EXCLUSION OF
CERTAIN DAMAGES:
THE COMPANY DISCLAIMS LIABILITY FOR INCIDENTAL AND CONSEQUENTIAL
DAMAGES FOR BREACH OF ANY EXPRESS OR IMPLIED WARRANTY, INCLUDING
ANY IMPLIED WARRANTY OF MERCHANTABILITY, WITH RESPECT TO THIS
PRODUCT. THIS WRITING CONSTITUTES THE ENTIRE AGREEMENT OF THE
PARTIES WITH RESPECT TO THE SUBJECT MATTER HEREOF; NO WAIVER OR
AMENDMENT SHALL BE VALID UNLESS IN WRITING
SIGNED BY THE COMPANY.
Some states do not allow the exclusion or limitation
of consequential
damages, so the above limitation or exclusion may not apply to you.
/