Page is loading ...

it’s all about the fish
Aquarium
Setup Guide
1.
place aquarium on
Strong, Stable Surface 2.
add
Substrate
Rinse substrate with waterMake sure surface is level
•
Place aquarium on a sturdy, level
surface away from sunny windows,
drafts, and heating/air conditioning
vents.
•
Surface should be able to easily
support more than 150 lbs.
•
Carefully pour rinsed substrate
into middle of aquarium. Do not
use soap or cleaning agents.
•
Spread substrate evenly around
aquarium bottom to a depth of
1" - 3".
•
Create hills and valleys for
aesthetic appeal.
Welcome to the fascinating world of dwarf
freshwater shrimp! Keeping these
captivating aquatic creatures as pets is
becoming increasingly popular as they are
perfect inhabitants for planted aquariums
and desktop nano-tanks. Shrimp are always
looking for food, cleaning up uneaten
morsels or harvesting algae.
7.5G LEDShrimp
Aquarium Kit
Because of their small size, they don't
require a large aquarium, making it possible
to have a shrimp tank almost anywhere in
your home or workplace!
Because of their small size, they don't
require a large aquarium, making it possible
to have a shrimp tank almost anywhere in
your home or workplace!
it’s all about the fish
Aquarium
Setup Guide
1.
place aquarium on
Strong, Stable Surface
Make sure surface is level
•
Place aquarium on a sturdy, level
surface away from sunny windows,
drafts, and heating/air conditioning
vents.
•
Surface should be able to easily
support more than 150 lbs.
7.5G LEDShrimp
Aquarium Kit
1.
place aquarium on
Strong, Stable Surface
4.
add
Water
Add Water Conditioner as directed
Make sure surface is level
•
Place aquarium on a sturdy, level
surface away from sunny windows,
drafts, and heating/air conditioning
vents.
•
Surface should be able to easily
support more than 150 lbs.
•
Pour room-temperature water
into aquarium over hand to
avoid disturbing substrate, plants
and décor.
•
Fill aquarium with water to 1"
from top of frame.
•
Add water conditioner per
product instructions.

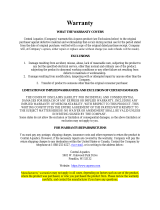
SPECIES DIFFICULTY LEVEL IDEAL TEMP IDEAL pH WATER HARDNESS
Ghost Shrimp Easy 65º-82º F 6.8 - 8.0 Moderate
(Palaemonetes paludosus)
Amano Shrimp Easy 65º-82º F 6.8 - 8.0 Moderate
(Caridina multidentata)
Cherry Shrimp Easy 65º-82º F 6.8 - 8.0 Moderate
(Neocaridina species)
Crystal and Bee Shrimp Medium 65º-78º F 6.0 - 7.0 Soft
(Caridina species)
Bamboo Shrimp Medium 72º-80º F 6.5 - 7.5 Moderate
(Atyopsis moluccensis)
Recommended Shrimp
Selecting Shrimp
There are many types of dwarf shrimp. Ghost Shrimp, Red Cherry
and Yellow Neocaridina Shrimp are best for beginners due to their
hardiness to thrive in a wide range of water parameters. Bee, Crystal
and many other Caridina shrimp, on the other hand, can be more
demanding and need more pristine water conditions to survive.
It's best to research different species before purchasing dwarf shrimp.
Java Moss Moss Balls
Java Ferns Cryptocoryne
3.
add
Plants, Décor
Rinse décor with water
•
Place plants and décor items
into aquarium in desired
location in aquarium.
•
Cover base of plants and
bottom of décor items with
substrate to hold securely
in place.
Because of their small size, they don't
require a large aquarium, making it possible
to have a shrimp tank almost anywhere in
your home or workplace!
Because of their small size, they don't
require a large aquarium, making it possible
to have a shrimp tank almost anywhere in
your home or workplace!
2.
add
Substrate 3.
add
Plants, Décor
Rinse décor with water
Rinse substrate with water
•
Carefully pour rinsed substrate
into middle of aquarium. Do not
use soap or cleaning agents.
•
Spread substrate evenly around
aquarium bottom to a depth of
1" - 3".
•
Create hills and valleys for
aesthetic appeal.
•
Place plants and décor items
into aquarium in desired
location in aquarium.
•
Cover base of plants and
bottom of décor items with
substrate to hold securely
in place.
Welcome to the fascinating world of dwarf
freshwater shrimp! Keeping these
captivating aquatic creatures as pets is
becoming increasingly popular as they are
perfect inhabitants for planted aquariums
and desktop nano-tanks. Shrimp are always
looking for food, cleaning up uneaten
morsels or harvesting algae.
Because of their small size, they don't
require a large aquarium, making it possible
to have a shrimp tank almost anywhere in
your home or workplace!
Because of their small size, they don't
require a large aquarium, making it possible
to have a shrimp tank almost anywhere in
your home or workplace!
2.
add
Substrate
3.
add
Plants, Décor
Rinse filter cartridge before use
Rinse décor with water
Rinse substrate with water
6.
add
Filter, Heater (heater not included)
•
Assemble filter and insert filter
cartridge according to included
instructions.
•
Place filter in center of aquarium
to fit in cutout area of clear lid.
•
Install heater according
to instructions.
(Heater sold separately)
Properly connect power source
5.
add
Light Hood, Clear Cover
•
Place light hood on aquarium with
cutout positioned towards the back
of the tank.
•
Place clear cover on light hood with
the cutout in the back.
•
Carefully pour rinsed substrate
into middle of aquarium. Do not
use soap or cleaning agents.
•
Spread substrate evenly around
aquarium bottom to a depth of
1" - 3".
•
Create hills and valleys for
aesthetic appeal.
•
Place plants and décor items
into aquarium in desired
location in aquarium.
•
Cover base of plants and
bottom of décor items with
substrate to hold securely
in place.
1.
place aquarium on
Strong, Stable Surface
4.
add
Water
2.
add
Substrate
Add Water Conditioner as directed
Rinse substrate with waterMake sure surface is level
•
Place aquarium on a sturdy, level
surface away from sunny windows,
drafts, and heating/air conditioning
vents.
•
Surface should be able to easily
support more than 150 lbs.
•
Pour room-temperature water
into aquarium over hand to
avoid disturbing substrate, plants
and décor.
•
Fill aquarium with water to 1"
from top of frame.
•
Add water conditioner per
product instructions.
Properly connect power source
5.
add
Light Hood, Clear Cover
•
Place light hood on aquarium with
cutout positioned towards the back
of the tank.
•
Place clear cover on light hood with
the cutout in the back.
•
Carefully pour rinsed substrate
into middle of aquarium. Do not
use soap or cleaning agents.
•
Spread substrate evenly around
aquarium bottom to a depth of
1" - 3".
•
Create hills and valleys for
aesthetic appeal.
4.
add
Water
7.
add
Shrimp Aquarium Maintenance
Add Water Conditioner as directed
WAIT TO ADD SHRIMP!
•
Pour room-temperature water
into aquarium over hand to
avoid disturbing substrate, plants
and décor.
•
Fill aquarium with water to 1"
from top of frame.
•
Add water conditioner per
product instructions.
•
Allow aquarium to stabilize for
at least 72 hours before adding shrimp.
•
Add only a few shrimp at first to
cycle the aquarium. Wait at least
30 days before adding more shrimp
or livestock.
•
Monitor ammonia and nitrate levels
regularly with a test kit.
As with any freshwater aquarium, good
filtration and water changes are essential
to the health and happiness of the aquatic life
you are keeping, and shrimp are no exception.
•
Replace the filter cartridge every two weeks.
•
Do a 10% water change every two weeks
to help maintain desireable pH, alkalinity
and nitrate levels. When doing water changes,
be sure to add water conditioner to tap water
to remove harmful chloramines.
•
Variables such as the number of shrimp,
plants, water hardness (varies by geographic
location) and excess food in the aquarium can
affect the frequency of water maintenance.
Properly connect power source
5.
add
Light Hood, Clear Cover
•
Place light hood on aquarium with
cutout positioned towards the back
of the tank.
•
Place clear cover on light hood with
the cutout in the back.
4.
add
Water
7.
add
Shrimp
Add Water Conditioner as directed
WAIT TO ADD SHRIMP!
•
Pour room-temperature water
into aquarium over hand to
avoid disturbing substrate, plants
and décor.
•
Fill aquarium with water to 1"
from top of frame.
•
Add water conditioner per
product instructions.
•
Allow aquarium to stabilize for
at least 72 hours before adding shrimp.
•
Add only a few shrimp at first to
cycle the aquarium. Wait at least
30 days before adding more shrimp
or livestock.
•
Monitor ammonia and nitrate levels
regularly with a test kit.

3.
add
Plants, Décor
Rinse filter cartridge before use
Rinse décor with water
6.
add
Filter, Heater (heater not included)
•
Assemble filter and insert filter
cartridge according to included
instructions.
•
Place filter in center of aquarium
to fit in cutout area of clear lid.
•
Install heater according
to instructions.
(Heater sold separately)
•
Place plants and décor items
into aquarium in desired
location in aquarium.
•
Cover base of plants and
bottom of décor items with
substrate to hold securely
in place.
Rinse filter cartridge before use
6.
add
Filter, Heater (heater not included)
•
Assemble filter and insert filter
cartridge according to included
instructions.
•
Place filter in center of aquarium
to fit in cutout area of clear lid.
•
Install heater according
to instructions.
(Heater sold separately)
7.
add
Shrimp
WAIT TO ADD SHRIMP!
•
Pour room-temperature water
into aquarium over hand to
avoid disturbing substrate, plants
and décor.
•
Fill aquarium with water to 1"
from top of frame.
•
Add water conditioner per
product instructions.
•
Allow aquarium to stabilize for
at least 72 hours before adding shrimp.
•
Add only a few shrimp at first to
cycle the aquarium. Wait at least
30 days before adding more shrimp
or livestock.
•
Monitor ammonia and nitrate levels
regularly with a test kit.
Aquarium Maintenance
Rinse filter cartridge before use
6.
add
Filter, Heater (heater not included)
•
Assemble filter and insert filter
cartridge according to included
instructions.
•
Place filter in center of aquarium
to fit in cutout area of clear lid.
•
Install heater according
to instructions.
(Heater sold separately)
As with any freshwater aquarium, good
filtration and water changes are essential
to the health and happiness of the aquatic life
you are keeping, and shrimp are no exception.
•
Replace the filter cartridge every two weeks.
•
Do a 10% water change every two weeks
to help maintain desireable pH, alkalinity
and nitrate levels. When doing water changes,
be sure to add water conditioner to tap water
to remove harmful chloramines.
•
Variables such as the number of shrimp,
plants, water hardness (varies by geographic
location) and excess food in the aquarium can
affect the frequency of water maintenance.
Properly connect power source
5.
add
Light Hood, Clear Cover
•
Place light hood on aquarium with
cutout positioned towards the back
of the tank.
•
Place clear cover on light hood with
the cutout in the back.
•
Carefully pour rinsed substrate
into middle of aquarium. Do not
use soap or cleaning agents.
•
Spread substrate evenly around
aquarium bottom to a depth of
1" - 3".
•
Create hills and valleys for
aesthetic appeal.

IMPORTANT SAFETY INSTRUCTIONS
WARNING - To guard against injury, basic safety precautions should be observed including
the following:
1.
READ AND FOLLOW ALL SAFETY
INSTRUCTIONS.
2. DANGER - To avoid possible electric shock, special care should be taken since water is
employed in the use of aquarium equipment. For each of the following situations, do not
attempt to repair yourself; return the appliance to an authorized service facility for service
or discard the appliance.
A. If the appliance falls into the water, DO NOT reach for it! First unplug it and then retrieve
it. If electrical components of the appliance get wet, unplug the appliance immediately.
B. Carefully examine the appliance after installation. It should not be plugged in if there is
water on parts not intended to be wet.
C. Do not operate any appliance if it has a damaged cord or plug, if it is malfunctioning
or if it is dropped or damaged in any manner.
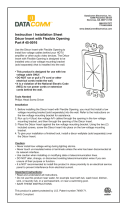
D. To avoid the possibility of the appliance
plug getting wet, position aquarium
stand and tank to one side of a wall
mounted receptacle to prevent water
from dripping onto the receptacle or
plug. A “drip loop”, shown in the gure
below, should be arranged by the user
for each cord connecting an aquarium
appliance to the receptacle. The “drip
loop” is the part of the cord below the
level of the receptacle, or the
connector if an extension cord is used,
to prevent water traveling along the
cord and coming in contact with the
receptacle.
If the plug or receptacle does get wet,
DO NOT unplug the cord. Disconnect
the fuse to the circuit breaker that
supplies power to the appliance.
Then unplug and examine for the
presence of water in the receptacle.
3. Close supervision is necessary when any
appliance is used by or near children.
4. To avoid injury, do not contact moving parts or hot parts such as heaters, reectors, lamp
bulbs, and the like.
5. Always unplug the appliance from the outlet when not in use, before putting on or taking off
parts, and before cleaning. Never yank the cord to pull plug from outlet. Grasp the plug and
pull to disconnect.
SPECIES
DIFFICULTY LEVEL
IDEAL TEMP IDEAL pH WATER HARDNESS
Ghost Shrimp Easy 65º-82º F 6.8 - 8.0 Moderate
(Palaemonetes paludosus)
Amano Shrimp Easy 65º-82º F 6.8 - 8.0 Moderate
(Caridina multidentata)
Cherry Shrimp Easy 65º-82º F 6.8 - 8.0 Moderate
(Neocaridina species)
Crystal and Bee Shrimp Medium 65º-78º F 6.0 - 7.0 Soft
(Caridina species)
Bamboo Shrimp Medium 72º-80º F 6.5 - 7.5 Moderate
(Atyopsis moluccensis)
Recommended Shrimp
Selecting Shrimp
There are many types of dwarf shrimp. Ghost Shrimp, Red Cherry
and Yellow Neocaridina Shrimp are best for beginners due to their
hardiness to thrive in a wide range of water parameters. Bee, Crystal
and many other Caridina shrimp, on the other hand, can be more
demanding and need more pristine water conditions to survive.
It's best to research different species before purchasing dwarf shrimp.
Selecting Plants
Live plants provide climbing surfaces and shelter for active shrimp
moving about in the aquarium. Décor like driftwood, stone and branches
add a dramatic touch to your aquarium environment while providing
essential surface area for beneficial bacteria and algae for shrimp to feed
on. See the plant recommendations above to help nurture your aquatic
shrimp environment.
Java Moss Moss Balls
Java Ferns Cryptocoryne
4.
add
Water
7.
add
Shrimp Aquarium Maintenance
Add Water Conditioner as directed
WAIT TO ADD SHRIMP!
•
Pour room-temperature water
into aquarium over hand to
avoid disturbing substrate, plants
and décor.
•
Fill aquarium with water to 1"
from top of frame.
•
Add water conditioner per
product instructions.
•
Allow aquarium to stabilize for
at least 72 hours before adding shrimp.
•
Add only a few shrimp at first to
cycle the aquarium. Wait at least
30 days before adding more shrimp
or livestock.
•
Monitor ammonia and nitrate levels
regularly with a test kit.
As with any freshwater aquarium, good
filtration and water changes are essential
to the health and happiness of the aquatic life
you are keeping, and shrimp are no exception.
•
Replace the filter cartridge every two weeks.
•
Do a 10% water change every two weeks
to help maintain desireable pH, alkalinity
and nitrate levels. When doing water changes,
be sure to add water conditioner to tap water
to remove harmful chloramines.
•
Variables such as the number of shrimp,
plants, water hardness (varies by geographic
location) and excess food in the aquarium can
affect the frequency of water maintenance.
Properly connect power source
5.
add
Light Hood, Clear Cover
•
Place light hood on aquarium with
cutout positioned towards the back
of the tank.
•
Place clear cover on light hood with
the cutout in the back.
4.
add
Water
7.
add
Shrimp Aquarium Maintenance
Add Water Conditioner as directed
WAIT TO ADD SHRIMP!
•
Pour room-temperature water
into aquarium over hand to
avoid disturbing substrate, plants
and décor.
•
Fill aquarium with water to 1"
from top of frame.
•
Add water conditioner per
product instructions.
•
Allow aquarium to stabilize for
at least 72 hours before adding shrimp.
•
Add only a few shrimp at first to
cycle the aquarium. Wait at least
30 days before adding more shrimp
or livestock.
•
Monitor ammonia and nitrate levels
regularly with a test kit.
As with any freshwater aquarium, good
filtration and water changes are essential
to the health and happiness of the aquatic life
you are keeping, and shrimp are no exception.
•
Replace the filter cartridge every two weeks.
•
Do a 10% water change every two weeks
to help maintain desireable pH, alkalinity
and nitrate levels. When doing water changes,
be sure to add water conditioner to tap water
to remove harmful chloramines.
•
Variables such as the number of shrimp,
plants, water hardness (varies by geographic
location) and excess food in the aquarium can
affect the frequency of water maintenance.
Properly connect power source
5.
add
Light Hood, Clear Cover
•
Place light hood on aquarium with
cutout positioned towards the back
of the tank.
•
Place clear cover on light hood with
the cutout in the back.
3.
add
Plants, Décor
Rinse filter cartridge before use
Rinse décor with water
6.
add
Filter, Heater (heater not included)
•
Assemble filter and insert filter
cartridge according to included
instructions.
•
Place filter in center of aquarium
to fit in cutout area of clear lid.
•
Install heater according
to instructions.
(Heater sold separately)
•
Place plants and décor items
into aquarium in desired
location in aquarium.
•
Cover base of plants and
bottom of décor items with
substrate to hold securely
in place.
4.
add
Water
7.
add
Shrimp
Add Water Conditioner as directed
WAIT TO ADD SHRIMP!
•
Pour room-temperature water
into aquarium over hand to
avoid disturbing substrate, plants
and décor.
•
Fill aquarium with water to 1"
from top of frame.
•
Add water conditioner per
product instructions.
•
Allow aquarium to stabilize for
at least 72 hours before adding shrimp.
•
Add only a few shrimp at first to
cycle the aquarium. Wait at least
30 days before adding more shrimp
or livestock.
•
Monitor ammonia and nitrate levels
regularly with a test kit.
7.
add
Shrimp
WAIT TO ADD SHRIMP!
•
Allow aquarium to stabilize for
at least 72 hours before adding shrimp.
•
Add only a few shrimp at first to
cycle the aquarium. Wait at least
30 days before adding more shrimp
or livestock.
•
Monitor ammonia and nitrate levels
regularly with a test kit.
7.
add
Shrimp
WAIT TO ADD SHRIMP!
•
Allow aquarium to stabilize for
at least 72 hours before adding shrimp.
•
Add only a few shrimp at first to
cycle the aquarium. Wait at least
30 days before adding more shrimp
or livestock.
•
Monitor ammonia and nitrate levels
regularly with a test kit.

A product of Central Aquatics
(Division of Central Garden & Pet Company)
Franklin, WI 53132 888.255.4527
Aqueon and It’s all about the fish
are registered trademarks of Central Garden & Pet Company
©2018 Central Garden & Pet Company
IMPORTANT SAFETY INSTRUCTIONS
WARNING - To guard against injury, basic safety precautions should be observed including
the following:
1.
READ AND FOLLOW ALL SAFETY
INSTRUCTIONS.
2. DANGER - To avoid possible electric shock, special care should be taken since water is
employed in the use of aquarium equipment. For each of the following situations, do not
attempt to repair yourself; return the appliance to an authorized service facility for service
or discard the appliance.
A. If the appliance falls into the water, DO NOT reach for it! First unplug it and then retrieve
it. If electrical components of the appliance get wet, unplug the appliance immediately.
B. Carefully examine the appliance after installation. It should not be plugged in if there is
water on parts not intended to be wet.
C. Do not operate any appliance if it has a damaged cord or plug, if it is malfunctioning
or if it is dropped or damaged in any manner.
D. To avoid the possibility of the appliance
plug getting wet, position aquarium
stand and tank to one side of a wall
mounted receptacle to prevent water
from dripping onto the receptacle or
plug. A “drip loop”, shown in the gure
below, should be arranged by the user
for each cord connecting an aquarium
appliance to the receptacle. The “drip
loop” is the part of the cord below the
level of the receptacle, or the
connector if an extension cord is used,
to prevent water traveling along the
cord and coming in contact with the
receptacle.
If the plug or receptacle does get wet,
DO NOT unplug the cord. Disconnect
the fuse to the circuit breaker that
supplies power to the appliance.
Then unplug and examine for the
presence of water in the receptacle.
3. Close supervision is necessary when any
appliance is used by or near children.
4. To avoid injury, do not contact moving parts or hot parts such as heaters, reectors, lamp
bulbs, and the like.
5. Always unplug the appliance from the outlet when not in use, before putting on or taking off
parts, and before cleaning. Never yank the cord to pull plug from outlet. Grasp the plug and
pull to disconnect.
LIMITED WARRANTY *
Aqueon warrants that this product shall be free from defective electrical components due to
defects in materials or workmanship for a period of 90 days from the date of purchase. If a
defect is shown, Aqueon will, at Aqueon’s sole discretion, either repair or replace the product
without charge. No cash refunds will be made. This warranty is provided solely to the original
consumer purchaser of the product and may not be transferred or assigned.
This warranty does not apply to damage resulting from accident, misuse, abuse, lack of
reasonable care, failure to follow safety and installation instructions, use of the product with
non-standard electrical service, or any other defect not resulting from defects in the electrical
components of the product or defects in materials or workmanship. This warranty will not be
effective unless and until the Aqueon product is shown to have been used in accordance with
the safety and installation instructions accompanying the product, including the requirement
that the product be used over a covered aquarium.
THIS CONSTITUTES AQUEON’S ENTIRE WARRANTY AND AQUEON MAKES NO OTHER
WARRANTIES, WHETHER EXPRESS OR IMPLIED, WITH RESPECT TO THE PRODUCT. AQUEON
SPECIFICALLY DISCLAIMS ANY AND ALL IMPLIED WARRANTIES, INCLUDING, WITHOUT
LIMITATION, WARRANTIES OF MERCHANTABILITY AND FITNESS FOR A PARTICULAR PURPOSE. IF
AQUEON CANNOT LAWFULLY DISCLAIM IMPLIED WARRANTIES UNDER THIS LIMITED WARRANTY,
ALL SUCH WARRANTIES, INCLUDING WARRANTIES OF MERCHANTABILITY AND FITNESS FOR A
PARTICULAR PURPOSE ARE LIMITED IN DURATION TO THE DURATION OF THIS WARRANTY.
AQUEON IS NOT RESPONSIBLE FOR DIRECT, SPECIAL, INCIDENTAL OR CONSEQUENTIAL
DAMAGES RESULTING FROM ANY BREACH OF WARRANTY OR CONDITION, OR UNDER ANY
OTHER LEGAL THEORY. AQUEON EXPRESSLY DISCLAIMS ALL ALLEGED DAMAGES FOR LOSS OF
AQUATIC LIFE, PERSONAL INJURY, AND/OR PROPERTY DAMAGE. Some states and provinces do
not allow the exclusion or limitation of incidental or consequential damages or exclusions or
limitations on the duration of implied warranties or conditions, so the above limitations or
exclusions may not apply to you. This warranty gives you specific legal rights, and you may also
have other rights that vary by state or province.
Aqueon shall not have any obligations under this warranty unless the owner notifies Aqueon in
writing of any alleged defect(s) within 30 days of discovery of the defect(s). Any notice to
Aqueon must be delivered by United States or electronic mail to one of the following addresses:
U.S. Mail:
Central Aquatics - Aqueon
5401 West Oakwood Park Drive
Franklin, Wisconsin 53132
Electronic Mail:
Aqueon shall be allowed a reasonable period of time to investigate any warranty c
laim and to
perform any testing Aqueon deems necessary to determine the cause of the defect. This
warranty shall be interpreted under the laws of the state of Wisconsin.
For additional information regarding this limited warranty, please contact us at the addresses
above, or call us at 888-255-4527.
*Lamps are not included in this warranty.
6. Do not use an appliance for other than intended use. The use of attachments not recommended
or sold by the appliance manufacturer may cause an unsafe condition.
7. Do not install or store the appliance where it will be exposed to the weather or to temperatures
below freezing.
8. Make sure an appliance mounted on a tank is securely installed before operating it.
9. Read and observe all the important notices on the appliance.
10. If an extension cord is necessary, a cord with a proper rating should be used. A cord rated for
less amperes or watts than the appliance rating may overheat. Care should be taken to arrange
the cord so that it will not be tripped over or pulled.
11. The 2 conductor power cord has a polarized plug (one blade is wider than the other). As a
safety feature, this plug will t in a polarized outlet only one way. If the plug does not t fully in
the outlet, reverse the plug. If it still does not t, contact a qualied electrician. Never use with
an extension cord unless plug can be fully inserted. Do not attempt to defeat this safety feature.
12. The appliance is intended FOR HOUSEHOLD USE ONLY. Do not use or mount this appliance in
such a way that the top vents are restricted or blocked. These vents are necessary to avoid over
heating and ensure safe operating temperatures.
13.
SAVE THESE INSTRUCTIONS.
Water Pump and AdaptorUses a
SPECIES DIFFICULTY LEVEL IDEAL TEMP IDEAL pH WATER HARDNESS
Ghost Shrimp Easy 65º-82º F 6.8 - 8.0 Moderate
(Palaemonetes paludosus)
Amano Shrimp Easy 65º-82º F 6.8 - 8.0 Moderate
(Caridina multidentata)
Cherry Shrimp Easy 65º-82º F 6.8 - 8.0 Moderate
(Neocaridina species)
Crystal and Bee Shrimp Medium 65º-78º F 6.0 - 7.0 Soft
(Caridina species)
Bamboo Shrimp Medium 72º-80º F 6.5 - 7.5 Moderate
(Atyopsis moluccensis)
Selecting Plants
Live plants provide climbing surfaces and shelter for active shrimp
moving about in the aquarium. Décor like driftwood, stone and branches
add a dramatic touch to your aquarium environment while providing
essential surface area for beneficial bacteria and algae for shrimp to feed
on. See the plant recommendations above to help nurture your aquatic
shrimp environment.
Rinse filter cartridge before use
6.
add
Filter, Heater (heater not included)
•
Assemble filter and insert filter
cartridge according to included
instructions.
•
Place filter in center of aquarium
to fit in cutout area of clear lid.
•
Install heater according
to instructions.
(Heater sold separately)
Aquarium Maintenance
Rinse filter cartridge before use
6.
add
Filter, Heater (heater not included)
•
Assemble filter and insert filter
cartridge according to included
instructions.
•
Place filter in center of aquarium
to fit in cutout area of clear lid.
•
Install heater according
to instructions.
(Heater sold separately)
As with any freshwater aquarium, good
filtration and water changes are essential
to the health and happiness of the aquatic life
you are keeping, and shrimp are no exception.
•
Replace the filter cartridge every two weeks.
•
Do a 10% water change every two weeks
to help maintain desireable pH, alkalinity
and nitrate levels. When doing water changes,
be sure to add water conditioner to tap water
to remove harmful chloramines.
•
Variables such as the number of shrimp,
plants, water hardness (varies by geographic
location) and excess food in the aquarium can
affect the frequency of water maintenance.
Properly connect power source
5.
add
Light Hood, Clear Cover
•
Place light hood on aquarium with
cutout positioned towards the back
of the tank.
•
Place clear cover on light hood with
the cutout in the back.
Aquarium Maintenance
As with any freshwater aquarium, good
filtration and water changes are essential
to the health and happiness of the aquatic life
you are keeping, and shrimp are no exception.
•
Replace the filter cartridge every two weeks.
•
Do a 10% water change every two weeks
to help maintain desireable pH, alkalinity
and nitrate levels. When doing water changes,
be sure to add water conditioner to tap water
to remove harmful chloramines.
•
Variables such as the number of shrimp,
plants, water hardness (varies by geographic
location) and excess food in the aquarium can
affect the frequency of water maintenance.
7.
add
Shrimp Aquarium Maintenance
WAIT TO ADD SHRIMP!
•
Allow aquarium to stabilize for
at least 72 hours before adding shrimp.
•
Add only a few shrimp at first to
cycle the aquarium. Wait at least
30 days before adding more shrimp
or livestock.
•
Monitor ammonia and nitrate levels
regularly with a test kit.
As with any freshwater aquarium, good
filtration and water changes are essential
to the health and happiness of the aquatic life
you are keeping, and shrimp are no exception.
•
Replace the filter cartridge every two weeks.
•
Do a 10% water change every two weeks
to help maintain desireable pH, alkalinity
and nitrate levels. When doing water changes,
be sure to add water conditioner to tap water
to remove harmful chloramines.
•
Variables such as the number of shrimp,
plants, water hardness (varies by geographic
location) and excess food in the aquarium can
affect the frequency of water maintenance.
/