Page is loading ...

it’s all about the fish
Aquarium
Setup Guide
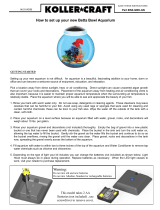
1.
place aquarium on
Strong, Stable Surface 2.
add
Gravel
Rinse gravel in colanderMake sure surface is level
•
Place aquarium on a flat, level
surface so the weight of the
aquarium is completely supported
•
Surface should be able to easily
support more than 50 lbs
•
Carefully pour rinsed gravel
into middle of aquarium
•
Spread gravel evenly around
aquarium bottom
•
Gravel depth should measure
1" - 3" from the bottom
Success Tip
1 Success Tip
2 Success Tip
3
Feeding
Give your fish one
small pinch of food
2 or 3 times per day.
Water Changes
Only change 25% of the
water once per month.
Never empty all the
water at once.
Lighting
Only keep aquarium
lights on for 8-10 hours
during the day, then
turn off at night.
8-10
Hours of Light
per day
25
%
Water Change
monthly
1 Pinch
of Food
2-3 times per day
it’s all about the fish
Aquarium
Setup Guide
1.
place aquarium on
Strong, Stable Surface 2.
add
Gravel
Rinse gravel in colanderMake sure surface is level
•
Place aquarium on a flat, level
surface so the weight of the
aquarium is completely supported
•
Surface should be able to easily
support more than 50 lbs
•
Carefully pour rinsed gravel
into middle of aquarium
•
Spread gravel evenly around
aquarium bottom
•
Gravel depth should measure
1" - 3" from the bottom
Success Tip
1 Success Tip
2 Success Tip
3
Feeding
Give your fish one
small pinch of food
2 or 3 times per day.
Water Changes
Only change 25% of the
water once per month.
Never empty all the
water at once.
Lighting
Only keep aquarium
lights on for 8-10 hours
during the day, then
turn off at night.
8-10
Hours of Light
per day
25
%
Water Change
monthly
1 Pinch
of Food
2-3 times per day
Making Success Simple
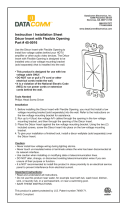
Drip Loop
See reverse for additional information.
Whenever you plug in any electrical
appliance, it's important to utilize
a "drip loop". This prevents water droplets
from reaching the electrical outlet, which
can cause a severe hazard.
To make a drip loop, follow the diagram to the right.
Simply drop the power supply cord below the level
of the outlet you're plugging it into. This way, if any
water should get on the cord, it will drip off before
it reaches the electrical outlet.
Power Supply
Cord
Drip Loop
Aquarium
Light Appliance
it’s all about the fish
Aquarium
Setup Guide
1.
place aquarium on
Strong, Stable Surface
Make sure surface is level
•
Place aquarium on a flat, level
surface so the weight of the
aquarium is completely supported
•
Surface should be able to easily
support more than 50 lbs
1.
place aquarium on
Strong, Stable Surface
4.
add
Water
Add Water Conditioner as directed
Make sure surface is level
•
Place aquarium on a flat, level
surface so the weight of the
aquarium is completely supported
•
Surface should be able to easily
support more than 50 lbs
•
Pour room-temperature water
into aquarium over hand to
avoid moving gravel, plants
and décor
•
Fill aquarium with water to 1"
from top of frame
•
Add water conditioner

Making Success Simple
Drip Loop
See reverse for additional information.
3.
add
Plants, Décor
Rinse plants and décor items
IMPORTANT SAFETY INSTRUCTIONS
WARNING - To guard against injury, basic safety precautions should be observed including
the following:
1.
READ AND FOLLOW ALL SAFETY
INSTRUCTIONS.
2. DANGER - To avoid possible electric shock, special care should be taken since water is
employed in the use of aquarium equipment. For each of the following situations, do not
attempt to repair yourself; return the appliance to an authorized service facility for service
or discard the appliance.
A. If the appliance falls into the water, DO NOT reach for it! First unplug it and then retrieve
it. If electrical components of the appliance get wet, unplug the appliance immediately.
B. Carefully examine the appliance after installation. It should not be plugged in if there is
water on parts not intended to be wet.
C. Do not operate any appliance if it has a damaged cord or plug, if it is malfunctioning
or if it is dropped or damaged in any manner.
D. To avoid the possibility of the appliance
plug getting wet, position aquarium
stand and tank to one side of a wall
mounted receptacle to prevent water
from dripping onto the receptacle or
plug. A “drip loop”, shown in the gure
below, should be arranged by the user
for each cord connecting an aquarium
appliance to the receptacle. The “drip
loop” is the part of the cord below the
level of the receptacle, or the connector
if an extension cord is used, to prevent
water traveling along the cord and
coming in contact with the receptacle.
If the plug or receptacle does get wet,
DO NOT unplug the cord. Disconnect
the fuse to the circuit breaker that
supplies power to the appliance.
Then unplug and examine for the
presence of water in the receptacle.
3. Close supervision is necessary when any
appliance is used by or near children.
4. To avoid injury, do not contact moving parts or hot parts such as heaters, reectors, lamp
bulbs, and the like.
5. Always unplug the appliance from the outlet when not in use, before putting on or taking off
parts, and before cleaning. Never yank the cord to pull plug from outlet. Grasp the plug and
pull to disconnect.
•
Place plants and décor items
into aquarium in desired
location
•
Cover base of plants and
bottom of décor items with
gravel to hold securely
in place
Whenever you plug in any electrical
appliance, it's important to utilize
a "drip loop". This prevents water droplets
from reaching the electrical outlet, which
can cause a severe hazard.
To make a drip loop, follow the diagram to the right.
Simply drop the power supply cord below the level
of the outlet you're plugging it into. This way, if any
water should get on the cord, it will drip off before
it reaches the electrical outlet.
Power Supply
Cord
Drip Loop
Aquarium
Light Appliance
Making Success Simple
Drip Loop
See reverse for additional information.
3.
add
Plants, Décor
Rinse plants and décor items
•
Place plants and décor items
into aquarium in desired
location
•
Cover base of plants and
bottom of décor items with
gravel to hold securely
in place
Whenever you plug in any electrical
appliance, it's important to utilize
a "drip loop". This prevents water droplets
from reaching the electrical outlet, which
can cause a severe hazard.
To make a drip loop, follow the diagram to the right.
Simply drop the power supply cord below the level
of the outlet you're plugging it into. This way, if any
water should get on the cord, it will drip off before
it reaches the electrical outlet.
Power Supply
Cord
Drip Loop
Aquarium
Light Appliance
Making Success Simple
Drip Loop
See reverse for additional information.
2.
add
Gravel 3.
add
Plants, Décor
Rinse plants and décor items
Rinse gravel in colander
•
Carefully pour rinsed gravel
into middle of aquarium
•
Spread gravel evenly around
aquarium bottom
•
Gravel depth should measure
1" - 3" from the bottom
•
Place plants and décor items
into aquarium in desired
location
•
Cover base of plants and
bottom of décor items with
gravel to hold securely
in place
Whenever you plug in any electrical
appliance, it's important to utilize
a "drip loop". This prevents water droplets
from reaching the electrical outlet, which
can cause a severe hazard.
To make a drip loop, follow the diagram to the right.
Simply drop the power supply cord below the level
of the outlet you're plugging it into. This way, if any
water should get on the cord, it will drip off before
it reaches the electrical outlet.
Power Supply
Cord
Drip Loop
Aquarium
Light Appliance
Success Tip
1 Success Tip
2 Success Tip
3
Feeding
Give your fish one
small pinch of food
2 or 3 times per day.
Water Changes
Only change 25% of the
water once per month.
Never empty all the
water at once.
Lighting
Only keep aquarium
lights on for 8-10 hours
during the day, then
turn off at night.
8-10
Hours of Light
per day
25
%
Water Change
monthly
1 Pinch
of Food
2-3 times per day
5.
install
Filter Hanging Bracket 6.
add
Filter
2.
add
Gravel
3.
add
Plants, Décor
Make sure all clips attach to tank
Rinse plants and décor items
Rinse gravel in colander
•
Clear any decorations from back
corner of aquarium
•
Place filter hanging bracket in
back corner of aquarium, making
sure it is pushed back as far as
possible
•
More assembly instructions
on reverse side of setup guide
Rinse filter cartridge before use
•
Assemble filter and insert
filter cartridge according to
included instructions
•
Hang filter from back of filter
hanging bracket using included clips
•
Carefully pour rinsed gravel
into middle of aquarium
•
Spread gravel evenly around
aquarium bottom
•
Gravel depth should measure
1" - 3" from the bottom
•
Place plants and décor items
into aquarium in desired
location
•
Cover base of plants and
bottom of décor items with
gravel to hold securely
in place
1.
place aquarium on
Strong, Stable Surface
4.
add
Water
5.
install
Filter Hanging Bracket
2.
add
Gravel
Make sure all clips attach to tank
Add Water Conditioner as directed
Rinse gravel in colanderMake sure surface is level
•
Place aquarium on a flat, level
surface so the weight of the
aquarium is completely supported
•
Surface should be able to easily
support more than 50 lbs
•
Pour room-temperature water
into aquarium over hand to
avoid moving gravel, plants
and décor
•
Fill aquarium with water to 1"
from top of frame
•
Add water conditioner
•
Clear any decorations from back
corner of aquarium
•
Place filter hanging bracket in
back corner of aquarium, making
sure it is pushed back as far as
possible
•
More assembly instructions
on reverse side of setup guide
•
Carefully pour rinsed gravel
into middle of aquarium
•
Spread gravel evenly around
aquarium bottom
•
Gravel depth should measure
1" - 3" from the bottom
4.
add
Water
7.
add
Light Hood 8.
add
Fish
5.
install
Filter Hanging Bracket
Make sure all clips attach to tankAdd Water Conditioner as directed
Wait 24 hours before adding sh
Place plastic panel on light hood
•
Pour room-temperature water
into aquarium over hand to
avoid moving gravel, plants
and décor
•
Fill aquarium with water to 1"
from top of frame
•
Add water conditioner
•
Place light hood on aquarium
making sure filter (and heater)
cords flow through opening
in back for proper fit
•
Plug in filter and light hood
using the "drip loop" method
(see above)
•
Touch power button to turn on light
•
Turn off light, unplug and remove light hood
•
Place fish, while in bag from store, into
aquarium, and let sit for 20 minutes
•
Open bag and add about 1/2 cup
of aquarium water, wait five minutes
and repeat
•
Carefully allow fish to enter aquarium,
top off with conditioned water, replace
light hood and plug in
•
Clear any decorations from back
corner of aquarium
•
Place filter hanging bracket in
back corner of aquarium, making
sure it is pushed back as far as
possible
•
More assembly instructions
on reverse side of setup guide
4.
add
Water
7.
add
Light Hood
Add Water Conditioner as directed
Place plastic panel on light hood
•
Pour room-temperature water
into aquarium over hand to
avoid moving gravel, plants
and décor
•
Fill aquarium with water to 1"
from top of frame
•
Add water conditioner
•
Place light hood on aquarium
making sure filter (and heater)
cords flow through opening
in back for proper fit
•
Plug in filter and light hood
using the "drip loop" method
(see above)
•
Touch power button to turn on light

A product of Central Aquatics
(Division of Central Garden & Pet Company)
Franklin, WI 53132 888.255.4527
Aqueon and It’s all about the fish are registered trademarks of Central Garden & Pet Company
©2017 Central Garden & Pet Company
IMPORTANT SAFETY INSTRUCTIONS
WARNING - To guard against injury, basic safety precautions should be observed including
the following:
1.
READ AND FOLLOW ALL SAFETY
INSTRUCTIONS.
2. DANGER - To avoid possible electric shock, special care should be taken since water is
employed in the use of aquarium equipment. For each of the following situations, do not
attempt to repair yourself; return the appliance to an authorized service facility for service
or discard the appliance.
A. If the appliance falls into the water, DO NOT reach for it! First unplug it and then retrieve
it. If electrical components of the appliance get wet, unplug the appliance immediately.
B. Carefully examine the appliance after installation. It should not be plugged in if there is
water on parts not intended to be wet.
C. Do not operate any appliance if it has a damaged cord or plug, if it is malfunctioning
or if it is dropped or damaged in any manner.
D. To avoid the possibility of the appliance
plug getting wet, position aquarium
stand and tank to one side of a wall
mounted receptacle to prevent water
from dripping onto the receptacle or
plug. A “drip loop”, shown in the gure
below, should be arranged by the user
for each cord connecting an aquarium
appliance to the receptacle. The “drip
loop” is the part of the cord below the
level of the receptacle, or the connector
if an extension cord is used, to prevent
water traveling along the cord and
coming in contact with the receptacle.
If the plug or receptacle does get wet,
DO NOT unplug the cord. Disconnect
the fuse to the circuit breaker that
supplies power to the appliance.
Then unplug and examine for the
presence of water in the receptacle.
3. Close supervision is necessary when any
appliance is used by or near children.
4. To avoid injury, do not contact moving parts or hot parts such as heaters, reectors, lamp
bulbs, and the like.
5. Always unplug the appliance from the outlet when not in use, before putting on or taking off
parts, and before cleaning. Never yank the cord to pull plug from outlet. Grasp the plug and
pull to disconnect.
LIMITED WARRANTY *
Aqueon warrants that this product shall be free from defective electrical components due to
defects in materials or workmanship for a period of 90 days from the date of purchase. If a
defect is shown, Aqueon will, at Aqueon’s sole discretion, either repair or replace the product
without charge. No cash refunds will be made. This warranty is provided solely to the original
consumer purchaser of the product and may not be transferred or assigned.
This warranty does not apply to damage resulting from accident, misuse, abuse, lack of
reasonable care, failure to follow safety and installation instructions, use of the product with
non-standard electrical service, or any other defect not resulting from defects in the electrical
components of the product or defects in materials or workmanship. This warranty will not be
effective unless and until the Aqueon product is shown to have been used in accordance with
the safety and installation instructions accompanying the product, including the requirement
that the product be used over a covered aquarium.
THIS CONSTITUTES AQUEON’S ENTIRE WARRANTY AND AQUEON MAKES NO OTHER
WARRANTIES, WHETHER EXPRESS OR IMPLIED, WITH RESPECT TO THE PRODUCT. AQUEON
SPECIFICALLY DISCLAIMS ANY AND ALL IMPLIED WARRANTIES, INCLUDING, WITHOUT
LIMITATION, WARRANTIES OF MERCHANTABILITY AND FITNESS FOR A PARTICULAR PURPOSE. IF
AQUEON CANNOT LAWFULLY DISCLAIM IMPLIED WARRANTIES UNDER THIS LIMITED WARRANTY,
ALL SUCH WARRANTIES, INCLUDING WARRANTIES OF MERCHANTABILITY AND FITNESS FOR A
PARTICULAR PURPOSE ARE LIMITED IN DURATION TO THE DURATION OF THIS WARRANTY.
AQUEON IS NOT RESPONSIBLE FOR DIRECT, SPECIAL, INCIDENTAL OR CONSEQUENTIAL
DAMAGES RESULTING FROM ANY BREACH OF WARRANTY OR CONDITION, OR UNDER ANY
OTHER LEGAL THEORY. AQUEON EXPRESSLY DISCLAIMS ALL ALLEGED DAMAGES FOR LOSS OF
AQUATIC LIFE, PERSONAL INJURY, AND/OR PROPERTY DAMAGE. Some states and provinces do
not allow the exclusion or limitation of incidental or consequential damages or exclusions or
limitations on the duration of implied warranties or conditions, so the above limitations or
exclusions may not apply to you. This warranty gives you specific legal rights, and you may also
have other rights that vary by state or province.
Aqueon shall not have any obligations under this warranty unless the owner notifies Aqueon in
writing of any alleged defect(s) within 30 days of discovery of the defect(s). Any notice to
Aqueon must be delivered by United States or electronic mail to one of the following addresses:
U.S. Mail:
Central Aquatics - Aqueon
5401 West Oakwood Park Drive
Franklin, Wisconsin 53132
Electronic Mail:
Aqueon shall be allowed a reasonable period of time to investigate any warranty claim and to
perform any testing Aqueon deems necessary to determine the cause of the defect. This
warranty shall be interpreted under the laws of the state of Wisconsin.
For additional information regarding this limited warranty, please contact us at the addresses
above, or call us at 888-255-4527.
*Lamps are not included in this warranty.
6. Do not use an appliance for other than intended use. The use of attachments not recommended
or sold by the appliance manufacturer may cause an unsafe condition.
7. Do not install or store the appliance where it will be exposed to the weather or to temperatures
below freezing.
8. Make sure an appliance mounted on a tank is securely installed before operating it.
9. Read and observe all the important notices on the appliance.
10. If an extension cord is necessary, a cord with a proper rating should be used. A cord rated for
less amperes or watts than the appliance rating may overheat. Care should be taken to arrange
the cord so that it will not be tripped over or pulled.
11. The 2 conductor power cord has a polarized plug (one blade is wider than the other). As a
safety feature, this plug will t in a polarized outlet only one way. If the plug does not t fully in
the outlet, reverse the plug. If it still does not t, contact a qualied electrician. Never use with
an extension cord unless plug can be fully inserted. Do not attempt to defeat this safety feature.
12. The appliance is intended FOR HOUSEHOLD USE ONLY. Do not use or mount this appliance in
such a way that the top vents are restricted or blocked. These vents are necessary to avoid over
heating and ensure safe operating temperatures.
13.
SAVE THESE INSTRUCTIONS.
Water Pump and AdaptorUses a
6.
add
Filter
3.
add
Plants, Décor
Rinse plants and décor items
Rinse filter cartridge before use
•
Assemble filter and insert
filter cartridge according to
included instructions
•
Hang filter from back of filter
hanging bracket using included clips
•
Place plants and décor items
into aquarium in desired
location
•
Cover base of plants and
bottom of décor items with
gravel to hold securely
in place
6.
add
Filter
Simply Succeed
Follow the Three Tips to Succeed
along with the setup guide
instructions, and you'll spend more
time enjoying a healthy aquarium
and less time maintaining it.
As an additional resource, you'll find
a variety of instructional video
segments on our website:
aqueonproducts.com/videos
Rinse filter cartridge before use
•
Assemble filter and insert
filter cartridge according to
included instructions
•
Hang filter from back of filter
hanging bracket using included clips
7.
add
Light Hood
Place plastic panel on light hood
•
Pour room-temperature water
into aquarium over hand to
avoid moving gravel, plants
and décor
•
Fill aquarium with water to 1"
from top of frame
•
Add water conditioner
•
Place light hood on aquarium
making sure filter (and heater)
cords flow through opening
in back for proper fit
•
Plug in filter and light hood
using the "drip loop" method
(see above)
•
Touch power button to turn on light
8.
add
Fish
5.
install
Filter Hanging Bracket 6.
add
Filter
Make sure all clips attach to tank
Wait 24 hours before adding sh
•
Turn off light, unplug and remove light hood
•
Place fish, while in bag from store, into
aquarium, and let sit for 20 minutes
•
Open bag and add about 1/2 cup
of aquarium water, wait five minutes
and repeat
•
Carefully allow fish to enter aquarium,
top off with conditioned water, replace
light hood and plug in
Simply Succeed
Follow the Three Tips to Succeed
along with the setup guide
instructions, and you'll spend more
time enjoying a healthy aquarium
and less time maintaining it.
As an additional resource, you'll find
a variety of instructional video
segments on our website:
aqueonproducts.com/videos
•
Clear any decorations from back
corner of aquarium
•
Place filter hanging bracket in
back corner of aquarium, making
sure it is pushed back as far as
possible
•
More assembly instructions
on reverse side of setup guide
Rinse filter cartridge before use
•
Assemble filter and insert
filter cartridge according to
included instructions
•
Hang filter from back of filter
hanging bracket using included clips

A product of Central Aquatics
(Division of Central Garden & Pet Company)
Franklin, WI 53132 888.255.4527
Aqueon and It’s all about the fish are registered trademarks of Central Garden & Pet Company
©2017 Central Garden & Pet Company
LIMITED WARRANTY *
Aqueon warrants that this product shall be free from defective electrical components due to
defects in materials or workmanship for a period of 90 days from the date of purchase. If a
defect is shown, Aqueon will, at Aqueon’s sole discretion, either repair or replace the product
without charge. No cash refunds will be made. This warranty is provided solely to the original
consumer purchaser of the product and may not be transferred or assigned.
This warranty does not apply to damage resulting from accident, misuse, abuse, lack of
reasonable care, failure to follow safety and installation instructions, use of the product with
non-standard electrical service, or any other defect not resulting from defects in the electrical
components of the product or defects in materials or workmanship. This warranty will not be
effective unless and until the Aqueon product is shown to have been used in accordance with
the safety and installation instructions accompanying the product, including the requirement
that the product be used over a covered aquarium.
THIS CONSTITUTES AQUEON’S ENTIRE WARRANTY AND AQUEON MAKES NO OTHER
WARRANTIES, WHETHER EXPRESS OR IMPLIED, WITH RESPECT TO THE PRODUCT. AQUEON
SPECIFICALLY DISCLAIMS ANY AND ALL IMPLIED WARRANTIES, INCLUDING, WITHOUT
LIMITATION, WARRANTIES OF MERCHANTABILITY AND FITNESS FOR A PARTICULAR PURPOSE. IF
AQUEON CANNOT LAWFULLY DISCLAIM IMPLIED WARRANTIES UNDER THIS LIMITED WARRANTY,
ALL SUCH WARRANTIES, INCLUDING WARRANTIES OF MERCHANTABILITY AND FITNESS FOR A
PARTICULAR PURPOSE ARE LIMITED IN DURATION TO THE DURATION OF THIS WARRANTY.
AQUEON IS NOT RESPONSIBLE FOR DIRECT, SPECIAL, INCIDENTAL OR CONSEQUENTIAL
DAMAGES RESULTING FROM ANY BREACH OF WARRANTY OR CONDITION, OR UNDER ANY
OTHER LEGAL THEORY. AQUEON EXPRESSLY DISCLAIMS ALL ALLEGED DAMAGES FOR LOSS OF
AQUATIC LIFE, PERSONAL INJURY, AND/OR PROPERTY DAMAGE. Some states and provinces do
not allow the exclusion or limitation of incidental or consequential damages or exclusions or
limitations on the duration of implied warranties or conditions, so the above limitations or
exclusions may not apply to you. This warranty gives you specific legal rights, and you may also
have other rights that vary by state or province.
Aqueon shall not have any obligations under this warranty unless the owner notifies Aqueon in
writing of any alleged defect(s) within 30 days of discovery of the defect(s). Any notice to
Aqueon must be delivered by United States or electronic mail to one of the following addresses:
U.S. Mail:
Central Aquatics - Aqueon
5401 West Oakwood Park Drive
Franklin, Wisconsin 53132
Electronic Mail:
Aqueon shall be allowed a reasonable period of time to investigate any warranty claim and to
perform any testing Aqueon deems necessary to determine the cause of the defect. This
warranty shall be interpreted under the laws of the state of Wisconsin.
For additional information regarding this limited warranty, please contact us a
t the addresses
above, or call us at 888-255-4527.
*Lamps are not included in this warranty.
8.
add
Fish
Wait 24 hours before adding sh
•
Turn off light, unplug and remove light hood
•
Place fish, while in bag from store, into
aquarium, and let sit for 20 minutes
•
Open bag and add about 1/2 cup
of aquarium water, wait five minutes
and repeat
•
Carefully allow fish to enter aquarium,
top off with conditioned water, replace
light hood and plug in
Simply Succeed
Follow the Three Tips to Succeed
along with the setup guide
instructions, and you'll spend more
time enjoying a healthy aquarium
and less time maintaining it.
As an additional resource, you'll find
a variety of instructional video
segments on our website:
aqueonproducts.com/videos
•
Clear any decorations from back
corner of aquarium
•
Place filter hanging bracket in
back corner of aquarium, making
sure it is pushed back as far as
possible
•
More assembly instructions
on reverse side of setup guide
•
Assemble filter and insert
filter cartridge according to
included instructions
•
Hang filter from back of filter
hanging bracket using included clips
A product of Central Aquatics
(Division of Central Garden & Pet Company)
Franklin, WI 53132 888.255.4527
Aqueon and It’s all about the fish
are registered trademarks of Central Garden & Pet Company
©2017 Central Garden & Pet Company
IMPORTANT SAFETY INSTRUCTIONS
WARNING - To guard against injury, basic safety precautions should be observed including
the following:
1.
READ AND FOLLOW ALL SAFETY
INSTRUCTIONS.
2. DANGER - To avoid possible electric shock, special care should be taken since water is
employed in the use of aquarium equipment. For each of the following situations, do not
attempt to repair yourself; return the appliance to an authorized service facility for service
or discard the appliance.
A. If the appliance falls into the water, DO NOT reach for it! First unplug it and then retrieve
it. If electrical components of the appliance get wet, unplug the appliance immediately.
B. Carefully examine the appliance after installation. It should not be plugged in if there is
water on parts not intended to be wet.
C. Do not operate any appliance if it has a damaged cord or plug, if it is malfunctioning
or if it is dropped or damaged in any manner.
D. To avoid the possibility of the appliance
plug getting wet, position aquarium
stand and tank to one side of a wall
mounted receptacle to prevent water
from dripping onto the receptacle or
plug. A “drip loop”, shown in the gure
below, should be arranged by the user
for each cord connecting an aquarium
appliance to the receptacle. The “drip
loop” is the part of the cord below the
level of the receptacle, or the
connector if an extension cord is used,
to prevent water traveling along the
cord and coming in contact with the
receptacle.
If the plug or receptacle does get wet,
DO NOT unplug the cord. Disconnect
the fuse to the circuit breaker that
supplies power to the appliance.
Then unplug and examine for the
presence of water in the receptacle.
3. Close supervision is necessary when any
appliance is used by or near children.
4. To avoid injury, do not contact moving parts or hot parts such as heaters, reectors, lamp
bulbs, and the like.
5. Always unplug the appliance from the outlet when not in use, before putting on or taking off
parts, and before cleaning. Never yank the cord to pull plug from outlet. Grasp the plug and
pull to disconnect.
LIMITED WARRANTY *
Aqueon warrants that this product shall be free from defective electrical components due to
defects in materials or workmanship for a period of 90 days from the date of purchase. If a
defect is shown, Aqueon will, at Aqueon’s sole discretion, either repair or replace the product
without charge. No cash refunds will be made. This warranty is provided solely to the original
consumer purchaser of the product and may not be transferred or assigned.
This warranty does not apply to damage resulting from accident, misuse, abuse, lack of
reasonable care, failure to follow safety and installation instructions, use of the product with
non-standard electrical service, or any other defect not resulting from defects in the electrical
components of the product or defects in materials or workmanship. This warranty will not be
effective unless and until the Aqueon product is shown to have been used in accordance with
the safety and installation instructions accompanying the product, including the requirement
that the product be used over a covered aquarium.
THIS CONSTITUTES AQUEON’S ENTIRE WARRANTY AND AQUEON MAKES NO OTHER
WARRANTIES, WHETHER EXPRESS OR IMPLIED, WITH RESPECT TO THE PRODUCT. AQUEON
SPECIFICALLY DISCLAIMS ANY AND ALL IMPLIED WARRANTIES, INCLUDING, WITHOUT
LIMITATION, WARRANTIES OF MERCHANTABILITY AND FITNESS FOR A PARTICULAR PURPOSE. IF
AQUEON CANNOT LAWFULLY DISCLAIM IMPLIED WARRANTIES UNDER THIS LIMITED WARRANTY,
ALL SUCH WARRANTIES, INCLUDING WARRANTIES OF MERCHANTABILITY AND FITNESS FOR A
PARTICULAR PURPOSE ARE LIMITED IN DURATION TO THE DURATION OF THIS WARRANTY.
AQUEON IS NOT RESPONSIBLE FOR DIRECT, SPECIAL, INCIDENTAL OR CONSEQUENTIAL
DAMAGES RESULTING FROM ANY BREACH OF WARRANTY OR CONDITION, OR UNDER ANY
OTHER LEGAL THEORY. AQUEON EXPRESSLY DISCLAIMS ALL ALLEGED DAMAGES FOR LOSS OF
AQUATIC LIFE, PERSONAL INJURY, AND/OR PROPERTY DAMAGE. Some states and provinces do
not allow the exclusion or limitation of incidental or consequential damages or exclusions or
limitations on the duration of implied warranties or conditions, so the above limitations or
exclusions may not apply to you. This warranty gives you specific legal rights, and you may also
have other rights that vary by state or province.
Aqueon shall not have any obligations under this warranty unless the owner notifies Aqueon in
writing of any alleged defect(s) within 30 days of discovery of the defect(s). Any notice to
Aqueon must be delivered by United States or electronic mail to one of the following addresses:
U.S. Mail:
Central Aquatics - Aqueon
5401 West Oakwood Park Drive
Franklin, Wisconsin 53132
Electronic Mail:
Aqueon shall be allowed a reasonable period of time to investigate any warranty c
laim and to
perform any testing Aqueon deems necessary to determine the cause of the defect. This
warranty shall be interpreted under the laws of the state of Wisconsin.
For additional information regarding this limited warranty, please contact us at the addresses
above, or call us at 888-255-4527.
*Lamps are not included in this warranty.
6. Do not use an appliance for other than intended use. The use of attachments not recommended
or sold by the appliance manufacturer may cause an unsafe condition.
7. Do not install or store the appliance where it will be exposed to the weather or to temperatures
below freezing.
8. Make sure an appliance mounted on a tank is securely installed before operating it.
9. Read and observe all the important notices on the appliance.
10. If an extension cord is necessary, a cord with a proper rating should be used. A cord rated for
less amperes or watts than the appliance rating may overheat. Care should be taken to arrange
the cord so that it will not be tripped over or pulled.
11. The 2 conductor power cord has a polarized plug (one blade is wider than the other). As a
safety feature, this plug will t in a polarized outlet only one way. If the plug does not t fully in
the outlet, reverse the plug. If it still does not t, contact a qualied electrician. Never use with
an extension cord unless plug can be fully inserted. Do not attempt to defeat this safety feature.
12. The appliance is intended FOR HOUSEHOLD USE ONLY. Do not use or mount this appliance in
such a way that the top vents are restricted or blocked. These vents are necessary to avoid over
heating and ensure safe operating temperatures.
13.
SAVE THESE INSTRUCTIONS.
Water Pump and AdaptorUses a

Additional Assembly Instructions
for Filter Hanging Bracket
To set the triangular grid in place,
align the half moon notches on the
grid to the back of the hanging
bracket's vertical wall. Lock into place.
Finished assembly.Place filter into the hanging bracket.
/