Page is loading ...

Quick
Start
Guide
Fill in for your records:
Serial Number:
Purchase Date:
This guide is intended to assist
with initial setup and operation of
your Lectrosonics product.
For a detailed user manual,
download the most current
version at: www.lectrosonics.com
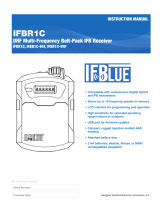
DSR4
Four Channel Digital Slot Receiver
DSR4-A1B1, DSR4-B1C1, DSR4-941, DSR4-961
23 May 2023
scan for our DSR4
Deep Dive product videos

LECTROSONICS, INC.2
IMPORTANT WARNING
The DSR4 is a high current receiver
that should not be used in a slot-mount
camera without double checking
available current from the camera.Many,
if not most, slot mount cameras are
designed for lower current receivers and
are current limited/fuse protected.The
DSR4 draws up to 700mA at 7VDC. DO
NOT drop it in the camera to “see what
happens.” Consult with your camera
manufacturer FIRST before attempting
to use this receiver in-slot.
The DSR4 is intended for use in slot
devices which can supply enough current
safely and without damage to fuses or
poly-fused circuits.
Lectrosonics will not be responsible
for damages that may result from
using this receiver in a slot mount
that cannot supply adequate current.

www.lectrosonics.com 3
Technical
Description
The DSR4 digital 4-channel re-
ceiver is a versatile slot receiver,
equally appropriate for bag use,
as well as reality TV and run and
gun applications.
Extremely high Third Order In-
tercept (IP3) performance of +15
dBm, 24-bit/48 kHz audio perfor-
mance, and AES-256 CTR mode
encryption ensure that profession-
als in all audio disciplines have
the tools needed to get the job
done, even in extremely tough
environments.
Compatibility Modes
The DSR4 receiver was designed
to operate with Lectrosonics
digital transmitters from the D2,
DCH and M2 series. The receiver
is also backward compatible with
Digital Hybrid Wireless® trans-
mitters including those with NA
Hybrid, NU Hybrid, JA HYBRID
and EU Hybrid modes.
Encryption
The DSR4 receiver features AES
256-bit, CTR mode encryption,
with 4 dierent key policies avail-
able.
Diversity Options
The DSR4 oers two diversity
options: for 4-channel operation,
each channel combines signals
from both antennas in or out
of phase, depending on eld
strength at each antenna and
which combination yields the best
results. For 2-channel opera-
tion, receivers can be paired for
Vector Diversity operation. The
Vector subsystem smoothly and
continuously combines RF signals
from both channels, with dif-
fering phase angles in order to
obtain maximum energy. The four
receivers in the DSR4 can be use
separately or combined in pairs.
RF Frequency Tracking
Front-End
In addition to the extremely high
IP3 capability of the receiver, to
signicantly reduce unwanted
interference and intermodulation
problems, the DSR4 has a fre-
quency selective front-end section
that tracks and tunes to the de-
sired signal frequency and rejects
unwanted interfering signals. The
low noise, high current RF ampli-
er was designed with feedback
regulation for stability and precise
gain in order to handle stronger
RF signals without output over-
load. This produces a robust
front-end that is as selective as
xed single frequency designs
and is suitable for use in close
proximity to other receivers and
transmitters commonly used in
eld production bag systems.
Smart Noise Reduction
(SmartNR™)
The DSR4 has been meticulously
designed using the best avail-
able low noise components and
techniques. Nonetheless, the
wide dynamic range of digital and
Hybrid transmission technology,
combined with at response to
20 kHz, makes it possible to hear
the -120 dBV noise oor in the
transmitter’s mic preamp, or the
(usually) greater noise from the
lav microphone itself. (To put this

LECTROSONICS, INC.4
in perspective, the noise gener-
ated by the recommended 4k bias
resistor of many electret lavaliere
mics is –119 dBV and the noise
level of the microphone’s elec-
tronics is much higher.) In order
to reduce this noise and thus
increase the eective dynamic
range of the system, the DSR4 is
equipped with a selectable Smart
Noise Reduction algorithm, which
removes hiss without sacricing
high frequency response.
The Smart Noise Reduction algo-
rithm works by attenuating only
those portions of the audio signal
that t a statistical prole for
randomness or “electronic hiss.”
Desired high frequency signals
having some coherence such as
speech sibilance and tones are
not aected.
The Smart Noise Reduction al-
gorithm has three modes - OFF/
NORMAL/FULL - selectable
from a user setup screen. When
switched OFF (the default set-
ting for digital compat modes)
no noise reduction is performed
and complete transparency is
preserved. All signals presented
to the transmitter’s front end,
including any faint microphone
hiss, will be faithfully reproduced
at the receiver. When switched
to NORMAL, (the factory default
setting for Hybrid modes) enough
noise reduction is applied to
remove most of the hiss from the
mic preamp and some of the hiss
from lavaliere microphones. The
noise reduction benet is dramat-
ic in this position, yet the degree
of transparency maintained is
exceptional. When switched to
FULL, enough noise reduction
is applied to remove most of the
hiss from nearly any signal source
of reasonable quality, assum-
ing levels are set properly at the
transmitter. This additional noise
reduction comes at the cost of
some transparency for low-level
room noise, yet the algorithm
remains undetectable under most
circumstances.
Audio Output Level
A setup screen is provided for ad-
justing the audio output level in 1
dB increments from -50 to +7 dBu
using the front panel MENU/SEL,
UP, and DOWN buttons.
Test Tone
To assist in matching the audio
levels of equipment connected to
the DSR4, a 1 kHz audio test tone,
adjustable from -50 to +7 dBu in 1
dB increments, is available at the
outputs. If using AES3 outputs,
the level is xed and cannot be
adjusted.
Power Supply
The DSR4 is operated from
an external DC power source
(DCR15/4AU recommended).
The receiver has a built-in Poly-
Fuse for protection. This fuse
automatically resets if the power
supply is disconnected for about
15 sec. The power section also
has protection circuits that prevent
damage to the receiver if a positive
ground power source is applied.
Power O
When the Front Panel Power/
Back button is pressed for sev-
eral seconds, the audio output is
instantly muted (squelched) and
the message “POWERING OFF...”
is displayed briey before the
receiver switches o.

www.lectrosonics.com 5
DSR4 Front
Panel Controls
MENU/SEL Button
The MENU button accesses the
available menus and selects the
desired setting.
PWR/BACK Button
The PWR/BACK button is used to
turn the receiver on and o. When
browsing menus and making
changes to settings, press PWR/
BACK to return to previous menu.
Up/Down Arrow Buttons
The UP/DOWN buttons are used
to scroll or input the various op-
tions within each menu selection.
Antenna Port (2)
TA5M Connector
Routes analog audio Channels 3
and 4 or AES3 audio channels 1-4
to the top of the unit.
IR (infrared) Port
(just under the front panel)
Settings can be transferred be-
tween transmitter and receiver or
receiver and receiver.
USB Port
(just under the front panel)
The microB USB port can be
used to connect the DSR4 to the
Lectrosonics Wireless Designer
software and to perform rmware
updates.
Main Window
Display
The Main Window displays
information concerning the RF
levels at each antenna per chan-
nel, audio modulation levels, the
condition of the Pilot Tone (Hy-
brid) or Link (digital), and power
conditions for both the receiver
and the associated transmitters. It
is also the access portal to menu
selections for setting up the
receiver and searching for clear
frequency channels. The PWR/
BACK button will cycle between
the Home screen, showing all four
channels and the channel detail
screens. Use the UP and DOWN
arrows to go between individual
channels in the Channel Detail
view.
• Antenna Icons: Status of
the diversity system.

LECTROSONICS, INC.6
• RF Signal Strength Strip
Charts: RF signal strength
indicators.
• Channel Status Indicator:
Pilot tone, link and encryption
system status.
Navigating the
Menus
From the Main Window, press
MENU/SEL to enter the menu,
then navigate with the UP and
DOWN arrows to highlight the
desired setup item. Press MENU/
SEL to enter the setup screen for
that item. Refer to the Menu Map
on the following pages.
Operating
Instructions
The following checklist includes
the minimum required settings to
start using the receiver:
• Install either a battery sled,
camera slot adapter or
other power source via EXT
BOTTOM PLATE.
• Connect power to the re-
ceiver.
• Set the COMPAT (compatibil-
ity) mode for the transmitters
to be used.
• Find clear operating frequen-
cies for one or both receivers
using SmartTune or manual
scanning.
• Set transmitters on the
matching frequencies, manu-
ally or by using IR sync.
• Verify transmitters are set to
the same compatibility mode
as the receiver (see transmit-
ter manual).
• Adjust transmitter input gain
to match voice level and
mic position (see transmitter
manual).
• Adjust receiver output level
as needed for the camera or
mixer input level desired.
IR Reector -
Purpose and
Installation
Some users, especally those who
plan to use the DSR4 in a rack
or closely-packed bag, may nd
syncing dicult due to the close
spacing near the IR window.
For these users, we include an
IR Reector (P/N 27372) and
Adhesive Strip (P/N 27373). Once
in place, this reector allows IR
sync to happen from the front of
the control panel.
Materials Needed:
IR Reector
Adhesive strip
Alcohol pad or alcohol and a
cotton swab
Tweezers (or needle nose
pliers)

www.lectrosonics.com 7
Instructions:
1) Holding the reector with twee-
zers (or pliers), swab the reector
with the alcohol pad or alcohol
on a cotton swab. Lay reector
with the at side, as shown. The
at side is where adhesive will be
placed. The oil from your ngers
will hamper adhesion, which is
why it is important not to touch
the reector.
2) Swab the area just below and
directly on either side of the IR
window on the DSR with the alco-
hol pad. This is where the reector
will be placed.
3) Carefully remove the paper
backing from the adhesive strip.
Using your tweezers/pliers, place
it sticky side up on a at surface.
Pick up the reector and lay it on
top of the adhesive strip. Press
the center and end tabs into the
adhesive with your tweezers.
4) Slowly and carefully remove
the reector from the adhesive
strip using your tweezers. It will
leave the adhesive from the strip
behind. Do not be concerned with
the “coverage,” as the reector
only needs enough adhesive to
stick to the DSR4.
5) Lay the DSR4 on a at sur-
face with adhesive facing up,
and, using your tweezers, align
the bottom edge of the reector
with the bottom of the “IR PORT”
engraving. Press rmly with
ngers to adhere the reector to
the DSR4. The bond is strong but
can be removed if needed. You
will need another adhesive strip to
re-adhere (see Accessory pages
for re-order information).

LECTROSONICS, INC.8
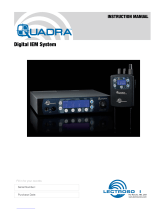
DSR4 LCD Menu Map
The menus presented on the LCD are ar-
ranged in a straightforward manner, with
those that are likely to be used more often
located at the top of the tree.
You’ll notice that the menu headers are now
in color, with symbols indicative of the menu
section.
Main Menu Tree
Frequency
to pause scan
Select Freq or Grp with arrow buttons
to toggle.
Frequency 1
607.900
Grp u
Scan to select
channel. to zoom view.
When zoomed, press MENU/SEL +
UP or DOWN for fine tuning
Scanning... 1
607.000
Clear Scan
Data
Scan
data
CLEARED
Pilot Bypass
Select option with arrow buttons
to select.
Pilot Bypass
OFF
ON
* Pilot Tone Bypass
is only available in
Hybrid Compat
Modes
PWR
BACK
Select option with arrow buttons
to select.
Talkback Talkback 1
ON
PWR
BACK
Select option with arrow buttons
to toggle.
Select option with arrow buttons
to toggle.
After scan clears it automatically
reverts to back the main menu tree.
Select Rx1-4 with arrow buttons
to toggle
between Rx
and mode options .
Compat
Mode
CompatMode 1
D2
Select option with arrow buttons
to select.
Audio
Setup
Select option with arrow buttons
to select.
Output Type
Output Type
AES3 ANLG
Select option with arrow buttons
to toggle.
Polarity
PWR
BACK
Select option with arrow buttons.
Values are Off, Norm and Full.
to select.
Smart NR PWR
BACK
to get key.
to send key.
IR &
Keys
Select option with arrow buttons
to select.
Send Freq
Send All
Get Freq
Get All
IR
SYNC
OK
IR
SYNC
OK
IR
SYNC
OK
IR
SYNC
OK
RF Setup
Group Edit Group Edit u
(empty)
MENU + å to ADD
MENU + ã to DEL
Use arrows
to toggle
and add freq
range and
groups. Use
Down Arrow
to save.
* After adding a group,
navigate to SD Card,
then Save Group,
then Save to Card to
share groups with other
units.
Group Edit u
(empty)
Vector Pairs
Vector Pairs
1&2: Paired
3&4: Not Paired
TxInfo Rx 1
Block: A1B1
Step: 25
TxInfo
Test Tone Test Tone
Level: -48dB
Freq: 1000 Hz
Select option with arrow buttons
to select.
Lock/Unlock
RX On/Off
Backlight
Backlight
Auto On Auto On?
Always on
30 Seconds
5 Seconds
Select option with arrow buttons
to select.
Enabled
Disabled
Select option with arrow buttons
to select.
TXBat Icon
Select option with arrow buttons
to select.
Select option with arrow buttons
to select.
TXBat Timer
TX Bat Timer Select option with arrow buttons
to toggle.
Time: 1:33
No Alert
Settings
TXBat Type
Select option with arrow buttons
to select.
Locked
Unlocked
Select option with arrow buttons
to select.
Lock/Unlock
MENU+å to reset
PWR
BACK
PWR
BACK
PWR
BACK
PWR
BACK
PWR
BACK
Locale Locale
About
About DSR4
Select option with arrow buttons
to select.
Band A1B1
V1.05
/1.01
Default Restore
defaults?
No
Yes
Select option with arrow buttons
to toggle.
NA
EU
AU
to go back.
PWR
BACK
Audio Level
Audio Level
1 3
2 4
+7 +00
+7 +00
1&2 3&4
Smart NR
1 3
2 4
ON OFF
OFF OFF
Polarity
1 3
2 4
POS POS
POS POS
Sync --->
Send Freq Rx1
Sync --->
Send All Rx1
Sync --->
Get Freq Rx1
Sync --->
Get All Rx1
to get key.
Group Sync
IR
SYNC
OK
to get key.
Key Type
IR
SYNC
OK
Send
Group Sync
u
Group
Universal
Key Type
RX On/Off
1 3
2 4
ON OFF
OFF OFF
TXBat Type
1 3
2 4
LB50 AAalk
9VLth LB-50
Rx1
TXBat Icon
1 TI 3
2 4
VOLT TIME
BAR BAR
Smart Tune
Smart Tune
Rx 1
Rx 2
RX 3
to select. Tx1 Range?
A1B1
A1
Use arrow buttons to toggle
through range options
to
select.
Searching...
470.600
Tuned Rx 1
525.100
Sync!
Selects an open frequency.
Choose Down Arrow to Sync.
to repeat and tune RX 2
Select option with arrow buttons

www.lectrosonics.com 9
Main Menu Tree
Frequency
to pause scan
Select Freq or Grp with arrow buttons
to toggle.
Frequency 1
607.900
Grp u
Scan to select
channel. to zoom view.
When zoomed, press MENU/SEL +
UP or DOWN for fine tuning
Scanning... 1
607.000
Clear Scan
Data
Scan
data
CLEARED
Pilot Bypass
Select option with arrow buttons
to select.
Pilot Bypass
OFF
ON
* Pilot Tone Bypass
is only available in
Hybrid Compat
Modes
PWR
BACK
Select option with arrow buttons
to select.
Talkback Talkback 1
ON
PWR
BACK
Select option with arrow buttons
to toggle.
Select option with arrow buttons
to toggle.
After scan clears it automatically
reverts to back the main menu tree.
Select Rx1-4 with arrow buttons
to toggle
between Rx
and mode options .
Compat
Mode
CompatMode 1
D2
Select option with arrow buttons
to select.
Audio
Setup
Select option with arrow buttons
to select.
Output Type
Output Type
AES3 ANLG
Select option with arrow buttons
to toggle.
Polarity
PWR
BACK
Select option with arrow buttons.
Values are Off, Norm and Full.
to select.
Smart NR PWR
BACK
to get key.
to send key.
IR &
Keys
Select option with arrow buttons
to select.
Send Freq
Send All
Get Freq
Get All
IR
SYNC
OK
IR
SYNC
OK
IR
SYNC
OK
IR
SYNC
OK
RF Setup
Group Edit Group Edit u
(empty)
MENU + å to ADD
MENU + ã to DEL
Use arrows
to toggle
and add freq
range and
groups. Use
Down Arrow
to save.
* After adding a group,
navigate to SD Card,
then Save Group,
then Save to Card to
share groups with other
units.
Group Edit u
(empty)
Vector Pairs
Vector Pairs
1&2: Paired
3&4: Not Paired
TxInfo Rx 1
Block: A1B1
Step: 25
TxInfo
Test Tone Test Tone
Level: -48dB
Freq: 1000 Hz
Select option with arrow buttons
to select.
Lock/Unlock
RX On/Off
Backlight
Backlight
Auto On Auto On?
Always on
30 Seconds
5 Seconds
Select option with arrow buttons
to select.
Enabled
Disabled
Select option with arrow buttons
to select.
TXBat Icon
Select option with arrow buttons
to select.
Select option with arrow buttons
to select.
TXBat Timer
TX Bat Timer Select option with arrow buttons
to toggle.
Time: 1:33
No Alert
Settings
TXBat Type
Select option with arrow buttons
to select.
Locked
Unlocked
Select option with arrow buttons
to select.
Lock/Unlock
MENU+å to reset
PWR
BACK
PWR
BACK
PWR
BACK
PWR
BACK
PWR
BACK
Locale Locale
About
About DSR4
Select option with arrow buttons
to select.
Band A1B1
V1.05
/1.01
Default Restore
defaults?
No
Yes
Select option with arrow buttons
to toggle.
NA
EU
AU
to go back.
PWR
BACK
Audio Level
Audio Level
1 3
2 4
+7 +00
+7 +00
1&2 3&4
Smart NR
1 3
2 4
ON OFF
OFF OFF
Polarity
1 3
2 4
POS POS
POS POS
Sync --->
Send Freq Rx1
Sync --->
Send All Rx1
Sync --->
Get Freq Rx1
Sync --->
Get All Rx1
to get key.
Group Sync
IR
SYNC
OK
to get key.
Key Type
IR
SYNC
OK
Send
Group Sync
u
Group
Universal
Key Type
RX On/Off
1 3
2 4
ON OFF
OFF OFF
TXBat Type
1 3
2 4
LB50 AAalk
9VLth LB-50
Rx1
TXBat Icon
1 TI 3
2 4
VOLT TIME
BAR BAR
Smart Tune
Smart Tune
Rx 1
Rx 2
RX 3
to select. Tx1 Range?
A1B1
A1
Use arrow buttons to toggle
through range options
to
select.
Searching...
470.600
Tuned Rx 1
525.100
Sync!
Selects an open frequency.
Choose Down Arrow to Sync.
to repeat and tune RX 2
Select option with arrow buttons

LECTROSONICS, INC.10
AMJ19
Swivelling Whip Antenna with
Standard SMA Connector, Block
19. Ships with A1B1 units only.
AMJ22
Swivelling Whip Antenna with
Standard SMA Connector, Block
22. Ships with A1B1 and B1C1
units.
AMJ25
Antenna with swiveling SMA con-
nector. Shipped with B1C1 units
only.
AMJ944
Antenna with swiveling SMA con-
nector. Shipped with 941 units
only.
AMJ961
Antenna with swiveling SMA con-
nector. Shipped with 961 units
only.
Supplied Parts
and Accessories
Optional Parts
and Accessories
21770
Male SMA to Female BNC Adapt-
er.
21926
MicroB USB cable for rmware
updates.
27372
IR Reector. To be used with
27373.
27373
Adhesive strip to be used with IR
Reector.
28979
Replacement screws (4) for 36016
DSR4 mounting bezel kit.
ACOAXTX
Antenna, Coaxial, SMA Plug;
Specify Block.
DCR15/4AU
Power Supply, 4ADC 100-240V In,
15VDC Regulated Output.
DSR4BATTSLEDBOTTOM
A “battery sled” that positions the
battery on the bottom of the re-
ceiver for mounting on the bottom
of the camera with the LCD and
rear panel nomenclature oriented
correctly. Two TA5 audio connec-
tors and one DC coaxial connec-
tor.
DSR4BATTSLEDTOP
A “battery sled” that positions the
battery on top of the receiver for
mounting on the top of the cam-
era with the LCD and rear panel
nomenclature oriented correctly.
Two TA5 audio connectors and
one DC coaxial connector.
DSR4DB25
DSR4 Superslot adapter
connector plate for Sound
Devices SL-2. This includes the
adapter plate only with the two
mounting screws plus one extra
screw.

www.lectrosonics.com 11
MCTA5TA3F2
Audio cable for portable digital
receivers, TA5F to two TA3F con-
nectors, 18” cable. For two analog
balanced receiver outputs, or
two AES digital pairs (four audio
channels), into mixer or recorder
inputs.
MCTA5TPT2
Audio cable for portable digital
receivers, TA5F to two stripped
and tinned wires, 18” cable. For
two analog balanced receiver out-
puts, or two AES digital pairs (four
audio channels).
MCSR/5PXLR2
Audio cable for SR-type receivers,
rotatable right-angle TA5 to two
3-pin male XLRs. 20” cable.
PS200A
Power Cable, 15 in., Hirose4 to
LZR
PS2200A
Power Cable, 15 in., Hirose4 to
Dual LZR
SNA600A Omni Dipole Antenna
Versatile Antenna, 100 MHz Band-
width tunable from 550 to 800
MHz. Includes mounting screws
and bracket. Requires SMA to
BNC Adapter.
DSR4EXT
Adapter kit for DSR4 re-
ceiver, two TA5 audio output
jacks, locking power con-
nector, includes 6’ power
cord. Has spare mounting
screws in dummy holes in
adapter.
DSR4EXTUSB Adapter
This kit includes an output
and power panel with two
TA5 male balanced output
pairs, and a locking Hirose-4
DC power jack. A USB-C
jack allows for connection
of the DSR4 to Wireless
Designer for monitoring,
channel setup, scanning,
and frequency coordination.
Firmware updates must be
done with the USB Micro B
connector on the top panel
of the unit. Power cord not
incl.; order PS200A or use
equivalent.
DSR4OCTOSPACER
DSR4 mounting bezel
kit with 4 screws for
Octopack and Quadpack,
no connector included.
WARNING: Do not use
Hirose 4 DC connector
on the Octopack when
mounting DSR4 receivers.
DSR4SUPER
DB-25 bottom plate adapter
for DSR4 receivers used in
SuperSlot docks. This in-
cludes: The end plate adapt-
er, blue bezel (PN 27315-1),
gasket and hardware set.

LIMITED ONE YEAR WARRANTY
The equipment is warranted for one year from date of purchase against defects in
materials or workmanship provided it was purchased from an authorized dealer. This
warranty does not cover equipment which has been abused or damaged by careless
handling or shipping. This warranty does not apply to used or demonstrator equipment.
Should any defect develop, Lectrosonics, Inc. will, at our option, repair or replace any
defective parts without charge for either parts or labor. If Lectrosonics, Inc. cannot
correct the defect in your equipment, it will be replaced at no charge with a similar new
item. Lectrosonics, Inc. will pay for the cost of returning your equipment to you.
This warranty applies only to items returned to Lectrosonics, Inc. or an authorized
dealer, shipping costs prepaid, within one year from the date of purchase.
This Limited Warranty is governed by the laws of the State of New Mexico. It states the
entire liablility of Lectrosonics Inc. and the entire remedy of the purchaser for any
breach of warranty as outlined above. NEITHER LECTROSONICS, INC. NOR
ANYONE INVOLVED IN THE PRODUCTION OR DELIVERY OF THE EQUIPMENT
SHALL BE LIABLE FOR ANY INDIRECT, SPECIAL, PUNITIVE, CONSEQUENTIAL,
OR INCIDENTAL DAMAGES ARISING OUT OF THE USE OR INABILITY TO USE
THIS EQUIPMENT EVEN IF LECTROSONICS, INC. HAS BEEN ADVISED OF THE
POSSIBILITY OF SUCH DAMAGES. IN NO EVENT SHALL THE LIABILITY OF
LECTROSONICS, INC. EXCEED THE PURCHASE PRICE OF ANY DEFECTIVE
EQUIPMENT.
This warranty gives you specific legal rights. You may have additional legal rights which
vary from state to state.
/