Page is loading ...

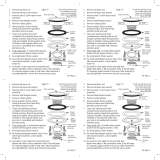
Rapid Ring plumbers putty
pre-installed! Gently pull
away and DISCARD plastic
friction washer BEFORE
setting into sink!
Rapid Ring plumbers putty
pre-installed! Gently pull
away and DISCARD plastic
friction washer BEFORE
setting into sink!
Rapid Ring plumbers putty
pre-installed! Gently pull
away and DISCARD plastic
friction washer BEFORE
setting into sink!
Rapid Ring plumbers putty
pre-installed! Gently pull
away and DISCARD plastic
friction washer BEFORE
setting into sink!
Sink
Sink
Sink
Sink
Rubber
gasket
Rubber
gasket
Rubber
gasket
Rubber
gasket
Style “D”
Style “D”
Style “D”
Style “D”
1. Remove basket.
2. Remove strainer lock screw.
3. Remove top body insert.
4. Remove plastic friction washer. Gently
pull away from Rapid Ring plumbers
putty and discard.
5. Clean sink opening and insert
complete top body insert above
sink through opening. Rapid Ring
plumbers putty pre-installed.
Simply position top body insert
centered in sink opening. Make
sure your sink is compatible with
standard plumbers putty.
6. From under sink, re-install rubber
gasket. Gasket will rest against
bottom of sink. Position body assembly.
7. Re-install strainer lock screw from
above sink. Screw into body assembly
and tighten with a deep socket or flat
screwdriver. Note: Putty will begin to
compress against inside of sink bowl.
After assembly is securely tightened,
remove and discard excess putty.
Sink
Sink
Sink
Sink
Body
assembly
Body
assembly
Body
assembly
Body
assembly
Basket
Basket
Basket
Basket
Strainer lock
screw
Strainer lock
screw
Strainer lock
screw
Strainer lock
screw
Top body
insert
Top body
insert
Top body
insert
Top body
insert
RP-INS-D
RP-INS-D
RP-INS-D
RP-INS-D
/