Page is loading ...

WINE AND BAR SERIES
Sink Installation Kit
For assistance, call 1.877.306.8930; for UK 0800.031.4069; e-mail at info@newageproducts.com

Parts Supplied
Unpacking
• Begin by placing the package on a protected at surface.
• Remove all cardboard, foam packaging material and clear plastic bags.
• Dispose / recycle all packaging materials.
• Verify all the contents in the box and gather the required tools.
See “Parts Supplied” and “Tools Needed” in the following sections
Sink Install Kit
Sink 1
Faucet Assembly 1
Top Washer with Sealing Gasket 1
2” Sealing Gasket 1
2” Metal Washer 1
Threaded Reducer 1
Plastic Fastening Sleeve 1
Tipout Tray 1
Tipout Hinge Set (Left and Right) 1
Handle Bolts (M5 x 16mm) 2
Tipout Hinge Screws (M__ x __mm) 12
2mm Spacers 2
Drain Body 1
4 -1/4” Rubber Washer 1
Drain Locking Nut 1
Plastic Tailpiece Washer 1
Tailpiece 1
Tailpiece Locking Nut 1
Removable Strainer 1
Anti-Friction Ring 1
Hot(Red) / Cold(Blue) Braided Hoses 1of Each Color
Faucet
Assembly
Sink
Sealing
Gasket
Top Washer
with
Sealing Gasket
Metal
Washer
Tip-out Tray
Plastic
Fastening
Sleeve
Threaded
Reducer
M4 X 16MM
Handle Bolt
Braided
Hose
Tip-out
Hinge
2.0mm
Spacer
M3 X 14MM
Screws
Installation Requirements
• Pressure of supply water: 0.05MPa - 1.0MPA, if greater than 1.0MPa please install pressure reducing valve.
• Temperature of supply water must be less than 90c
Drain
Locking Nut
4 -1/4”
Rubber Washer
Drain Body
Tailpiece
Locking Nut
Plastic
Tailpiece Washer
Tailpiece
Removable
Strainer
Anti-Friction
Ring

Tools Needed
1 x #2 Phillips Bit
1 x Tape Measure
1 x Cordless
Power Drill
1 x #2 Phillips Head
Screwdriver
1 x Set
Square
1
1 2 3
2
3
1 x Pencil
1 x Wood Bit
1 x Jig Saw
1 x 1-3/8”
Hole Saw
1 x Caulking Gun
1 x Silicone
1 x Plumbers Putty
Manufacturer One Year Warranty
1. Service calls to correct the installation of any NewAge products or to instruct you how to use or install them.
2. Damage resulting from improper handling or shipping of products, or products damaged by accident, misuse, abuse, re, ood,
improper installation, acts of God, neglect, corrosion, modication, mishandling or not following care instructions.
3. Repairs or replacement when your product is used in other than normal, single-family household use, such as a commercial
environment, or handled in anyway inconsistent with the installation instructions included with the product.
4. Surfaces damaged due to chemical interaction resulting in corrosion of metal.
5. Replacement parts for NewAge products outside Canada and the United States, U.K.
6. Loss of product contents due to theft, re, ood, accident or acts of God.
7. Shipping or freight fees to deliver replacement products or to return defective products.
8. Any labor costs during the limited warranty period.
When this product is installed, operated and maintained according to the instructions attached to or furnished with the product,
NewAge Products Inc. will replace the defective product or parts if the part fails as a result of defective materials or workmanship
for a period of one year from the date of purchase.
NEWAGE PRODUCTS INC. WILL NOT PAY FOR:
IMPLIED WARRANTIES, INCLUDING TO THE EXTENT APPLICABLE WARRANTIES OF MERCHANTABILITY OR FITNESS FOR A PARTICULAR PURPOSE, ARE
EXCLUDED TO THE EXTENT LEGALLY PERMISSIBLE. ANY IMPLIED WARRANTIES THAT MAY BE IMPOSED BY LAW ARE LIMITED TO ONE YEAR, OR THE SHORTEST
PERIOD ALLOWED BY LAW. SOME STATES AND PROVINCES DO NOT ALLOW LIMITATIONS OR EXCLUSIONS ON HOW LONG AN IMPLIED WARRANTY OF
MERCHANTABILITY OR FITNESS LASTS, SO THE ABOVE LIMITATIONS OR EXCLUSIONS MAY NOT APPLY TO YOU. THIS WARRANTY GIVES YOU SPECIFIC LEGAL
RIGHTS, AND YOU MAY ALSO HAVE OTHER RIGHTS WHICH VARY FROM STATE TO STATE OR PROVINCE TO PROVINCE
DISCLAIMER OF IMPLIED WARRANTIES; LIMITATION OF REMEDIES
Unpacking
• Begin by placing the package on a protected at surface.
• Remove all cardboard, foam packaging material and clear plastic bags.
• Dispose / recycle all packaging materials.
• Verify all the contents in the box and gather the required tools.
See “Parts Supplied” and “Tools Needed” in the following sections

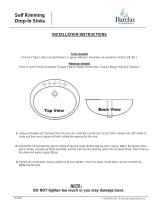
Preparing Cabinet for Sink Installation
1
Measure and mark opening to be
cut in cabinet top with a pencil.
Unfasten and remove left and
right drawer slides.
7-3/4”
5-5/8”
13”
12-3/4”
2
Removing Drawer
Press plastic triggers on underside of
drawer according to arrows in image.
2
Tilt and remove drawer.
3
Extend drawer fully.
1
Unfasten and remove both the
drawer face and the handle.
4

Drill a 1/2” hole in each corner of
the marked opening.
Use 2.0mm spacers and align the
drawer edges with the edges of
the doors.
Fasten tip-out hinges to cabinet using
four M3 x 14mm screws for each hinge.
Connect all four corner holes using a
jigsaw by cutting along the marked lines.
5/16”
from
Front
5
6
Align Edges
Install tip-out tray and handle.
Reaching through the top of the cabinet
attach drawer face to tip-out hinges
using two M3 x 14mm screws per hinge.
7
8
3
4
Bottom Flush
with Crossbar

Preparing Countertop for Sink Installation
Measure and mark opening to be cut in countertop with a pencil.
Connect all four corner holes using a
jigsaw by cutting along the marked lines.
Drill a 1/2” hole in each corner of the
marked opening.
1
2
3
4
10-3/4”
5-5/8”
10”
12-3/4”
+24” for each
additional cabinet
5-5/8”
10-3/4”
5-5/8”
10”
12-3/4”
+24” for each
additional cabinet
5-5/8”
10-3/4”
5-5/8”
10”
12-3/4”
+24” for each
additional cabinet
5-5/8”
Place worktop over cabinets and lower onto cabinets.
4 - #8 x 25mm
screws

Drill 4, 3/32” pilot holes on
interior roof of cabinet.
Tighten screws to secure cabinets.
3
5
6

Installing the Sink and Faucet
1
Remove sink and use 1-3/8”
circular saw to cut faucet hole.
Insert sink into opening and trace
faucet hole.
2
Insert the drain body into drain
opening and press into
plumber’s putty.
Apply a thin bead of plumber’s putty
to the perimeter of the drain
opening on the inside of the sink.
A
R
N
D
A
D
R
N
DRAWN
A
R
N
D
A
D
R
N
DRAWN
Drain Locking Nut
Anti-Friction Ring
Rubber Washer
From the bottom of the sink add the
rubber washer, anti-friction ring and
tighten the drain locking nut
A
R
N
D
A
D
R
N
DRAWN
Tailpiece
Tailpiece Locking Nut
Tailpiece Washer
5
6
3
4
From the bottom of the sink add the
tailpiece washer, tailpiece and tighten
with the tailpiece locking nut.

Apply silicone to bottom edge of
sink using a caulking gun.
Attach threaded reducer to the
faucet assembly.
Attach the braided hoses to the
faucet assembly.
Insert sink into opening and ensure front
edges of sink and countertop are parallel.
PARALLEL
Add top washer with sealing gasket
to assembly and insert braided
hoses into faucet hole.
Apply a small bead of silicone to
the perimeter of the sink.
7
8
9
10
11
12

From the inside of the cabinet add
the sealing gasket, metal washer and
tighten the plastic fastening sleeve.
Sealing Gasket
Metal Washer
Plastic Fastening
Sleeve
Fasten the (red) hot water braided
hose to the hot water intake angle
valve, and the (blue) cold water
braided hose to the cold water
intake angle valve.
Water Intake
Angle Valve
13
14
Attach the sink drain tailpiece to the
drain pipe outlet.
15
Turn on water and check for leaks
around drain opening.
16
For assistance connecting sink to
plumbing system please contact
your local contractor or plumber.
Use plumbers putty to stop any
water leaks around drain opening.
17
/