
AT&T 555-021-729
Issue 1
November 1991
DEFINITY® Communications System
ISDN Asynchronous Data Module
Feature Package 3
User Manual

NOTICE
While reasonable efforts were made to ensure that the information in this document was complete and
accurate at the time of printing, AT&T can assume no responsibility for any errors. Changes or
corrections to the information contained in this document may be incorporated into future reissues.
TO ORDER COPIES OF THIS MANUAL
Call: AT&T Customer Information Center on 800-432-6600
In Canada Call 800-255-1242
Write: AT&T Customer Information Center
2855 North Franklin Road
P.O. Box 19901
Indianapolis, Indiana 46219
Order: Integrated Services Digital Network (ISDN)
Asynchronous Data Module
Feature Package 3
User’s Manual
Document No. 555-021-729 Issue 1, November 1991
For more information about AT&T documents, see Business Communications Systems Publications
Catalog (555-000-010).
FCC NOTICE
This equipment has been tested and found to comply with the limits for a Class A digital device, pursuant
to Part 15 of the FCC Rules. These limits are designed to provide reasonable protection against harmful
interference when the equipment is operated in a commercial environment. This equipment generates,
uses, and can radiate radio frequency energy and, if not installed and used in accordance with the
instruction manual, may cause harmful interference to radio communications. Operation of this equipment
in a residential area is likely to cause harmful interference in which case the user will be required to
correct the interference at his own expense.
TRADEMARK NOTICE
5ESS is a registered trademark of AT&T.
Prepared by 1991 AT&T
AT&T Technical Publications Department All Rights Reserved
Middletown, New Jersey 07748 Printed in U.S.A.
1

Contents
1
Chapter 1
Introduction 1-1
Data Features 1-2
The System Administrator: An Important Note to
All Users
1-3
On the ISDN Network: An Important Note on
System Dependencies 1-3
Organization of the Users Manual 1-4
2
Chapter 2
Getting Started 2-1
Communicating With The ADM 2-1
Setting Critical Options To Make a Data Call 2-2
Making a Data Call 2-6
3
Chapter 3
Using the CMD and AT Commands 3-1
When to Type Commands 3-1
Using CMD Local Mode Commands 3-2
Using AT Local Mode Commands 3-8
4
Chapter 4
Data Options and Profiles 4-1
Data Option Definitions 4-3
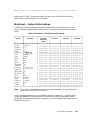
Data Option Profiles 4-15
Typical Data Option Settings for Data Transfer 4-20
5
Chapter 5
Testing 5-1

6
Chapter 6
Technical Information 6-1
EIA-232-D Lead Operation 6-1
Packet Assembler Disassembler (PAD)
Capabilities
6-4
Messages on the Voice Terminal or the Attached
Data Terminal Displays 6-7
7
Troubleshooting
Troubleshooting 7-1
Use of the Data ZAP Command to Clear a
Locked-up ADM
7-1
Use of the Self-Test to Clear a Locked-up ADM 7-2
A
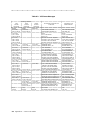
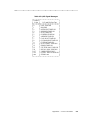
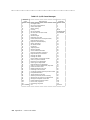
Appendix A — Cause Code Tables
Appendix A — Cause Code Tables A-1
GL
Glossary
Index

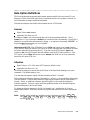
Introduction
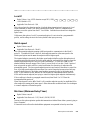
Congratulations on the addition of an Asynchronous Data Module (ADM II) to your AT&T
Integrated Services Digital Network (ISDN) set. Following our tradition of excellent quality and
high reliability, the ADM is designed to provide you with the latest in telecommunications
technology (Figure 1).
FIGURE 1-1
Rear View of Terminal with and without ADM
AT&T’s ISDN voice terminals with the addition of the ADM provide you with simultaneous
voice and data communications capabilities in one unit. As a telephone, the ISDN voice terminal
offers programmable buttons, fixed feature buttons, and a message indicator. The addition of the
ADM allows attached data terminals or personal computers to send and receive data through an
ISDN network. This user’s manual applies to AT&T’s third generation of ADM products,
referred to as Feature Package 3 (FP-3).*
* FP-3 is the first feature package designed for use with ADM II hardware. FP-1 and FP-2 were designed for use
with ADM I hardware. FP-3 can only be installed into an older FP-1 or FP-2 (ADM I) set if the ADM I circuit
board is replaced with an ADM II circuit board.
Introduction 1-1

Data Features
Asynchronous full-duplex operation at data rates from 1200 bits per second (bps) to 57.6
kilobits per second (Kbps) through an EIA-232-D interface.
X.25 packet switched data communication including receipt of X.29 commands from a
remote X.25 host for setting packet switched data parameters.
Circuit switched data communication over 56 or 64 Kbps facilities via industry standard
V.120 rate adaption protocol.
Circuit switched data communication over 64 Kbps facilities via AT&T’s DMI Mode 2 or
Mode 3 rate adaption protocols.
A user friendly command interface with on-screen help, nine programmable named data
memory numbers, and four programmable data option profiles.
A standard AT command set interface for compatibility with applications which require this
command format.
Remote and local loopback tests.
Voice Terminal Control Features
With ADM II and Feature Package 3, your ISDN set also features the Application Programming
Interface (API). This interface allows PC communications software to be used to enhance the
operability of your ISDN set. For example, the API allows a PC communications package
complete control of your ISDN set, from dialing a voice call to answering a voice call.
Some of the many things that an application program running in a PC can accomplish through the
Application Programming Interface include:
A "call screening" feature that examines the calling party number and uses a distinctive ring
based on who is calling. This allows prioritization of your incoming calls.
An automated personal phone book that looks up the number and places a call to the
specified person. The application also puts any notes about the person being called on the
computer screen so that it provides the information you need when you need it.
An automated data lookup that identifies an incoming call and searches for any data
available on the caller. The information is available on a timely basis so that you are
knowledgeable about the incoming call when you answer the telephone.
An automatic redial feature that will retry a busy telephone number and signal you when the
call goes through so that you do not have to waste time constantly redialing.
An automatic conference feature will set up a conference between several parties without the
inconvenience of looking up several numbers and placing several calls.
A variable call forwarding feature prompts the user for a name, retrieves the number from a
data base, and activates call forwarding to that number.
Any of these things, and more, could be happening simultaneously with a data call.
For more information on this interface refer to the Integrated Services Digital Network (ISDN)
Application Programming Interface (API) Programmer’s Manual, document number
533-705-200. You can order copies of this manual by calling the AT&T Customer Information
Center at 1-800-432-6600.
1-2 Chapter 1

The System Administrator: An Important Note to All
Users
Throughout this manual, we ask you to speak to your "system administrator." In your company,
it is the person who has been given overall responsibility for the ISDN — including all terminals
as well as the system. His or her title may vary from business to business. It may be "systems
manager," "telecommunications manager," "data communications manager," or something more
unique to your company.
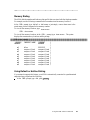
We recommend you write down the name and the phone number of your system administrator.
NAME:
PHONE:
On the ISDN Network: An Important Note on
System Dependencies
Your ADM is intended for use with the AT&T 5ESS switch. This system supports both X.25
packet switched data communication and circuit switched data communication. For X.25 packet
switched data, the system supports either dialed-up data calls (X.25 virtual circuit) or a
permanent connection (X.25 permanent virtual circuit). For circuit switched data, the system
supports only dialed-up data calls. Your ADM supports only one data call at a time, either circuit
or packet switched.
Your ADM rate adapts circuit switched data calls onto 56 or 64 Kbps channels. This is true
regardless of the asynchronous data rate of the EIA-232-D interface. Therefore communication
circuit switched data directly between two ISDN networks requires digital connectivity between
the switching systems.
Introduction 1-3

Organization of the User´s Manual
This manual is arranged into the following chapters.
Chapter 1: Introduction
Chapter 2: Getting Started — Explains how to set some data options from the keypad and
how to make a data call.
Chapter 3: Using the CMD and AT Commands — Explains when to type commands, and
how to use CMD and AT Local Mode Commands.
Chapter 4: Data Options and Profiles — Gives definitions of data options used to set up
your ADM and explains how to create data profiles.
Chapter 5: Testing — Describes local and remote loopback test procedures.
Chapter 6: Technical Information — Provides reference-type material for technical
personnel.
Chapter 7: Troubleshooting — Provides information on using the Data ZAP command and
the self-test to clear a locked-up ADM.
Appendix A: Cause Code Tables — Provides cause messages that may occur during data
call set-up.
Conventions of this Manual
The following conventions are used in this manual:
Items in rounded boxes (for example,
RETURN
), represent buttons and keys to be pressed.
Information to be entered by the user on the data terminal keyboard, for example, commands
or command options, appear in this document in this font:
DIAL 3784
.
The touch-tone keys on the voice terminal are referred to as the keypad.
Messages appearing on the terminal display or the data terminal screen are shown in this
font: Quit?
If the manual instructs you to type
H
for help,
dial
when you are making a data call, and so
forth, you can type any and all information in either lowercase or uppercase — whichever
you find easier.
Items in italics, such as nnn, represent numeric variables.
1-4 Chapter 1

Getting Started
This chapter explains how to prepare your Asynchronous Data Module (ADM) for data
operations and how to make data calls.
Communicating With The ADM
You can "talk" to the ADM through an attached data terminal by means of commands typed on
the terminal’s keyboard. There are two types of commands that can be used to talk to the ADM:
CMD and AT. CMD is the preferred method of talking to the ADM. However, if you have a
personal computer and you are using a communications package, you may need to use AT
commands because that may be the only command form that the package understands. A more
detailed explanation of these commands can be found in Chapter 3, Using the CMD and AT
Commands.
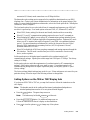
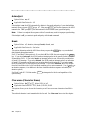
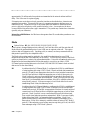
To use the commands, you must be communicating directly with the ADM in what is called
"local mode" (Figure 2-1). In local mode, characters entered at the data terminal keyboard are
read, interpreted, and acted on by the ADM. This is in contrast to the "data mode," in which the
ADM passes data from your terminal to your host computer or other data endpoint.
FIGURE 2-1
Local and Data Mode Operation
Getting Started 2-1

Local Mode
In local mode, commands typed at the data terminal keyboard are read, interpreted, and acted
upon by the ADM to make and end data calls as well as to modify data option values. There are
two varieties of local mode: local-idle and local-data. The ADM is in local-idle mode whenever
no data call has been initiated. The ADM goes into local-data mode when an established data
call is temporarily suspended by a user who wants to view or modify option values or disconnect
a call.
Data Mode
In the data mode, data from your data terminal or PC is exchanged with a host computer or other
data endpoint without interpretation by the ADM.
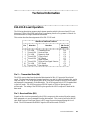
Setting Critical Options To Make a Data Call
The ADM is shipped to you with default data option settings. Depending on your particular
needs, you may need to change some of these options. This section briefly describes the four
most important data options —local mode, data mode, speed, and parity, and explains how to set
them from your ISDN set keypad. If you are unable to successfully transmit data after following
the procedures in this section, refer to Chapter 4, Data Options and Profiles for complete
information on each of the options.
You can also set these options and additional data options from an attached data terminal or PC
keyboard. These additional options may allow you to specify more precisely the configuration
which best suits your needs. For information on setting data options from an attached terminal,
see the CMD Set and Program command descriptions in Chapter 3.
Data Mode, Local Mode, Speed, and Parity Options
The data mode option setting determines whether the outgoing calls that you make will use X.25
packet switched data on the ISDN D-channel or one of several other data protocols circuit
switched on an ISDN B-channel. (For incoming calls, your ADM automatically adapts to the
data protocol in use by the compatible calling endpoint.) The D-channel X.25 packet switched
option value is DX25. The B-channel circuit switched data mode option values are: B2 (factory
setting), BA, BV64U, BV64I, BV56U, and BV56I.
Select D-channel X.25 packet switched data (DX25) for packet switched data connections.
Select B-channel AT&T Mode 2 (B2) or B-channel AT&T Mode 3/2 Adaptive (BA) for
connectivity over 64 Kbps facilities to endpoints supporting only one or both of these
protocols.
Select B-channel V.120 protocol (BV64U, BV64I, BV56U, BV56I) for connection to
equipment supporting this newer industry standard protocol. Select BV64I for error
corrected (I-frame) mode or BV64U for uncorrected (UI-frame) mode connections over
64 Kbps facilities. Select BV56I for error corrected (I-frame) mode or BV56U for
2-2 Chapter 2

uncorrected (UI-frame) mode connections over 56 Kbps facilities.
The data mode option setting must correspond to the capabilities administered on your ISDN
telephone line. Contact your System Administrator for information on the proper setting of this
option. For more detailed information on data mode, refer to the Mode option in the "Data Option
Definitions" section, Chapter 4.
The local mode option lets you select which form of commands and responses your ADM will
use after it is powered up. Local mode option values are CMD, AT, Enhanced AT, and Off.
Select CMD (factory setting) for the most user friendly interface with on-screen help.
Select AT if your PC communications package requires the use of an AT command set.
Select Enhanced AT only if you are using a PC communications package intended for use
with the AT&T ISDN Telephone Application Programming Interface. Enhanced AT mode
allows your PC to monitor and control all aspects of your ISDN voice and data telephone
service. For more information on Enhanced At, refer to the Integrated Services Digital
Network (ISDN) Application Programming Interface (API) Programmer’s Manual,
document number 533-705-200.
Select Off to disable the ADM from accepting commands and issuing responses through the
EIA interface. The Off mode is useful when your ADM is connected to a receive-only
device, such as a printer.
Set the speed option to the highest speed compatible with your data terminal or PC
communications package. Speed option values range from 1200 bps to 57.6 Kbps. The factory
setting is 9.6 Kbps.
Set the parity option to match the requirements of your data terminal or PC communications
package. Parity option values are odd, even, mark, or space. If your data terminal or PC
communications package does not require a particular parity, set the parity option to "space"
(factory setting).
The factory settings (default settings) may work for you. If these settings are not correct for your
particular set-up, follow the steps in the following sections to change them.
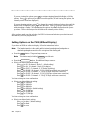
Setting Options on the 7506 or 7507 Display Sets
If you have an ISDN 7506 or 7507 set, you may find it easier to follow the instructions on the
set’s display.
Note: The handset must be in the cradle and the internal speakerphone/loudspeaker or
attached speakerphone must be off to set options from the keypad.
1 Press the
Select
button. The green lamp comes on.
Note: This button may be labeled
Shift/Select
on older sets.
2 Press the
DATA/SEND/OFF
button. No additional lamps come on.
Follow the instructions on the set’s display as described below.
3 Press
#
to view the options or
*
to change any of the options.
Getting Started 2-3

If you are viewing the options, press
#
to continue stepping through the display of all the
options. Press
*
to quit once you have viewed the options. (When viewing the options, the
currently active values are displayed.)
If you are changing options, press
*
to change the currently displayed option value until the
desired value is displayed, press
#
to save the value. Press
0
to skip to the next option
without making a change. (When changing the options, the values displayed are the power-
up values. These values may not be the same as the currently active values.)
After you have made your last selection, the ISDN set stores and activates your selections and
automatically exits the program mode.
Setting Options on the 7505 (Without Display)
If you have an ISDN set without a display, follow the instructions below.
Note: The handset must be in the cradle and the internal speakerphone/loudspeaker or
attached speakerphone must be off to set options from the keypad.
1 Press the
Select
button. The green lamp comes on.
Note: This button may be labeled
Shift/Select
on older sets.
2 Press the
DATA/SEND/OFF
button. No additional lamps come on.
3 Select your desired data mode setting.
Press
1
for B2. (B-channel: Mode 2 -- default setting)
Press
2
for BA. (B-channel: Mode 3/2 Adaptive)
Press
3
for DX25. (D-channel: X.25 Packet Switching)
Press
4
for BV64U (B-channel: V.120 @ 64 Kbps without error correction)
Press
5
for BV64I (B-channel: V.120 @ 64 Kbps: with error correction)
Press
6
for BV56U (B-channel: V.120 @ 56 Kbps: without error correction)
Press
7
for BV56I (B-channel: V.120 @ 56 Kbps: with error correction)
You hear a rising two-tone confirmation.
4 Select your desired data rate setting.
Press
2
for 1200 bps.
Press
3
for 2400 bps.
Press
4
for 4800 bps.
Press
5
for 9600 bps. (default setting)
Press
6
for 19,200 bps.
Press
7
for 38,400 bps.
Press
8
for 57,600 bps.
You hear a rising two-tone confirmation.
5 Select your desired parity setting.
Press
1
for space. (default setting)
Press
2
for mark.
Press
3
for even.
2-4 Chapter 2

Press
4
for odd.
You hear a rising two-tone confirmation.
6 Select your desired Local Mode setting.
Press
1
for CMD. (default setting)
Press
2
for off.
Press
3
for AT.
Press
4
for Enhanced AT.
You hear a rising two-tone confirmation.
After you have made your last selection, the ISDN set stores and activates your selections, and
automatically exits the program mode.
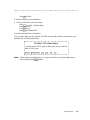
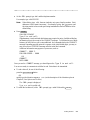
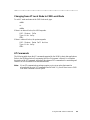
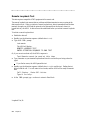
EXAMPLE (7505 without display)
To set the mode to DX25, speed to 9600, parity to even, and local
mode to CMD, press:
Select Data/Send/Off 3 5 3 1
Note: When using the procedures above, you can exit and save your option changes at any
time by pressing the
Select
button.
Getting Started 2-5

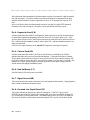
Making a Data Call
You can use the keypad of your ISDN set to initiate a data call, or you can initiate it from your
data terminal or PC. If you initiate the call from your data terminal or PC, you can use CMD
commands or AT commands. Check the documentation for your PC communications package to
determine if you need to use AT commands. The procedures for all three methods follow.
Making a Data Call from the ISDN Set
1 Turn on your data terminal or PC.
If you are using a PC, make certain your communications software is configured
properly at the speed and parity you want to use.
2 Press
DATA/SEND/OFF
.
The red lamp comes on.
3 Dial the telephone number on your ISDN set keypad.
4 Press
DATA/SEND/OFF
again.
The red lamp stays on and the green lamp blinks.
Supplementary circuit switched data features may require the entry of additional dialing
information prior to completion of the connection. To facilitate the use of these features,
the ADM allows you to dial additional digits and send them to the network by pressing
DATA/SEND/OFF
. Depending upon the network’s response to the initial dialed digits, you
may or may not receive a CONTINUE message on the 7506 or 7507 display.
Once the computer at the other end answers, both lamps remain on during the data call.
5 To end a data call press
DATA/SEND/OFF
.
Red and green lamps go off.
6 To redial the last data call, press
DATA/SEND/OFF
followed by
REDIAL
.
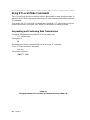
Making a Data Call From a Terminal or PC Using CMD Local
Mode Commands
The Local Mode option must be set for CMD Local Mode. See the earlier section, "Setting
Options To Make a Data Call".
1 Turn on your data terminal or PC.
If you are using a PC, make certain your communications software is configured
properly at the speed and parity you want to use. The CMD: prompt should appear on
your terminal screen.
Note: If the CMD: prompt does not appear on your data terminal or PC, the speed and
parity options in your ADM may not be matched to your data terminal or PC. Press
the
BREAK
key on your terminal keyboard followed by the letters
AT
and
RETURN
. If the CMD: prompt still does not appear, the ADM’s autoadjust option
may not be set to ON. Refer to the definition of Autoadjust in Chapter 4, Data
Options and Profiles for more information.
2-6 Chapter 2

2 At the CMD: prompt, type
dial
and the telephone number.
For example, type
dial 5551212
.
Note: When dialing, type:
dial
; then one (and only one) space; then the number. Strict
adherence to this format is necessary. For example, typing
dial
, two spaces, and
the string results in the second space being transmitted as the first character in the
dialed string.
3 Press
RETURN
.
CALLING 1234567
Type E to end call:
Supplementary circuit switched data features may require the entry of additional dialing
information prior to the receipt of the CONNECT message. To facilitate the use of these
features, the ADM allows you to enter additional dial commands before the CONNECT
message Depending upon the network’s response to the initial dialed digits, you may or
may not receive a CONTINUE message after the initial dial command.
Additional information may appear on your screen, such as:
CONNECT - MODE 2
FAR END SPEED - 9600
OR
CONNECT
DATA MODE
Once you see the CONNECT message, you should ignore the Type E to end call.
You are now ready to communicate with the far end. Enter data to be transmitted.
4 To end a data call, do one of the following:
press the
DATA/SEND/OFF
button
OR
rapidly type the Attention sequence:
+++
(see the description of the Attention option in
Chapter 4, Data Options and Profiles).
The CMD: prompt is displayed.
Type
e
or
end
to end the call.
5 To redial the last data call, at the CMD: prompt, type
redial
followed by
RETURN
.
Getting Started 2-7

Making a Data Call From a Terminal or PC Using AT Local
Mode Commands
The Local Mode data option must be set for AT Local Mode. See the earlier section, "Setting
Options To Make a Data Call".
1 Turn on your data terminal or PC.
If you are using a PC, make certain your communications software is configured
properly at the speed and parity you want to use.
2 Type
atd
and the telephone number. For example, type
atd 1234567
3 Press
RETURN
. The ADM’s response will be similar to what is shown below.
CONNECT 9600
Supplementary circuit switched data features may require the entry of additional dialing
information prior to the receipt of the CONNECT message. To facilitate the use of these
features, the ADM allows you to enter additional ATD commands before the CONNECT
message Depending upon the network’s response to the initial dialed digits, you may or may
not receive a CONTINUE message after the initial dial command.
Conventional Hayes compatible applications abort data call attempts which have not yet
connected upon receipt of any character. One consequence of allowing secondary dial
commands is that in order to terminate (abort) such a call attempt, you must issue an ATH
(hangup) command rather than typing any character.
You are now ready to communicate with the far end. Enter data to be transmitted.
4 To end a data call, do one of the following:
press the
DATA/SEND/OFF
button
OR
rapidly type the Attention sequence:
+++
(see the description of the Attention option in
Chapter 4, Data Options and Profiles).
The OK prompt is displayed.
Type
ath
to end the call
2-8 Chapter 2

Using the CMD and AT Commands
When to Type Commands
You can only type commands using the data terminal keyboard to dial calls, program, and
maintain your system when your ADM is in Local Mode. When your ADM is in CMD Local
Mode or AT Local Mode, you are not transmitting data; your ADM is interpreting and acting
upon the instructions that you type. If your Local Mode is set to CMD, then your terminal
displays the CMD: prompt while you are in Local Mode. AT Local Mode does not display any
prompt.
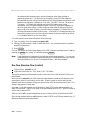
If you are on a data call, you can move to Local Data Mode by typing the attention sequence
+++
(default attention value) rapidly. The CMD: prompt or an OK response should appear on
your screen depending on the Local Mode you have selected.
Using the CMD and AT Commands 3-1

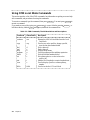
Using CMD Local Mode Commands
This section provides a list of the CMD commands, has information on getting on-screen help
with commands, and procedures for using the commands.
To execute a command, type the command, then press
RETURN
. You must press
RETURN
to
execute a command.
If you make an error while typing, use
BACKSPACE
to correct it before pressing
RETURN
, or
hold down the key labeled
CTRL
and type
x
, to cancel the command line.
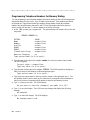
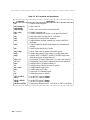
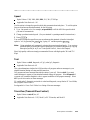
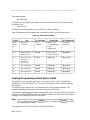
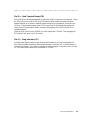
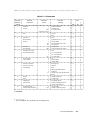
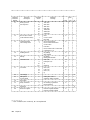
Table 3-1: CMD Commands, Their Abbreviations and Descriptions
Command Abbreviation Description
Returns the ADM to Data Mode from the Local
Data Mode
continue con
Used to save active profiles, change a profile,
store the last data number dialed
copy cop
dial d Dials a data call
end e Ends a data call
help h Displays Help menus
program p Used to program profiles and data repertories
Dials the last data number dialedredial r
Sets a data option to a value in the active
profile (pA)
set s
Enables local loopback or remote loopback teststest t
Used to display a profile or a data repertory,
number
view v
Used to invoke the AT Local Mode&&h &&h
3-2 Chapter 3

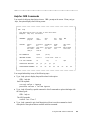
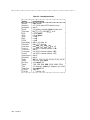
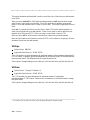
Help for CMD Commands
You can ask for help any time that you have a CMD: prompt on the screen. When you type
help
, the system displays the following screen:
CMD: help
Type HELP and the topic you want to learn more about.
Examples: help test, h attention
COMMANDS: continue copy dial end help &&H
program redial set test view
OPTIONS: answer attention autoadjust break char.erase
dcd dtr echo edit fcpn
forwarding idle.timer line.erase local.echo match.speed
min.timer mode rec.flow text trans.flow
v120.ps v120.ws
EIA INTERFACE: speed parity
UNSTORED OPTIONS local.cr local.erase local.lf
X.25 CALL OPTIONS: cd cug rc rpoa
STORED DATA PROFILES: p0 p1 p2 p3 p4
STORED MEMORY NUMBERS: ml m2 m3 m4 m5 m6 m7 m8 m9
You can get further help in any of the following ways:
1 Type
help
option to display the possible values for the option:
CMD:
help dtr
the ADM responds:
current value = ignore
possible values = follow ignore
2 Type
help
followed by a partial command to list all commands or options that begin with
the letters typed:
CMD:
help re
The ADM responds:
redial rec.flow ?
3 Type
help
command to get a brief description of how to use the command or a brief
description of the options that are available with the command:
Using the CMD and AT Commands 3-3

CMD:
help end
The ADM responds:
Type END to end a data call in progress.
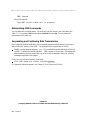
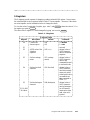
Abbreviating CMD Commands
You can abbreviate command names. You need only type the "unique" part of the name (See
Table 3-1). For example, dial becomes d, and continue becomes con. You can abbreviate
option names in the same way.
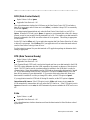
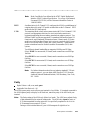
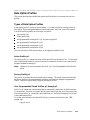
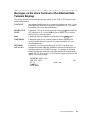
Suspending and Continuing Data Transmission
Once a data call has been established, you can suspend transmission and return to local mode so
that you can "talk" directly to the ADM. The procedure below explains how to do this.
Rapidly type the attention sequence:
+++
. (If you pause between keystrokes, the ADM will
send the
+
characters as end-to-end data.) CMD: appears on your screen. This means that
data transmission has been suspended; you can now issue commands to the ADM, using the
commands explained in this chapter.
To exit the Local Mode and return to Data Mode:
At the CMD: prompt, type
continue,
followed by
RETURN
.
(To change the Attention sequence, see Chapter 4, Data Options and Profiles.)
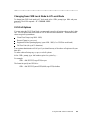
FIGURE 3-1
Changing Between CMD Local Mode and Data Mode During a Data Call
3-4 Chapter 3
Page is loading ...
Page is loading ...
Page is loading ...
Page is loading ...
Page is loading ...
Page is loading ...
Page is loading ...
Page is loading ...
Page is loading ...
Page is loading ...
Page is loading ...
Page is loading ...
Page is loading ...
Page is loading ...
Page is loading ...
Page is loading ...
Page is loading ...
Page is loading ...
Page is loading ...
Page is loading ...
Page is loading ...
Page is loading ...
Page is loading ...
Page is loading ...
Page is loading ...
Page is loading ...
Page is loading ...
Page is loading ...
Page is loading ...
Page is loading ...
Page is loading ...
Page is loading ...
Page is loading ...
Page is loading ...
Page is loading ...
Page is loading ...
Page is loading ...
Page is loading ...
Page is loading ...
Page is loading ...
Page is loading ...
Page is loading ...
Page is loading ...
Page is loading ...
Page is loading ...
Page is loading ...
Page is loading ...
Page is loading ...
Page is loading ...
Page is loading ...
Page is loading ...
Page is loading ...
Page is loading ...
Page is loading ...
-
 1
1
-
 2
2
-
 3
3
-
 4
4
-
 5
5
-
 6
6
-
 7
7
-
 8
8
-
 9
9
-
 10
10
-
 11
11
-
 12
12
-
 13
13
-
 14
14
-
 15
15
-
 16
16
-
 17
17
-
 18
18
-
 19
19
-
 20
20
-
 21
21
-
 22
22
-
 23
23
-
 24
24
-
 25
25
-
 26
26
-
 27
27
-
 28
28
-
 29
29
-
 30
30
-
 31
31
-
 32
32
-
 33
33
-
 34
34
-
 35
35
-
 36
36
-
 37
37
-
 38
38
-
 39
39
-
 40
40
-
 41
41
-
 42
42
-
 43
43
-
 44
44
-
 45
45
-
 46
46
-
 47
47
-
 48
48
-
 49
49
-
 50
50
-
 51
51
-
 52
52
-
 53
53
-
 54
54
-
 55
55
-
 56
56
-
 57
57
-
 58
58
-
 59
59
-
 60
60
-
 61
61
-
 62
62
-
 63
63
-
 64
64
-
 65
65
-
 66
66
-
 67
67
-
 68
68
-
 69
69
-
 70
70
-
 71
71
-
 72
72
-
 73
73
-
 74
74


Ask a question and I''ll find the answer in the document
Finding information in a document is now easier with AI
Related papers
Other documents
-
Lucent Technologies 7400B User manual
-
H3C MSR 3660 Command Reference Manual
-
AT&T Definity 8101 User manual
-
-
Toshiba Telephone CTX28 User manual
-
ADTRAN 1200051L1 User manual
-
 Cyclades PC400 User manual
-
-
Siemens HiPath 3800 Service Documentation
-
Toshiba Strata IP5000 series User manual
